
How to Export & Sync iPhone Calendar to Google with 4 Easy Methods [iPhone 17 Supported]
iPhone Backup
- iPhone Data Backup
- 1. Back up iPhone in Recovery Mode
- 2. Back Up iPhone With/Without iTunes
- 3. Back up iPhone to Mac
- 4. Back up iPhone/iPad to Computer
- 5. Back up iPhone to Mac Catalina
- 6. Back up Jailbreak Apps And Restore
- 7. iPhone Backup Software
- 8. Back up iPhone/iPad Easily
- 9. Back up iPhone/iPad in DFU Mode
- 10. Back up iPhone Apps and App Data
- 11. Back up Notes on iPhone and iPad
- 12. Back up iOS to External Hard Drive
- 13. Export Notes from iPhone to PC/Mac
- 14.Back up iPhone Photos to Google Photos
- 15. Back Up Your iPhone Voicemails
- 16. Back Up to External Drive
- 17.How to Back Up to NAS
- 18.Back Up iPhone With Broken Screen
- 19.Back Up iPhone to Google Drive
- 20.Buy Used iPhones
- 21.Sell Used Phone for Cash
- 22.Sell Used iPhone for Dollar
- 23.How Much is My iPhone Worth
- iPhone Data Recovery
- 1. Recover iPhone Data Without Backup
- 2. Restore Calendar on iPhone
- 3. Recover Call History on iPhone
- 4. Recover iPhone Lost Data
- 5. Restore iPhone in Recovery Mode
- 6. Undelete iPhone Backup Files
- 7. Recover Deleted iPhone Messages
- iPhone Data Restore
- 1. Restore iPhone from iTunes Backup
- 2. Restore iPhone after Downgrade
- 3. Restore iPhone from Backup
- 4. Restore iPhone from iPad Backup
- 5. Restore iPhone from DFU Mode
- 6. Restore iPhone Deleted Text Message
- iPhone Backup Problems
- 1. Find iPhone Backup Location on Mac
- 2. iPhone Backup Password Never Set
- 3. iPhone Backup Password Forget
- 4. iCloud Backup Taking Forever
- 5. iPhone Won't Backup to iCloud
- 6. iTunes Won't Backup iPhone
- iPhone Restore Problems
- 1. iTunes Stuck on Verifying iPhone
- 2. Not Space to Restore iPhone Backup
- 3. iTunes Backup Not Restoring
- 4. iPhone Won't Restore
- WhatsApp Backup & Restore
- 1. WhatsApp from Google Drive to iOS
- 2. Restore Old WhatsApp Backup
- 3. Restore WhatsApp Chat on iPhone
- 4. Retrieve WhatsApp Chat History
- 5. See Deleted Messages on WhatsApp
- 6. Restore WhatsApp Stuck on iPhone
- 7. iPhone WhatsApp to Google Drive
- 8. Back Up WhatsApp on iPhone
- 9. Backup WhatsApp Data before Changing Number
- iPhone Backup Tips
- 1. Extract Data From iPhone
- 2. Encrypt iPhone Backup
- 3. Reset iPhone Backup Password
- 4. Extract iPhone Backup in Win 10
- 5. How Long take iPhone to Backup
- 6. Find iPhone Backup Location
- 7. iPhone Backup Password
- 8. View iPhone Backup on Computer
- 9. iPhone Backup with iTunes/iCloud
- 10.Check Last Backup on iPhone
- 11. How To Backup Foldable iPhone
- 12. Best Backup Chargers for iPhone
- 13. Speed Up Your iPhone Backups
- 14. Save Data When iPhone Disabled
- ● Manage/transfer/recover data
- ● Unlock screen/activate/FRP lock
- ● Fix most iOS and Android issues
- Free Download Free Download Free Download

Jun 30, 2026 • Filed to: Backup & Restore Solutions • Proven solutions
 TL;DR:
To sync your iPhone calendar to Google, use iOS Account Settings or the Google Calendar app for automatic ongoing synchronization, or manually import an ICS file via a computer, iCloud web link, or the paid Wondershare Dr.Fone tool.
● Enabling calendar access via iOS Settings under Accounts or toggling iCloud access within the Google Calendar app establishes a continuous, bi-directional sync that automatically updates future events across all platforms.
● Exporting events using a computer (Mac Calendar or Windows iTunes) or an Android browser (modifying an iCloud public link from webcal:// to http:// to download an ICS file) performs a one-time batch transfer that does not automatically sync new schedule additions.
● Wondershare Dr.Fone provides a desktop alternative to automate bi-directional calendar syncing and extract full device backups for all iOS devices, including the iPhone 17, but this method requires a paid subscription.
Ask AI for a summary
 ChatGPT
 Perplexity
 Gemini
 Claude
 Grok
Grok
Dr.Fone Basic:
Better Control for Your Phone
Manage, transfer, back up, restore, and mirror your device
These days the balancing between work, personal commitments, and social engagements is the thorniest of acts. In our hectic, modern lives, it is urgently important to have an efficient calendar to keep everything organized. Although the built-in Calendar application on your iPhone is good, you might need to look at those events using different devices and kinds of operating systems.
It is here that exporting the iphone calendar to Google is of great help. The popular web-based calendar by Google syncs alongside all your devices and lets you manage and schedule your events from anywhere. No matter if you are on your computer, tablet, or Android device, your calendar is never more than a few taps away.
In this tutorial, we’ll show you the simplest ways to export iPhone calendar events and seamlessly integrate them with Google Calendar. No more manually re‑entering appointments or worrying about missing events—the entire process is automated and efficient. Whether you’re using an older device or the latest iPhone 17, you can easily export Apple Calendar to Google and sync all of your important events across platforms. Follow these quick steps to keep your schedules organized in every ecosystem.
Part 1: Sync iPhone Calendar with Google via Account Settings
One of the easiest methods of exporting Apple Calendar to Google is right through the devices' settings. By allowing your Gmail account to have calendar access, you can sync the events on different platforms keeping the dates consistent.
Here's how:
Step 1: Look up the "Settings" app on your iPhone and click "Calendar".

Step 2: Hit "Accounts" and choose your existing Gmail attribute or get "Add Account" to have a new one.
Step 3: Turn it on "Calendars", after accessing your Gmail account settings.

That's it! Proceeding into the future, any new events you add to your iPhone Calendar will be synchronized in your Google Calendar across all appliances. With Calendars, you can even alter or add hyperlinks from Google Calendar, and they'll move back to your iPhone.
Part 2: Use the Google Calendar App
If you prefer a dedicated app, the Google Calendar app for iOS makes it easy to manage events after you export iPhone calendar data. It provides a simple, seamless way to export Apple Calendar to Google, ensuring all your schedules stay synced across platforms.
First, download the Google Calendar app from the App Store. After installing it, simply:
Step 1: Log into the app using your Google account credentials.
Step 2: Tap the menu icon and go to "Settings".

Step 3: Under " Manage Accounts," select your iCloud account and toggle on "Calendars".

Now your iPhone's Calendar events will continuously sync to the Google Calendar app, ensuring you have access to your full schedule no matter which device you're using. The app also provides handy features like calendar sharing, event notifications, and more.
Part 3: Export via Public Link on Android
Don't have access to a computer or prefer doing things from your Android device? No problem! While a bit more involved, you can still export iPhone calendar events by copying a public link.
Here are the steps:
Step 1: On your Android web browser, visit iCloud.com and log into your Apple ID.

Step 2: Open the Calendar app and tap the "broadcast" icon next to the calendar you want to share.
Step 3: Copy the provided "Public Calendar" link.

Step 4: Open a new tab, paste the link, but replace "webcal://" with "http://". This will trigger a download of an ICS file containing your events.

Step 5: Open this file, select "Add All" and choose your Google account.

While not an automatic sync, this method allows you to manually transfer your iPhone Calendar over to Google whenever needed from your Android device.
No matter which option you choose, syncing your calendars provides seamless access to your schedule across all your tech. Never miss a beat - export your iPhone calendar events to Google Calendar today!
Part 4: Export iPhone Calendar Using Computer
If you have access to a computer, you can easily export iPhone calendar events to Google Calendar with a one‑time full transfer. The process is simple: generate an ICS file from your Apple Calendar, then import it into Google to seamlessly export Apple Calendar to Google and keep all events synced across platforms.
For Mac Users:
Step 1: Open the Calendar app on your Mac and go to File > Export > Export.
Step 2: Choose a name and location for the ICS calendar file, then click "Export".

Step 3: Go to Google Calendar on the web and click the gear icon > Settings.

Step 4: Select "Import & Export" from the side menu.
Step 5: Click "Select file from your computer" and upload the ICS file you exported.

Step 6: Choose which Google Calendar to import the events into.

For Windows Users:
Step 1: Connect your iPhone to your PC and open iTunes.
Step 2: Select your device, then go to the Info tab.
Step 3: Under "Calendar", check to see if Sync Calendars is enabled. If not, enable it.
Step 4: Once synced, go to Google Calendar and import the ICS file as outlined above.
This desktop method does a full batch transfer of your Apple calendar events over to Google in one go. Just be aware it won't create an ongoing sync - any new iPhone events after the import won't automatically appear in Google Calendar.
Part 5: Bonus Tip: Use Dr.Fone To Export Calendar To Google
While the methods above are reliable, many users prefer a more automated way to sync their iPhone and Google calendars. If you want to quickly export iPhone calendar events or export Apple Calendar to Google, especially on the latest iPhone 17, Wondershare Dr.Fone provides a seamless solution. With its intuitive interface, Dr.Fone automates the entire process, ensuring all your appointments and events stay synced across devices without the hassle of manual transfers.
This app integrates directly with your iPhone's calendar app as well as Google Calendar. It monitors for any new events and syncs them bi-directionally across platforms. That way, your calendars always match up perfectly no matter where you're viewing or editing them from. Just follow the steps given below:
Dr.Fone - Phone Backup (iOS)
Export Calendar To Google in 3 minutes!
- One-click to back up the whole iOS device to your computer.
- Allow previewing and selectively export contacts from your iPhone to your computer.
- No data loss on devices during the restoration.
- Works for all iOS devices. Compatible with the latest iOS version.


Step 1: Choose File Types
- Select the specific file types you want to export from your backup, like photos, contacts, etc.
- Then click "Export to PC".

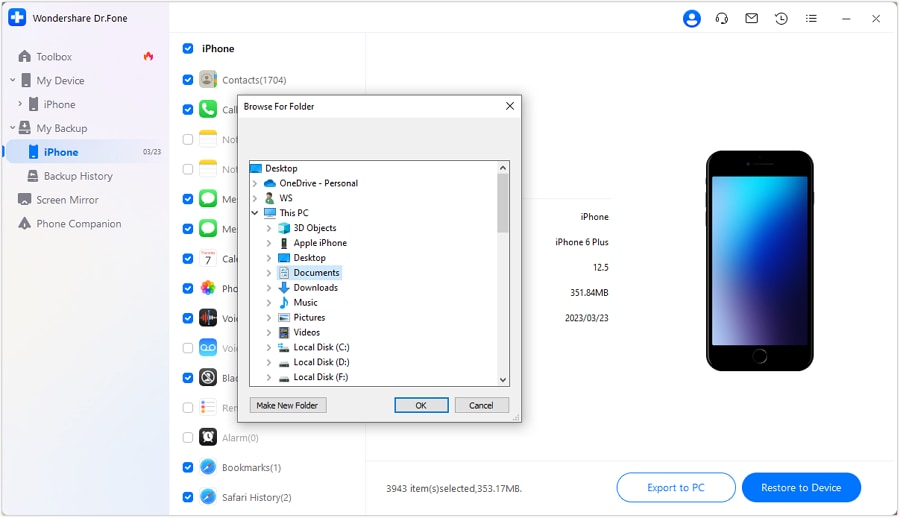
Step 2: Pick a Save Location
- A window will open asking where on your computer you want to save the exported backup file.
- Browse and pick a folder.
Step 3: Wait for Export
- Just wait while the backup file exports and saves to the location you picked.
- You'll see a progress bar.
- Click "Cancel" if you want to stop it.

That's it! With these simple steps, you can easily back up your iOS device to Dr.Fone, restore backups to devices, or export backups to save on your computer.
Of course, this paid tool comes with a subscription cost. But for those who heavily rely on both calendar systems, the automated sync can be well worth the investment to ensure you never miss an event.
No matter which approach you take, bridging the divide between your Apple and Google calendar ecosystems is a huge productivity booster. Your schedule stays consolidated and accessible everywhere you need it. With just a few simple steps, you'll free yourself from being trapped in a single platform - the best of both calendar worlds!
Conclusion
Backing up and transferring data between devices has never been easier thanks to powerful tools like Wondershare Dr.Fone. Whether you're an iPhone, iPad, or iPod touch user, this handy software provides a seamless way to export Apple calendar to Google calendar and create comprehensive backups of all your important data - photos, messages, contacts, calendars, and even app data.
One of the key advantages of using Dr.Fone is its flexibility for iPhone users. With iPhone 17, you can easily export iPhone calendar events in just a few clicks — either by manually backing up anytime or by scheduling automatic backups that run in the background. This ensures your data, including Apple Calendar, is always securely saved without extra effort.
Dr.Fone Basic:
Better Control for Your Phone
Manage, transfer, back up, restore, and mirror your device


James Davis
staff Editor