
Hassle-Free Methods for iPhone Music Backup
iPhone Backup
- iPhone Data Backup
- 1. Back up iPhone in Recovery Mode
- 2. Back Up iPhone With/Without iTunes
- 3. Back up iPhone to Mac
- 4. Back up iPhone/iPad to Computer
- 5. Back up iPhone to Mac Catalina
- 6. Back up Jailbreak Apps And Restore
- 7. iPhone Backup Software
- 8. Back up iPhone/iPad Easily
- 9. Back up iPhone/iPad in DFU Mode
- 10. Back up iPhone Apps and App Data
- 11. Back up Notes on iPhone and iPad
- 12. Back up iOS to External Hard Drive
- 13. Export Notes from iPhone to PC/Mac
- 14.Back up iPhone Photos to Google Photos
- 15. Back Up Your iPhone Voicemails
- 16. Back Up to External Drive
- 17.How to Back Up to NAS
- 18.Back Up iPhone With Broken Screen
- 19.Back Up iPhone to Google Drive
- 20.Buy Used iPhones
- 21.Sell Used Phone for Cash
- 22.Sell Used iPhone for Dollar
- 23.How Much is My iPhone Worth
- iPhone Data Recovery
- 1. Recover iPhone Data Without Backup
- 2. Restore Calendar on iPhone
- 3. Recover Call History on iPhone
- 4. Recover iPhone Lost Data
- 5. Restore iPhone in Recovery Mode
- 6. Undelete iPhone Backup Files
- 7. Recover Deleted iPhone Messages
- iPhone Data Restore
- 1. Restore iPhone from iTunes Backup
- 2. Restore iPhone after Downgrade
- 3. Restore iPhone from Backup
- 4. Restore iPhone from iPad Backup
- 5. Restore iPhone from DFU Mode
- 6. Restore iPhone Deleted Text Message
- iPhone Backup Problems
- 1. Find iPhone Backup Location on Mac
- 2. iPhone Backup Password Never Set
- 3. iPhone Backup Password Forget
- 4. iCloud Backup Taking Forever
- 5. iPhone Won't Backup to iCloud
- 6. iTunes Won't Backup iPhone
- iPhone Restore Problems
- 1. iTunes Stuck on Verifying iPhone
- 2. Not Space to Restore iPhone Backup
- 3. iTunes Backup Not Restoring
- 4. iPhone Won't Restore
- WhatsApp Backup & Restore
- 1. WhatsApp from Google Drive to iOS
- 2. Restore Old WhatsApp Backup
- 3. Restore WhatsApp Chat on iPhone
- 4. Retrieve WhatsApp Chat History
- 5. See Deleted Messages on WhatsApp
- 6. Restore WhatsApp Stuck on iPhone
- 7. iPhone WhatsApp to Google Drive
- 8. Back Up WhatsApp on iPhone
- 9. Backup WhatsApp Data before Changing Number
- iPhone Backup Tips
- 1. Extract Data From iPhone
- 2. Encrypt iPhone Backup
- 3. Reset iPhone Backup Password
- 4. Extract iPhone Backup in Win 10
- 5. How Long take iPhone to Backup
- 6. Find iPhone Backup Location
- 7. iPhone Backup Password
- 8. View iPhone Backup on Computer
- 9. iPhone Backup with iTunes/iCloud
- 10.Check Last Backup on iPhone
- 11. How To Backup Foldable iPhone
- 12. Best Backup Chargers for iPhone
- 13. Speed Up Your iPhone Backups
- 14. Save Data When iPhone Disabled
- ● Manage/transfer/recover data
- ● Unlock screen/activate/FRP lock
- ● Fix most iOS and Android issues
- Free Download Free Download Free Download

Jun 30, 2026 • Filed to: Backup & Restore Solutions • Proven solutions
 TL;DR:
Securing your iPhone music library requires choosing between Apple's native automated or offline syncing, third-party selective extraction, or manual uploads to high-capacity cloud storage.
● iCloud automatically syncs your iCloud Music Library across devices but requires a sufficient storage plan, whereas iTunes creates a free, local computer backup but necessitates periodic, manual USB syncing to keep tracks updated.
● Google Drive offers up to 2TB of off-site cloud storage for large collections, provided you manually upload the audio files from your computer and maintain active monthly subscription fees to retain access.
● Wondershare Dr.Fone - Phone Backup (iOS) bypasses Apple's ecosystem limitations, allowing Windows and Mac users to preview and selectively extract non-purchased music files directly from their device.
Ask AI for a summary
 ChatGPT
 Perplexity
 Gemini
 Claude
 Grok
Grok
Dr.Fone Basic:
Better Control for Your Phone
Manage, transfer, back up, restore, and mirror your device
We all have that collection of songs that just makes us feel alive – the perfect anthems for driving with the windows down, the slow jams for romantic nights in, and the nostalgia-inducing tracks that transport us back to other times and places. Whether you're an avid music fan or just someone who loves having a solid playlist for every mood and occasion, your personal music library is something to be cherished.
However, what if your iPhone was lost or broken, and all the playlists that you took time to put together and the odd downloads just disappeared in the blink of an eye? On the bright side, you can back up your music in several ways on your iPhone, so you will never part with your much-loved tunes. In this article, we will show you the different methods and immediately apply the steps, so you can easily back up your music on your iphone and have peace of mind that it's safe.
Part 1: Backup iPhone Music to iCloud
Apple's iCloud service is designed in such a way that it will send copies of music to all of your devices. And since it seamlessly integrates with your iPhone, the music library is an excellent choice for backing up music to iCloud. All you need to do is:
Step 1: Go to the iCloud in the settings.
On your iPhone, open settings, click [Your Name], then iCloud > log into iCloud if you haven't yet.

Step 2: Switch on the Music library of iCloud
Over the “Apps Using iCloud” tab, you want to click “Music” and then there is an option of “iCloud Music Library.” Turn it on next. This enables iCloud to access and back up your Apple Music/iTunes song data.
Step 3: Initiate the backup
Re-enter Settings > [Your Name] > iCloud > iCloud Backup

Step 4: Then select "Back Up Now." Your iPhone will start transferring files, including music, to iCloud.

While the initial backing up of music to iCloud can take a while depending on your library size and internet speed, any new additions like downloaded songs will sync up quickly going forward. Just make sure you have enough free iCloud storage, or you may need to upgrade your plan.
You can always check that your iCloud Music Library is up to date by opening the Music app and looking under Library > Songs. Scroll through and you should see all your backed-up tracks there, easily accessible from any device signed into your Apple ID. Pretty nifty!
Part 2: Backup music on iphone to itunes
For those who prefer a more old-school, local backup approach, iTunes remains a tried-and-true method for making sure your music is safely stored on your computer's hard drive. While not as seamless as iCloud, it gets the job done without relying on internet connectivity. The main catch is that you'll need to periodically re-connect your iPhone and initiate new backing-up music to iCloud to keep everything current.
Step 1: Connect your iPhone to your computer
Using the USB cable that came with your iPhone, plug it directly into your computer and launch the latest version of iTunes if it doesn't open automatically.

Step 2: Tell iTunes to sync your music files
Once your iPhone shows up in the iTunes window, click on its icon in the upper left corner. Then navigate to the "Music" tab and check the box next to "Sync Music." This allows you to choose whether to transfer music from iTunes to your iPhone, or from your iPhone to iTunes.
For our backing up music to iTunes, you'll want to select the option to "Remove and replace music on a device with music from the library." This ensures that any new or updated tracks get copied from your iPhone to your iTunes library.
Step 3: Start the sync process
With all your settings applied, click the blue "Sync" button in the lower right to transfer your iPhone's music to your computer. Depending on the size of your library, this could take a little while. But once it's finished, your entire collection will be safely backed up within iTunes.

Now here's the key - don't just let your iTunes backup get stale and outdated. Anytime you add new music to your iPhone, you'll need to reconnect it and repeat this sync process to make sure your iTunes library stays current. It's a minor hassle, but a small price to pay for safeguarding those irreplaceable tunes.
Part 3: Storing Backups in the Cloud with Google Drive
Our smartphones have become potent music players, replacing the need to carry separate dedicated MP3 devices. So it makes sense that our music collections may have outgrown the storage limits of aging laptops and desktop PCs. That's where virtually unlimited cloud storage services like Google Drive come in handy.
With Google Drive, you can easily upload and store full backups of your iPhone's music library online. Since these backups don't actually live on your iPhone, you'll have a secure off-site storage location protecting your tunes from any mishaps that could affect your physical devices. And Drive's robust 2TB storage quotas should handle even the most extensive music hoards.
Step 1: Sign into your Google account
Visit drive.google.com and log into the Google account where you want to host your music backup using your usual Gmail credentials. Google Drive works seamlessly across both mobile and desktop environments.
Step 2: Upload your music files
Once inside Google Drive, hit the rainbow-colored "New" button in the top left corner, then choose "File upload" or "Folder upload" depending on how your iPhone's music is structured. Navigate to wherever those audio files live on your computer and select them all to begin the upload process.

For large multi-gig libraries, this could take a good while. But Google's upload manager can keep chugging along even if you close your browser, pause the upload, or switch WiFi networks. The files will simply resume transferring when connectivity is re-established.
Step 3: Manage and access your backups
After everything has been successfully uploaded, all your backed-up songs will be visible in Google Drive's file browser pane. You can stream them instantly if needed by double-clicking or easily sharing access with friends and family. Just be sure to keep Google Drive's monthly fees paid up, because you'd lose access to everything if your storage quota is depleted.
For audiophiles serious about preserving their music compilations for posterity, maintaining redundant backups on your computer's hard drive, an external drive, and cloud storage makes the most sense. That way, you'll always have a copy secured somewhere, no matter what technical hiccups happen along the way.
Part 4: Bonus Tip: Using Dr.Fone To Backup Data
While iCloud and iTunes get the job done, they have their limitations, especially when it comes to backing up non-purchased music. But fear not - there are third-party apps and software programs that can fill in the gaps. One highly rated option is the Wondershare Dr.Fone.
Dr.Fone - Phone Backup (iOS)
Selectively backup your iPhone contacts in 3 minutes!
- One-click to backup the whole iOS device to your computer.
- Allow previewing and selectively export contacts from iPhone to your computer.
- No data loss on devices during the restoration.
- Works for all iOS devices. Compatible with the latest iOS version.


With Dr.Fone's backup capabilities, you can selectively pull music files off of your iPhone and save them securely to your computer with just a few clicks, regardless of where you originally got those songs from. This gives you much more control and flexibility compared to the all-or-nothing approach of iTunes and iCloud backups.
Step 1: Connect your iPhone and fire up Dr.Fone
Install the Dr.Fone program on your computer and launch it, then use your iPhone's USB cable to connect your device. In the main Dr.Fone window, click on the “My backup" option.

Step 2: Choose your backup preferences
On the Backup & Restore screen, tick the box next to "Music" under the list of data types. This tells Dr.Fone that you specifically want to back up your iPhone's music files. You can choose other types like photos, messages, and more too if desired.
Step 3: Start backing up
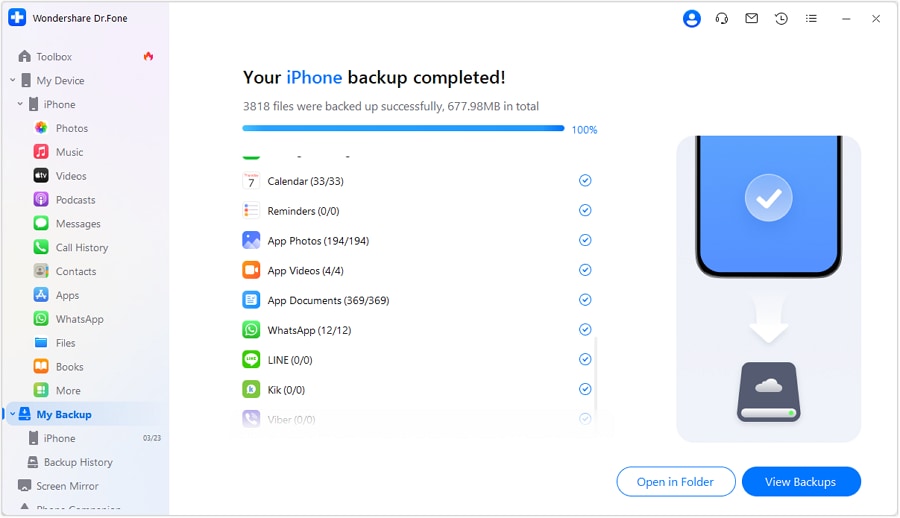
When you're ready, click the big "Backup" button at the bottom. Dr.Fone will kick into gear, scanning your iPhone's storage for all music data. You'll see a progress bar so you can track how it's going.

Step 4: Explore your backup
Once the backup of music on the iphone is complete, you can click the "View" button to browse through the music files Dr.Fone extracted from your iPhone. All the songs will be neatly organized by playlist, artist, album, etc. You can even preview tracks directly in Dr.Fone before deciding what to keep or restore.
The beauty of Dr.Fone is that you're not just blindly backing everything up - you have full visibility and control over what data gets copied over. That level of granularity provides great peace of mind.
Conclusion
At the end of the day, our music collections represent deeply personal narratives of our lives and experiences. The songs we cherish are almost like audible imprints of memories, emotions, and meaningful moments forever etched into our consciousness.
So whether you're a diehard vinyl collector with a Luddite's distrust of "the cloud," a music streamer who prefers access over ownership, or someone who simply loves rediscovering saved playlists from your distant past - it's critical to back up music to iphone for safeguarding those timeless audio treasures.
Between the convenience of iCloud and iTunes, the power of third-party tools like Wondershare Dr.Fone, or the virtually infinite storage potential of Google Drive and similar cloud lockers, you've got plenty of options for ensuring your music is properly secured and easily retrievable whenever you need it most.
Take some time to implement a consistent backup approach that works for your needs and listening habits. That way, you can always keep those precious melodies close at hand, no matter what curves life throws your way. Because that's what music is all about - holding onto those special moments forever through sound.
Dr.Fone Basic:
Better Control for Your Phone
Manage, transfer, back up, restore, and mirror your device


James Davis
staff Editor