
How to Know Where iTunes Store iPhone Backup Location
iPhone Backup
- iPhone Data Backup
- 1. Back up iPhone in Recovery Mode
- 2. Back Up iPhone With/Without iTunes
- 3. Back up iPhone to Mac
- 4. Back up iPhone/iPad to Computer
- 5. Back up iPhone to Mac Catalina
- 6. Back up Jailbreak Apps And Restore
- 7. iPhone Backup Software
- 8. Back up iPhone/iPad Easily
- 9. Back up iPhone/iPad in DFU Mode
- 10. Back up iPhone Apps and App Data
- 11. Back up Notes on iPhone and iPad
- 12. Back up iOS to External Hard Drive
- 13. Export Notes from iPhone to PC/Mac
- 14.Back up iPhone Photos to Google Photos
- 15. Back Up Your iPhone Voicemails
- 16. Back Up to External Drive
- 17.How to Back Up to NAS
- 18.Back Up iPhone With Broken Screen
- 19.Back Up iPhone to Google Drive
- 20.Buy Used iPhones
- 21.Sell Used Phone for Cash
- 22.Sell Used iPhone for Dollar
- 23.How Much is My iPhone Worth
- iPhone Data Recovery
- 1. Recover iPhone Data Without Backup
- 2. Restore Calendar on iPhone
- 3. Recover Call History on iPhone
- 4. Recover iPhone Lost Data
- 5. Restore iPhone in Recovery Mode
- 6. Undelete iPhone Backup Files
- 7. Recover Deleted iPhone Messages
- iPhone Data Restore
- 1. Restore iPhone from iTunes Backup
- 2. Restore iPhone after Downgrade
- 3. Restore iPhone from Backup
- 4. Restore iPhone from iPad Backup
- 5. Restore iPhone from DFU Mode
- 6. Restore iPhone Deleted Text Message
- iPhone Backup Problems
- 1. Find iPhone Backup Location on Mac
- 2. iPhone Backup Password Never Set
- 3. iPhone Backup Password Forget
- 4. iCloud Backup Taking Forever
- 5. iPhone Won't Backup to iCloud
- 6. iTunes Won't Backup iPhone
- iPhone Restore Problems
- 1. iTunes Stuck on Verifying iPhone
- 2. Not Space to Restore iPhone Backup
- 3. iTunes Backup Not Restoring
- 4. iPhone Won't Restore
- WhatsApp Backup & Restore
- 1. WhatsApp from Google Drive to iOS
- 2. Restore Old WhatsApp Backup
- 3. Restore WhatsApp Chat on iPhone
- 4. Retrieve WhatsApp Chat History
- 5. See Deleted Messages on WhatsApp
- 6. Restore WhatsApp Stuck on iPhone
- 7. iPhone WhatsApp to Google Drive
- 8. Back Up WhatsApp on iPhone
- 9. Backup WhatsApp Data before Changing Number
- iPhone Backup Tips
- 1. Extract Data From iPhone
- 2. Encrypt iPhone Backup
- 3. Reset iPhone Backup Password
- 4. Extract iPhone Backup in Win 10
- 5. How Long take iPhone to Backup
- 6. Find iPhone Backup Location
- 7. iPhone Backup Password
- 8. View iPhone Backup on Computer
- 9. iPhone Backup with iTunes/iCloud
- 10.Check Last Backup on iPhone
- 11. How To Backup Foldable iPhone
- 12. Best Backup Chargers for iPhone
- 13. Speed Up Your iPhone Backups
- 14. Save Data When iPhone Disabled
- ● Manage/transfer/recover data
- ● Unlock screen/activate/FRP lock
- ● Fix most iOS and Android issues
- Free Download Free Download Free Download

Jun 30, 2026 • Filed to: Backup & Restore Solutions • Proven solutions
 TL;DR:
iTunes automatically saves full iPhone backups to the MobileSync/Backup directory hidden within your computer's system files, and it does not offer a native setting to change this storage path.
● To locate your files, navigate to C:\Users\[Your username]\AppData\Roaming\Apple Computer\MobileSync\Backup\ on Windows (requires enabling hidden files) or ~/Library/Application Support/MobileSync/Backup/ on Mac.
● Windows users can force iTunes to save backups to a different location by deleting the original backup folder and using the Command Prompt mklink /J command to create a symbolic link that redirects data to a custom directory.
● Unlike the mandatory full-device backups enforced by iTunes, third-party tools like Wondershare Dr.Fone allow for selective backups and restorations, enabling you to choose specific data types to conserve storage space.
Ask AI for a summary
 ChatGPT
 Perplexity
 Gemini
 Claude
 Grok
Grok
Dr.Fone Basic:
Better Control for Your Phone
Manage, transfer, back up, restore, and mirror your device
When you back up your iPhone using iTunes, the software saves a significant amount of your data and settings to your computer. This can include everything from photos and videos to app data and device settings, leading many users to ask, "Where does iTunes store iPhone backups?"
Knowing the location can be crucial for managing storage space, performing manual backups, or retrieving specific data. This guide will explain where iTunes stores iPhone backups on both Windows and Mac systems.
Part 1: Where does iTunes store backups?
When locating your iPhone backups, iTunes saves them in specific directories depending on your operating system. By identifying these locations, you can manage your backups more efficiently, saving space and ensuring your data is secure. Let’s delve into the backup directories for both Windows and Mac systems to answer the question, "Where does iTunes keep backups?"
1. Where does iTunes store the backup on Windows 11/10
On Windows 11 or 10, your iTunes backup files are stored in the MobileSync folder. Ready to dive in and find those backups? Where does iTunes store backups on Windows 11? follow this path to get to the MobileSync folder:
C:\Users\Your username\AppData\Roaming\Apple Computer\MobileSync\Backup\
Or
C:\Users\Your username\Apple\MobileSync\Backup\
You can easily find your backups using the Windows Start Menu’s Search box. Just follow these simple steps:
Step 1. In Windows 11, kick things off by opening the Start menu. Look right next to the Start button, and you'll spot a handy search bar waiting to help!

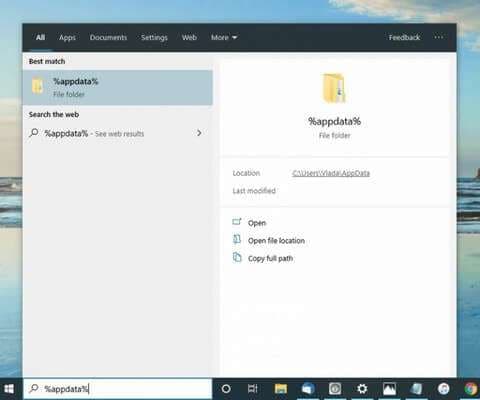
Step 2. If you grabbed iTunes from the Microsoft Store, head over to the Search bar and type in %appdata%.
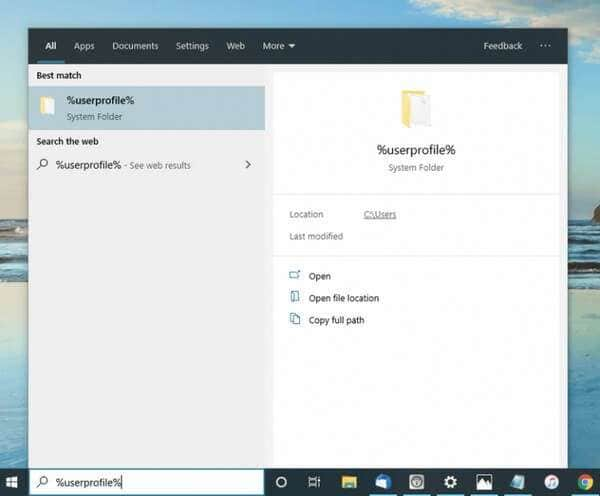
Step 3. Or %USERPROFILE% and press Enter/Return.
Step 4. Once you're in the Appdata folder, dive into the “Apple” folder, then navigate to “Apple Computer” and “MobileSync.” Finally, head to the “Backup” folder where all your iTunes backups await you.
Note: Can't find the backup folder? It might be because the AppData folder is hidden. No worries! Just enable "Show hidden files" in the Explorer settings and try again.
2. Where does iTunes store backups on Windows 7
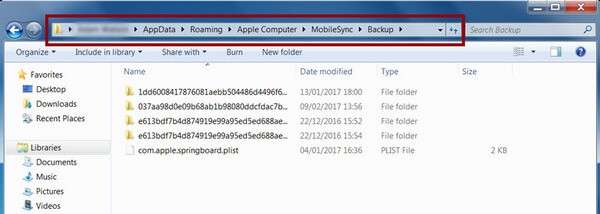
On Windows 7, discovering your iTunes backup files is a breeze! Just head to the MobileSync folder. Curious how to get there? Follow this path:
C:\Users\Your username\AppData\Roaming\Apple Computer\MobileSync\Backup\
To easily find your list of backups, just use the Windows Start Menu’s Search box. Here’s how:
Step 1. Fire up Windows 7 and click on the Start menu. Just above the Start button, you'll spot the Search bar waiting for your command!
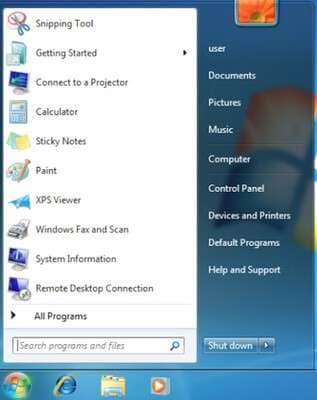
Step 2. Click in the Search bar, type %appdata%, and hit Enter/Return.
Step 3. Open Apple Computer > MobileSync > Backup folders one at a time.
Step 4. You'll find all your backup files neatly organized in the folder, just like in the image above.
3. Where does iTunes store backups on Mac
Ready to locate your backups on your Mac? Follow these easy steps and you'll be there in no time!
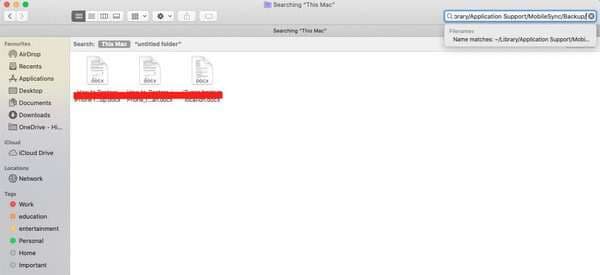
Step 1: Click on the search bar (magnifier icon) in the Finder menu or simply hit “Command + F” in the Finder window to quickly search your desired location. itunes backup location 6

Step 2. Ready for a shortcut? Use the "Go to Folder" option in the Finder menu to quickly jump to your desired location!
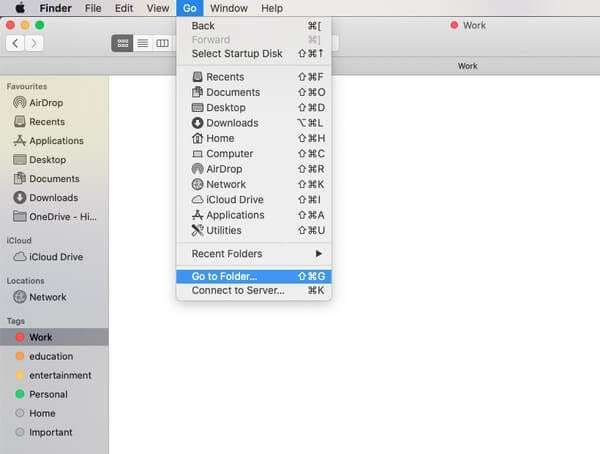
Step 3. Copy and paste or type this directory location: ~/Library/Application
Support/MobileSync/Backup/
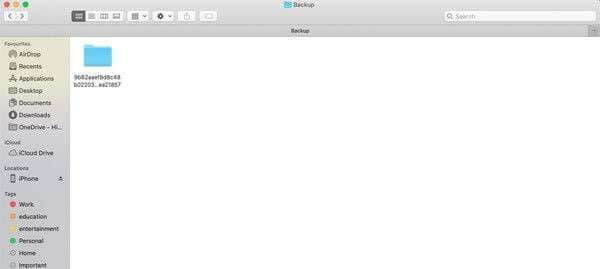
Step 4. Here, you'll discover all your iPhone and other Apple device backups, each one marked with a unique, intriguing string of letters and numbers. If you're wondering where does iTunes backup iPhones, this folder contains all the necessary backup files organized for easy access.
Step 5. You can easily find your files through iTunes (if you're on an older macOS version) or use Finder with the latest macOS Catalina.
a. Head over to iTunes and open the preferences menu. Once there, click on Devices, then right-click your device and select Reveal in Finder. Voilà! You’ll see all the backups linked to your iPhone
. itunes backup location 10
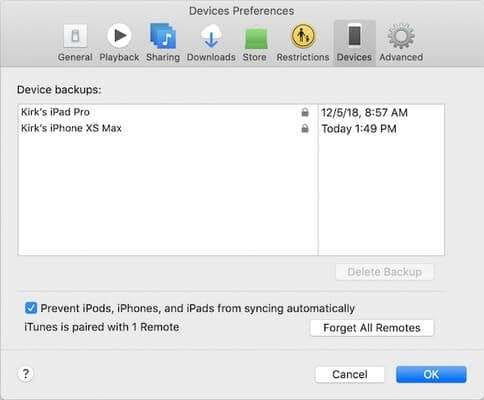
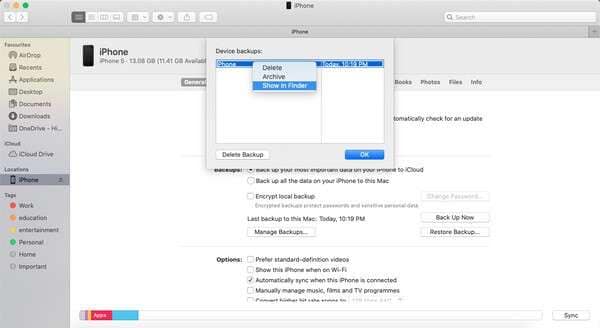
b. If you're on the latest Catalina, navigate to your connected iPhone under the Locations section in the Finder window. Click “Manage Backups,”. A Device backup window will appear. Right-click on the backup file and select “Show in Finder.”
Part 2: How to change the iTunes backup location?
Changing the iTunes backup location can help you manage your storage more effectively and ensure your backups are stored in your preferred directory. In this part, we'll guide you through the process of changing the backup location on both Windows and Mac systems.
1. How to change iTunes backup location Windows 11/10/8
We're going to switch up the iTunes backup location on Windows using the symlink method – also known as a symbolic link. Think of the symlink as a new path for iTunes to find your backups. If you're wondering where does iTunes store backups on Windows 10, this method provides a way to change the default location. In this guide, we'll walk you through using the Windows Command Prompt to create a symbolic link that cleverly redirects iTunes back up to your preferred location. Let's get started!
You'll need to use the Windows Command Prompt for some finagling. Don't worry, I'll guide you through each step of the process!
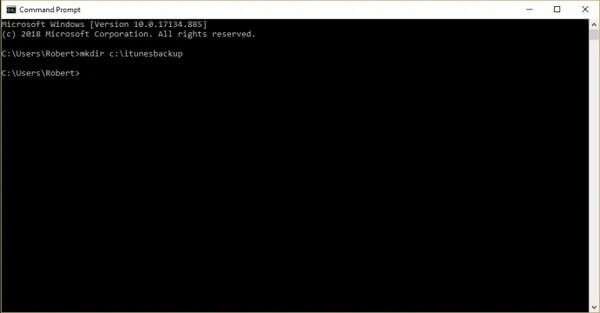
Step 1. Create a new directory wherever you want iTunes to store all your backups. For example, create a directory in the C:\ folder.
Step 2. Now that we've pinpointed the current iTunes backup directory, let's create a copy of it. Navigate to “C:\Users\Your username\AppData\Roaming\Apple Computer\MobileSync\Backup\” and make a backup of your backup!
Step 3. Dive into your newly created directory by using the trusty “cd” command.
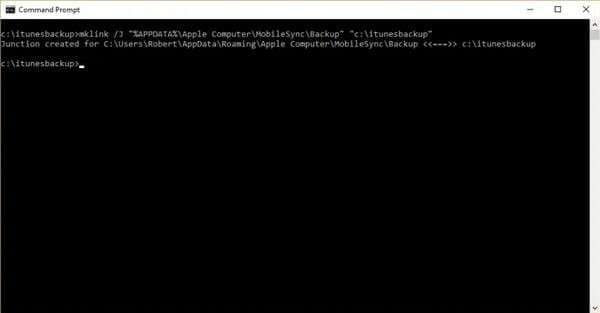
Step 4. Head back to the Command Prompt and type the same command: mklink /J “%APPDATA%\Apple Computer\MobileSync\Backup” “c:\itunesbackup”. Again, ensure to use the quotes.
Step 5. Ready for the next step? Open Windows File Explorer and head to your current backup location: “C:\Users\Your username\AppData\Roaming\Apple Computer\MobileSync\Backup\”. Once there, delete the backup directory and all its contents.

Step 6. Congratulations! You've created a symbolic link, a virtual bridge between the two directories, and successfully moved your iTunes backup location to Windows 10.
Step 7. Your new iTunes backups will now be saved to “C:\itunesbackup” or whatever cool location you’ve chosen!
2. how to change iTunes backup location on Windows 7
A symbolic link acts like a special bridge between two folders, with one serving as a stand-in for the other. This clever trick leverages the operating system, ensuring everything runs smoothly. We'll follow the same steps we used for Windows 10, using the trusty Windows Command Prompt to outsmart iTunes.
Step 1. Navigate to the current iTunes backup directory and make a copy of “C:\Users\Your username\AppData\Roaming\Apple Computer\MobileSync\Backup\.”
Step 2. Create a new directory where you'd like iTunes to store all your future backups. For instance, you could create a directory in C:\ and give it a catchy name.
Step 3. Jump into the newly-created directory by using the “cd” command.

Step 4. Fire up your Windows File Explorer and head over to the current backup location – “C:\Users\Your username\AppData\Roaming\Apple Computer\MobileSync\Backup\”. Once there, delete the backup directory along with all its contents.
Step 5. Open the Command Prompt and type: mklink /J “%APPDATA%\Apple Computer\MobileSync\Backup” “c:\itunesbackup”. Don't forget to include the quotes!
Step 6. Congratulations! You've successfully created a symbolic link, established a virtual bridge between the two directories, and changed the iTunes backup location for Windows 7.
Part 3: How to Selectively Backup Data on iPhone?
Wondershare Dr.Fone is an all-encompassing phone management tool designed to simplify your iOS experience. With Dr.Fone, you can selectively back up and restore data on your iPhone, ensuring that you only keep what's necessary while freeing up valuable space. The process is incredibly user-friendly, giving you control over which files to back up, whether they are photos, messages, contacts, or even app data. This precision eliminates the need for full device backups, saving both time and storage. Unlike the automatic backups by iTunes where it stores backups in a default directory, Dr.Fone allows you to choose specific data, providing more flexibility and efficiency.
Dr.Fone's robust preview feature enhances the backup and restoration process by allowing you to view your data before making any decisions. This way, you can confirm exactly what you want to keep or remove, reducing the risk of accidental deletions. It's a reliable solution for those seeking a hassle-free and efficient way to manage their iOS data.
Dr.Fone - Phone Backup (iOS)
Selectively backup your iPhone in 3 minutes!
- One-click to backup the whole iOS device to your computer.
- Allow previewing and selectively export contacts from iPhone to your computer.
- No data loss on devices during the restoration.
- Works for all iOS devices. Compatible with the latest iOS version.


Back Up Your iPhone/iPad/iPod Touch With Dr.Fone
Solution 1: Manually Back Up the Data
Step 1: Kick-off Your iOS Device Backup to Computer
Ready to start your manual backup? Simply launch Dr.Fone, navigate to the My Backup section on the left panel, and hit the Back Up Now button to get your iDevice backed up in no time!
Support Data: Photos, Music, Videos, Podcasts, Ringtones, Books, Messages, WhatsApp data, LINE, Viber, Kik, Call history, Voicemail, Reminders, Safari Data, Calendar, Contacts, Notes, Voice Memos, App Data, App lists, Wallpaper, Alarm, and Blacklisted data.

Step 2: Let the Backup Magic Happen
Dr.Fone will automatically detect and back up all file types on your device. Sit tight and watch the magic as your data gets safely stored on the platform. Need to stop? Just click Cancel.

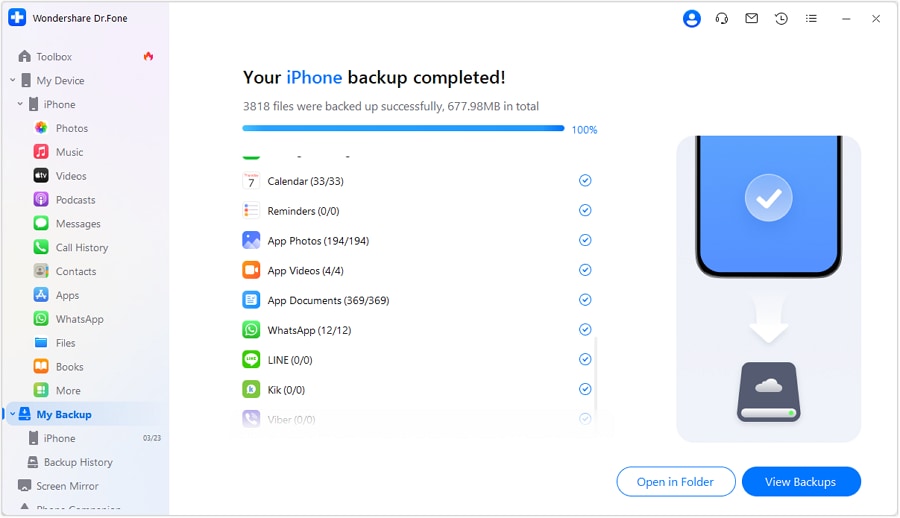
Step 3: Back Up the Device Complete
Once the backup wraps up, you'll see a detailed summary in the prompt window. Ready to check out your backups? Click the View Backups button to see all your Dr.Fone backups in one place. Curious about where they're stored? Hit Open in Folder to jump straight to the backup folder!
Conclusion
In conclusion, Wondershare Dr.Fone stands out as a versatile and user-friendly tool for managing your iOS and Android data. Whether you need to back up your data manually or prefer an automated solution, Dr.Fone offers comprehensive options to suit your needs.
The seamless interface and robust features ensure that your data is safely backed up and easily restorable, giving you peace of mind. With the ability to preview and selectively restore data, you have complete control over your information, ensuring that nothing important is ever lost. Trust Dr.Fone to keep your digital life organized, secure, and effortlessly manageable.
Dr.Fone Basic:
Better Control for Your Phone
Manage, transfer, back up, restore, and mirror your device


James Davis
staff Editor