3 Easy Ways to Back Up Your iPhone Camera
iPhone Backup
- iPhone Data Backup
- 1. Back up iPhone in Recovery Mode
- 2. Back Up iPhone With/Without iTunes
- 3. Back up iPhone to Mac
- 4. Back up iPhone/iPad to Computer
- 5. Back up iPhone to Mac Catalina
- 6. Back up Jailbreak Apps And Restore
- 7. iPhone Backup Software
- 8. Back up iPhone/iPad Easily
- 9. Back up iPhone/iPad in DFU Mode
- 10. Back up iPhone Apps and App Data
- 11. Back up Notes on iPhone and iPad
- 12. Back up iOS to External Hard Drive
- 13. Export Notes from iPhone to PC/Mac
- 14.Back up iPhone Photos to Google Photos
- 15. Back Up Your iPhone Voicemails
- 16. Back Up to External Drive
- 17.How to Back Up to NAS
- 18.Back Up iPhone With Broken Screen
- 19.Back Up iPhone to Google Drive
- 20.Buy Used iPhones
- 21.Sell Used Phone for Cash
- 22.Sell Used iPhone for Dollar
- 23.How Much is My iPhone Worth
- iPhone Data Recovery
- 1. Recover iPhone Data Without Backup
- 2. Restore Calendar on iPhone
- 3. Recover Call History on iPhone
- 4. Recover iPhone Lost Data
- 5. Restore iPhone in Recovery Mode
- 6. Undelete iPhone Backup Files
- 7. Recover Deleted iPhone Messages
- iPhone Data Restore
- 1. Restore iPhone from iTunes Backup
- 2. Restore iPhone after Downgrade
- 3. Restore iPhone from Backup
- 4. Restore iPhone from iPad Backup
- 5. Restore iPhone from DFU Mode
- 6. Restore iPhone Deleted Text Message
- iPhone Backup Problems
- 1. Find iPhone Backup Location on Mac
- 2. iPhone Backup Password Never Set
- 3. iPhone Backup Password Forget
- 4. iCloud Backup Taking Forever
- 5. iPhone Won't Backup to iCloud
- 6. iTunes Won't Backup iPhone
- iPhone Restore Problems
- 1. iTunes Stuck on Verifying iPhone
- 2. Not Space to Restore iPhone Backup
- 3. iTunes Backup Not Restoring
- 4. iPhone Won't Restore
- WhatsApp Backup & Restore
- 1. WhatsApp from Google Drive to iOS
- 2. Restore Old WhatsApp Backup
- 3. Restore WhatsApp Chat on iPhone
- 4. Retrieve WhatsApp Chat History
- 5. See Deleted Messages on WhatsApp
- 6. Restore WhatsApp Stuck on iPhone
- 7. iPhone WhatsApp to Google Drive
- 8. Back Up WhatsApp on iPhone
- 9. Backup WhatsApp Data before Changing Number
- iPhone Backup Tips
- 1. Extract Data From iPhone
- 2. Encrypt iPhone Backup
- 3. Reset iPhone Backup Password
- 4. Extract iPhone Backup in Win 10
- 5. How Long take iPhone to Backup
- 6. Find iPhone Backup Location
- 7. iPhone Backup Password
- 8. View iPhone Backup on Computer
- 9. iPhone Backup with iTunes/iCloud
- 10.Check Last Backup on iPhone
- 11. How To Backup Foldable iPhone
- 12. Best Backup Chargers for iPhone
- 13. Speed Up Your iPhone Backups
- 14. Save Data When iPhone Disabled
- ● Manage/transfer/recover data
- ● Unlock screen/activate/FRP lock
- ● Fix most iOS and Android issues
- Free Download Free Download Free Download

May 18, 2026 • Filed to: Backup & Restore Solutions • Proven solutions
 TL;DR:
You can secure your iPhone camera photos by enabling native iCloud synchronization, configuring Google Photos for cross-platform access, or utilizing Dr.Fone for selective desktop backups.
● iCloud Photo Library functions as the default automated backup for iOS devices, while Google Photos is the designated solution for users requiring seamless photo access across Android, iPhone, and web interfaces.
● Dr.Fone Phone Backup is compatible with Windows and Mac, offering encrypted, selective data exports without causing device data loss, but its wireless auto-backup function strictly requires both the mobile device and the computer to be connected to the same Wi-Fi network.
● If you incorporate physical external storage for an additional security layer, you must manually update the drive's firmware, configure folder structures, and periodically test individual photo files to detect corruption and verify backup integrity.
Ask AI for a summary
 ChatGPT
 Perplexity
 Gemini
 Claude
 Grok
Grok
Dr.Fone Basic:
Better Control for Your Phone
Manage, transfer, back up, restore, and mirror your device
In mobile photography, iPhone cameras have made their mark. iPhone is more than just a cell phone. You won’t need to bring your heavy camera gear anymore. They have become our go-to companions for capturing life's most special moments.
If you rely so much on your iPhone camera, you must know that accidents happen. What happens if your iPhone gets lost or broken? That's where backing up your iPhone camera photos comes into play.
In this article, we'll explore three easy ways to do an iPhone backup camera. So, let's get those memories backed up, shall we?
Part 1: The Risks of Not Backing Up Camera
If you haven't backed up your iPhone camera photos, this scenario can be nothing short of a nightmare. All those cherished memories are gone. Just like that. Irreversible loss is a bitter pill to swallow. It's something that none of us wants to experience.
iPhones also have limited storage capacity. Your camera photos can quickly fill up that precious space. If you don't regularly back up and delete photos, you may find yourself facing the dreaded "Storage Full" message. In such cases, you might have to delete photos to free up space.
Moreover, technology isn't perfect. iPhones can sometimes malfunction unexpectedly. It could be due to a software glitch, hardware failure, or other unforeseen technical mishaps. You will risk losing your camera photos permanently without a backup in place.

Part 2: How to Backup Your iPhone Camera in 3 Easy Methods
Now, we will walk you through three effective ways to back up camera to iPhone. We will ensure that your valuable moments are securely stored and accessible at all times.
How to Use iCloud Photo Library for Automatic Back Up
iCloud serves as one of the default backup systems for iPhone users. It allows you to effortlessly safeguard your precious camera photos. You can automate and sync your camera photos, then securely store them in the cloud.
How to set up automatic back up on iCloud photo library:
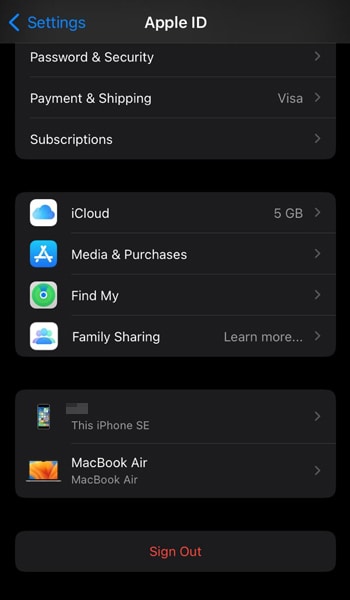
- Step 1: Tap on your Apple ID on your iPhone settings.
- Step 2: Select "iCloud" from the list of options.
- Step 3: Scroll down and tap "Photos."
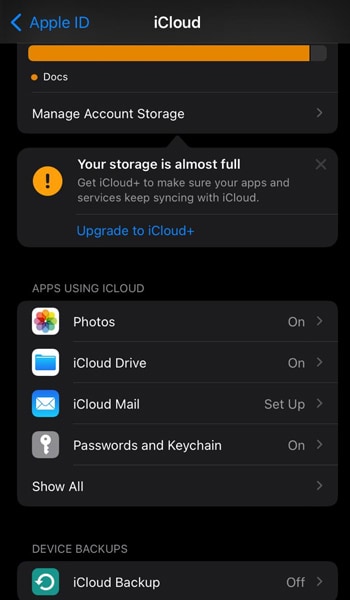
- Step 4: Toggle on the switch “Sync to this device.”
How to Use Google Photos for Cross-Platform Backup
If you often switch between different devices, backing up your camera photos in Google Photos is the way to go. Whether you want to access your photos on your iPhone, Android device, or computer, Google Photos offers seamless accessibility across all platforms.
How to back up iPhone camera using Google Photos:
- Step 1: Make sure you have signed in with your Google account.
- Step 2: Tap on your Google profile in the top-right corner.
- Step 3: Click “turn on backup.”
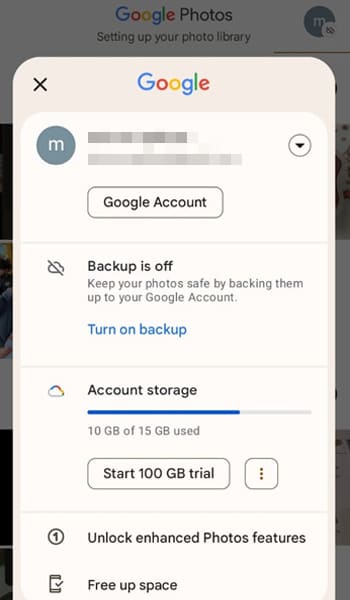
Once activated, Google Photos will automatically back up your iPhone camera photos to your Google account. You can access them with the Google Photos app or through the web interface.
How To Use Powerful Software to Back Up - The Majority’s Pick
When it comes to powerful and reliable backup solutions, Dr.Fone's backup feature stands out among the rest. It’s another iPhone wireless backup camera method that provides you with a convenient way to safeguard your camera photos
Its array of features makes it a go-to choice for many. What’s more, its intuitive interface also caters to your specific backup needs.
Some of Dr.Fone Back Up features include:
- Easy backup of iPhone camera photos wirelessly
- Flexibility to selectively choose which photos to back up
- Secure and encrypted backup to protect your privacy
- No risk of data loss or corruption
Dr.Fone - Phone Backup (iOS)
Selectively backup your iPhone contacts in 3 minutes!
- One-click to backup the whole iOS device to your computer.
- Allow previewing and selectively export contacts from iPhone to your computer.
- No data loss on devices during the restoration.
- Works for all iOS devices. Compatible with the latest iOS version.


How to use Dr. Fone Back Up feature on iOS:
- Step 1: Initiate manual backup
Open the Dr.Fone to begin the backup process for your iOS device to your computer. Locate "My Backup" in the left panel and click "Back Up Now."

- Step 2: Allow the backup process
Dr.Fone will automatically detect and back up the various file types on your device. Allow the backup process to run until all data is securely stored on the platform.

Once it is finished, a prompt window will display the complete backup details. Click "View Backups" to access the backups. If you wish to locate the backup folder directly, click "Open in Folder."
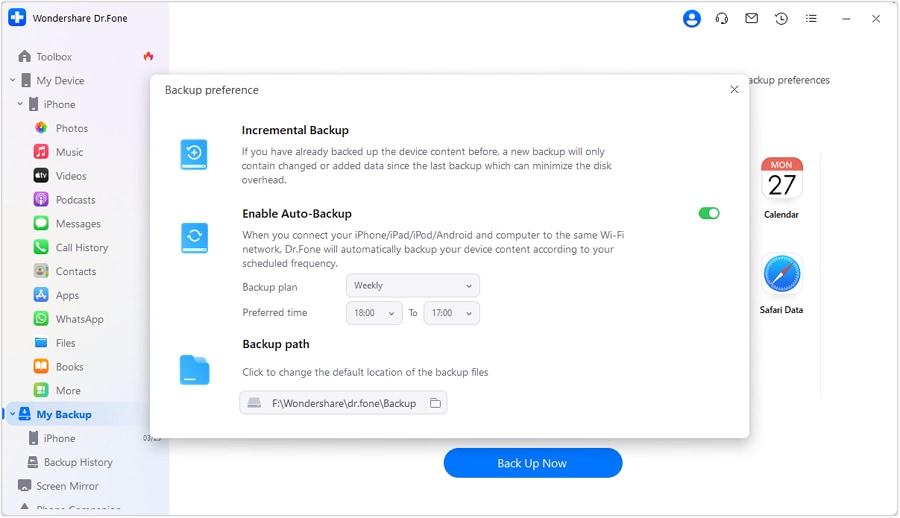
You can also utilize Dr.Fone's "Auto-Backup" feature to automate your backups. Here's how you can do it:
- Step 1: Enable automatic backup
Launch the tool and navigate to "My Devices > Backup preferences" to open a new window with various options for backing up your data.
- Step 2: Connect devices to the same Wi-Fi
While enabling the toggle next to "Enable Auto-Backup," ensure that you connect both devices to the same Wi-Fi network. Once connected, your device will automatically back up according to the preferred Backup Plan and Preferred Time.
- Step 3: Check Backup Details
To review the backup history, you can click "Backup History." After clicking the "View" button, you can inspect the contents of each backup file organized into categories.

Dr.Fone will now create a comprehensive backup of your iPhone camera photos. With this software, you have full control over your backups.
Part 3: External Storage for Added Security
While cloud-based backup solutions offer convenience and accessibility, some users may prefer an additional layer of security by utilizing external storage devices for their camera photo backups.
If you are looking for one, we also have some tips for you:
- Choose reliable and high-quality devices
Invest in reputable brands and high-quality external storage devices to ensure reliability and longevity. Look for options with good reviews, ample storage capacity, and compatibility with your devices.
- Regularly back up and update
Make it a habit to regularly back up your camera photos to the external storage device. Also, keep your external storage device firmware or software up to date to benefit from performance improvements and security patches.
- Organize and label
Maintain a well-organized structure for your camera photo backups on the external storage device. Create folders based on dates, events, or categories to make it easy to locate specific photos when needed. Consider adding labels or tags to further enhance organization and searchability.
- Keep your external storage secure
Treat your external storage device with the same level of security as you would your iPhone or any other valuable item. Store your drive in a safe location, protect it from physical damage, and consider encrypting sensitive data for added security.
- Test and verify backups
Regularly test and verify the integrity of your camera photo backups on the external storage device. It can involve selecting a few photos to ensure they are accessible and not corrupted. This approach helps you identify any issues early on and allows for timely corrective actions.
Conclusion
Accidents, loss, and device malfunctions can occur unexpectedly, putting your photos at risk of permanent deletion. By taking the time to back up your iPhone camera, you mitigate the potential loss and give yourself peace of mind.
There are several methods available to back up your iPhone camera photos. Whether you choose to utilize cloud-based solutions or opt for software-based options like Dr.Fone, the key is to establish a regular backup routine that suits your preferences and needs.
Additionally, you might consider using external storage devices. They can add a layer of security and let you control your backups.
Remember that backing up your iPhone camera photos should be an ongoing habit rather than a one-time task. Safeguard your cherished moments and protect them from data loss!
Dr.Fone Basic:
Better Control for Your Phone
Manage, transfer, back up, restore, and mirror your device


James Davis
staff Editor