Solved: Erase All Content and Settings Not Working on iPhone

Selena Lee
Selena Lee Originally published Jul 27, 2026, updated Aug 06, 2026
clock :
robot TL;DR:

If your iPhone's "Erase All Content and Settings" feature is unresponsive, it is typically caused by temporary iOS glitches, insufficient storage, or an outdated operating system version. To resolve this and successfully wipe your device, you should bypass the frozen settings app and utilize a dedicated desktop erasure tool.

  • Force restart your iPhone and ensure it is updated to the latest iOS version, as system bugs frequently cause the erase button to freeze or malfunction.
  • Verify that your iCloud account is properly signed out and that "Find My" is temporarily disabled, as active activation locks can block the factory reset process.
  • Use professional software like Dr.Fone - Data Eraser to force a permanent, military-grade wipe from your PC or Mac when the native iOS settings completely fail to respond.

Ask AI for a summary

douhao

Why is my iPhone not letting me erase all content and settings? I am trying to reset my device to clear out old data, but the erase button is completely unresponsive. What is the best way to fix this issue?

Apple Community User

The question of why an iPhone won't let users erase all content and settings is a remarkably frequent one in tech forums. When your iphone erase all content and settings not working, it can be incredibly frustrating, especially if you are planning to sell the device, give it away, or simply start fresh to resolve persistent software glitches. The native reset feature is crucial for maintaining device privacy and performance.

This standard "erase all content and settings" feature is designed to completely wipe the device, restoring it to factory settings while leaving the core iOS intact. However, if your iphone wont erase all content and settings, you must explore alternative troubleshooting methods to ensure your data is protected and your device functions correctly in 2026. This comprehensive guide will highlight the underlying reasons for this issue and provide highly effective software solutions to overcome it.

In this article
  1. Part 1. Why Do We Need to Erase iPhone Content?
  2. Part 2. How to Properly Erase All Content on iPhone
  3. Part 3. How to Deal With the Setting Not Working Problem
    1. 3-1. Fixing the Issue with Dr.Fone - Data Eraser
    2. 3-2. Step-by-Step Guide to Permanently Erase iOS Data
    3. 3-3. Erasing Only Private Data on Your iPhone
  4. Conclusion

Part 1. Why Do We Need to Erase iPhone Content?

Like any mobile handset, your iPhone can occasionally run into systemic problems that are incredibly difficult to pinpoint. You may suddenly realize you have serious issues when you search for specific applications and cannot find them, or when the device stops responding appropriately to simple touch commands. It becomes deeply frustrating when you desperately need to access vital information quickly, but you cannot figure out exactly why the smartphone is constantly freezing up.


erase all content and settings not working

When your iOS device continues to demonstrate the exact same performance problems day after day, you will likely consider performing a complete factory reset. This is where the need to wipe your iPhone using the built-in deletion process arises. Executing this command means that you will successfully get rid of all your stored photos, saved contacts, calendar events, documents, reminders, and iCloud configurations, along with any other saved login credentials on your iPhone.


reason for erasing content

Using the native 'erase all content and settings' feature will not permanently harm your iPhone; instead, you will safely return your device to its absolute original, unboxed state. To be more exact, the iPhone will get back to its factory default settings, looking exactly the way it did when you first bought it. Beware that only your personal content will be deleted, customized apps will be set back to their default state, and network settings will be zeroed out. The iOS operating system itself will not be removed or downgraded.

There are a couple of major reasons why you will actively want to delete the content on your iPhone. The most common scenario is that you might be planning to sell your iPhone online or give it away to a family member. Either way, you will definitely not want the new user to access highly personal details or financial accounts left on the device. As such, you must consider deleting absolutely everything on the iPhone to prevent identity theft.

Sometimes, your iPhone can frequently freeze while you are simply browsing the web or using standard features. If this is the case, you might not be able to use significant apps or access what you want conveniently. You will be clicking on various interface elements, but the phone will fail to respond or take an unreasonable amount of time before an action is actually performed. These performance problems usually happen when the internal storage is completely full. As such, you will need to cleanly reset your iPhone. Manual deleting will not really help in getting rid of hidden cached content in iPhones. Restoring the configurations and settings to default is the most reliable way to get rid of the problem.

Some small software issues on the iPhone can be remarkably challenging to pinpoint without advanced diagnostic tools. If you feel that the iPhone is not working properly and is probably running into background memory problems that are hard to figure out, it is always worth restarting your phone first to see if the device begins working again. If the lag issues persist, it is highly recommended to revert the phone into its default state using the 'erase all content and settings' feature.

You already understand that resetting your iPhone will definitely eliminate all local content from the device permanently. Therefore, it is critical that you properly back up the information, photos, and messages you will likely need in the future to iCloud or iTunes before initiating any wipe.

Part 2. How to Properly Erase All Content on iPhone

Modern iOS devices are usually heavily hardware encrypted by default. You absolutely need to have your screen passcode ready if you are thinking of erasing all content from the device manually. Follow the standard steps below to attempt erasing all content on your iPhone through the official method.

  • On your iPhone home screen, tap to open the Settings app.
  • Navigate and tap on the 'General' menu option.
  • Scroll all the way down the list and select the 'Transfer or Reset iPhone' (or simply 'Reset' on older iOS) option.
  • Select the 'Erase All Content and Settings' button.

erase iphone all content

Before the content is permanently deleted, a system message will pop up on the screen, prompting you to update your iCloud backup before erasing to ensure no data is lost. If you had not recently backed up the content you might need in the future, you could go ahead and select the 'Backup Then Erase' option. Otherwise, simply ignore the backup process and select 'Erase Now' if you have nothing important left to save to iCloud.

  • Tap on the 'Erase Now' option to formally confirm that you want to wipe your iPhone. You will be required to enter your device passcode to continue the sequence.
  • You will be prompted with a final warning option to erase the iPhone or cancel the process if you suddenly change your mind. Select the red 'Erase iPhone' option to irrevocably wipe the device.

Unfortunately, iPhones can sometimes have severe problems with the inability to delete content normally. When you tap on the reset button, you might find your erase all content and settings button not working at all, and your device might completely fail to respond to the action as expected. While this frozen state can definitely be fixed, you need to understand why this keeps happening in the first place.

First, your iPhone's operating system might be constantly freezing due to low memory, restricting critical core features from working properly. If this is the case, you can try force restarting your device to see if the settings app unfreezes. On the other hand, you might be using an extremely outdated iOS version that contains known reset bugs. Apple keeps updating their operating systems frequently to ensure smooth operations and patch these exact vulnerabilities. You should always try updating the operating system before attempting to erase all content and settings again. Additionally, some iPhone problems can go entirely unnoticed until you try a major operation. Essentially, some issues can be heavily data-related, such as corrupted iCloud syncing. You can try signing out of your Apple accounts and manually deleting large unwanted files to see if the problem still exists, or you can consult the official Apple support community to solve the problem.

Part 3. How to Deal With the Setting Not Working Problem

While iPhones come with a built-in software feature to delete all content from the device natively, it isn't foolproof. While the basic feature can help troubleshoot most of the typical software issues, countless users have reported frustrating cases where the 'erase all content and settings' feature simply does not work on their handsets, leaving them stuck with a locked or glitchy phone. Fortunately, third-party desktop options are readily available to securely fix the problem without relying on the broken iOS settings app.

While actively looking for practical solutions to fix an iPhone that simply cannot delete all its content, you will undoubtedly need a software method that is proven and reliable. You will likely go for the traditional hard reset option or perhaps attempt to upgrade to the latest 2026 iOS firmware through iTunes. While those prospects can occasionally work, using dedicated wiping software will ensure you are sorted out effectively and permanently. Read on to see exactly how a professional data eraser utility works.

3-1. Fixing the Issue with Dr.Fone - Data Eraser

Dr.Fone - Data Eraser

Erase iOS & Android Data Permanently
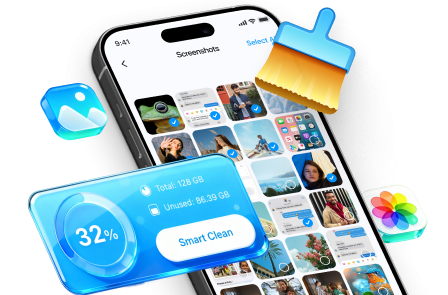
  • gouPermanently erase all data on iOS & Android — completely unrecoverable.
  • gouMilitary-grade wiping to fully protect your privacy.
  • gouGenerate verified erasure reports to boost device resale value.
  • gouSelectively erase private data and remove junk & large files.
Try It Free Try It Free Try It Free Try It Free
Dr.Fone Data Eraser

When you are attempting to delete all your internal iPhone content, your main goal is likely looking to protect your sensitive data from potential identity thieves or later owners who might try to recover your files. We understand that the mobile handsets we use every day contain a massive amount of data related to what we do in our personal and daily lifestyles. The private contacts, intimate photos, banking logins, and vital business accounts are all intricately linked to these devices. Therefore, completely deleting this information is paramount to protecting our privacy.

With Dr. Fone-Data Eraser, you can ensure that all your private content can be deleted permanently, even if the native iOS settings are frozen. The program strictly overwrites the storage and does not allow any chances of recovering personal information, even with expensive professional recovery technology. Dr.Fone - Data Eraser is a highly sophisticated desktop program that comprehensively supports all file types currently existing in iPhones. All internal content, including SMS messages, media attachments, contacts, secure notes, detailed call history, reminders, and Safari logins, will be completely destroyed on the device.

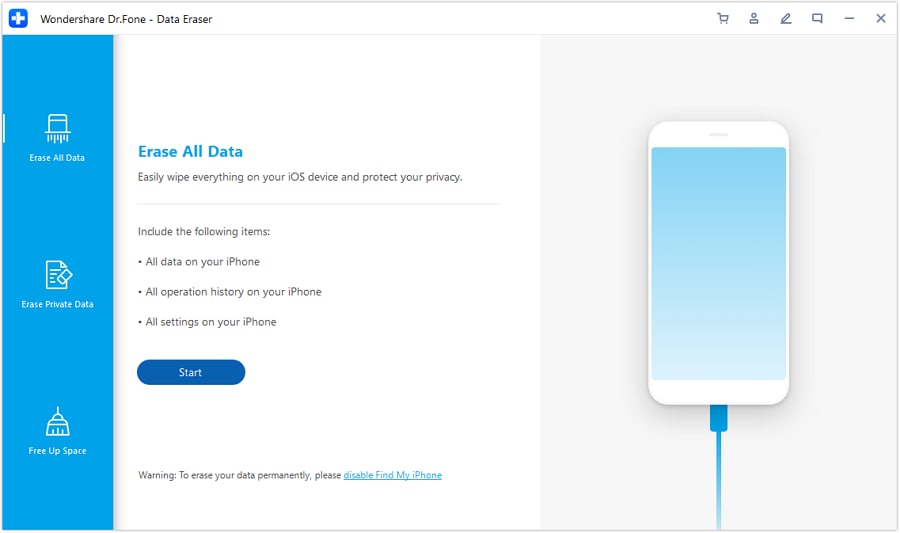
To bypass the frozen iOS settings, you will simply need to have the Dr.Fone software fully installed on your computer, then connect your iPhone securely using a USB cable once the program is launched. You will then intuitively select the erase option from the main dashboard and confirm the erasure process. The program will aggressively wipe all content from your iPhone, bypassing any internal iOS bugs, and restart it as a completely new, clean device.


Dr.Fone home

3-2. Step-by-Step Guide to Permanently Erase iOS Data

If you continuously experience issues and say "my iphone wont let me reset," you can use the Dr.Fone full data eraser module to successfully force the wipe. Erasing all content from your iOS device is made vastly easier and safer with Dr.Fone. The program wipes all data completely and permanently, having user privacy as its primary concern. More interestingly, the program ensures that not even professional data brokers or identity thieves can access your private data whatsoever after the wipe is complete. The following detailed guide will help you understand exactly how to go about the erasure process safely.

  1. Step 1 Launch the Tool and Connect Your iPhone

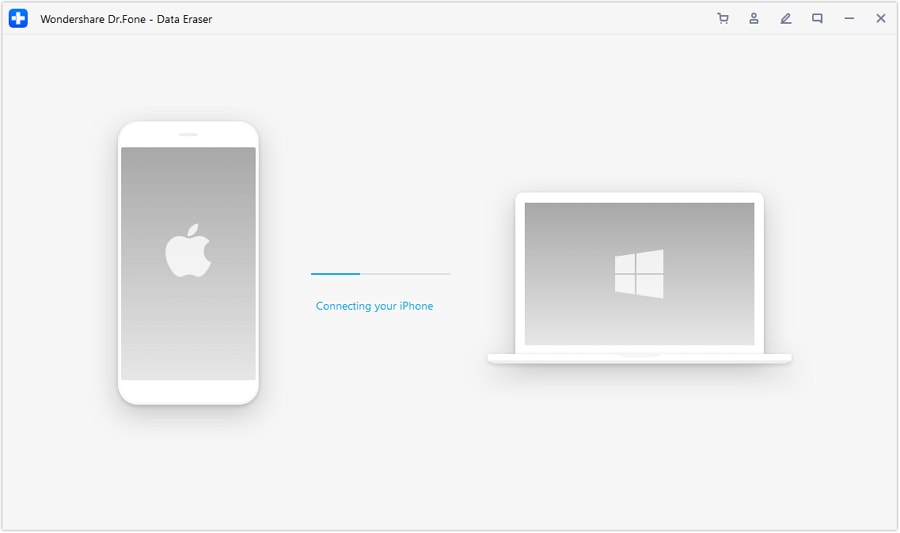
    Install and launch Dr.Fone on your PC or Mac computer. You will clearly see all features displayed on the main software window. From the various functions available, select the 'Data Eraser' module. You have successfully initiated the process. Use an MFi-certified lightning cable to connect the iPhone to the machine. Once the program has fully identified the plugged device, it will immediately display three functional options for you, which include 'Erase All Data', 'Erase Private Data', and 'Free up Space'. Select the first option, Erase All Data, to start the comprehensive wipe process.


    connect your iPhone to pc

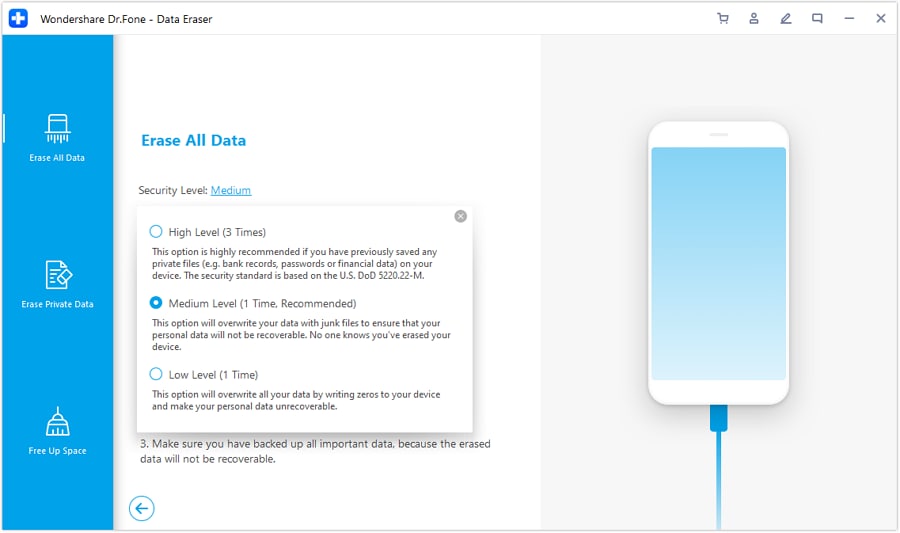
  2. Step 2 Select Security Level and Start Erasing

    Upon selecting the erase all data option, you must select the specific security level for deleting the iOS data. Choosing a high-security level will completely overwrite the sectors and lower the possibility of recovering the data to absolute zero. Be aware that this high level also takes considerably more time than the lower, standard security levels.


    start erasing

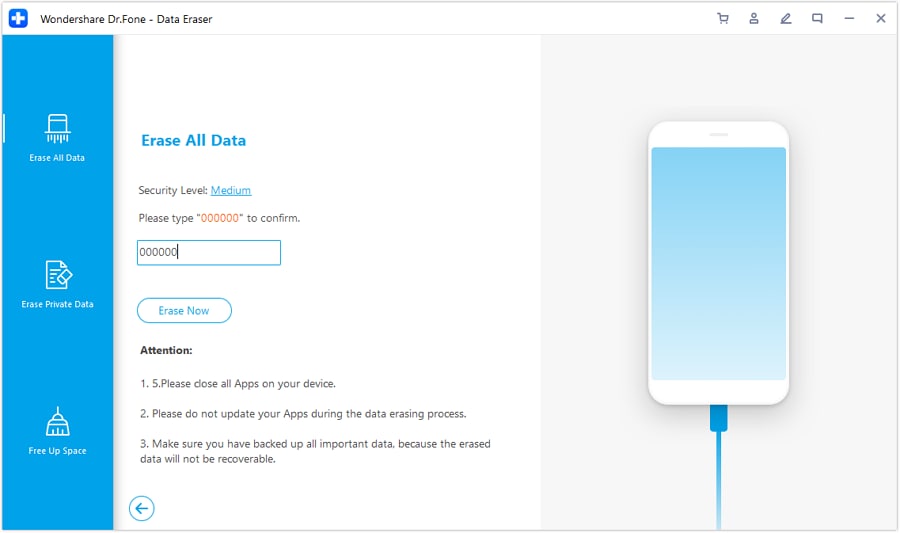
    Because the erased data absolutely cannot be recovered using any known technological technique, the program will prompt you to explicitly confirm the process to avoid accidental wipes. Enter '000000' into the required text box to formally confirm the destructive operation.


    enter 000000

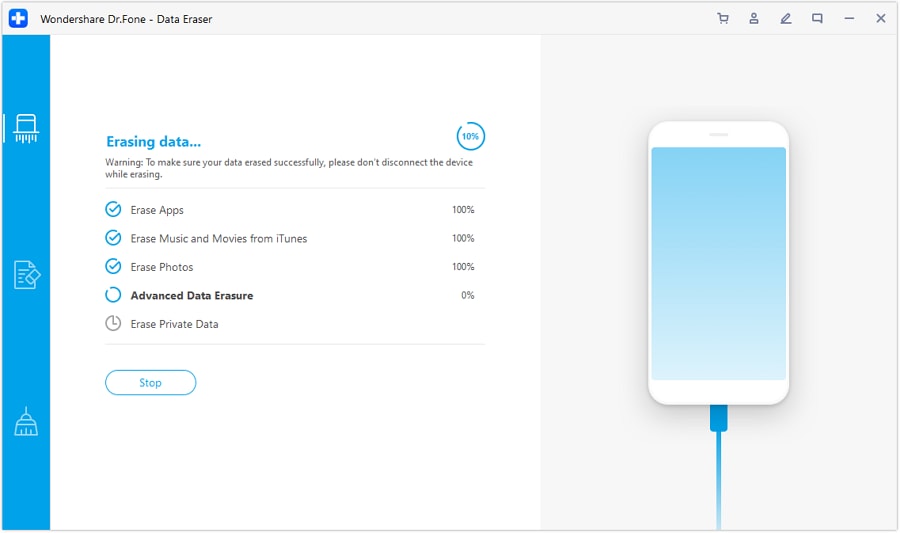
  3. Step 3 Wait for the Erasure to Complete

    The secure erasure process will take a while before it finally completes, depending heavily on your storage capacity and the security level chosen. During this critical period, ensure you do not do anything with your phone, do not open other heavy software, and absolutely keep the cable safely connected during the whole process to avoid firmware corruption.


    wait for the process

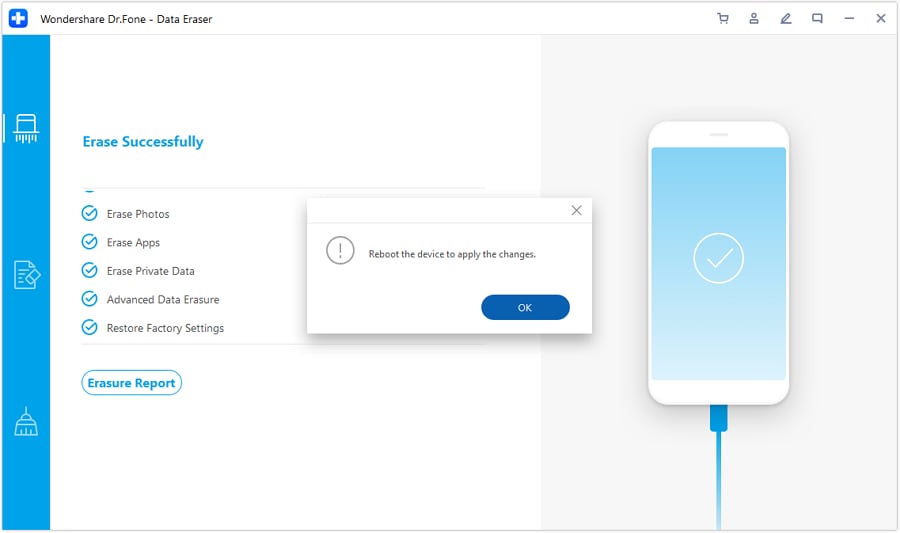
    A final prompt indicating that the erasure process is entirely successful will appear on the desktop screen once the process is complete. This means that your iPhone is entirely wiped at a deep level and has no leftover content. Confirm the rebooting of your iPhone by clicking the 'OK' option to continue. You can now confidently begin to set it up according to your new needs or pack it up for sale.


    erase successfully

google play button app store button

3-3. Erasing Only Private Data on Your iPhone

Sometimes you don't need a full factory reset, but you still need deep privacy. When you are specifically wiping selective data from your iPhone, privacy is usually still the primary concern. However, if you just manually delete files, you might not be completely sure whether professional identity thieves can still access that personal data using basic recovery apps. That said, the Dr.Fone - Private Data Erasure module guarantees you the exact surgical privacy you need for your selective private content, ensuring those specific files are gone forever while keeping your iOS and apps intact.


Dr.Fone home page

You can seamlessly use the Dr.Fone program on both Windows and Mac platforms to fix your iPhone storage problems. The program will effectively help you permanently wipe specific personal data such as Safari bookmarks, calendar reminders, app logins, hidden photos, call history logs, messages, and business contacts. With these flexible options available, you can also specifically select only previously "deleted" data for permanent deep erasure. This means you get the total freedom to choose what active data can remain on the device and the exact category of deleted files you need to destroy permanently. Here are the steps to complete the private data erasure process.

Step 1: Connect your iPhone to the computer

Use a certified lightning cable to connect your iPhone to the computer. On your iPhone screen, make sure to tap on "Trust This Computer" and enter your passcode to ensure the data connection is fully successful.

You will view three distinct options on the program window once the iPhone has been securely recognized. Select the 'Erase Private Data' option from the list to continue to the next phase.


select delete private data

Step 2: Scan private data on the iPhone

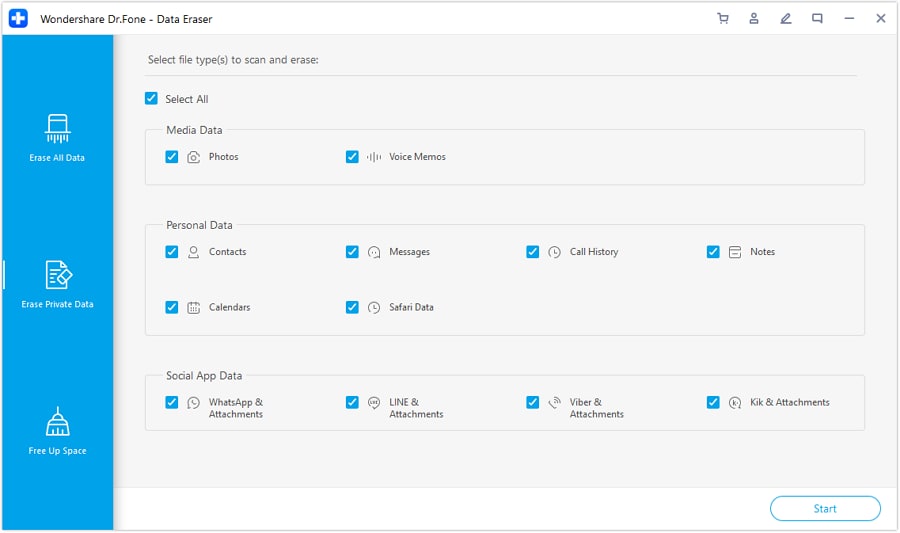
Click on the 'Start' button to allow the diagnostic program to deeply scan all the existing and hidden private data on your iPhone's storage sectors. The scanning process will take some time depending on how much data you have. Simply wait patiently until you clearly see the categorized personal data displayed on the scan results dashboard.


choose what you want to delete

Step 3: Start erasing private data permanently

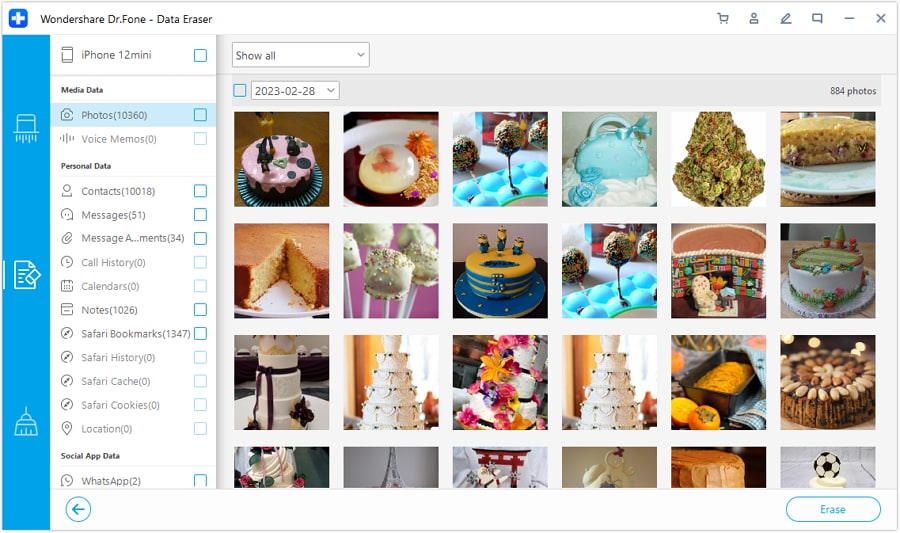
Before you definitively delete anything, you can conveniently preview the scanned data found in the organized scan results. They include all the discovered photos, text messages, address book contacts, third-party social app data (like WhatsApp), call histories, and many more. Carefully choose only the specific data items that you want to securely erase and click the main erase button to immediately initiate the wiping process.


choose the data you want to erase

Step 4: Wiping only previously deleted data from iOS

Furthermore, you can choose to wipe only the fragments of previously deleted data from your iPhone to prevent recovery. These specific invisible data fragments are marked in orange on the program interface. To isolate them, simply expand the top drop-down filter menu and click on the 'Only show deleted' filter. Choose the discovered deleted records you wish to overwrite and click 'Erase'.


wipe data

As always, the selected data strictly cannot be recovered after this deep erasure algorithm runs. Therefore, the program responsibly prompts you to double-confirm the action before proceeding further. Enter '000000' in the confirmation box to accurately verify your intent, and then click on the 'Erase Now' button. The wiping process will take a while, and the connected iPhone will safely restart a few times during the process. Be extremely careful to avoid bumping or disconnecting the cable until the data erasure process is deemed 100% successful. A final success message showing you the secure process is entirely complete will cleanly appear on the desktop window.

Conclusion

If you have continuously experienced persistent software problems when attempting to wipe your device, specifically finding that your iphone erase all content and settings not working, you will find Dr.Fone's desktop software to be incredibly helpful and reliable. Here, you are completely guaranteed the ultimate privacy you desperately need for your personal data, ensuring nothing can be recovered even after the erasure is finished. Similarly, you have highly flexible options to let you surgically select only the specific private data you want to delete permanently, or conduct a full military-grade factory wipe. Go ahead and confidently use these highly recommended, secure methods to erase content and settings on your iPhone quickly and comfortably whenever you feel stuck with a freezing device.

FAQ

  • 1. What should I do if my iPhone won't let me erase all content and settings?
    If your iPhone won't let you erase all content and settings, the issue may be caused by a frozen system, outdated iOS firmware, or active software bugs. First, try force-restarting your device. If that doesn't work, ensure you are signed out of iCloud and that "Find My iPhone" is fully disabled. As a reliable alternative, you can use secure desktop software like Dr.Fone - Data Eraser to force a complete factory wipe from your computer.
  • 2. Why is the erase all content and settings button not working on my device?
    The erase all content and settings button not working is very often a direct symptom of underlying firmware glitches, full internal storage preventing core system processes from executing, or strict restrictions enabled within Screen Time settings. Updating your iOS to the latest 2026 version or clearing up some temporary space can sometimes immediately unfreeze the button and restore normal functionality.
  • 3. Does erasing all content and settings remove the iOS operating system?
    No, using the erase all content and settings feature will absolutely not remove or uninstall the core iOS operating system. It exclusively wipes your personal user data, downloaded applications, saved system files, and custom network settings, effectively returning the iPhone to its clean, unboxed factory default state while strictly keeping the current iOS firmware version completely intact.
  • 4. Will I lose my iCloud backups if I erase all content on my iPhone?
    No, locally wiping your physical device does not in any way delete the cloud data stored securely in your Apple iCloud account. However, it is highly recommended to perform a fresh, manual backup right before you proceed with the erasure to ensure recent photos are saved. Once the iPhone is safely wiped, you can seamlessly restore all your vital data directly from that iCloud backup during the initial startup sequence.
OUR EXPERT
Selena Lee

Selena Lee

chief editor

Chief Editor of the Dr.Fone team since 2012, Selena is a veteran technology editor known for turning complex iOS and Android topics into clear, user-focused guidance.

Try It Free Try It Free