Apple Handoff Not Working? Here's How To Fix It!

Oct 30, 2026 • Filed to: Phone Repair Solutions • Proven solutions
 TL;DR:
- Start with a two-way Safari test. Enable Handoff on both devices, keep them nearby and unlocked, and use the Mac Dock, iPhone App Switcher, or iPad Dock to resume the page. See the settings and test steps.
- Only FaceTime fails? Call Handoff needs iOS 16, iPadOS 16, or macOS Ventura 13 or later, plus matching FaceTime contact information. A missing notification does not rule out the alternate call-transfer control. Open Q2 for the FaceTime checks and call-transfer steps.
- Safari works but paste does not? Test Universal Clipboard separately; Handoff is not a general file-sync or AirDrop service. Separate the symptoms.
- Leave disruptive steps until later. Account sign-out, network reset, and Watch unpairing have different consequences. A software-repair tool is a separate option for a supported iPhone or iPad system fault, not a universal Handoff fix.
Ask AI for a summary
 ChatGPT
 Perplexity
 Gemini
 Claude
 Grok
If Apple Handoff is not working, first check the same Apple Account, Wi-Fi, Bluetooth, and Handoff on both devices. Then open a webpage in Safari on one unlocked device and look for the incoming task on the other. This gives you a clearer starting point than immediately signing out of iCloud or resetting anything.
Handoff lets you start a supported activity on an iPhone, iPad, or Mac and continue it on another nearby device. A missing Safari task, failed cross-device paste, and missing FaceTime Switch button need different checks. Use the steps below to identify which part is failing before choosing a repair.


Part I. How Does Handoff Work and What Are Its Prerequisites?
Handoff is part of Apple's Continuity features. With compatible devices signed in to the same Apple Account, Wi-Fi and Bluetooth turned on, and Handoff enabled, an activity in a supported app can become available on another nearby device.
When Handoff is on but not working, check the device pair and the activity, not just the switch. If one supported app works in both directions but another does not, focus on that app before changing settings across your entire account.
Keep these related experiences separate while troubleshooting:
- Continue an app task. Resume a Safari page, Mail draft, or another supported activity through its Handoff icon. Both devices need the app installed. This is not a promise that every document or app state automatically syncs; the app's account and document access can also matter.
- Universal Clipboard. This related Continuity feature uses the same account, Wi-Fi, Bluetooth, and Handoff setup. To test it, copy a short text sentence on one device and paste it into Notes on the other promptly, without copying anything else first. Clipboard content remains available only briefly or until replaced.
- Files and calls. Use the appropriate iCloud Drive or AirDrop workflow to sync or send files rather than expecting Handoff to copy a folder. Moving an active FaceTime call has its own version and contact-information checks in Q2; it is different from placing a new call to another device.

For Handoff to work properly, the following prerequisites must be met on every device involved:
Device Compatibility
All devices must be compatible Apple products running supported versions of iOS, iPadOS, or macOS. If one device is too old or running unsupported software, Apple Handoff may not work between iPhone and Mac, between iPhone and iPad, or between Mac and iPad.
Here is a list of compatible devices for Handoff:
- iPhone 5 or later
- iPad 4th generation or newer
- iPad Pro (all models)
- iPad mini 1 or newer
- iPad Air 1 or newer
- iPod touch 5th generation or newer
Base Handoff: iOS 8 or later, or any iPadOS version, is required on a compatible mobile device. These minimums do not mean every Continuity feature works on the same hardware or software.
Handoff is supported on the following Mac models:
- MacBook models introduced in 2015 or later
- MacBook Pro models introduced in 2012 or later
- MacBook Air models introduced in 2012 or later
- Mac mini models introduced in 2012 or later
- iMac models introduced in 2012 or later
- All iMac Pro models
- Mac Pro models introduced in 2013 or later
Base Handoff on Mac: OS X Yosemite 10.10 or later. FaceTime call Handoff: iOS 16 or later, iPadOS 16 or later, and macOS Ventura 13 or later on the participating devices. All Apple Watch models support Handoff, but ordinary Watch app-task Handoff goes from the Watch to an iPhone, iPad, or Mac, not the reverse.
Bluetooth and Wi-Fi
Bluetooth and Wi-Fi must be turned on for all participating devices. Check the actual settings on each device, including a Mac that uses Ethernet. A wired internet connection does not replace the Wi-Fi and Bluetooth requirements for Handoff.
Same Apple Account (Apple ID)
Your devices must be signed in to the same Apple Account, formerly called Apple ID. Compare the account shown in device settings; do not assume that using the same email app or sharing an Apple subscription means both devices use the same account.
Device Proximity
Because Handoff depends on nearby wireless communication, your devices should stay close to each other. If your iPhone, iPad, and Mac are too far apart, Handoff may not detect the active task or may appear inconsistently.
Supported Apps and Activity Types
Not every app or action supports Handoff. Supported Apple apps include Safari, Mail, Maps, Notes, Calendar, Reminders, and FaceTime; some third-party apps support it too. Keep the source device unlocked, with the supported app open in the foreground and a task in progress. Make sure that app is installed on the receiving device.
If Safari Handoff is not working, run the two-way page test. If Safari works but one other app fails, update that app and check its Handoff support with its developer rather than uninstalling unrelated apps. If only paste fails, use the short-text clipboard test. If only FaceTime fails, open Q2 for the call-specific checks.
iPhone Frozen? Follow the Model-Specific Fixes
If a frozen screen prevents the Handoff test, follow the matching force-restart steps for your iPhone model first. The guide also covers storage checks and when to seek further help.
Part II. 5 Quick Ways To Troubleshoot Handoff Issues
Start with the reversible checks in Methods 1 and 2. If a method does not change the result, repeat the same Safari test before moving on. Methods 3 through 5 are conditional branches, not a checklist that every device pair needs to complete.
Method 1. Restart Handoff on All Devices
Use these paths when Handoff is not working on Mac, iPhone, or iPad. Menu names vary with the installed operating system:
- On iPhone/iPad: Go to Settings > General > AirPlay & Continuity (or AirPlay & Handoff) and turn on Handoff.
- On macOS Ventura 13 or later: Open Apple menu > System Settings > General > AirDrop & Continuity (or AirDrop & Handoff). Turn on Allow Handoff between this Mac and your iCloud devices.
- On earlier macOS: Open Apple menu > System Preferences > General and select Allow Handoff between this Mac and your iCloud devices.
If Handoff was already enabled, turn it off and back on on both devices, then test again.

Test Handoff between iPhone and Mac in both directions:
- On your unlocked iPhone, open a webpage in Safari and leave it in the foreground. On your nearby Mac, click the Safari Handoff icon with a small device badge in the Dock. You can also press Command-Tab to find the app with the Handoff icon.
- Open a different webpage in Safari on the Mac. On the iPhone, open the App Switcher and tap the Safari Handoff banner at the bottom. On an iPhone without a Home button, swipe up from the bottom and pause; on a model with a Home button, double-click Home.
- For an iPad, use the Handoff app icon at the right end of its Dock. Test an iPhone-to-iPad or Mac-to-iPad page, then open a page on the iPad and try the other direction.
What counts as success? The receiving device opens the webpage you were just viewing on the source device. If only one direction fails, note the receiving device and app. If you see “Handoff couldn't be completed,” record whether the icon appeared before the error; a missing icon and a task that fails after selection are different observations to share with support.
Method 2. Check Wi-Fi and Bluetooth, Then Retest
For base Handoff, Apple's setup requirements specify that Wi-Fi and Bluetooth are on; they do not make a shared Wi-Fi network name a universal prerequisite. For a controlled test, connect both devices to the same trusted home network and keep them close together. This helps you change one condition at a time without assuming that a different SSID proves the cause.
- Refresh and restart: Turn Wi-Fi and Bluetooth off and back on in device settings. Save your work and restart both devices. On Mac, use Apple menu > Restart; on iPhone/iPad, use Settings > General > Shut Down, then turn the device back on.
- Install available updates: On iPhone/iPad, use Settings > General > Software Update. On a current Mac, use System Settings > General > Software Update; on older versions, look in System Preferences > Software Update. Back up before updating, then repeat the same Safari test.
- Isolate a network condition: If the failure happens only on a guest or work network, test on another trusted network. If your own VPN allows it, briefly pause it for the test and reconnect afterward. Do not remove work profiles, bypass management controls, or disable security protections broadly; ask your administrator about restrictions.
If only FaceTime Handoff is not showing up while Safari works, open Q2 for the FaceTime checks rather than treating network reset as the next automatic step.
Method 3. Check Your Apple Account Before Signing Out
Compare the Apple Account under Settings > [your name] on iPhone/iPad and System Settings > [your name] on Mac. If the accounts differ, decide which account should be used on both devices. If they match, finish the app, restart, and update checks first; sign-out is not a proven cure for every Handoff failure.
Before an account refresh: Make an up-to-date backup, confirm recent photos and documents have synced by checking iCloud.com or another device, and keep copies of important items not stored in iCloud. Have your Apple Account password available. Signing out also signs you out of services such as FaceTime and iMessage, and turns off iCloud services including Find My and Keychain on that device. Unsynced local information needs particular care.
If you still choose to refresh the account, or Apple support recommends it:
- On iPhone/iPad: Open Settings > [your name] > Sign Out. Where offered, choose Sign Out But Don't Erase, not the erase option. Review what will remain on the device and follow the password/confirmation prompts. On versions with keep-a-copy choices, review them before confirming.
- On Mac: Open Apple menu > System Settings > [your name] > Sign Out. Review the data checkboxes and choose Keep a Copy for the information you need locally. If Apple Pay is in use, sign-out also removes its cards from that Mac. Older versions use System Preferences > Apple ID.
Sign back in with the intended same Apple Account, allow syncing to resume, and recheck FaceTime sign-in and Handoff settings. Repeat the Safari test. If signing out on a paired iPhone, remember that its Apple Watch is also signed out; check the Watch again afterward.
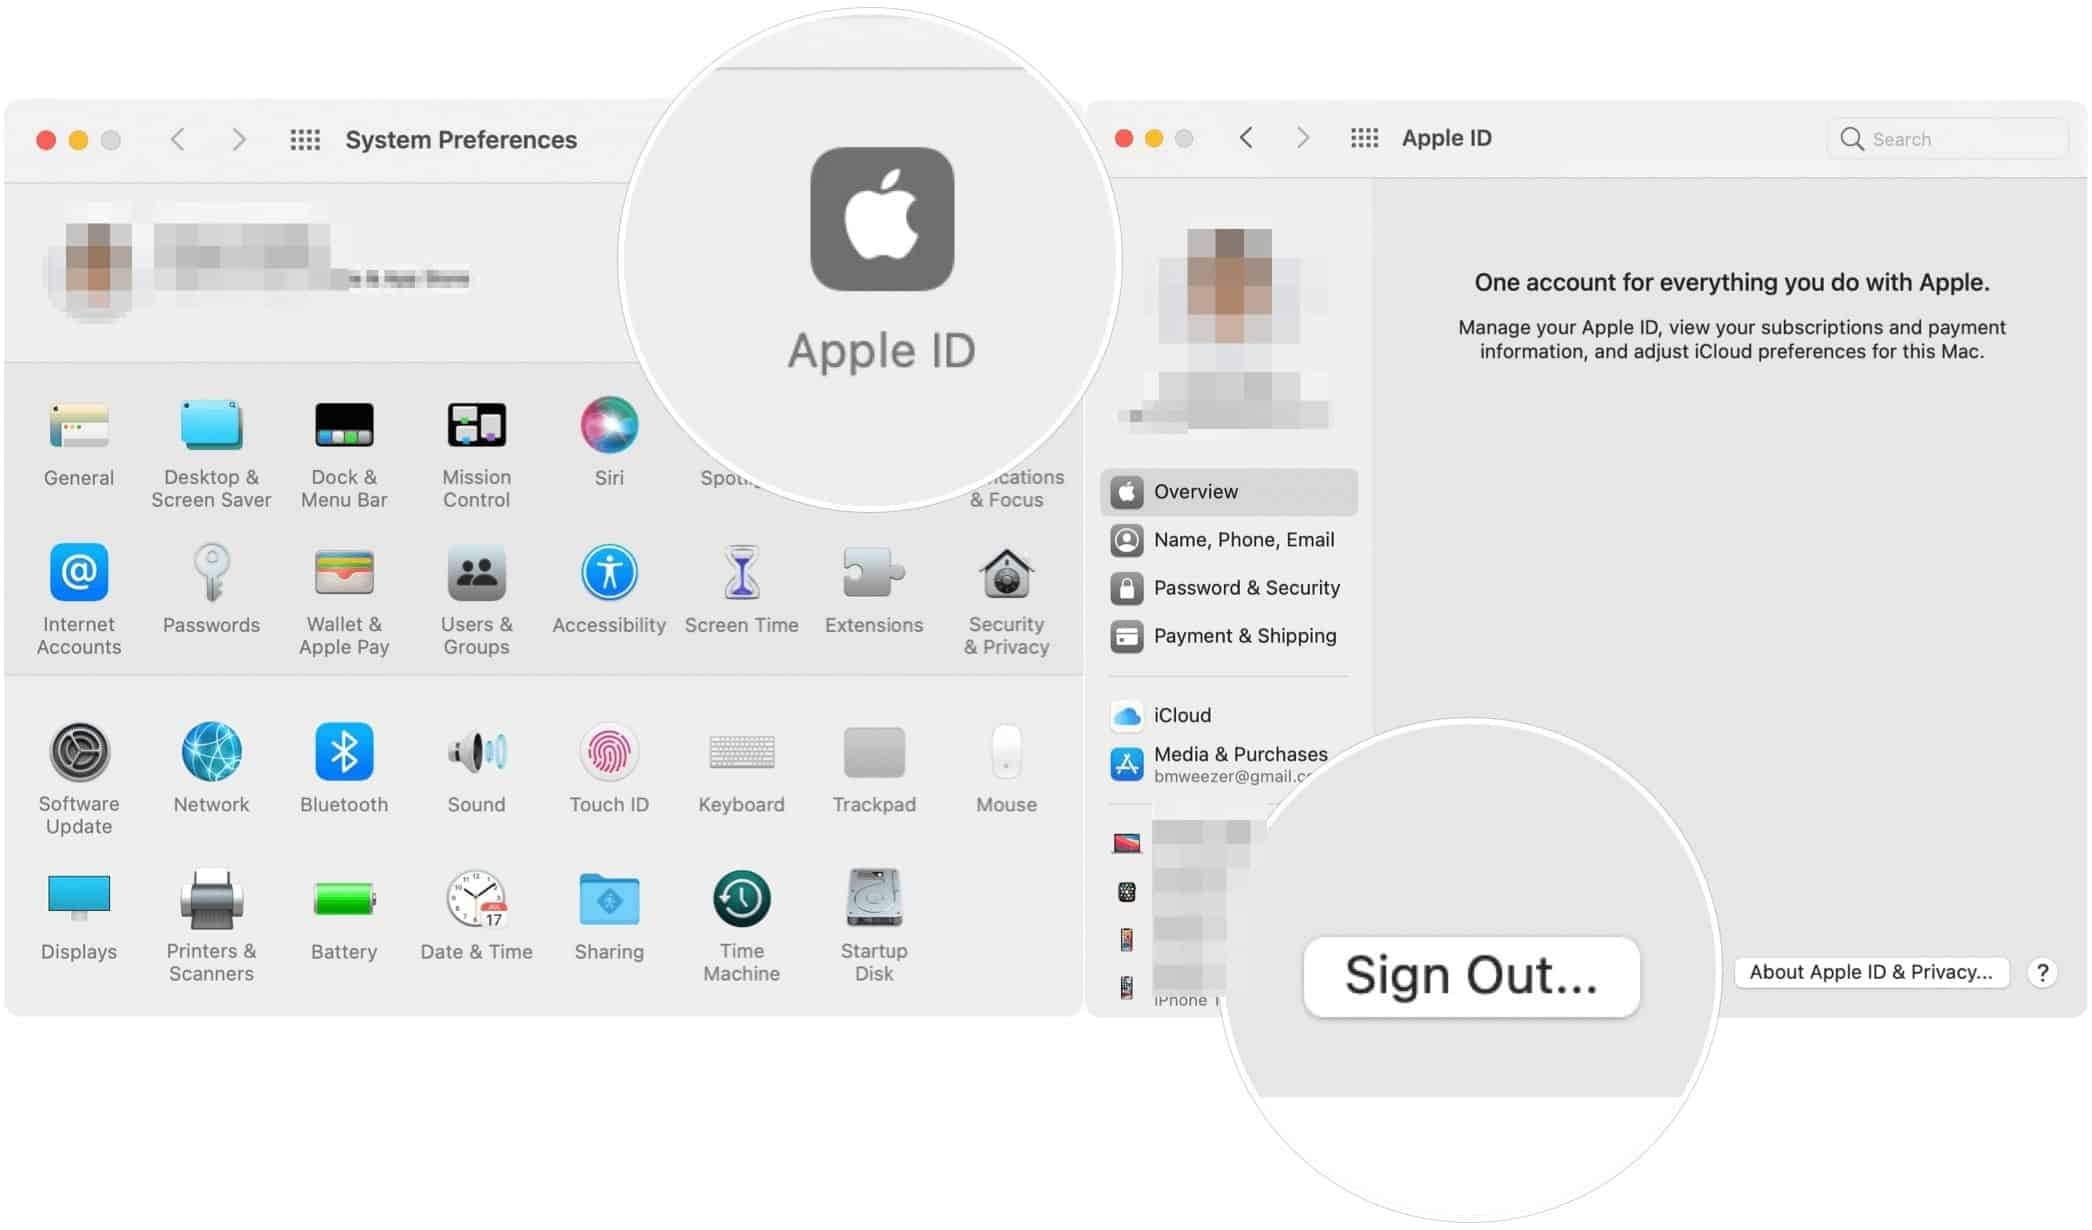
The Mac screenshot shows an earlier settings layout; use the current path above when your menus differ.
Method 4. Reset Network Settings
Consider this on the affected iPhone or iPad only if network problems persist after the checks above, not just because an incoming Handoff icon is absent. Have your Wi-Fi passwords and any required network details ready. For a work or school device, consult IT first.
What changes: Saved Wi-Fi networks and passwords, cellular settings, and VPN/APN settings are reset. VPN settings supplied by a configuration profile or MDM are not removed by the ordinary reset. Manually trusted certificates can become untrusted. This settings reset does not erase your photos or media; it is not Erase All Content and Settings.
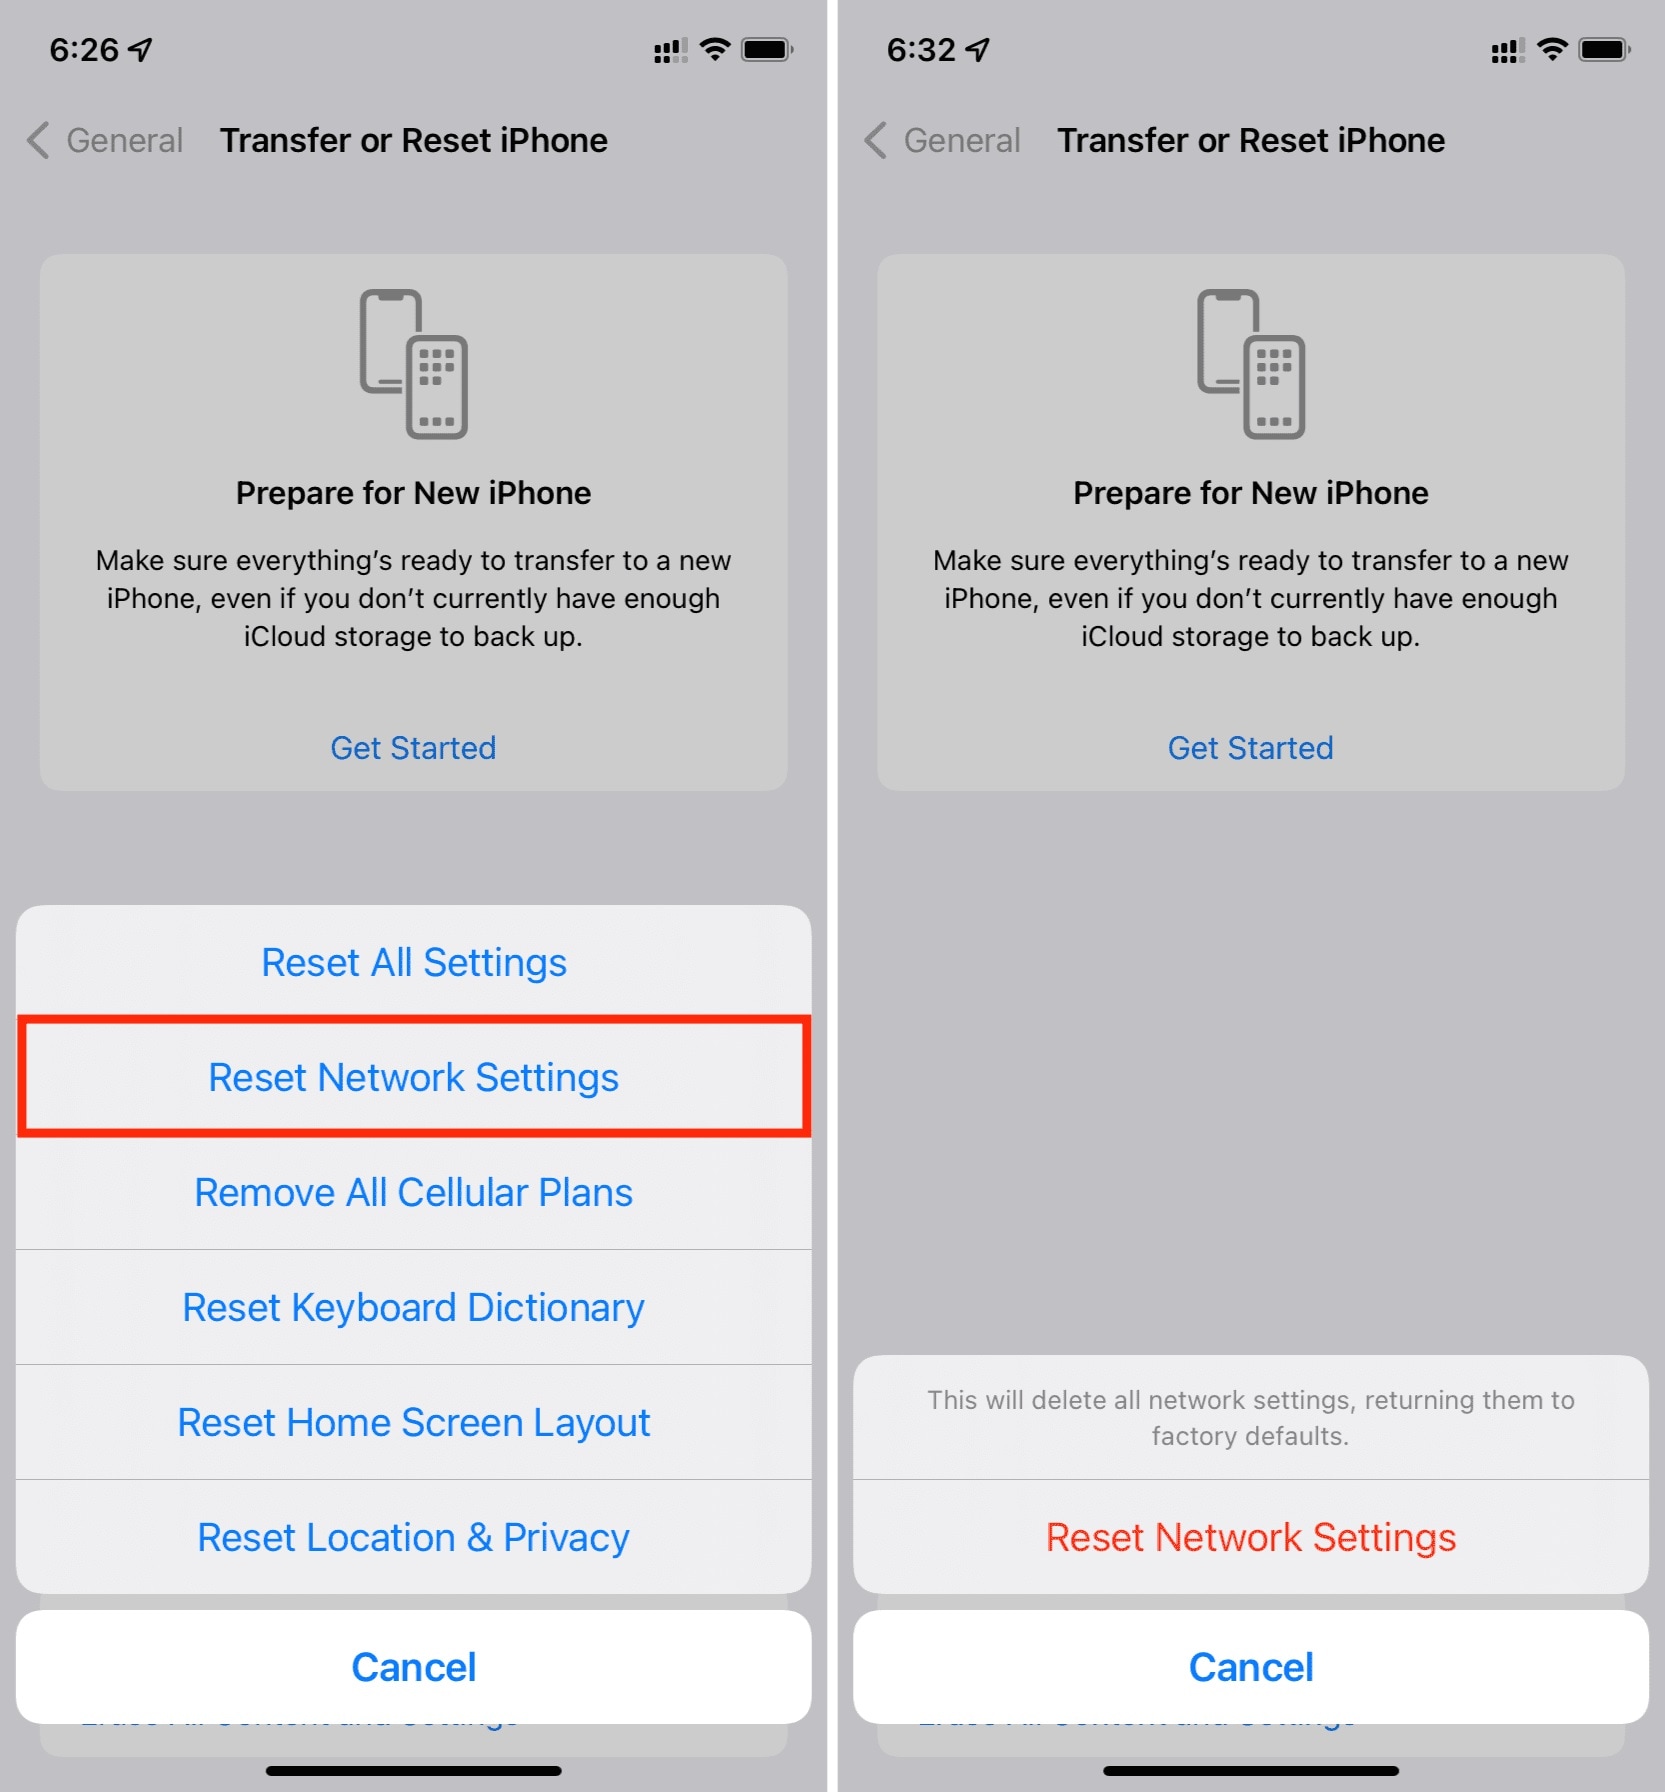
- On iPhone/iPad: Open Settings > General > Transfer or Reset iPhone/iPad > Reset > Reset Network Settings, enter your passcode if prompted, and confirm the network reset. Earlier iOS versions place Reset directly under General.
Reconnect to your trusted Wi-Fi network, check Bluetooth and Handoff are on, and repeat the same two-way Safari test. If Wi-Fi itself still fails on multiple networks, contact Apple or your network administrator rather than repeatedly resetting the device.
Method 5. Check Apple Watch Handoff; Re-pair Only If Needed
Skip this method if the problem is between an iPhone, iPad, and Mac and no Watch activity is involved. On the paired iPhone, open Watch > General > Enable Handoff. Start a supported task on the Watch and look for it on the receiving iPhone, iPad, or Mac. Ordinary Watch app-task Handoff is from the Watch to those devices, not from a Mac app to the Watch.
If only the Watch continues to fail after restarting and updating the paired devices, consider further help from Apple before unpairing. Unpairing erases the Watch and restores factory settings. Back up the paired iPhone and make sure important Watch information has synced. Have your Apple Account password and Watch passcode available. For a Watch you will pair again, keep its cellular plan when prompted.
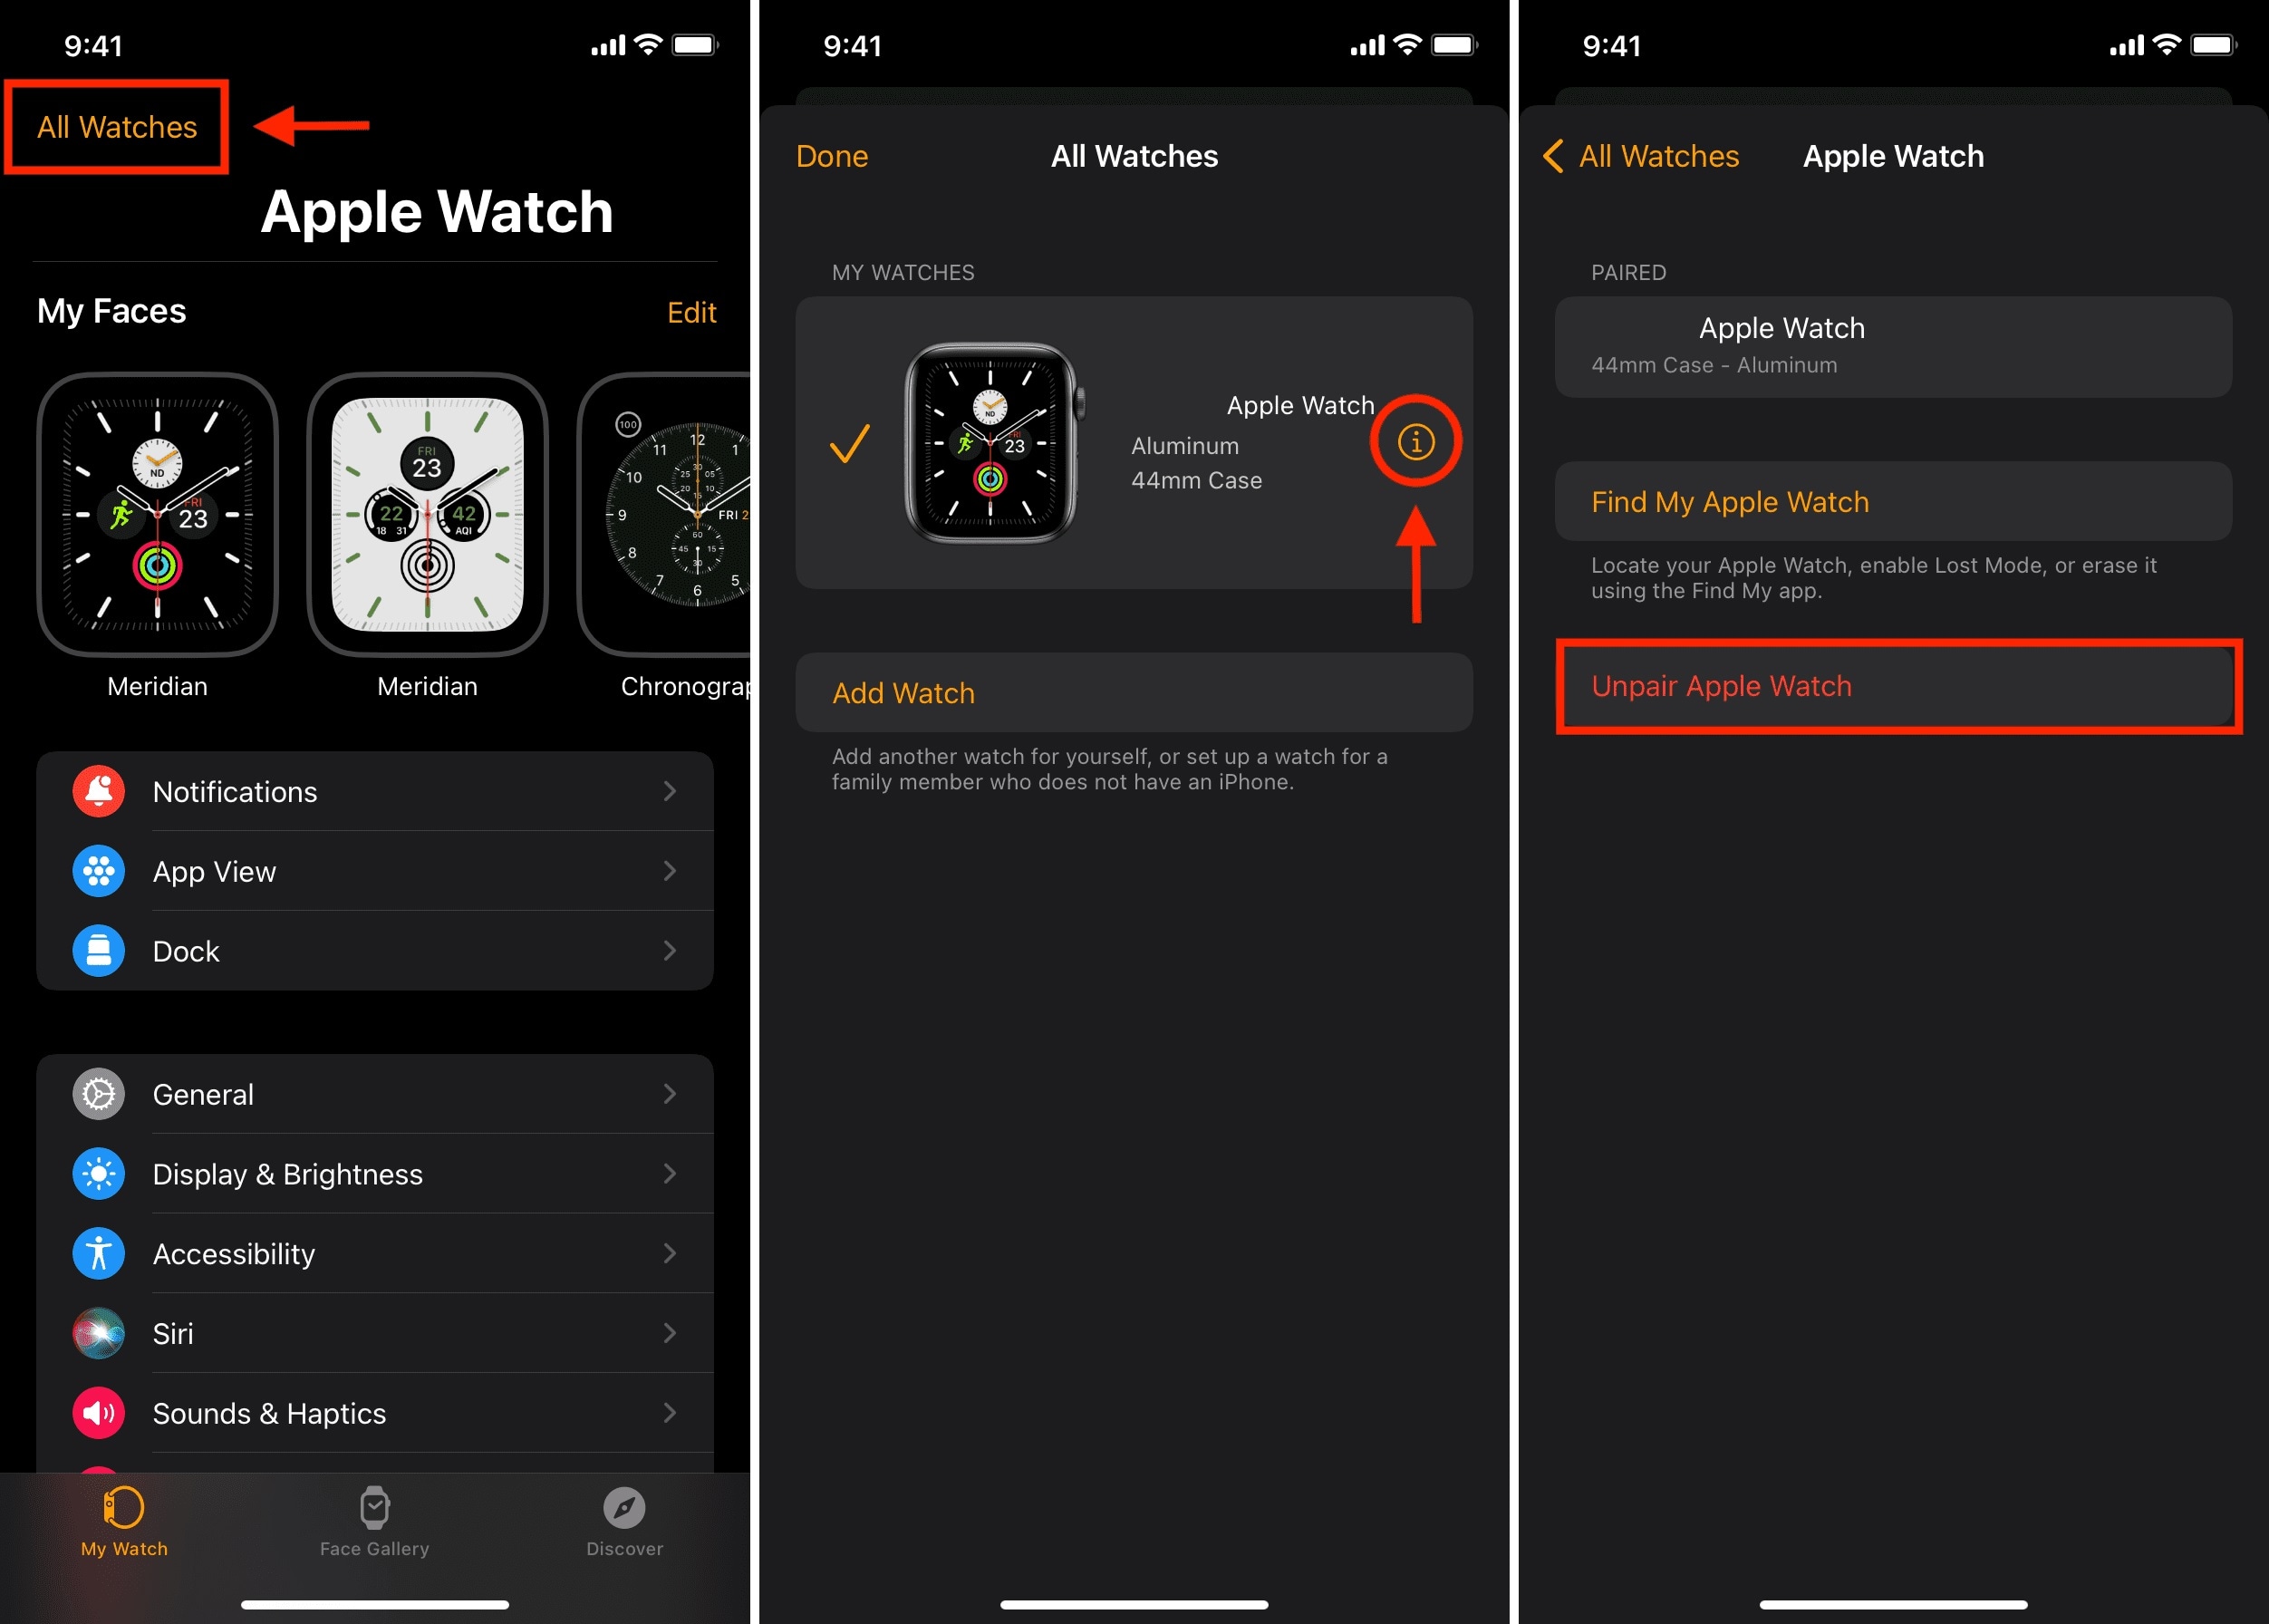
- Step 1: Keep the Watch and paired iPhone close. Open Watch > My Watch > All Watches on the iPhone, tap the info button beside the Watch, and choose Unpair Apple Watch. Confirm the Watch name, keep the cellular plan if re-pairing, and enter the Apple Account password to disable Activation Lock and finish unpairing.
- Step 2: Pair and set up the Watch again with the iPhone, following the onscreen setup and available backup-restore choices. Re-enable Handoff and retest a supported Watch activity. Erasing from the Watch alone is different: it does not remove Activation Lock.
If Handoff alone still fails, record the devices, software versions, app, direction, and exact result for Apple support. If an iPhone or iPad also has a persistent system fault, such as a boot loop or failed update, Dr.Fone - System Repair (iOS) provides a guided software-repair path described below. If you suspect a hardware fault, contact Apple for diagnostics and service; hardware diagnosis is not the same as repairing firmware.
Part III. Professional Choice: Wondershare Dr.Fone System Repair
When an iPhone or iPad has a supported software fault as well as a Handoff problem, Wondershare Dr.Fone System Repair offers guided firmware repair. It addresses issues such as a boot loop, a device stuck in recovery mode, or a failed iOS update. Standard Repair is designed to preserve personal data while repairing supported system issues.
Choose the path that matches the symptom: Try available Apple software updates and the Handoff tests first. For a persistent supported iPhone/iPad system fault, the Dr.Fone workflow below keeps mode selection, firmware preparation, and repair progress in one place. For a Mac-only failure, an account restriction, or suspected wireless hardware damage, use Apple support or your administrator; this iOS repair workflow does not repair the Mac, change account permissions, or replace hardware service. Failure of Handoff alone does not establish a firmware fault.

Dr.Fone - System Repair (iOS)
Guided iOS System Repair With Data-Preserving Standard Repair.
- Use Standard Repair's data-preserving design for supported iOS system faults.
- Repair supported problems such as being stuck in recovery mode, a white screen, a black screen, or a startup loop.
- Follow guided device detection and firmware preparation instead of assembling the workflow yourself.
- Track the repair's progress and completion before checking device operation again.
For a supported system fault, these features make the repair process easier to follow. They are not a guarantee that every Handoff failure will be fixed.
- Address the underlying system symptom. The product covers 150+ iOS system issues, including supported boot and update problems. For a problem limited to app crashes, identify the affected app and try its own troubleshooting before a system-level repair.
- Prioritize keeping personal data. Standard Repair is the data-preserving mode, so you can start with the workflow designed to retain your content instead of immediately choosing an erasing repair. If your device also reports iPhone error 4013, use that error-specific guidance to distinguish the next steps.
- Follow one guided process. Device selection, compatible firmware download, verification, and visible repair progress reduce the need to piece together separate firmware instructions.
Part IV. How To Repair a Supported iOS Fault With Dr.Fone
Use this workflow for a supported iPhone or iPad system fault identified in Part III. Install Dr.Fone on a compatible Windows or Mac computer and prepare a reliable USB cable, a stable internet connection, and a backup where possible. The current product includes iOS 27 and iPhone 18 series support; the exact device and firmware must be eligible for the selected repair. Interface details can differ between Windows and Mac.
Before choosing a repair mode: Standard Repair is designed to retain data, not a guarantee of data preservation or repair success. Advanced Repair erases device data. Full system repair may require a paid license. The firmware offered depends on the device; repair can change the installed iOS version. Upgrade or downgrade availability is not universal, and the Guide warns that jailbroken or previously unlocked devices can lose those modifications.
- Step 1: Open the iOS repair workflow. Launch Dr.Fone, open Toolbox > System Repair, and connect the device by USB. Choose iPhone for the iOS device route, then select iOS Repair.
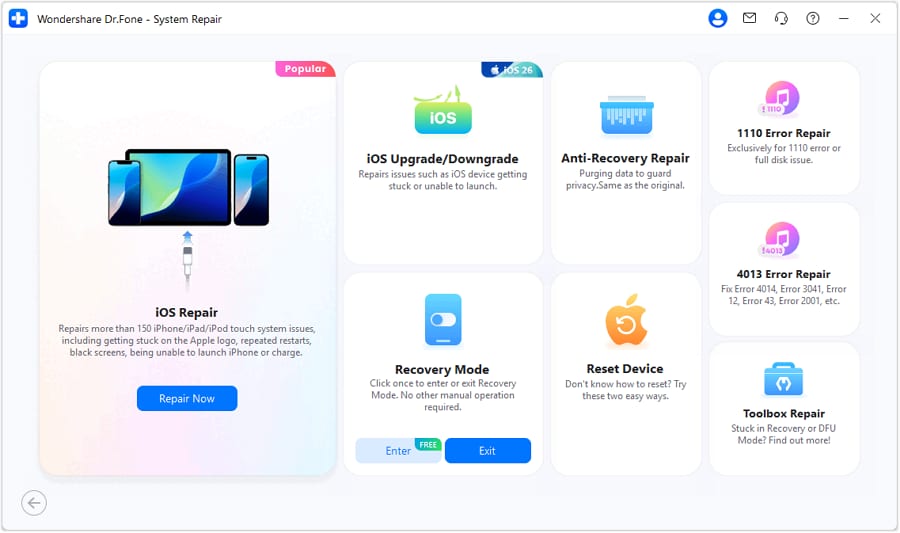
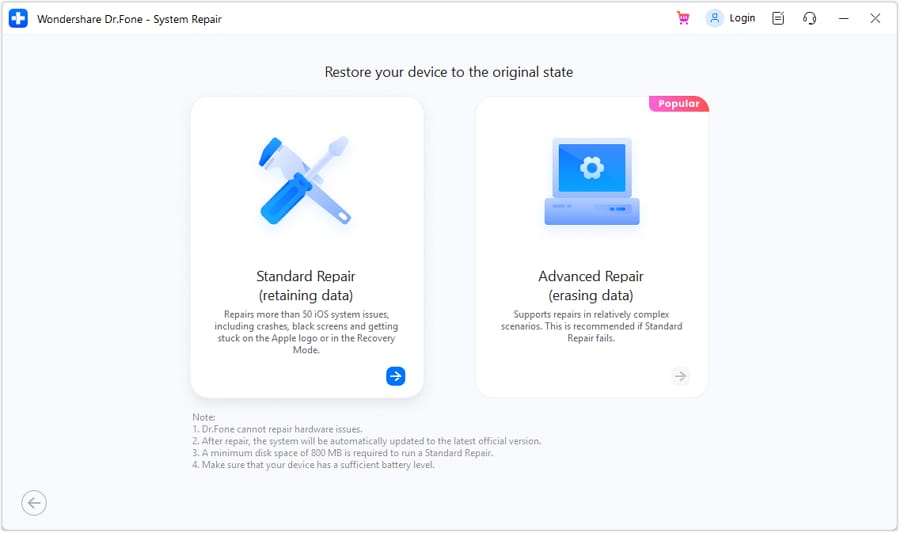
- Step 2: Choose Standard Repair and prepare the device. Select Standard Repair. Follow the displayed instructions to put the device in recovery mode; use Guide if it is unresponsive, then continue with Enter Recovery Mode when prompted.
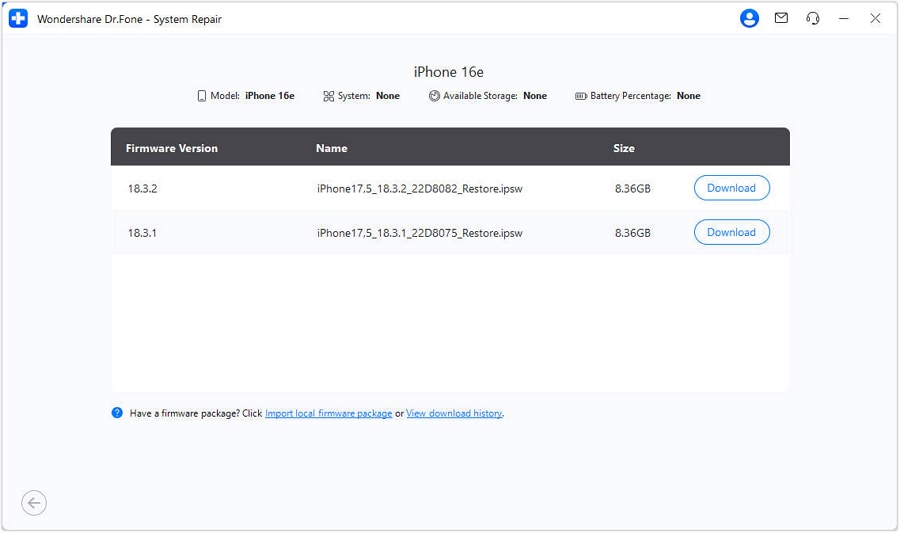
- Step 3: Download and verify compatible firmware. Review the detected device and firmware choices. Click Download for an eligible package and wait for downloading and verification to finish before proceeding.
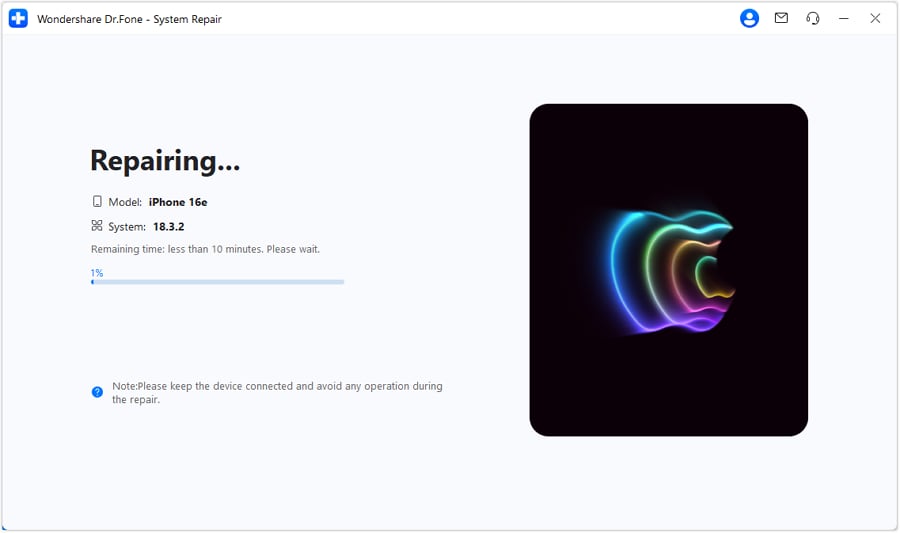
- Step 4: Complete repair and retest. Click Repair Now when the firmware is ready. Keep the device connected while repair runs. At the completion screen, choose Done, check that the original system symptom is resolved, and repeat the two-way Handoff test. If Handoff alone still fails, return to its app/account checks rather than assuming another firmware repair is needed.
Related Articles:
Conclusion
When Handoff is not working between iPhone and Mac, first verify the account and wireless settings, then test Safari in both directions. For an iPad, check its Dock rather than looking for the iPhone App Switcher banner. A successful page test helps you separate a general Handoff problem from a single app or clipboard issue.
If only FaceTime fails, use its version, contact-information, and Switch-control checks. Keep account sign-out, network reset, and Watch unpairing conditional. For a separate supported iPhone/iPad software fault, Dr.Fone - System Repair (iOS) offers guided repair with a Standard Repair mode designed to preserve personal data.
If the same task still fails after these checks, give Apple support the exact device pair, OS versions, app, direction, and result. Those details are more useful than repeating increasingly disruptive resets.
4,624,541 people have downloaded it
 safe & secure
FAQs
 Q1. Why is Handoff not working between my iPhone and Mac?Q2. Why is FaceTime Handoff not working or not showing up?
FaceTime Handoff not working can have call-specific causes even when Safari Handoff works. Moving an active call requires iOS 16 or later, iPadOS 16 or later, or macOS Ventura 13 or later on the participating devices, with Handoff enabled, Wi-Fi and Bluetooth on, and the same Apple Account.
Match the contact information: On a current iPhone or iPad, open Settings > Apps > FaceTime (or Settings > FaceTime on older versions). On Mac, open FaceTime > Settings. Check that the selected phone number or email address used for FaceTime calls matches on the devices. Being signed in to the same account alone is not the whole check.
- Keep the FaceTime call active and bring the other device nearby. On the receiving iPhone or iPad, tap Move Call to This [device] when offered. If the notification is absent, use the FaceTime/video call control at the top of the screen instead.
- Choose Switch or Join as offered, then confirm in the FaceTime window. On a receiving Mac, click Move Call to This Mac, or use the FaceTime call control in the menu bar and choose Switch, then confirm Switch in FaceTime.
- Confirm that the ongoing call has moved to the new device; on the original device, a banner can offer Switch to bring it back. The same receiving-device controls apply when moving a call from Mac to iPhone or iPad, or from iPad to iPhone.
If neither the notification nor the alternate control appears, recheck the software versions and matching FaceTime contact selections, restart/update both devices, and test again. Do not select an arbitrary contact to place a new call: that is not transferring the active call. If the problem persists while Safari works, report it as FaceTime-specific rather than erasing a Watch or repairing a Mac with an iOS tool.
Q3. What should I do if Handoff is not working on my Mac or iPad?Q4. How can I fix Handoff if basic troubleshooting does not work?


iPhone Issues
- iPhone Storage Full
- 1. Stuck on Apple Logo Storage Full
- 2. Erase Content Settings not Working
- 3. iPhone Lagging
- 4. iPhone Running Slow
- iPhone Update Problems
- 1. Stuck on Updating iCloud Settings
- 2. iPhone Frozen During iOS Update
- 3. iPhone Checking for Update Stuck
- 4. iPhone Cellular Update Failed
- 5. iPhone Software Update Failed
- 6. iPhone Stuck on Update Requested
- 7. iPhone Update Error 1110
- 8. iPhone is Findable and Won’t Turn On
- 9. iPhone Won't Update
- 10. Update Server Couldn't Be Contacted
- 8. iPhone & iPad Security Updates
- 9. Update iPhone with/without iTunes
- 10. Can't Download or Update Apps
- iPhone Media Problems
- 1. Apple Music Song Not Available
- 2. iPhone Not Ringing
- 3. iPhone Echo Problem
- 4. iPhone Ringer Problems
- 5. iPhone Plays Music by Itself
- 6. Ringer Volume Changes by Itself
- 7. Music Won't Play on iPhone
- 8. Blurry Photos & Videos on iPhone
- 9. iPhone Volume Problems
- iPhone Sound Problems
- 1. YouTube no Sound
- 2. iPhone Microphone Problem
- 3. Test iPhone Microphone
- 4. Headphones No Sound from iPhone
- 5. No Sound on iPhone Game
- 6. iPhone Sound Not Working
- 7. iPhone Screen Recording no Sound
- iPhone Calling Problems
- 1. iPhone No Sound on Calls
- 2. Screen Goes Black During Call
- 3. iPhone Recent Calls Not Showing
- 4. iPhone Dropping Calls Issue
- 5. iPhone Calling Problem
- iPhone Camera Problems
- 1. iPhone Camera Black
- 2. iPhone Camera Blurry
- 3. iPhone Camera Not Working
- 4. iPhone Front Camera Not Working
- 5. TrueDepth Camera Not Working
- 6.Out-of-Focus Photos on iPhone 15
- iPhone Network Problems
- 1. Airpods Won't Connect to iPhone
- 2. iPhone Disabled Connect to iTunes
- 3. iPhone Not Syncing Problems
- 4. iPhone Internet Not Working
- 5. iPhone Keep Disconnecting from Wifi
- 6. iPhone WIFI Not Working
- 7. PC Not Recognizing iPhone
- 8. iPhone Stuck on Connect to iTunes
- 9. iPhone Not Showing up in iTunes
- 10. iTunes Not Detecting Your iPhone
- 11. iPhone Bluetooth Disconnect
- 12.Apple CarPlay Keeps Disconnecting
- iPhone Screen Problems
- 1. White Spots in iPhone Screen
- 2. iPhone Bleeding Screen
- 3. Turn Off iPhone When Frozen
- 4. Fix Orange Dot on iPhone
- 5. iPhone Green Screen Flickering
- 6. Green Lines in iPhone Screen
- Other iPhone Problems
- ● Manage/transfer/recover data
- ● Unlock screen/activate/FRP lock
- ● Fix most iOS and Android issues
- Free Download Free Download Free Download



Daisy Raines
staff Editor
Generally rated4.5(105participated)