
Is Your iPhone Stuck on iOS 18/17 Update Requested? Let's Fix it!
Aug 27, 2025 • Filed to: Phone Repair Solutions • Proven solutions
Is your iPhone stuck on the "Update Requested" screen? You're not alone, and the good news is, there’s a fix. Updating your device is essential for security, performance, and accessing new features, but hiccups like this can be frustrating.
When your phone gets stuck during the update process, it can feel like you’re stuck in a loop with no clear way out. Luckily, we’ve got you covered with simple and effective solutions to fix iPhone stuck on iOS 18 update requested.
Keep reading for easy steps to get your iPhone back on track without the stress. Whether you're updating to enjoy the latest features or resolving bugs, these tips will help you handle the problem smoothly.
What is the Updated Requested on Your iPhone?
When your iPhone is stuck on the 'iPhone Update Requested' screen, updates are available for your device, but the phone cannot install them. This problem could be due to several reasons, such as insufficient storage space, low battery, or corrupted files.
The good news is that you can check what kind of update is available and decide if you want to proceed with it.
- To do this, go to the Settings app on your iPhone and select "General"
- Then "Software Update".
- You should see a list of available updates, along with information about the type of update (e.g., security patch or feature upgrade).
- Once you know what kind of update it is, you can decide if you want to proceed.
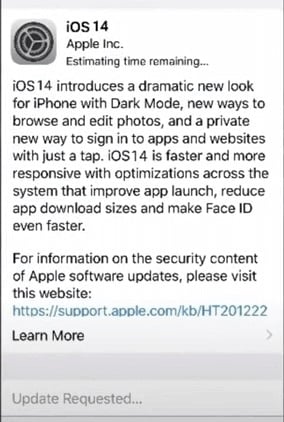
While some people may choose not to install the update, we recommend doing so whenever possible. Because updates often contain important bug fixes and security patches that protect your device from malicious attacks.
How to Fix iPhone Stuck on Update Requested?
Now that you know what type of update is available, we can move on to the next step in fixing your iPhone stuck on "Update Requested". Here are a few methods to try:
1. Force restart your iPhone
A force restart is the first step to try when dealing with this issue. This solution will stop and restart all processes running on the device, which can sometimes be enough to get past the "Update Requested" screen.
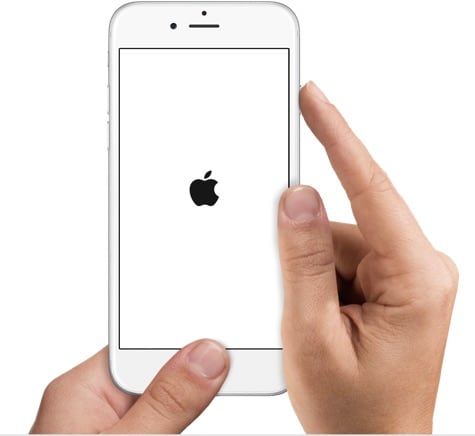
For iPhone 6 or earlier:
- To do this, press and hold the Home button and the Wake/ Sleep (power) button simultaneously for about 10 seconds until you see the Apple logo.
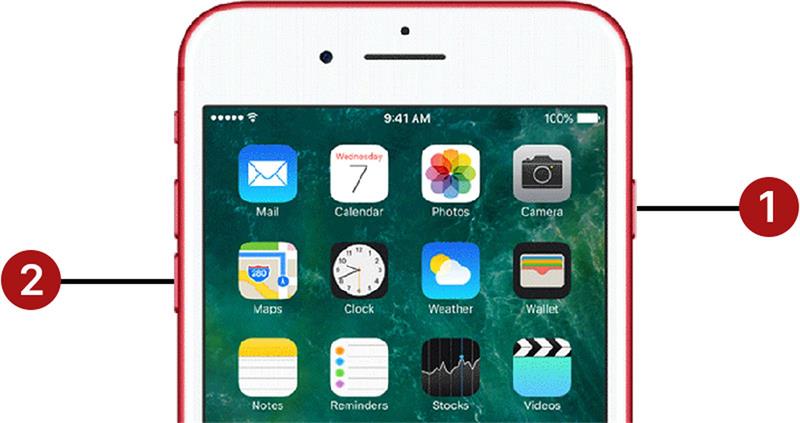
For iPhone 7:
- To force restart iPhone 7, please keep pressing the Power and Volume Down buttons and wait for the Apple logo.
For iPhone 8 or later
- Please hold the Volume Up and Volume Down buttons.
- And press the Power button.
- Then wait until the Apple logo shows up
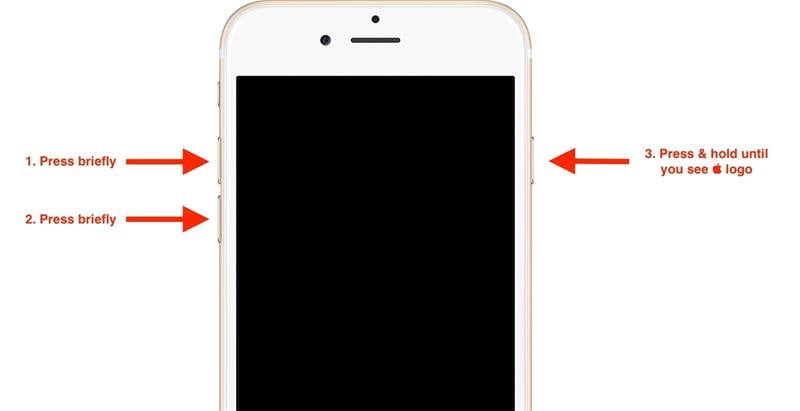
Force restart should do the trick, and your phone should work again. Because of the restart, you may need to enter your passcode and re-enter some of your information, like Wi-Fi passwords. And you should be all set!
2. Charge your iPhone
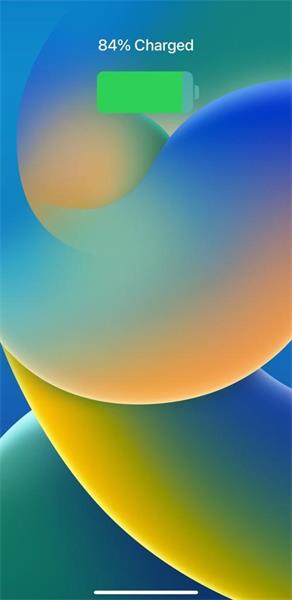
If a force restart doesn't work, try charging your device first because the battery is too low to continue with the update. Usually, a phone needs at least a 50% charge to perform updates.
Plug in your device and let it charge for at least an hour before trying to update again. This way should work and allow you to continue the update process without issues. When it's finished charging, try the update again, which should work this time.
Also, keep your device plugged in during the update process. And your phone doesn't lose power and get stuck in the same situation again. Otherwise, it could get stuck in a loop of trying to update but never succeeding. And we don't want that!
3. Check your network status
If both methods didn't work, try to check your network status. This could be because there is an issue with your internet connection or the Apple servers are overloaded.
- To do this, open the Settings app and select "General".
- Then tap "About" and check for any network errors.
- If there are any, try resetting your network settings by going to the "Reset" tab in the same menu.
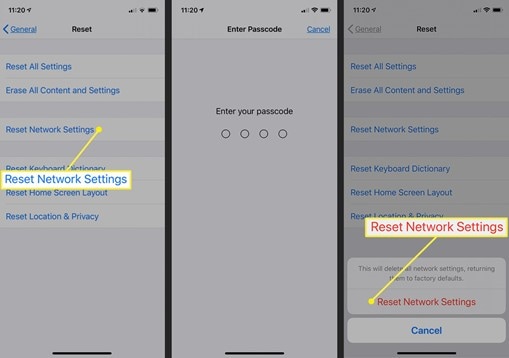
This should help fix any issues related to your internet connection and allow you to continue with the update process. After this step, your Wi-Fi passwords and other information will need to be re-entered. And finally, try the update again.
4. Delete software update
If none of these methods worked, then try deleting the software update. With this method, a corrupted file prevents the installation from taking place.
- To do this, go to "Settings" and select "General"
- Then select "iPhone Storage"
- Tap the iOS version
- Select "Delete Update"
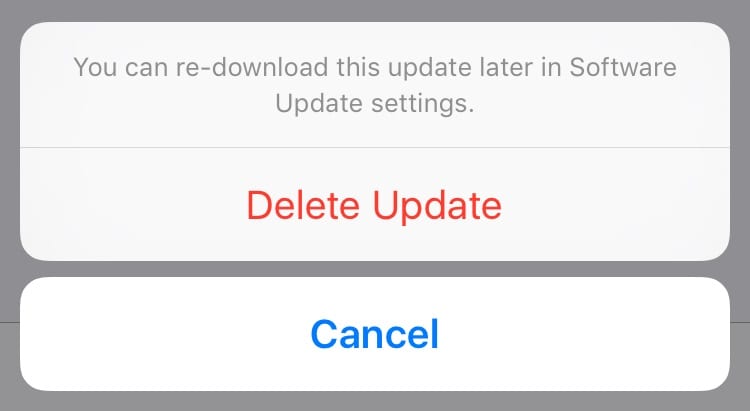
You should see a list of apps and software updates that are taking up storage space on your device. Scroll down to the "Software Update" section and delete any available updates. After deleting the update, try downloading it again by going to "General" and then freeing up your iPhone storage
5. Free up your iPhone storage
Too little storage space on your device can sometimes cause the "Update Requested" screen to appear. Downloading the new iOS version requires some free storage.
- To check how much space you have, go to the Settings app and select "General" then "Storage & iCloud Usage".
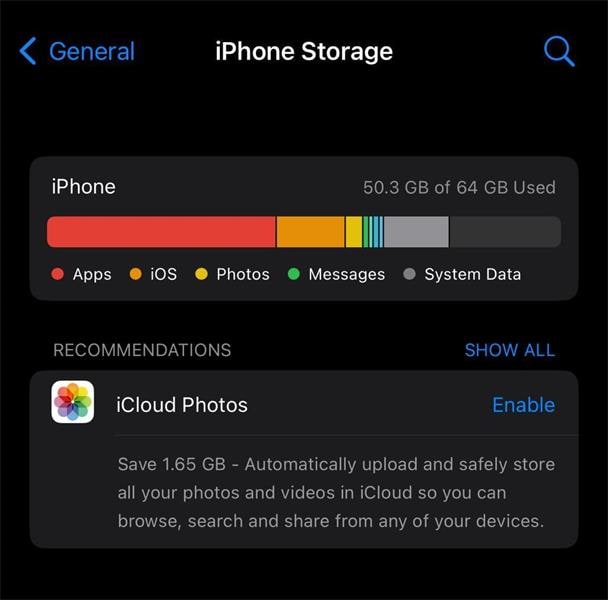
You should see a list of apps and how much space they are taking up. Try deleting any unnecessary apps or files to free up some storage space. More storage should help resolve the issue and allow you to update your iPhone without problems.
6. Update with iTunes
If none of these methods worked, try updating with iTunes on a computer instead. Because a corrupted file prevents the installation from taking place. To do this, ensure you have your computer's latest version of iTunes.
- Connect your iPhone to the computer and open iTunes.
- Select your device from the list and click "Check for Update" to check for useful updates.
- If an update is available, click "Download and Update" to start the installation process.
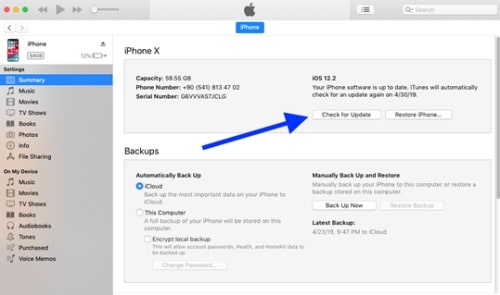
Follow the instructions to complete the update process. However, remember that this process will erase any data on your device, so make sure to back up your data before continuing.
7. Dr.Fone-System Repair
If all else fails, you can rely on Dr.Fone - System Repair (iOS) to fix the "Update Requested" issue effortlessly. This powerful tool is a top-rated iOS downgrade software designed to help you tackle various system problems with ease. Whether your iPhone is stuck during an update or facing other system errors, Dr.Fone has you covered.
Dr.Fone - System Repair not only allows you to downgrade iOS securely, but it also supports upgrading to iOS 26 Beta and iOS 18 without jailbreaking or risking your data. Its simple interface makes it easy for anyone to use, even without technical skills. Just connect your device, follow the instructions, and you'll be back to normal in no time.
Remember to carefully read the on-screen steps while using this powerful tool. Take control of your iPhone’s software smoothly and stress-free!
Dr.Fone - System Repair (iOS)
Fix your iPhone problems without data loss!
- Fix iOS issues in a few clicks without any data loss
- Troubleshoot and repair a variety of iPhone errors
- Enjoy a safe, reliable, and seamless experience
- Work for all models of iPhone, iPad, and iPod touch
Download and install Dr.Fone on your computer, then connect your device and open the tool. Follow these steps to complete the repair:
Step #1: You'll find the option "System Repair" on the homepage of Wondershare Dr.Fone - System Repair (iOS) once you've launched it.

Step #2: Confirm your device type as iOS and proceed by clicking "iOS Repair."

Step #3: One of the two options you should choose is "Standard Repair."

Step #4: Follow the on-screen steps to enter Recovery Mode. The tool will detect your device and switch it to Recovery Mode automatically.

Step #5: Download the necessary firmware, wait for the verification, and allow Dr.Fone to repair your device. Within minutes, your iPhone will be back to normal.


Dr.Fone - System Repair offers a seamless solution to resolve the "Update Requested" issue and other iOS problems efficiently!
The Bottom Line
Being stuck on the "Update Requested iPhone" screen can be frustrating, but don’t worry – there are effective ways to fix it. From simple methods to more reliable solutions, resolving this issue can be easier than you think. If you’re looking for a hassle-free option, try Dr.Fone - System Repair (iOS). This powerful yet easy-to-use tool quickly repairs system-related problems without risking your data. Plus, it ensures a safe update process. Take charge of your iPhone today and get back to enjoying its full potential!
Upgrade & Downgrade
- iOS Beta Install
- 1. Download iOS Beta Profile
- 2. Download the iOS 13 Beta
- 3. iOS 16 Beta Download
- 4. Uninstall iOS Beta
- 5. Install iPhone Beta Profile
- 6. Install Mac Beta Profile
- 7. Install iOS 15 Beta Profile
- 8. Upgrade iPad to iOS 14
- iOS News
- 1. Update iPhone 4s to iOS 9
- 2. Cheaper iPhone
- 3. Customize iPhone Home Screen
- 4. Know About iOS 15 Lock Screen
- 5. Add Lyrics to Song on Apple Music
- 6. Current iOS Version
- 7. Current iOS for iPad
- 8. iOS 19 and the iOS 26 Rumor
- iPhone Downgrade Tips
- 1. Downgrade iOS Like a Pro
- 2. Roll Back to an Older iOS Version
- 3. Downgrade to iOS 15
- 4. Install Developer Profile
- 5. Downgrade iOS without iTunes
- 6. Downgrade to iOS 14
- 7. Download and Install the iOS 16
- iPhone Update Tips
- 1. iPhone & iPad Security Updates
- 2. Undo an Update on iPhone
- 3. Update iPhone with/without iTunes
- 4. Fix iPhone Checking for Update Stuck
- 5. Fix iPad Software Update Failed
- 6. Fix iPhone Stuck On Update
- 7. Fix iPhone Won't Update
- 8. Fix Update Server Not Be Contacted
- 9. Fix iPhone Stuck on Update Requested
- 10. Resolve iPhone Cellular
- 11. Resolve iPhone Error 1110
- 12. Fix iPhone Frozen
- iOS 11/12 Problems
- 1. Fix iPhone Stuck on Waiting
- 2. Fix iPhone Can't Make Calls
- 3. Fix iPhone Stuck on Logo
- 4. Fix Photos Disappeared from iPhone
- 5. Fix iPhone Keeps Freezing
- iOS 13/14 Problems
- 1. Fix CarPlay Not Connecting
- 2. Fix Resolve Apps Won't Open
- 3. Fix Song/Playlist Missing
- 4. Fix iPhone Asking for Passcode
- 5. Fix Map Voice Navigation Won't Work
- 6. Fix iMessage Not Working
- 7. Recover Deleted Data on iOS 14
- 8. Recover Disappeared Notes on iOS 14
- iOS 15 Problems
- iOS 16 Problems
- 1. Fix iPhone Wi-Fi Not Working
- 2. Fix iOS 16 Battery Drain Issues
- 3. Fix Screen Mirroring Not Working
- 4. Fix Apple CarPlay is Not Supported
- 5. Fix iPhone Screen Not Responding
- 6. Fix iPhone Apps Keep Crashing
- 7. Fix Call Failed iPhone Issue
- 8. Fix iPhone Stuck On Apple Logo
- 9. Counter iPhone Heating Problems
- 10. Fix iPhone Stuck in Boot Loop
- 11. Fix iPhone Bluetooth Not Working
- iOS 17 Problems
- 1. iPhone Freezing After Update
- 2. iOS 17 Wallpapers Blurry at Top
- 3. Fix iPhone Charging Slow
- 4. Enable Live Activities iOS 17
- 5. Fix iOS 17 Apps Crashing
- 6. Fix iPhone Stuck on Verifying Update
- 7. Overheating after 17 Update
- 8. Fix iOS 17 Keyboard Bug
- 9. Fix iOS 17 Green Screen Issue
- 10. iOS 17 Bugs & Fixes
- 11. No iOS 17 Update on Your iPhone
- 12. iOS 17 Unable to Download
- 13. Missing contacts with iOS 17 update
- iOS 18 Problems
- 1. iOS 18 Black Screen
- 2. iPadOS 18 Math Notes Issues
- 3. iPhone Email Not Working
- 4. iPhone Contacts Disappeared
- 5. iPhone Stuck in Restore Mode
- 6. iPhone Stuck on Preparing Update
- 7. iPhone Flashlight Not Working
- 8. iPhone Bluetooth Issues
- 9. Stuck on Terms and Conditions
- 10. Frozen iPhone iOS 18
- 11. iOS 18 Beta Boot Loop Issue
- 12. iOS 18 Beta Overheating
- 13. iOS 18 Beta Volume Bug
- iOS 26 Topics


Daisy Raines
staff Editor
Generally rated4.5(105participated)