Ultimate Guide to Downloading Photos from iPhone
Jul 12, 2024 • Filed to: Manage Device Data • Proven solutions
People may need to transfer the photos in their iPhone to their PC or Mac for various reasons. They may want to create a backup of photos present in their iPhone on their computer. So they can avoid losing them on account of their device getting lost or damaged.
They want to save photos from their iPhone to PC to create more free space in their iPhone.
Thirdly, they have purchased a new iPhone 5 C and don’t need the old iPhone any more. So they want to take out the photos from the iPhone to save them on computer.
Users may face difficulty while trying to download photos from their iPhone for transferring them to their computer. To help them import photos from iPhone to their computer in an easy and hassle free manner, we are sharing various ways and tools along with the involved steps which they can use for transferring their photos.
- Solution 1. How to Download photos from iPhone to PC using AutoPlay
- Solution 2. Download pictures from iPhone to Windows 10 via Windows Photos App
- Solution 3. Import photos from iPhone to computer using iCloud
- Solution 4. How to Download photos from iPhone to Mac with Preview
- Solution 5. Transfer photos from iPhone to computer using Dr.Fone
Solution 1. How to Download photos from iPhone to PC using AutoPlay
AutoPlay is a useful feature contained in Windows 98. It checks out the newly discovered removable media and devices on the basis of content like pictures, video or music files and launches a suitable application to play or show the content.
These steps will help users know how to download photos from iPhone for transferring them to their PC through AutoPlay:
After they connect their iPhone to PC with a USB cable, they can find a pop-up Windows of AutoPlay. Through it, they can copy their photos, videos and music from their iPhone to PC.
They will find these steps about how to import photos from iPhone useful for easily transferring their photos to their computer.
Step 1. Click on the “Start Menu”. Then go to “Control Panel” and choose the “Search for AutoPlay” option. Then select “AutoPlay.” Turn on “Use AutoPlay for all media and devices” for enabling AutoPlay on your PC.
Step 2. Connect iPhone to PC. After finding the new device plugin at the bottom of the new pop-up windows, click on it for opening the AutoPlay windows.
Step 3. Choose the “Import photos and videos” option. Now click on the “Import Settings” link. In the window, change the folder to which your Camera Roll’s photos will get imported through the “Browse” option.
Step 4. After setting up the import option, click on the Import button for importing photos from your iPhone to PC.
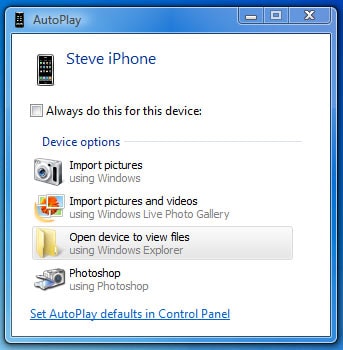
These steps about how to transfer photos from iPhone will let users import them easily and effortlessly.
Solution 2. Download pictures from iPhone to Windows 10 via Windows Photos App
Windows Photos app provides another easy and fast way of transferring photos in bulk from an iPhone to Windows 10.
These are the steps for how to download photos from iPhone with Windows Photos App.
Step 1. Connect your iPhone to the Windows 10 PC with a USB cable.
Step 2. Go to the Start menu in Windows and select the Photos app. If you do not find the app in the Start menu, use the search bar and type “Photos.”
Step 3. As Photos in Windows opens, click on the Import button on the upper right corner.
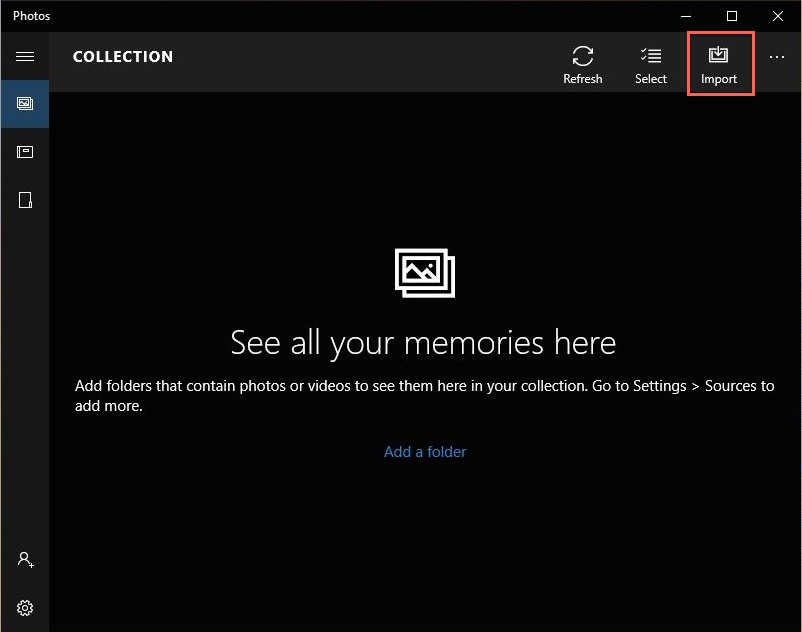
Step 4. Choose the pictures for importing to Windows 10. Then click on the “Import” button.
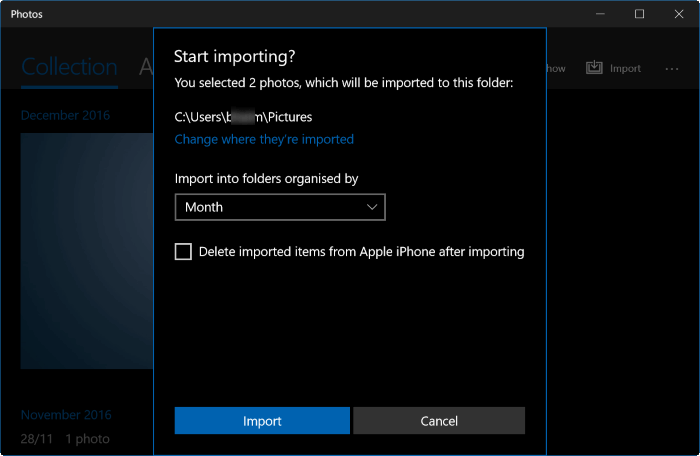
These steps about how to transfer photos from iPhone with Windows Photos App will let people import their photos with ease.
Solution 3. Import photos from iPhone to computer using iCloud
iCloud is a cloud storage and cloud computing service which lets users access their photos, videos, notes, documents, contacts, etc.
To import photos from iPhone through iCloud, set up Photo Stream for storing the last 30 days of photos on the iCloud server. Stored photos get automatically downloaded to all devices of a user which he has set up for using the Photo Stream.
Here are the steps for how to import photos from iPhone:
Step 1.Tap on the “Settings” app on iPhone device.
Step 2. Choose “iCloud” and then select “Photo Stream.”
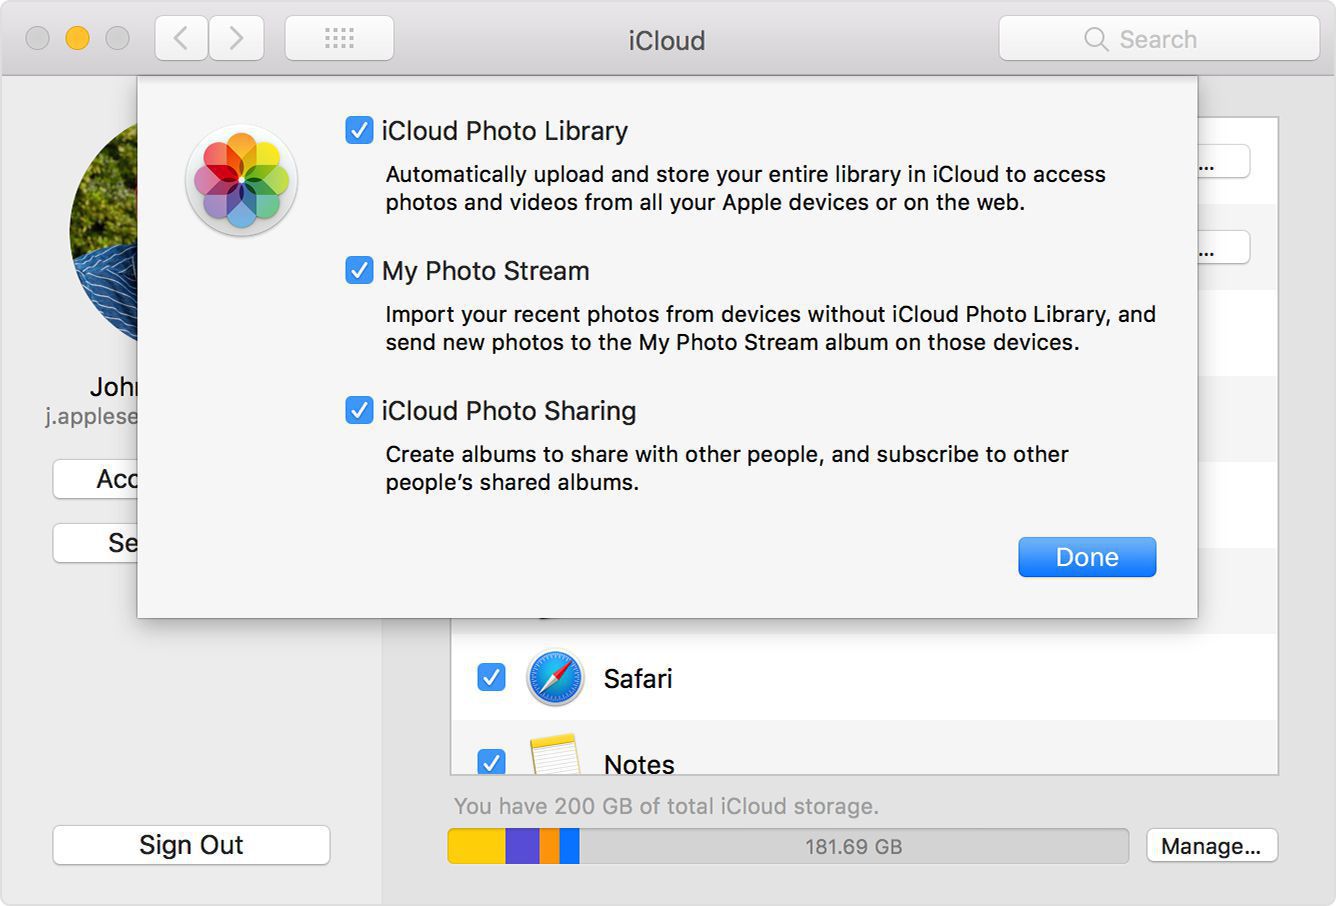
Step 3. Set the “Photo Stream” toggle switch in the “On” position.
Step 4. Access the iCloud Control Panel download page on the Apple Support Website on the Windows computer.
Step 5. Click on the download button and choose “Run.” Accept license terms, then click on “Next” and “Install.”
Step 6. Now check the “Open the iCloud Control Panel” check box and choose the “Finish” button.
Step 7. Fill the “Apple ID” and “Password” fields and click on the “Sign In” option.
Step 8. Choose the check box for “Photo Stream” and then choose the “Apply” button.
Step 9. Now select the “File Manager” on the Windows taskbar. Click on the “Pictures” menu, choose “Photo Stream” and select “My Photo Stream” to see photos synced from your iPhone.
These steps about how to download pictures from iPhone will let people easily transfer photos in their iPhone to their PC.
This next method is about how to download photos from iPhone through an innovative feature, Preview.
Solution 4. How to Download photos from iPhone to Mac with Preview
Preview feature enables fast importing of photos from iPhone device to Mac.
These are the steps for how to download pictures from iPhone.
Step 1.Connect your iPhone device to Mac with the USB cable.
Step 2. Then Launch Preview.
Step 3. Click on the File option on the upper left corner of your screen.
Step 4. Select Import from iPhone.
Step 5. Choose the photos for transferring with the Import or Import All option.
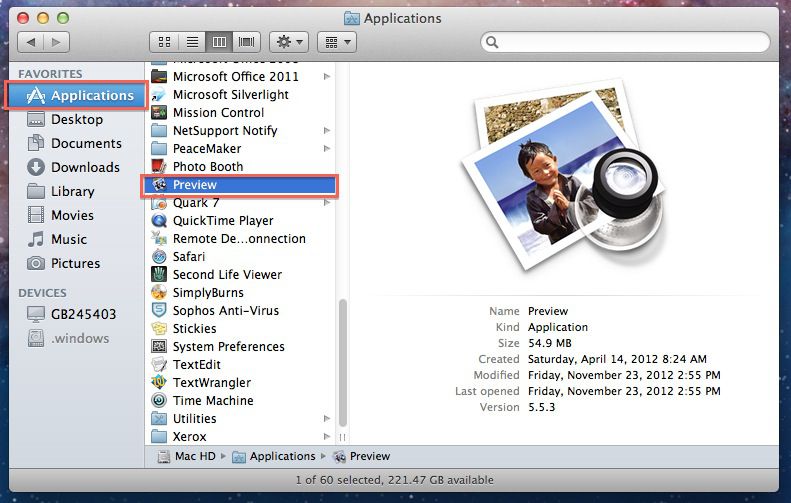
Step 6. Choose a destination for keeping the photos.
These steps will thus help users know how to download pictures from iPhone through the Preview software.
Solution 5. Transfer photos from iPhone to computer using Dr.Fone
The Dr.Fone - Phone Manager (iOS), a software program lets people transfer photos from their iPhone to their Windows or Mac computer with ease.
Dr.Fone - Phone Manager (iOS) holds various advantages over the four iPhone photo transfer solutions mentioned above. It can transfer the files in a more flexible manner. It does not overwrite data on the phone or computer.

Dr.Fone - Phone Manager (iOS)
Effective Solution to Import Photos from iPhone
- Backup your music, photos, videos, contacts, SMS, Apps etc. to computer and restore them easily.
- Transfer music, photos, videos, contacts, messages, etc from one smartphone to another.
- Transfer media files between iOS devices and iTunes.
- Fully compatible with iOS 7, iOS 8, iOS 9, iOS 10, iOS 11 and iPod.
These are the steps for how to transfer photos from iPhone through Dr.Fone - Phone Manager(iOS).
Step 1. Download this software and install it on your computer.

Step 2: Open the software and connect the iPhone device with the computer through the USB cable.
Step 3: The software auto detects your iPhone.
Step 4: Click on the “Transfer Device Photos to PC” option.

Step 5: On the next window, the media from the iPhone storage will open up. Choose photos for transferring.
Step 6: Now click on the “Transfer” button. The transfer of photos will take few seconds.
Step 7: After the transfer, press the “OK” button.
We hope you will find these methods and tools about how to import photos from iPhone useful for transferring photos to your computer in a fast and effortless manner.
iPhone Photos
- Convert HEIC to JPG
- 1. Convert HEIC to JPG on Linux
- 2. Convert HEIC to JPG Windows
- 3. Best HEIC Converter Online
- 4. Convert HEIC to JPG High Quality
- Export iPhone Photos
- 1. Upload iPhone Photos to Google Drive
- 2. Transfer Photo from iPhone to PC
- 3. Transfer Photo from iPhone to iPhone
- 4. Transfer from iPhone to iPhone
- 5. Transfer from iPhone to iPad
- 6. Move iPhone Photo to External Drive
- 7. Transfer from iPhone to Flash Drive
- 8. Extract Photos from iPhone
- 9. Download Photo from iPhone
- Import Photos to iPhone
- 1. Transfer from Laptop to iPhone
- 2. Transfer Photo from Camera to iPhone
- 3. Transfer Photo from Mac to iPhone
- 4. Transfer Photos from PC to iPhone
- 5. Transfer from iPhone to PC
- 6. Transfer from Android to iPhone
- 7. Transfer from Samsung to iPhone
- Manage iPhone Photos
- 1. Back up iPhone Photos
- 2. Get Photos off iPhone
- 3. Send Large Size Photos from iPhone
- 4. Photo/Video Compressor Apps
- 5. Delete Photos from iPhone/iPad
- 6. iPhone Photos Disappeared Suddenly
- 7. iPhone Photoshop Alternatives
- Recover iPhone Photos
- 1. Restore Deleted Photos from iPhone
- 2. Recover Photos from iPod Touch
- 3. Recover Deleted Picture from iPhone
- Transfer iPhone Photos to Mac
- Transfer iPhone Photos to PC
- 1. Transfer Data from iPhone to PC
- 2. Transfer Photo to Computer
- 3. Transfer Photo to PC without iTunes
- 4. Transfer Library to Computer
- 5. Send Photo from iPhone to Computer
- 6. Import Photo from iPhone to Windows
- 7. Transfer Photo to Windows
- Transfer Photos from Google Drive
- 1. Download from Google Drive to iPhone
- 2. Transfer from Google Photo to iPhone
- 3. Download from iCloud to iPhone
- Transfer Photos to Google Drive
- Image Convert Tips
- ● Manage/transfer/recover data
- ● Unlock screen/activate/FRP lock
- ● Fix most iOS and Android issues
- Learn More Learn More


Selena Lee
chief Editor