How To Upload Photos From iPhone to Google Drive?

Jul 12, 2024 • Filed to: Manage Device Data • Proven solutions
Do you own an iPhone and wish to back up your photos to Google Drive? We totally get it. iCloud is great, but you may find Google Drive more convenient than iCloud. For storage purposes, iCloud only provides 5 GB of free storage shared with other Apple products.
On the other hand, Google Drive offers a more generous 15 GB of free storage, but it can also be shared among other Google products. You’d be able to free up a lot of space on your iPhone by saving photos to Google Drive.
Now, let's dive into the process of transferring photos from your iPhone to Google Drive. There are a few ways to do it, but in this article, we have compiled a quick and easy guide on how to upload photos to Google Drive from an iPhone.
Part 1: How To Upload Photos to Google Drive From iPhone
When moving photos from your iPhone to Google Drive, you need to install the Google Drive app on your iPhone and set up a Google account. You can skip the sign-up process if you already have a Google account. From there, it's a pretty straightforward process.
Here are the steps on how to upload a photo from iPhone to Google Drive:
Step 1. Download and install Google Drive.
Search for Google Drive on the App Store. Then, hit "Get" to download and install the app on your iPhone.
Step 2. Set up your Google Drive.
Launch the app once the Google Drive app has been installed on your iPhone. If you already have a Google account, log in with your Google account credentials. If not, create a new one.
Step 3. Tap the “+” button on Google Drive.
Within the Google Drive app, locate the multicolored “+” button. Tap on it to reveal options.
Step 4. Upload the photos to Google Drive.
From the pop-up menu, select “Upload,” and then choose “Photos and Videos.” This action will prompt you to grant Google Drive access to your iPhone photos.
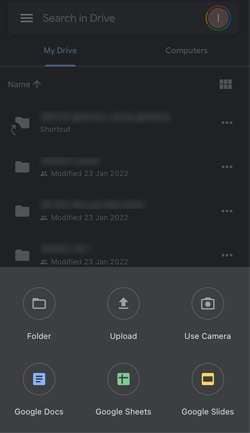
Step 5. Select the photos and videos you want to upload from your iPhone to Google Drive.
Browse through your iPhone’s photo library and select the specific photos and videos you wish to upload. Hold and tap to select multiple photos. Then, tap "Upload" to initiate the process.
Step 6. Upload and wait the process.
Once the photos have been selected, click “Upload” to start the process. Be patient until it's complete—the duration depends on the number and size of files selected.
Part 2: How to Auto Backup iPhone Photos using Google Drive
There’s another method on how to upload iPhone pictures to Google Drive using auto backup. If you enable this feature, you won’t have to manually upload your pictures to Google Drive again, as they will be automatically saved to your drive.
Follow these steps on how to upload photos in Google Drive from an iPhone with auto backup:
Step 1: Sign in to your Google account on Google Drive.
Step 2: Open your Google Drive settings > "Backup & Sync."
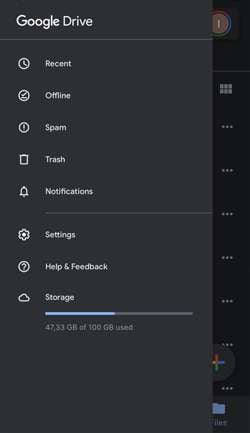
Step 3: Have the "Backup & Sync" toggle turned on.
After completing these steps, it will start uploading your photos to Google Drive. Keep in mind that the duration of this process may vary depending on the number and the size of photos stored on your iPhone.
Part 3: Common Mistakes When Uploading iPhone Photos to Google Drive
Despite applying the mentioned methods, users might face challenges when uploading photos to Google Drive. This section will hopefully answer your questions, such as "Why can't I upload iPhone photos to Google Drive?" or "Why does it keep loading during photo uploads?"
Common mistakes when uploading photos from iPhone to Google Drive:
1. Insufficient storage space
Users often overlook to check their Google Drive storage space before uploading numerous photos. It’s important to note that Google Drive only offers up to 15GB of free available space. The upload might fail or only partially complete if there's insufficient space.
2. Incomplete sync settings
Failing to configure Google Drive sync settings properly can result in incomplete photo uploads. Confirm that sync settings encompass all the desired photos and that the app has the necessary permissions to access your photos.
3. Limited internet connection
Uploading numerous photos requires a stable and relatively fast internet connection. Attempting uploads with a slow or unreliable connection can result in interruptions, errors, or prolonged upload times.
Bonus: How to Transfer iPhone Photos to Your Computer
Now that you have successfully uploaded photos from your iPhone to Google Drive, it's better to be safe and have a backup on your computer. This will double ensure the security of your digital memories.
You can do so by using Dr.Fone’s Export All Data feature. This all-in-one software eliminates the need to shift through multiple locations when seeking to locate and move files from your iPhone.
Dr.Fone Basic
Backup & Restore iOS Data Turns Flexible.
- One-click to back up the whole iOS device to your computer.
- Preview and selectively restore files to any device with simplicity.
- Export what you want from the backup to your computer.
- Your device's data remains intact during the restore process.
- Supports iPhone, iPad, iPod touch, and the latest iOS version.


Some of the Dr. Fone's Export All Data key features include:
- Comprehensive data export, including Photos, Contacts, Messages, Voicemail, and more
- Secure encrypted transfer and backup of data
- Compatible with both iOS and Android devices.
- Regular updates to ensure an improved user experience
To transfer photos from your iPhone to a computer using Dr.Fone, follow the step-by-step below:
Step 1: Connect your iPhone to the computer and launch Dr.Fone
Start by Image nameing your iPhone to your computer using a USB cable. Once connected, launch the Dr.Fone application. Within the Dr.Fone interface, navigate to the "My Device" section and select "Export all data.”

Step 2: Choose file types for export
A new window will pop up. Here, you get to pick the specific types of files you want to transfer. After that, click the "Export" button and choose the computer's location where you want to save the exported data.

Step 3: Create a password for the backup file
To enhance security, you'll be prompted to set up an encrypted password for the backup file to be stored on your computer. Create a password, confirm it, and click "Done" to initiate the encryption process.

Step 4: Monitor the progress
Your iPhone will start exporting its data to the computer through Dr.Fone. You can wait and monitor the progress on the screen.

Step 5: Successful export of data to the computer
Upon completing the data export, a window will appear on your computer screen. Click "Open" to review the exported data at your specified location. This step finalizes the transfer, and now you can easily access your iPhone photos on your computer.

Conclusion
In this guide, we've walked you through the process of how to upload photos on Google Drive from iPhone from the initial installation of the Google Drive app to exploring how to automatically upload photos using Google Photos. We've also covered common mistakes users might encounter during this process and provided insights into troubleshooting and ensuring a smooth upload experience.
As a bonus, we've highlighted the importance of a computer backup using Dr.Fone ’s Export All Data feature. This tool simplifies the process, offering encrypted transfers and compatibility any devices. With Dr.Fone, your digital memories are not only accessible on your computer but also secure and regularly updated for an enhanced user experience.


iPhone Photos
- Convert HEIC to JPG
- 1. Convert HEIC to JPG on Linux
- 2. Convert HEIC to JPG Windows
- 3. Best HEIC Converter Online
- 4. Convert HEIC to JPG High Quality
- Export iPhone Photos
- 1. Upload iPhone Photos to Google Drive
- 2. Transfer Photo from iPhone to PC
- 3. Transfer Photo from iPhone to iPhone
- 4. Transfer from iPhone to iPhone
- 5. Transfer from iPhone to iPad
- 6. Move iPhone Photo to External Drive
- 7. Transfer from iPhone to Flash Drive
- 8. Extract Photos from iPhone
- 9. Download Photo from iPhone
- Import Photos to iPhone
- 1. Transfer from Laptop to iPhone
- 2. Transfer Photo from Camera to iPhone
- 3. Transfer Photo from Mac to iPhone
- 4. Transfer Photos from PC to iPhone
- 5. Transfer from iPhone to PC
- 6. Transfer from Android to iPhone
- 7. Transfer from Samsung to iPhone
- Manage iPhone Photos
- 1. Back up iPhone Photos
- 2. Get Photos off iPhone
- 3. Send Large Size Photos from iPhone
- 4. Photo/Video Compressor Apps
- 5. Delete Photos from iPhone/iPad
- 6. iPhone Photos Disappeared Suddenly
- 7. iPhone Photoshop Alternatives
- Recover iPhone Photos
- 1. Restore Deleted Photos from iPhone
- 2. Recover Photos from iPod Touch
- 3. Recover Deleted Picture from iPhone
- Transfer iPhone Photos to Mac
- Transfer iPhone Photos to PC
- 1. Transfer Data from iPhone to PC
- 2. Transfer Photo to Computer
- 3. Transfer Photo to PC without iTunes
- 4. Transfer Library to Computer
- 5. Send Photo from iPhone to Computer
- 6. Import Photo from iPhone to Windows
- 7. Transfer Photo to Windows
- Transfer Photos from Google Drive
- 1. Download from Google Drive to iPhone
- 2. Transfer from Google Photo to iPhone
- 3. Download from iCloud to iPhone
- Transfer Photos to Google Drive
- Image Convert Tips
- ● Manage/transfer/recover data
- ● Unlock screen/activate/FRP lock
- ● Fix most iOS and Android issues
- Learn More Learn More
Alice MJ
staff Editor