How to transfer photos from iPhone to Google photos
Jul 12, 2024 • Filed to: Manage Device Data • Proven solutions
Google Photos does a lot more than act as a gallery. It also acts as cloud storage for videos and photos. Understanding how to use this resource opens up a whole new world of possibilities.
Many Android phones come with this service preinstalled. iPhone users are beginning to like the idea of Google Photos despite having iCloud Photos. The good news is that Google Photos is available on iOS without discrimination.
In this post, we will teach you how to transfer photos from iPhone to Google Photos. This post will help you if you desire to shift to Google Photos from iCloud. The process is quite simple. All you need to do is disable iCloud and install Google Photos. Everything else falls in place automatically.
Let’s dive straight in. Hold on, here’s some information on Google Photos first.
How Google Photos works on iPhone
If you have used iCloud at all, then this should be pretty easy to understand. Google Photos shares a lot of similarities with iCloud in the way both apps operate. Uploading photos from iPhone to Google Photos is not difficult.
Google Photos allows you to view your photos on your device, similar to a gallery. But that’s not all. It also helps you store the photos in the Google cloud. Isn’t that amazing?
What does this imply? It means you can delete the photos from your device to save space and still have them in Google Photos. Many iPhone users even transfer their photos to Google Photos from their devices.
iCloud, on the other hand, will help you save space only by compressing the photos. It does not take them off the device storage completely. This implies that it consumes more space.
How much space do you enjoy with Google Photos in comparison to iCloud?
Many people ask this question and while contemplating your migration, this information will be useful. You’ll only enjoy 5GB of free storage on iCloud. This is quite small considering that you’ll be sharing it across your Apple devices. No wonder users want to learn how to upload photos to Google photos from iPhone.
With Google Photos, you have a larger 15GB of free storage. Even though you share this across your devices, it is still a lot.
What’s more? It is possible to decide how you want to save photos and videos. You can either save the original version or save them in high-quality backup mode. Using the latter mode means the videos are compressed to 1080p and the photos to 16MP.
Now to the crux of this post.
Part One: How to move photos from iPhone to Google Photos on iPhone
Before we go ahead, here’s some helpful news. Transferring your photos from iPhone to Google Photos is possible. There are two methods of achieving this and we will discuss both below. The first method is to transfer photos from iPhone to Google Photos.
How does this work?
The first thing you need to do is to get the app on your device. Like we said earlier, you can download Google Photos from the App Store. After downloading the app, install it on your device.
Now, enable “Backup and Sync” on the app installed on your iPhone. What do you get with this? All the photos and videos located on your iPhone back up by default on Google Photos. This means that as long as the photo and videos have been stored on your device, they’ll move to Google Photos.
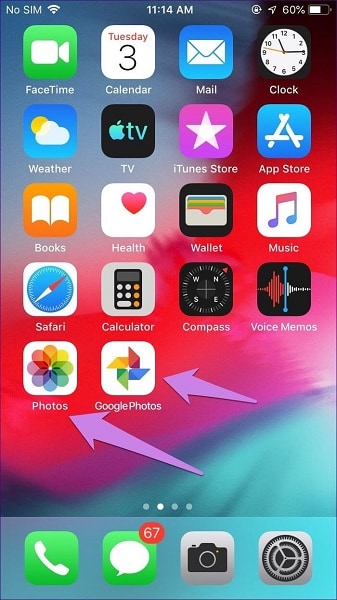
Note that this method will work, whether or not iCloud Photos is enabled. If iCloud Photos isn’t enabled, then the “Backup and Sync” process only covers files on the device memory. These are the only photos that will migrate to Google Photos.
On the other hand, if it is on, then the photos on iCloud will back up as well. What’s the process like? First, each photo on iCloud Photos creates a duplicate on your device. It is this duplicate that is now moved to the Google Photos storage.
Wouldn’t this consume excess space on your device? Well, Apple has provided a way out to help you save space. You can pick any of the two iCloud settings. The first is to optimize your iPhone storage and the second is to download and maintain originals.
If you choose the first option, you only see optimized versions of photos. The originals are saved in iCloud Photos. You only gain access to this feature when you are low on phone storage space. If you have enough space, it saves the original on your device as well.
Choosing the second option gives you access to original copies of photos on both iCloud and device storage. This is why we suggest that you transfer photos to Google Photos from your computer when iCloud is on. With this, you’ll knock off any chance of confusion between any of the two options.
Here’s a break down of how to transfer photos from iPhone to Google Photos in steps.
Step 1 – Download Google Photos to your device. Launch the app and log in using your Google login details.
Step 2 – Look toward the top-left corner of the app. You’ll see a three-bar icon. Tap on it to show the menu then select “Settings.”
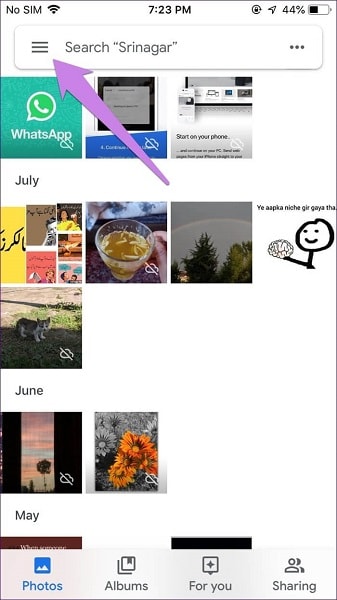
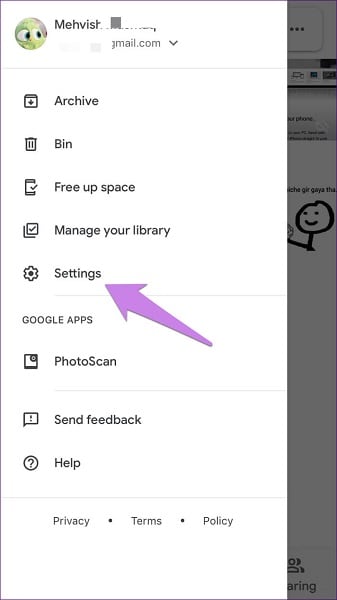
Step 3 – Select “Backup and Sync.” Enable this feature in the next popup screen.
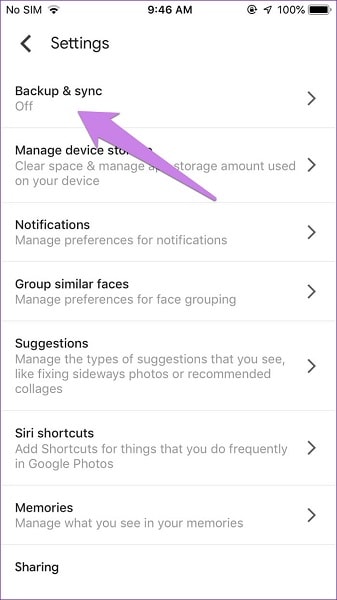
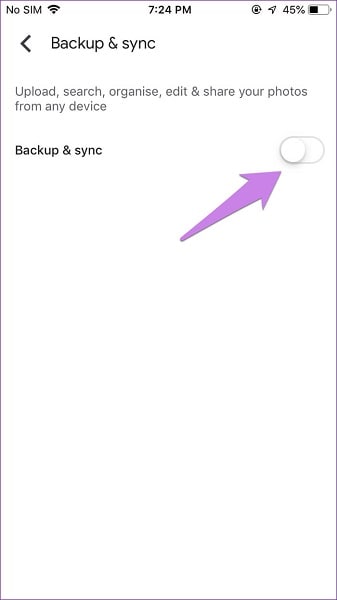
Step 4 – enabling “Backup and Sync” opens up a couple of options. Here, you can choose the “Upload Size” of your photos. To get access to free unlimited storage, select “High Quality.”
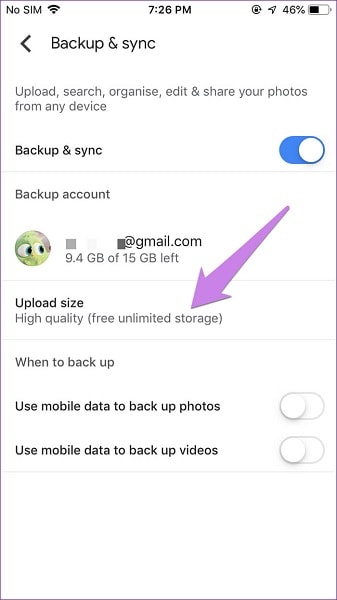
When you follow these steps, you automatically transfer photos from iPhone to Google Photos. Let’s take a look at the second method of using Google Photos with iPhone.
Part Two: How to upload photos to Google Photos from iPhone on computer
In case you are wondering if this is possible, yes it is and we will show you how in this section. There are two ways of achieving this. You can either upload offline photos or those stored in your iCloud.
Moving offline photos
In this case, you have to move the images on your iPhone to your PC via file transfer apps. A major example of such apps is Dr.Fone Phone Manager Tool Kit. By the way, Dr.Fone is free which is why we recommend it.
You can also make the transfer using a USB cord. After moving the photos to your computer, open your web browser. The next thing to do is to open photos.google.com in the browser.
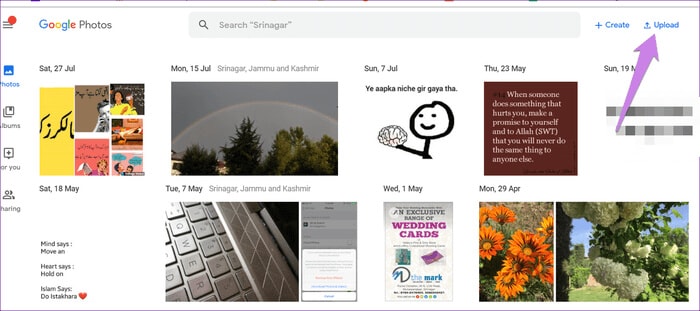
You will be required to log in using your Google account details. After doing this, look toward the top of the page, you’ll see “Upload.” Click this button and choose Computer as the source location.
Now, select the location where you stored the recently transferred files. Pick the files you want to upload and voila!!!
Moving iCloud Pictures
When using this method, the first thing to do is to download the photos to your computer. To do this, you need to open your web browser and go to icloud.com/photos. On this page, you have to log in using your Apple ID to gain access to your storage.
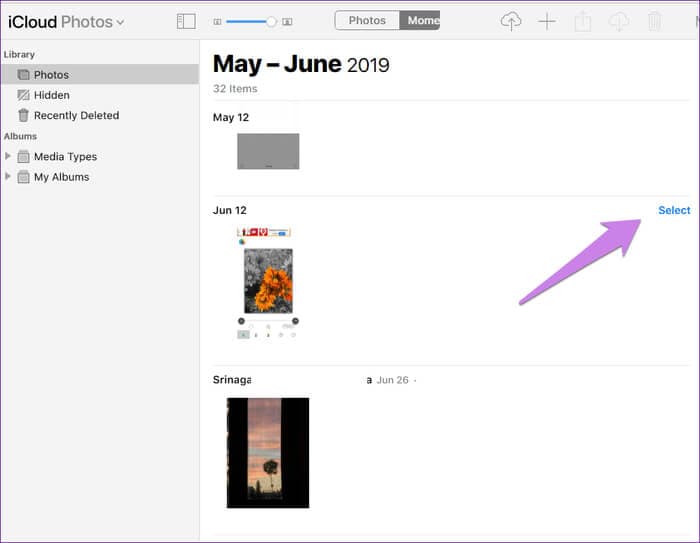
Look toward the right of each photo, you’ll see a “Select” option. Click on this to choose the photos or videos you plan on moving to Google Photos. If you are using a Windows PC, press CTRL + A, for a MAC PC, press CMD + A. Doing this allows you to select all the photos.
After selecting your preferred photos, click on “Download” to save the photos on your computer. The photos will be downloaded into a ZIP folder. To get the photos, you have to extract them from the ZIP folder.
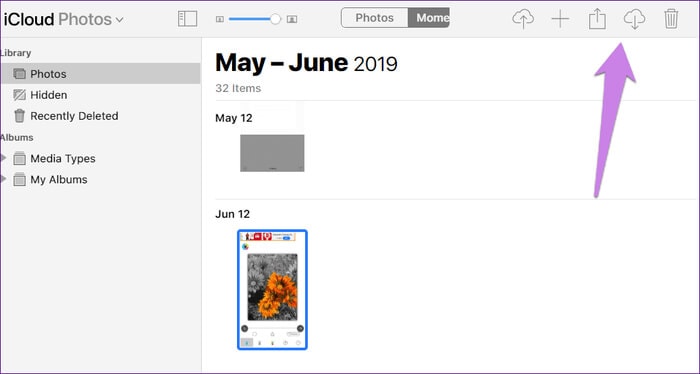
Once you have extracted the photos, open your web browser. When you do, open photos.google.com. Select “Upload” on the Google Photos page and choose “Computer” as your source folder. From here, you can navigate to the location of the files on your PC and then add all the files you want to.
When you use your PC to add photos to Google Photos, what happens?
If you want to know how to transfer photos from iPhone to Google Photos using PC, this is very important. We have described two ways you can transfer photos to Google Photos using your computer. Whichever method you choose, the pictures appear on the app on your device. Of course, this is only possible if you are using the same Google Account.
There is no need to enable settings of any form. It happens automatically even when Backup and Sync aren’t enabled. Huge advantages, right?
That’s not all. The photos don’t occupy the storage space on your device since they are located in the cloud.
Disabling iCloud Photos on your device
Now that you have learned how to upload photos to Google Photos from iPhone, you need to disable iCloud photos. After verifying that your photos are in Google Photos, you can let go of iCloud Photos.
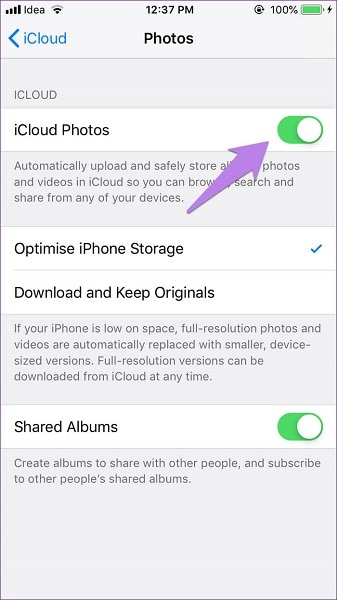
Go to “Settings” on your device and select “Photos.” There is a toggle in front of iCloud, turn it off. Read what will happen when you do this.
Wrap Up
There you have it. Now you know how to transfer photos from iPhone to Google Photos. There’s something you should know. This process might take a while depending on how many photos you have. So you need to be patient.
iPhone Photos
- Convert HEIC to JPG
- 1. Convert HEIC to JPG on Linux
- 2. Convert HEIC to JPG Windows
- 3. Best HEIC Converter Online
- 4. Convert HEIC to JPG High Quality
- Export iPhone Photos
- 1. Upload iPhone Photos to Google Drive
- 2. Transfer Photo from iPhone to PC
- 3. Transfer Photo from iPhone to iPhone
- 4. Transfer from iPhone to iPhone
- 5. Transfer from iPhone to iPad
- 6. Move iPhone Photo to External Drive
- 7. Transfer from iPhone to Flash Drive
- 8. Extract Photos from iPhone
- 9. Download Photo from iPhone
- Import Photos to iPhone
- 1. Transfer from Laptop to iPhone
- 2. Transfer Photo from Camera to iPhone
- 3. Transfer Photo from Mac to iPhone
- 4. Transfer Photos from PC to iPhone
- 5. Transfer from iPhone to PC
- 6. Transfer from Android to iPhone
- 7. Transfer from Samsung to iPhone
- Manage iPhone Photos
- 1. Back up iPhone Photos
- 2. Get Photos off iPhone
- 3. Send Large Size Photos from iPhone
- 4. Photo/Video Compressor Apps
- 5. Delete Photos from iPhone/iPad
- 6. iPhone Photos Disappeared Suddenly
- 7. iPhone Photoshop Alternatives
- Recover iPhone Photos
- 1. Restore Deleted Photos from iPhone
- 2. Recover Photos from iPod Touch
- 3. Recover Deleted Picture from iPhone
- Transfer iPhone Photos to Mac
- Transfer iPhone Photos to PC
- 1. Transfer Data from iPhone to PC
- 2. Transfer Photo to Computer
- 3. Transfer Photo to PC without iTunes
- 4. Transfer Library to Computer
- 5. Send Photo from iPhone to Computer
- 6. Import Photo from iPhone to Windows
- 7. Transfer Photo to Windows
- Transfer Photos from Google Drive
- 1. Download from Google Drive to iPhone
- 2. Transfer from Google Photo to iPhone
- 3. Download from iCloud to iPhone
- Transfer Photos to Google Drive
- Image Convert Tips
- ● Manage/transfer/recover data
- ● Unlock screen/activate/FRP lock
- ● Fix most iOS and Android issues
- Learn More Learn More


Alice MJ
staff Editor