How to Transfer Photo Library from iPhone to Computer

Jul 12, 2024 • Filed to: Manage Device Data • Proven solutions
As we all know, iPhone with good experience to take photos and view photos. So many iPhone users are used to saving their photos in their Photo Library. But in order to release more space for iPhone or back up the interesting photos, we usually choose to transfer Photo Library from iPhone to the computer. However, iTunes can only support syncing photos to your iPhone but can do nothing to copy photos back to iTunes. Thus, to copy Photo Library from iPhone to PC, you must search for other ways. This article will show you a freeway and an easier way to accomplish the task easily.
Part 1: Free Way to Transfer Photo Library from iPhone to Computer Using Email
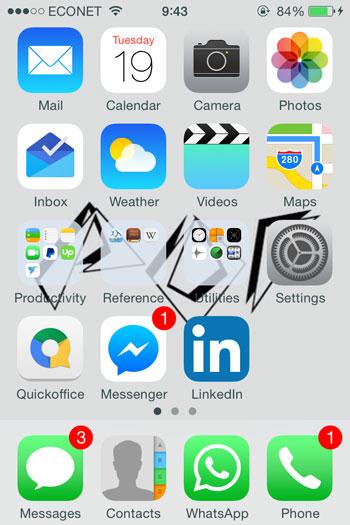
Step 1 Go to the Photos application on your iPhone and launch it.
Step 2 Look for the photos you wish to transfer to your computer. Tap the Select button so that it allows you to select more than one photo.
Step 3 Tap the Share button. However, it will only allow you to send up to five photos at a time. On the pop up after you select share, choose “Mail” which will prompt the mail application to open a new message window with the photos you selected attached.
Step 4 Enter your email address such that you send the photos to yourself.

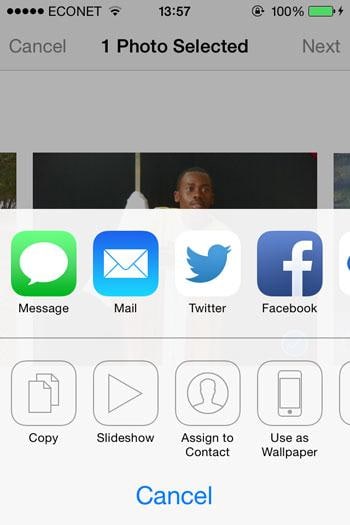

Step 5 Access your email account on your computer. For Gmail users, your email will have thumbnails of the images at the bottom of your message. For yahoo users, the attachment download option is at the top, you can just click download all attachments. The image will be downloaded and stored under your Downloads Folder, which is located at the left of your windows explorer.


Thus, to copy Photo Library from iPhone to PC, you may have to search for other ways. If you care about this, you come to the right place. Here is a powerful iPhone to computer transfer tool that enables you to accomplish the task easily. It’s Dr.Fone - Phone Manager (iOS).
Part 2: Transfer Photo Library from iPhone to Computer with Dr.Fone
TuneGo, copys photos, music, playlists, videos from iPod, iPhone & iPad to iTunes and to your PC for backup.
Step 1 Download the setup from the link below
Dr.Fone - Phone Manager (iOS)
Your must-have iOS phone transfer, between iPhone, iPad, and computers
- Transfer, manage, export/import your music, photos, videos, contacts, SMS, Apps, etc.
- Backup your music, photos, videos, contacts, SMS, Apps, etc. to computer and restore them easily.
- Transfer music, photos, videos, contacts, messages, etc from one smartphone to another.
- Transfer media files between iOS devices and iTunes.
- Fully compatible with iOS 7 to iOS 13 and iPod.


Step 2 Launch Dr.Fone and connect iPhone
Launch the software that you have just installed, and select "Phone Manager" among all the features. Using the cable that came with the iPhone, connect your iPhone with the Photo Library you wish to transfer to your computer. Dr.Fone - Phone Manager (iOS) should be able to detect your iPhone once you have connected it to your computer.

Step 3 Select the photos you wish to transfer to your computer
On the main window, on the top, click "Photos" tab to show the photo window. Then look for iPhone Photo Library and select the photos you want to transfer to your computer. and click "Export" > "Export to PC".
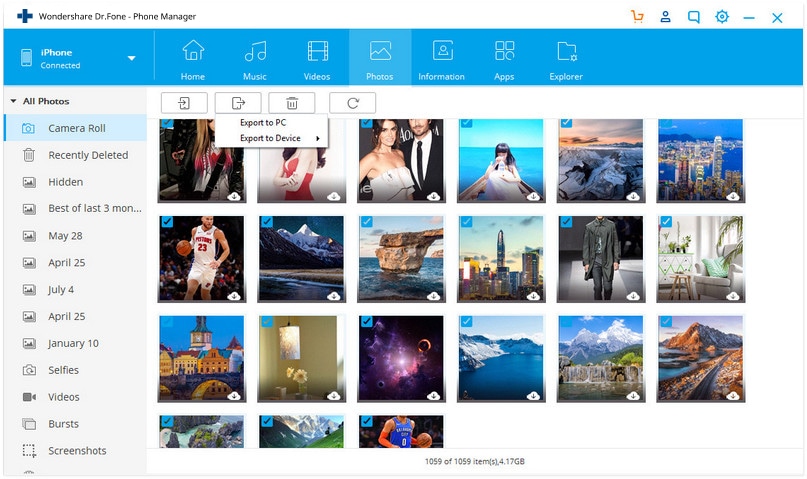
This should prompt a small browser window to show where you are supposed to choose a saving path to keep the Library Photos on your computer. This will be the folder where you will see the transferred photos from your Photo Library. After that, click OK to complete the process.
Alternatively, you can just select the photos and then drag the photos from Dr.Fone to the destination folder you wish to store or save in on PC.
The process should normally take a few seconds though it will depend on the number of photos you wish to transfer to your computer from your iPhone.
While the manual method using your email from Part 1 will have you struggle sending photos in batches of five each, Dr.Fone - Phone Manager (iOS) allows you to handle the process in less time and following easy steps that can be followed by anyone, even without deep expertise in IT. Also, the manual way through your email will require you to have an internet connection while Dr.Fone - Phone Manager (iOS) will do the job in considerably easy to follow methods without the need for an internet connection.
Dr.Fone - Phone Manager (iOS) has become a top iTunes companion bringing ease to management of a number of things on your Apple device.
Apart from transferring photos from iPhone to computer. The application allows users to transfer music and photo files from iPhone or iPad to flash drive, music files from iPod to computer, it can even convert music file formats and send them straight to iTunes allowing you to then sync to your iPhone or iPad. Also, you can delete photos form your iPad or iPhone, be it there are in your Photo Library, Camera Roll or Photo Stream.
All these features and more provide easy solutions to issues that people complain about on a daily basis, hence allowing you to live your life stress free.
Dr.Fone - Phone Manager (iOS) takes advantage of the big screen resolution that is provided by your PC, enabling you to enjoy the user interface hence doing the job that will have taken your hours in just a few seconds.


iPhone Photos
- Convert HEIC to JPG
- 1. Convert HEIC to JPG on Linux
- 2. Convert HEIC to JPG Windows
- 3. Best HEIC Converter Online
- 4. Convert HEIC to JPG High Quality
- Export iPhone Photos
- 1. Upload iPhone Photos to Google Drive
- 2. Transfer Photo from iPhone to PC
- 3. Transfer Photo from iPhone to iPhone
- 4. Transfer from iPhone to iPhone
- 5. Transfer from iPhone to iPad
- 6. Move iPhone Photo to External Drive
- 7. Transfer from iPhone to Flash Drive
- 8. Extract Photos from iPhone
- 9. Download Photo from iPhone
- Import Photos to iPhone
- 1. Transfer from Laptop to iPhone
- 2. Transfer Photo from Camera to iPhone
- 3. Transfer Photo from Mac to iPhone
- 4. Transfer Photos from PC to iPhone
- 5. Transfer from iPhone to PC
- 6. Transfer from Android to iPhone
- 7. Transfer from Samsung to iPhone
- Manage iPhone Photos
- 1. Back up iPhone Photos
- 2. Get Photos off iPhone
- 3. Send Large Size Photos from iPhone
- 4. Photo/Video Compressor Apps
- 5. Delete Photos from iPhone/iPad
- 6. iPhone Photos Disappeared Suddenly
- 7. iPhone Photoshop Alternatives
- Recover iPhone Photos
- 1. Restore Deleted Photos from iPhone
- 2. Recover Photos from iPod Touch
- 3. Recover Deleted Picture from iPhone
- Transfer iPhone Photos to Mac
- Transfer iPhone Photos to PC
- 1. Transfer Data from iPhone to PC
- 2. Transfer Photo to Computer
- 3. Transfer Photo to PC without iTunes
- 4. Transfer Library to Computer
- 5. Send Photo from iPhone to Computer
- 6. Import Photo from iPhone to Windows
- 7. Transfer Photo to Windows
- Transfer Photos from Google Drive
- 1. Download from Google Drive to iPhone
- 2. Transfer from Google Photo to iPhone
- 3. Download from iCloud to iPhone
- Transfer Photos to Google Drive
- Image Convert Tips
- ● Manage/transfer/recover data
- ● Unlock screen/activate/FRP lock
- ● Fix most iOS and Android issues
- Learn More Learn More
Daisy Raines
staff Editor