Effortless Ways to Transfer Data from Your Old Phone to iPhone 15

Aug 27, 2025 • Filed to: Data Transfer Solutions • Proven solutions
With the arrival of the iPhone 15, Apple continues to redefine technological boundaries. It offers users a device that combines innovation and elegance. If you are also switching to iPhone 15 from your old device, you will need to move data from one device to another. In this comprehensive guide, we explore iPhone 15 transfer data from your old phone.
This guide will decode the process, ensuring your valuable data finds its new home in the iPhone 15 without a hitch. Stick with the article to find different ways for data transfer to the new iPhone 15.
Part 1: How To Perform iPhone 15 Data Transfer With Official Methods
When it comes to data transfer to iPhone 15 from your old phone, there are multiple options available. There are four official methods available to transfer data from an old phone to a new iPhone. These range from using backups like iCloud and iTunes to direct transfer. Given below are the 4 official methods to transfer your data to the new iPhone 15:
Method 1: Using iCloud Backup
iCloud Backup emerges as a powerful solution when it comes to transferring your data to the iPhone 15. Apple's cloud-based ecosystem enables you to migrate your essential information seamlessly. It ensures that your new device is an extension of your digital world. Follow these steps to use iCloud Backup for a smooth transition:
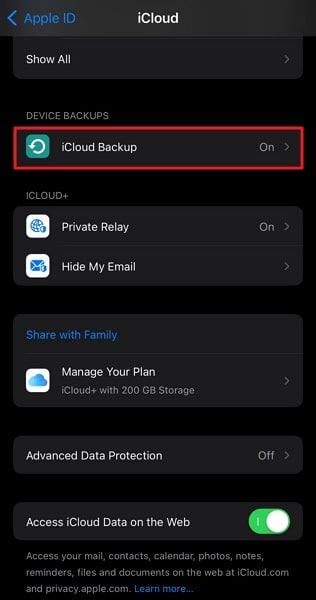
- Step 1: First, we begin with creating a backup of your old iPhone. To do that, you need to navigate to Settings and tap Apple ID. Here choose “iCloud” and follow it by tapping "iCloud Backup." Ensure it is toggled on, and use “Back Up Now” to create an iCloud backup.
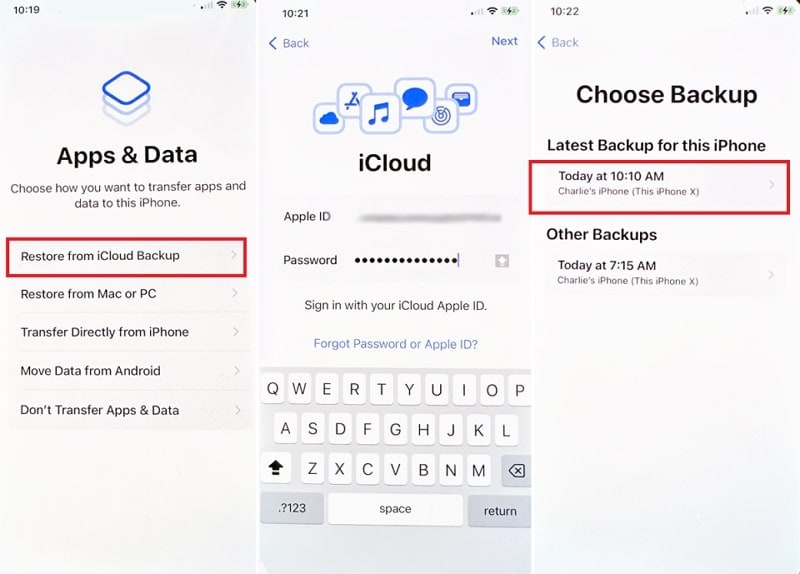
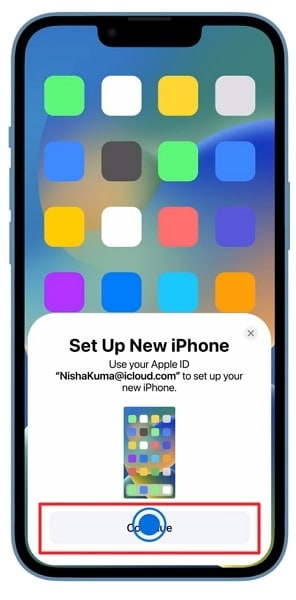
- Step 2: Now move to your new iPhone 15 and start setting it up. When you reach the "Apps & Data" screen, tap “Restore from iCloud Backup.” Here, log in using your Apple ID and choose the most recent backup file to restore data.
Method 2: Use the iTunes/Finder Backup
iTunes/Finder presents a reliable and customizable option for data transfer to a new iPhone. It is great for those who prefer a more hands-on approach to data transfer. You can create a backup of your old device on your computer. Later this backup is used to transfer your old device data to the new one. Follow these steps to transfer your data using iTunes or Finder:
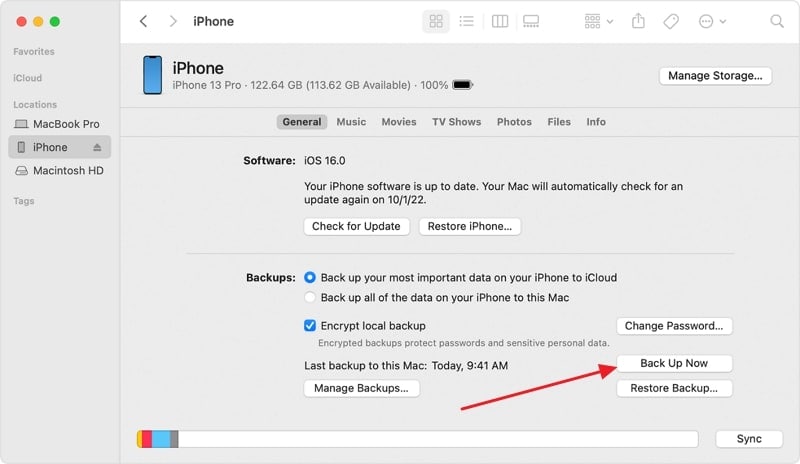
- Step 1: Begin by connecting your previous device to your computer using a USB cable. If you're using macOS Catalina or a later version, open Finder; otherwise, open iTunes. When your device is detected, ensure it's selected in iTunes or Finder.
- Step 2: Navigate to the "Summary" section and locate the "Back Up Now" option. Click on it to commence a comprehensive backup of your old device. The duration of this process depends on the volume of your data and may require some time.
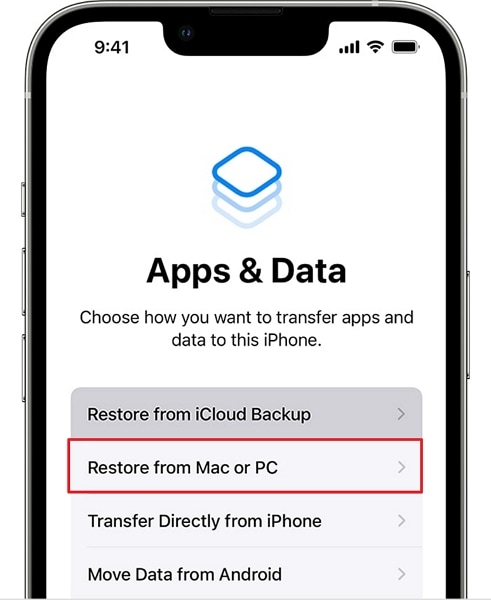
- Step 3: Power up your iPhone 15 and follow the initial setup prompts until you reach the "Apps & Data" display. Here opt for the "Restore from Mac or PC" and connect your iPhone 15 to the same computer where you performed the backup.
- Step 4: In Finder or iTunes, select your iPhone 15 from the sidebar or top. Enable the "Restore from this Backup" option and choose the most recent backup you created. Afterward, click "Continue" to begin the process of transferring the old iPhone data to iPhone 15.

Method 3: Transfer Directly Through Another iPhone
When setting up a new iPhone 15, transferring data directly from the old device to the new one is possible. Transferring data directly from one device to another is also known as the Quick Start method. It requires minimal equipment and promises a swift and efficient data migration process. Follow these steps to execute a direct transfer between iPhones:
- Step 1: Ensure the Bluetooth and Wi-Fi are enabled on the old iPhone. Now turn on the new iPhone and place it near the old device. Press "Continue" when a prompt appears on the old iPhone about setting up the new iPhone 15.
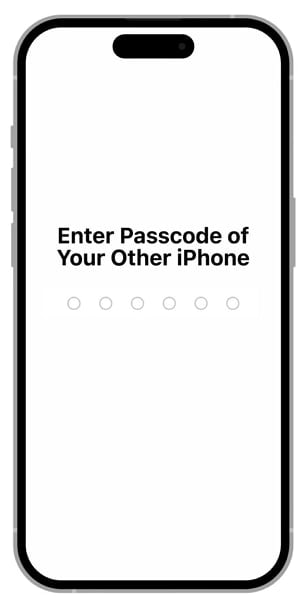
- Step 2: An animation will appear on the screen of the new iPhone 15. Scan it using the old iPhone, and afterward, enter the 6-digit passcode of the old device on the new iPhone 15. Log in using your Apple ID and set up your Face ID.
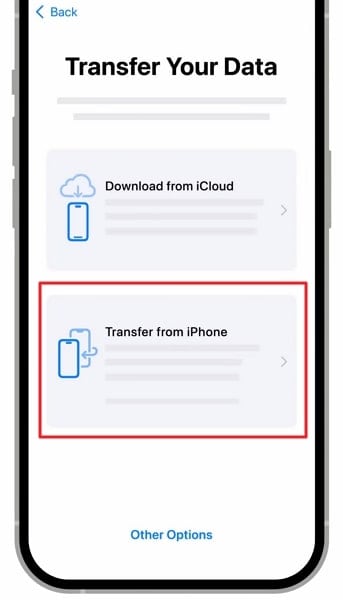
- Step 3: When it asks you to choose a data transfer method, select "Transfer from iPhone." It will kickstart the process of transferring your old device data to the new one. Keep the devices close to each other to avoid any complications.
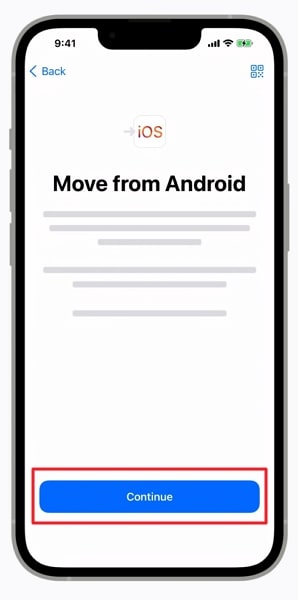
Method 4: Transfer Data from Android to iPhone 15
Transitioning from an Android device to the iPhone 15 is now a seamless process. It is mainly thanks to Apple's "Move to iOS" app. Designed to simplify the transfer of your data, this app ensures that your switch to the iPhone 15 is smooth and hassle-free. Use the simplified steps given below to transfer data to iPhone 15:
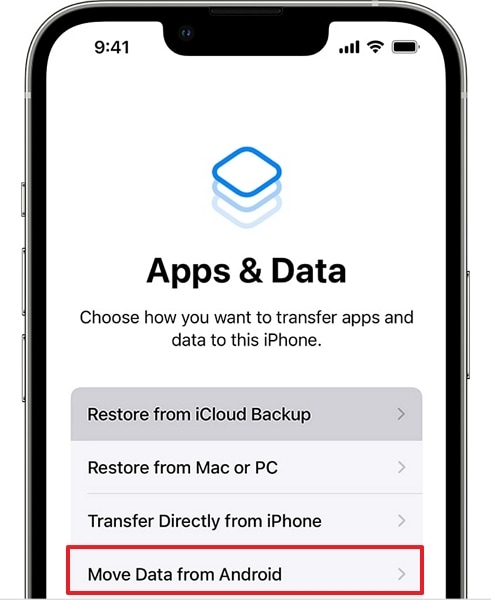
- Step 1: Turn on your new iPhone and set it up until you reach the "Apps & Data" screen. Here, tap "Move Data from Android" and move to the Android device.
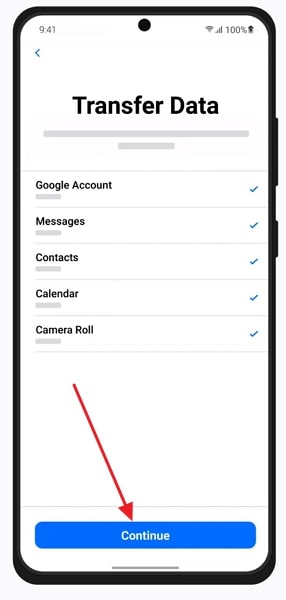
- Step 2: On your Android device, install and launch the Move to iOS app. Agree to the terms and conditions, and on the iOS device, press "Continue" once the Move to Android screen appears. It will display a code that you need to put on the Android device to establish a connection.
- Step 3: Once both devices are connected to the temporary Wi-Fi network, wait for the data transfer screen to appear on the Android. Then, choose the old Android device data you want to transfer. Lastly, press "Continue" to start the Android to iPhone 15 transfer process.
Part 2: The Blazing Fast and Efficient Phone Transfer Tool for iPhone 15
Whenever you switch from one device to another, data transfer stands out as the main hurdle. It makes you want to have a tool that can simplify the process and be quick at your disposal. Luckily, there is one such tool, and that is Dr.Fone - Phone Transfer. This software allows you to transfer data between Android and iOS devices with ease.
Main Features of Wondershare Dr.Fone
- Wondershare Dr.Fone supports data transfer over 12 types of data between different devices.
- It is a blazing-fast tool with a much higher data transfer speed than most official transfer tools.
- This software supports over 8000 smartphones for data transfer across all major brands.
Steps To Use Wondershare Dr.Fone To Transfer Old Device Data to iPhone 15
Given below are the detailed steps to use Wondershare Dr.Fone to transfer data to iPhone 15:
- Step 1: Connect the Respective Devices
To transfer data from your old phone to iPhone 15, start with launching Wondershare Dr.Fone on your computer. Next, head towards the "Toolbox" option and tap on it. It will show you a list of options from which you need to select the "Phone Transfer" option. Besides this, connect your old and new devices to your computer.

- Step 2: Assign Correct Positions to the Devices
So that platform can automatically detect them and give them respective positions as "Source" and "Destination." Your old phone would be the "Source," while the new iPhone 15 is the "Destination." Here, if the position of the devices is incorrect, use the "Flip" button to change the position between devices.

- Step 3: Start the iPhone 15 Transfer Process
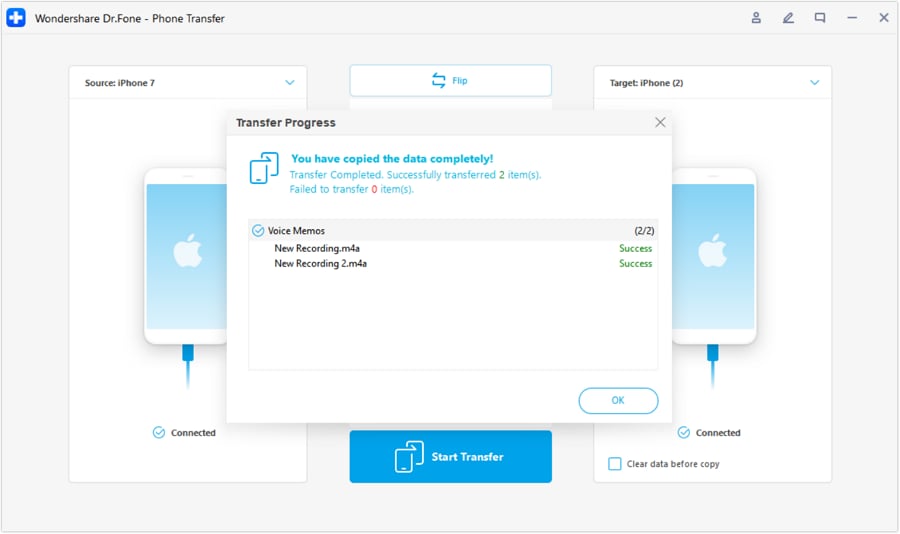
After this, select the data types on the platform you want to transfer and click the "Start Transfer" option. This will initiate the process of transferring data from source to destination, which you can track on the progress bar in the new window. Once the process is completed, click the "OK" button to conclude the process.
Part 3: Having Trouble When Transferring to iPhone 15 Stucks?
The issue of iPhone 15 getting stuck when users attempt to transfer data from their older devices, like the iPhone 14, to the new iPhone 15 has become a frustrating challenge for many Apple enthusiasts. This problem often arises due to the complex nature of data migration and the high expectations associated with Apple's seamless ecosystem. When attempting to transfer photos, apps, contacts, and other vital information, users may encounter lengthy delays, frozen screens, or failed transfers.
The possible reasons could be:
- ·Software glitches
- ·Insufficient storage space
- ·Incompatible iOS versions between the old and new devices
The impact of this issue extends beyond mere inconvenience, as it can result in data loss or a less-than-optimal out-of-the-box experience with the latest iPhone. Addressing this problem, you may try:
- ·Updating both devices to the latest iOS version
- ·Ensuring sufficient storage
- ·Seeking assistance from Apple Support
- ·Authorized service providers when necessary
Or, you can also try to ask for help from a third-party application, Dr.Fone - Phone Transfer is always at your service. Dr.Fone - Phone Transfer offers a reliable solution to the iPhone data transfer problem. This user-friendly software is designed to simplify the migration process, making it hassle-free for iPhone users. Here are the steps to get you started:
Step 1 Launch Phone Transfer Tool
Initiate the process by launching Wondershare Dr.Fone on the computer. Continue from Toolbox > Phone Transfer to redirect towards opening the particular tool.
Step 2 Set Data Transfer Path
On accessing the Phone Transfer tool, continue to connect your iOS devices and let them load their data on the next screen. Here, define the Source and Destination of the transfer to specify the direction of the phone transfer. To change locations, use the Flip button on the top.
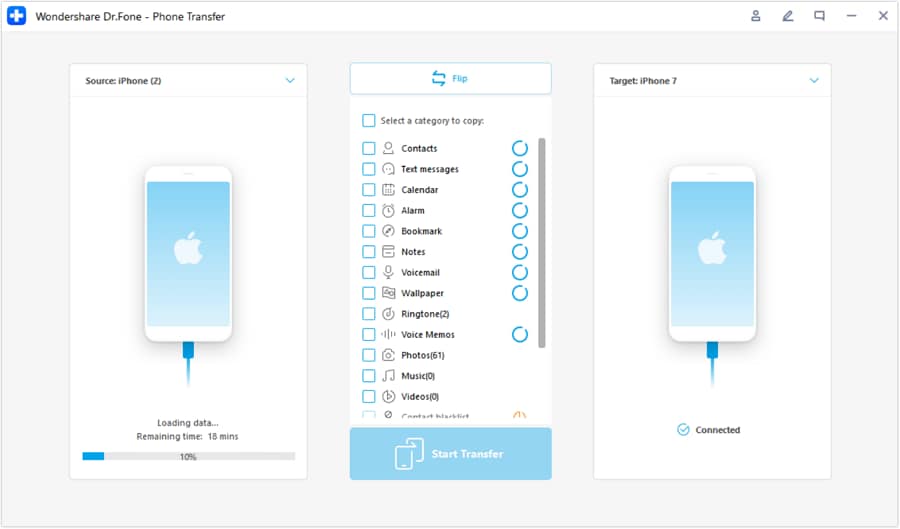
Step 3 Choose Data Types
After successfully determining the source and destination, select the specific data types you want to transfer. Checkmark all data and select Start Transfer to proceed with the operations.
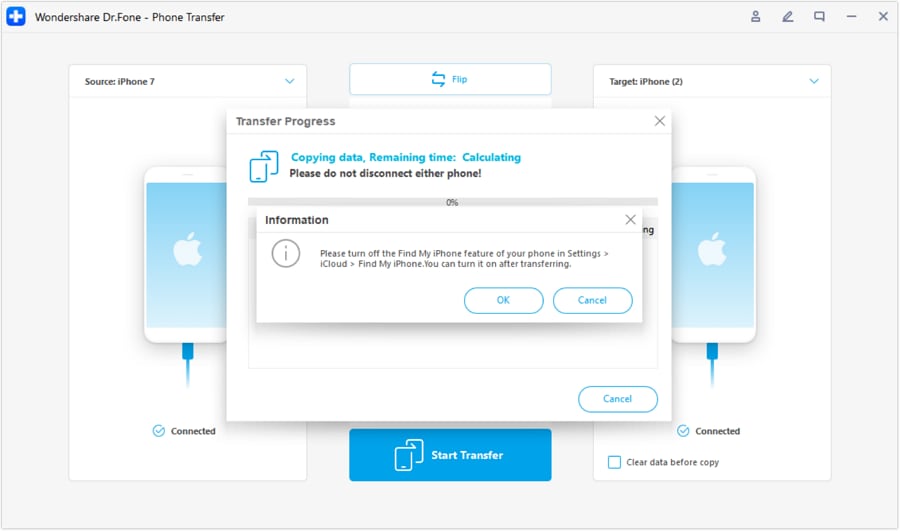
Step 4 Turn Off Find My Feature
Once done, a prompt appears on the front asking to turn off the Find My feature on iOS devices. Open the Settings of the iOS device and proceed further by tapping on the name at the top. Continue from iCloud > Find My feature and turn it off.
Step 5 Complete Your Transfer
Once done, the window in the front shows the completed phone transfer. Click OK to conclude the process entirely.
Bonus Tip: The Best Data Eraser To Make Old Phone Data Unrecoverable
Nowadays, data privacy is paramount. That's why ensuring your old phone's sensitive information remains unrecoverable is crucial. Before you part ways with your device, just deleting the data or factory resetting your device isn't enough. Wondershare Dr.Fone doesn't stop at facilitating seamless data transfer. It also offers an exceptional data eraser feature.
This ensures your data is permanently wiped from your old phone, leaving no traces behind. Moreover, it consists of a private data eraser through which you can erase your data and make it unrecoverable. You can also use its Space Saver feature to erase junk data to speed up your old or new device.
Conclusion
In summary, the realm of mobile technology continues to evolve. It has increased the importance of smooth and efficient data transfer. With the arrival of the iPhone 15, a new world of possibilities opens up. The journey of iPhone 15 data transfer should be a seamless transition. In this guide, we've explored a range of methods, both official and third-party.
These empower you to transfer your cherished data to the iPhone 15 easily. While Apple's official methods offer solid data migration, Wondershare Dr.Fone emerges as the ultimate solution that goes beyond the ordinary. Its unparalleled data transfer and erasure capabilities make it a game-changer.


iPhone Issues
- iPhone Storage Full
- 1. Stuck on Apple Logo Storage Full
- 2. Erase Content Settings not Working
- 3. iPhone Lagging
- 4. iPhone Running Slow
- iPhone Update Problems
- 1. Stuck on Updating iCloud Settings
- 2. iPhone Frozen During iOS Update
- 3. iPhone Checking for Update Stuck
- 4. iPhone Cellular Update Failed
- 5. iPhone Software Update Failed
- 6. iPhone Stuck on Update Requested
- 7. iPhone Update Error 1110
- 8. iPhone Stuck On Verifying Update
- 9. iPhone Won't Update
- 10. Update Server Couldn't Be Contacted
- 8. iPhone & iPad Security Updates
- 9. Update iPhone with/without iTunes
- 10. Can't Download or Update Apps
- iPhone Media Problems
- 1. Apple Music Song Not Available
- 2. iPhone Not Ringing
- 3. iPhone Echo Problem
- 4. iPhone Ringer Problems
- 5. iPhone Plays Music by Itself
- 6. Ringer Volume Changes by Itself
- 7. Music Won't Play on iPhone
- 8. Blurry Photos & Videos on iPhone
- 9. iPhone Volume Problems
- iPhone Sound Problems
- 1. YouTube no Sound
- 2. iPhone Microphone Problem
- 3. Test iPhone Microphone
- 4. Headphones No Sound from iPhone
- 5. No Sound on iPhone Game
- 6. iPhone Sound Not Working
- 7. iPhone Screen Recording no Sound
- iPhone Calling Problems
- 1. iPhone No Sound on Calls
- 2. Screen Goes Black During Call
- 3. iPhone Recent Calls Not Showing
- 4. iPhone Dropping Calls Issue
- 5. iPhone Calling Problem
- iPhone Camera Problems
- 1. iPhone Camera Black
- 2. iPhone Camera Blurry
- 3. iPhone Camera Not Working
- 4. iPhone Front Camera Not Working
- 5. TrueDepth Camera Not Working
- 6.Out-of-Focus Photos on iPhone 15
- iPhone Network Problems
- 1. Airpods Won't Connect to iPhone
- 2. iPhone Disabled Connect to iTunes
- 3. iPhone Not Syncing Problems
- 4. iPhone Internet Not Working
- 5. iPhone Keep Disconnecting from Wifi
- 6. iPhone WIFI Not Working
- 7. PC Not Recognizing iPhone
- 8. iPhone Stuck on Connect to iTunes
- 9. iPhone Not Showing up in iTunes
- 10. iTunes Not Detecting Your iPhone
- 11. iPhone Bluetooth Disconnect
- 12.Apple CarPlay Keeps Disconnecting
- Other iPhone Problems

Daisy Raines
staff Editor