How to Transfer Data to iPhone 16: Simple Methods with Dr.Fone

Oct 13, 2025 • Filed to: Data Transfer Solutions • Proven solutions
Getting the latest iPhone 16 is exciting, filled with anticipation for exploring its new features and capabilities. However, transferring all your important data from your old iPhone to the new one can be overwhelming. The fear of losing cherished photos, essential contacts, and critical apps can dampen the excitement.
A smooth transition is crucial to keep your data intact and ensure you can enjoy your new device immediately. Migrating your data manually can be time-consuming and complex, leading to potential frustrations. That's why having a reliable and easy method on how to transfer data from iphone to iphone is essential.

Dr.Fone is the perfect solution, offering a simple and effective way to move your data from one iPhone to another. With its user-friendly interface and reliable performance, Dr.Fone takes the stress out of the process, ensuring your transition to the iPhone 16 is as seamless as possible.
Part 1: Importance of Transfer Preparation
Before starting the data transfer process, you must prepare your old and new iPhones. This includes backing up your current device, ensuring both iPhones are fully charged, and updating them to the latest iOS version. Proper preparation helps prevent data loss, transfer interruptions, and potential compatibility issues, ensuring a smooth and successful migration to your new iPhone 16.

Dr.Fone is a powerful tool designed to take the hassle out of transferring data between iPhones. With Dr.Fone, you can seamlessly move all your important information—contacts, messages, photos, apps, and more—to your new device. The software simplifies the process, making it easy to upgrade without losing valuable data.
Key Features of Dr.Fone
Dr.Fone has powerful features that make it an ideal tool for transferring data between iPhones. Its design and functionality are tailored to ensure a smooth, secure, and efficient transfer experience, regardless of your technical expertise. Here’s what makes Dr.Fone stand out:
- User-Friendly Interface: Dr.Fone offers an easy-to-navigate design that guides you through the transfer process step by step, making it simple even for those who aren't tech-savvy.
- Comprehensive Data Support: It supports transferring a wide range of data types, including contacts, messages, photos, apps, and more, ensuring all your important information is moved to your new device.
- High-Speed Transfer: Dr.Fone is designed for efficiency, allowing you to quickly move data from one iPhone to another, saving time and minimizing downtime.
- Secure Data Handling: The tool prioritizes your data’s security, ensuring all your information remains intact and protected throughout the transfer process.
- Wide Compatibility: Dr.Fone works with all iPhone models and iOS versions, making it a versatile and reliable solution for any iPhone upgrade scenario.
Dr.Fone Unlock Online - Free IMEI Check
iPhone 17 Is Here. Is Your Old Phone Ready to Sell?
Quickly check your iPhone or Android device status for free: Verify Blacklist, iCloud, Carrier Lock, and Warranty Status in Seconds. Ad-free, and globally.
Part 2: How to Transfer Data to iPhone 16 Using Dr.Fone
Transferring data from one iPhone to another is straightforward with Dr.Fone - Phone Transfer. Follow these simple steps to safely move all your important information to your new device.
Dr.Fone - Phone Transfer
1 Click to Copy One Phone to Another
- Move data between devices with different OSs, i.e. iOS to Android.
- Transfer contacts, SMS, photos, videos, music, and more types.
- Simple, click-through process
- Compatible with Android 14 (Win) and the latest iOS 17.


Step 1: Launch the Phone Transfer Tool
Start by opening Dr.Fone on your computer and selecting the Phone Transfer tool from the Toolbox. Connect both your old and new iPhones to the computer using USB cables.
Step 2: Set Transfer Path
Once the devices are connected, define which iPhone will serve as the source and which will be the destination. If the positions are incorrect, use the Flip button to adjust the transfer direction, ensuring data is moved from your old iPhone to the new one.
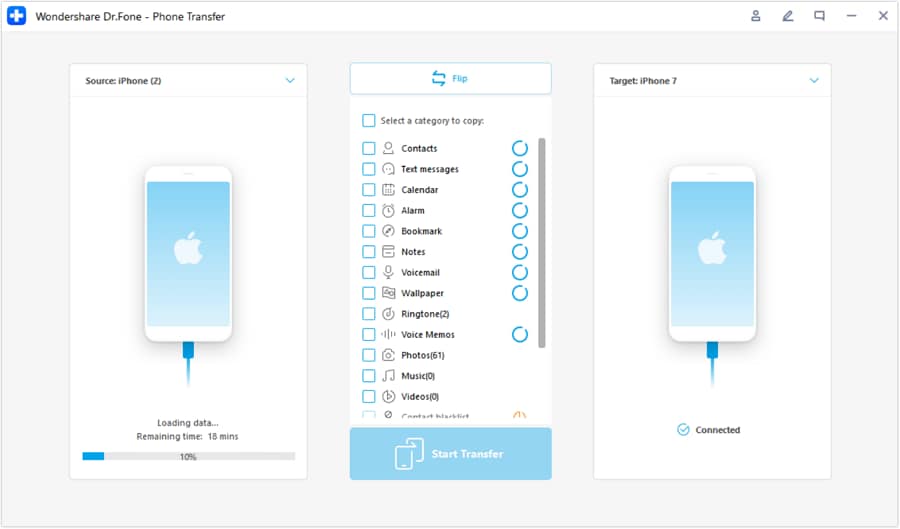
Step 3: Select Data Types for Transfer
Next, you must choose the data categories you want to transfer. Options include contacts, messages, photos, and more. Simply checkmark the desired data types and click Start Transfer to begin the process.

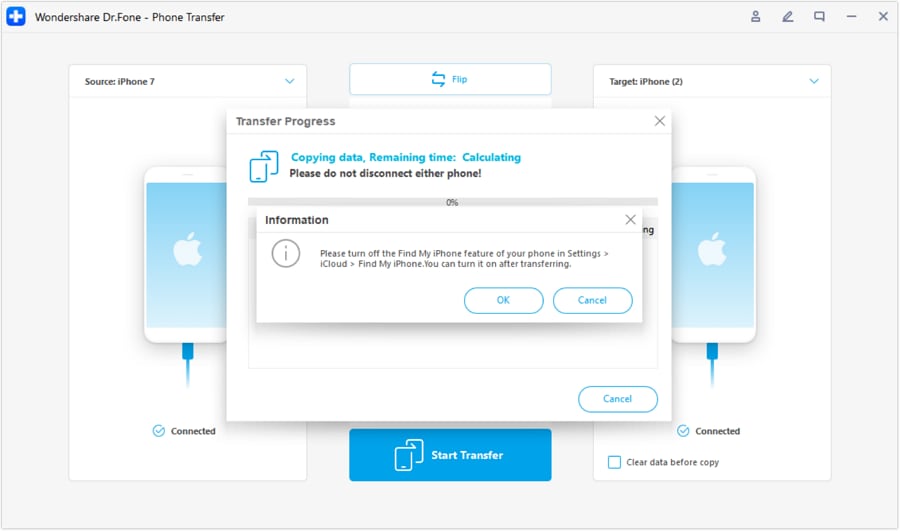
Step 4: Turn Off Find My iPhone
Before transferring, you must disable both devices' Find My iPhone feature. Go to Settings > Your Name > iCloud > Find My iPhone, and toggle the feature off on each iPhone. This step is necessary to complete the data transfer securely.
Part 3. Alternative Solutions to Transfer Data to New iPhone
If you prefer not to use Dr.Fone, other reliable methods exist to transfer data to your new iPhone. Here are two popular alternatives: iCloud and iTunes/Finder.
Solution 1: Using iCloud
iCloud provides a convenient and wireless way to transfer data from your old iPhone to your new one. Follow these simple steps to transfer data using iCloud
Step 1: Prepare the New iPhone
Begin by powering on your new iPhone and starting the setup process. Continue the steps until you reach the ""Apps & Data"" screen.
Step 2: Select the Latest Backup
Choose the option to restore from iCloud backup on the ""Apps & Data"" screen. Select the most recent backup from your old iPhone to transfer your data.

Step 3: Complete Setup
Once you've selected the backup, wait for the restoration process to complete. Follow the on-screen instructions to finish setting up your new iPhone, ensuring all your data is restored.
Solution 2: Using iTunes/Finder
Using iTunes or Finder is a reliable method to transfer data from your old iPhone to your new one. Follow these steps to backup and restore it to your new device.
Step 1: Connect the Old iPhone to the Computer
Start by connecting your old iPhone to your computer. Launch iTunes if you're using a PC or Finder if you're on a Mac running macOS Catalina or later.
Step 2: Create a Backup on the Computer
In iTunes or Finder, initiate a backup of your old iPhone to your computer. This backup will include all your essential data.
Step 3: Set Up New iPhone
Turn on your new iPhone and proceed through the setup steps. When you reach the ""Apps & Data"" screen, select ""Restore from Mac or PC.""
Step 4: Select and Restore Backup
Connect your new iPhone to the computer, open iTunes or Finder, and choose the backup you previously created. Restore the backup to transfer all your data to the new device.

Part 4: Comparison of Dr.Fone with iCloud and iTunes/Finder for iPhone Data Transfer

Choosing the right method for transferring data to your new iPhone is crucial to ensure a smooth, efficient, and secure migration. Each solution offers advantages and limitations, so understanding their differences can help you make an informed decision. Here’s a comparison of Dr.Fone, iCloud, and iTunes/Finder based on several key factors:
| Criteria | Dr.Fone | iCloud | iTunes/Finder |
| Ease of Use | User-friendly interface; step-by-step guidance. | Relatively simple, but relies on internet connection. | More complex; involves multiple steps and a computer. |
| Data Types Supported | Comprehensive: contacts, messages, photos, videos, apps, etc. | Key data types: contacts, photos, app data. | Wide range: contacts, photos, app data, etc. |
| Speed and Efficiency | High-speed transfer; efficient even with large data. | Dependent on internet speed; can be slow for large backups. | Fast with a wired connection; slower for large backups or older computers. |
| Data Security | Secure transfer with encryption; protected data handling. | Secure with Apple’s encryption protocols; depends on internet stability. | Secure via wired connection; relies on computer’s security. |
| Backup and Restore Flexibility | Selective data transfer; supports direct and backup-based transfers. | Limited flexibility; full backup restore required. | Allows full backup and restore; less flexible in selective data transfer. |
This table provides a clear comparison of Dr.Fone with iCloud and iTunes/Finder, highlighting the strengths of each method and emphasizing Dr.Fone’s superior features in ease of use, data support, speed, and flexibility.
Conclusion
Dr.Fone revolutionizes the process of transferring data from iPhone to iPhone by offering a streamlined and intuitive solution. With its user-friendly interface, comprehensive data support, and high-speed performance, Dr.Fone ensures a smooth and stress-free transition to your new iPhone 16.
This tool simplifies what can often be a complex and time-consuming task, allowing you to fully embrace the exciting features and enhanced experience of your new device without the hassle of manual data migration. To make your data transfer as efficient and effortless as possible, consider using Dr.Fone. For more information and to explore its features, visit this guide to know how do you transfer data from one iphone to another.
FAQs


iPhone Transfer
- Data Transfer
- 1. Video from iPhone to External Drive
- 2. Transfer MP4 to iPhone
- 3. Put Wallpapers on iPhone
- 4. Move Photos to SD Card
- 5. Best Apps to Transfer from iPhone to Android
- iPhone to PC
- 1. Transfer Pictures From iPhone to PC
- 2. Transfer From iPhone to Computer
- 3. Transfer Album from iPhone to PC
- 4. Transfer Data from iPhone to PC
- 5. Copy Voice Memo from iPhone to PC
- 6. iPhone Camera Roll to Computer
- 7. Podcasts from iPhone to Computer
- 8. Transfer Notes from iPhone
- 9. Techniques Used in Mobile Phone Forensics
- 10. Facing Please Unlock iPhone Photos Error
- iPhone to Mac
- 1. Voice memos from iPhone to Mac
- 2. Synce Notes from iPhone to Mac
- 3. Export iBooks to PC and Mac
- 4. Transfer Photos from iPhone to Mac
- 5. Transfer Music from iPhone to Mac
- Computer to iPhone
- 1. AirDrop From Mac to iPhone
- 2. Use AirDrop from Mac to iPhone
- 3. Transfer Data from PC to iPhone
- 4. Transfer Videos from PC to iPhone
- 5. Unsync iPhone from Computer
- 6. Sync iPhone with Multiple Computers
- Transfer to iPhone
- 1. Switch Cards Between iPhones
- 2. Facetime for Android to iPhone
- 3. Transfer Data from Motorola to iPhone
- 4. Samsung to iPhone Transfer
- 5. Transfer iPhone Apps to iPhone
- 6. Clone iPhone/iPad to iPhone
- Transfer from iPhone
- 1. Transfer Video from iPhone to Laptop
- 2. Transfer Data from iPhone to Laptop
- 3. Transfer Notes from iPhone to iPad
- 4. Transfer Data from iPhone to Android
- 5. Switch from iPhone to Google Pixel
- 6. Switch from iPhone to Samsung S10
- 7. Switch from iPhone to Samsung
- 8. Transfer from iPhone to Samsung S20
- iPhone Transfer Tips
- 1. Ford Sync iPhone
- 2. Sync iCal with iPhone
- 3. iPhone Calendar Not Syncing
- 4. iPhone Transfer Software
- WhatsApp Transfer
- 1. WhatsApp from iPhone to iPhone
- 2. WhatsApp from iPhone to Android
- 3. WhatsApp from iPhone to Samsung S10
- 4. WhatsApp Messages to iPhone
- 5. WhatsApp from iPhone to Samsung S9
- iTunes Transfer
- ● Manage/transfer/recover data
- ● Unlock screen/activate/FRP lock
- ● Fix most iOS and Android issues
- Transfer Now Transfer Now Transfer Now

Selena Lee
chief Editor