 Recover photos, messages, WhatsApp, and more — no backup
needed.
Recover photos, messages, WhatsApp, and more — no backup
needed.

 100% Security Verified | No Subscription Required | No Malware

 :
: 
 ChatGPT
 Perplexity
 Gemini
 Claude
 Grok
Grok
Digital photography has completely transformed the way we capture and preserve memories. Unlike the era of traditional printed pictures, digital photos are instantaneously accessible, highly portable, and incredibly convenient to share. Having the ability to store thousands of high-resolution images directly on your smartphone is an undeniable marvel of modern technology. We rely heavily on these devices to chronicle our daily lives, making them digital vaults of our most cherished moments.
Modern Android smartphones boast massive internal storage capacities specifically engineered to preserve digital media securely over the long term. However, disaster strikes when you accidentally or deliberately delete precious photos from your device's memory. A momentary slip of the finger can seemingly erase years of memories. But there is a silver lining: these files are rarely gone forever immediately. Thanks to the architecture of flash memory, there are several highly effective techniques you can employ to recover deleted photos on Android internal storage.
In this comprehensive 2026 guide, we will unpack the underlying reasons why digital images suddenly disappear from Android phones. More importantly, we will provide you with step-by-step, actionable methods to retrieve deleted photos from your Android internal storage securely. Continue reading to restore your valuable data.
In this article




Part 1. Common Reasons Behind Missing Photos on Android Internal Storage
To put it simply, internal storage is the built-in, non-volatile space on your mobile device dedicated to holding operating system data, application files, and user media. While modern Android devices are fortified with robust security protocols and file management systems, users frequently encounter situations where photos vanish inexplicably. Before jumping into the recovery process, it helps to understand the root causes. Consider the following scenarios:
Pictures get deleted by accident.
Human error remains the number one culprit for unexpected data loss. Whether you were clearing up space and hastily selected the wrong batch of images, or a child was playing with your unlocked phone, accidental deletion happens to everyone. Fortunately, the Android system doesn't instantly wipe the data off the physical memory chip, leaving a window of opportunity to recover deleted photos on Android internal storage.
Pictures get misplaced unintentionally.
Android grants users deep access to its file directory through the built-in File Manager application. While organizing, renaming, or transferring folders, it is entirely possible to accidentally move your camera roll to an obscure subdirectory. The photos aren't deleted; they are merely sitting in an unexpected path where the default Gallery app cannot index them.
A factory reset procedure has been initiated.
Did you perform a hard factory reset to fix device lag or prepare the phone for resale? A factory reset is designed to format the user data partition entirely, returning the device to its out-of-the-box state. While this wipes standard directories clean, deep data traces may still exist. Specialized data recovery software for Android phone's internal memory might be your only lifeline in this scenario.
Pictures become unreadable or corrupted.
Sometimes the files are exactly where they should be, but a software glitch, an interrupted download, or a failing memory sector causes the image file header to corrupt. When this happens, the Gallery app's photo viewer fails to parse the data and subsequently hides the file. Though seemingly lost, repairing the directory or using extraction tools can bypass these errors.
Operating system glitches disrupt storage indexing.
Major OS updates or rogue third-party applications can occasionally conflict with the Android Media Storage process. When the system's indexing cache corrupts, the internal storage struggles to display existing media. A simple cache clear or utilizing file exploration techniques can typically bypass this system anomaly.
Part 2. 4 Proven Techniques to Recover Deleted Photos on Android Internal Storage
Hearing that files are missing from "internal storage" might sound intimidating, but resolving data loss on modern Android systems is highly achievable. Depending on how the photos disappeared, different tactics will yield the best results. Below, we've broken down four systematic approaches to retrieve your media safely and effectively.
Solution 1: Retrieve the deleted photos from the File Manager app's trash folder
Most modern Android File Managers (like Files by Google, Samsung My Files, or Xiaomi File Manager) feature a fail-safe mechanism known as the Trash or Recycle Bin. Deleted files are kept in this temporary holding area鈥攖ypically for 30 days鈥攂efore being permanently wiped. If you act quickly, you can effortlessly revive them.
-
Step 1 Access the File Manager App
Unlock your phone, navigate to your app drawer, and launch the built-in File Manager application.
-
Step 2 Open the Sidebar Menu
Tap on the Three-lined (hamburger) menu icon located at the top-left corner of the screen to reveal the side navigation panel.

-
Step 3 Navigate to the Trash Bin
From the sidebar, select the Trash or Recently Deleted option. Browse through the temporary files and tap to select the specific photos you wish to recover.

-
Step 4 Execute the Restoration
Finally, tap the Restore button at the bottom of the screen. The images will instantly be moved back to their original folders within your internal storage.

Solution 2: Restore the missing photos by organizing the File Manager's Images folder
If your pictures aren't in the Trash, they might simply be misplaced. Often, third-party apps download media into hidden cache folders that standard Gallery apps ignore. By manually navigating your internal directory, you can locate and move these files back into your main photo stream.
-
Step 1 Open Image Categories
Launch the File Manager application on your Android device and navigate directly to the media categories section.
-
Step 2 Select the Images Tab
Tap on Images to allow the system to aggregate all picture files found across various deep folders.

-
Step 3 Locate the Missing Media
Browse through the All section or manually check obscure album names until you locate the misplaced photos. Long-press on the images to highlight them.
-
Step 4 Access Transfer Options
With the photos selected, tap the Three-dotted icon (More menu) located at the top-right corner of the interface.
-
Step 5 Initiate the Move Command
From the dropdown menu, select Move To (or sometimes labeled as 'Cut' depending on your OS version).

-
Step 6 Relocate to DCIM
Navigate to your preferred standard destination, typically Internal Storage > DCIM > Camera, and paste the files there. Your gallery should now display them normally.

Solution 3: Get rid of image files blocked by the ".nomedia" extension
The Android operating system uses a specific blank file called ".nomedia" to instruct media scanners (like your Gallery or Music app) to ignore a folder's contents. This is useful for hiding app cache icons or WhatsApp voice notes. However, if a ".nomedia" file is accidentally placed inside your Camera or Pictures folder, all your photos will vanish from the Gallery. Deleting this file resolves the issue.
-
Step 1 Launch File Manager Settings
Open the File Manager on your smartphone and tap the Three-lined menu button at the top-left.
-
Step 2 Access the Configuration Menu
Select Settings from the sidebar to open the advanced preferences for file browsing.

-
Step 3 Enable Hidden Files Visibility
Toggle on the switch located next to Show Hidden Files. Since files starting with a dot are invisible by default, this step is critical.

-
Step 4 Search for the Blocker File
Return to the main directory view and open the Images folder (or DCIM directory). Use the search bar to type in ".nomedia".
-
Step 5 Delete the Extension
If any ".nomedia" files appear in the search results within your photo folders, select and delete them immediately. Restart your phone to refresh the media scanner.

Solution 4: Recover deleted photos deeply embedded in internal storage using Wondershare Dr.Fone
If the photos are not hidden, misplaced, or resting in the trash bin, they have been permanently deleted from the directory index. However, the raw data still resides on your phone's memory sectors until overwritten by new data. This is where professional data recovery software for Android phone's internal memory becomes essential. Wondershare Dr.Fone features deep-scan technology capable of extracting raw photo data directly from the storage architecture.
-
Step 1 Install the Application
Download the Wondershare Dr.Fone app from the official Google Play Store and install it on your device.
-
Step 2 Launch and Authenticate
Open the app and complete the setup process. You may need to log in or create an account to access the deep recovery modules.
-
Step 3 Initiate Deep Photo Scan
On the primary dashboard interface, locate the "Recover From Deep Scan" section and tap on Photos.

-
Step 4 Select the Identified Media
Allow the software a few minutes to meticulously scan the internal storage chip. Once the scan populates, browse the thumbnails and select the images you wish to revive, or tap Select All.
-
Step 5 Finalize Data Restoration
Click the Recover button. The app will reconstruct the deleted data and securely save the photos back to your accessible storage space.

 Scan Android phones and tablets directly.
- Preview and recover only what you want.
- Supports WhatsApp, photos, videos, contacts, and more.
- Works with 6000+ Android devices.

Part 3. Bonus Tip: Prevent Future Data Loss by Backing Up Regularly
While mastering the art of file retrieval is incredibly useful for emergency scenarios, adopting a proactive stance is undeniably the most effective strategy against data loss. Taking mere minutes to generate secure backups of your device ensures that hardware failures, factory resets, or accidental deletions never result in permanent loss again. Wondershare Dr.Fone provides an intuitive desktop ecosystem that simplifies Android data backup and restoration, giving you absolute peace of mind.
-
Step 1 Install the Desktop Client
Download the robust Wondershare Dr.Fone desktop suite from its official website and complete the installation on your PC or Mac.
-
Step 2 Connect Your Mobile Device
Launch the application on your computer. Using a high-quality USB cable, connect your Android device and ensure USB debugging is enabled.
-
Step 3 Configure Backup Settings
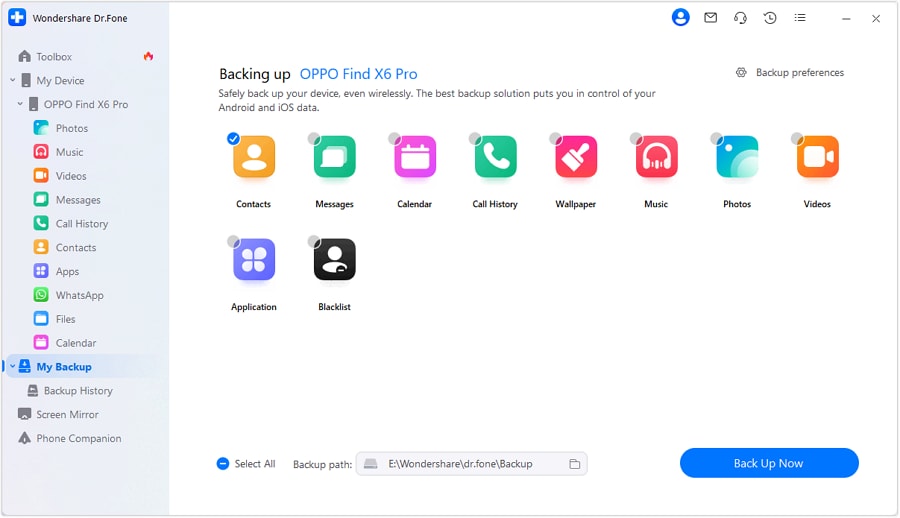
From the intuitive left-side navigation panel, select My Backup. Within the main interface dashboard, click Back Up Now to trigger the setup wizard.
-
Step 4 Handle SMS Backup Permissions
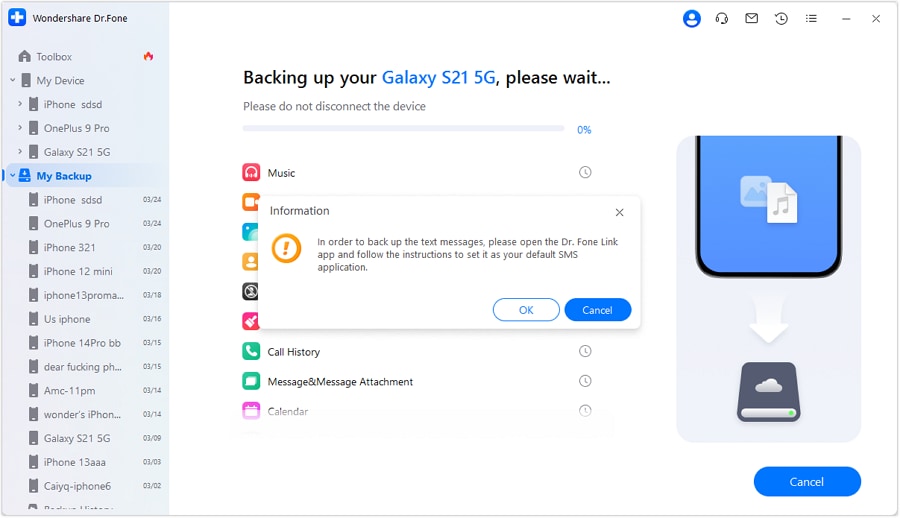
If prompted with on-screen instructions regarding default messaging apps for SMS backup, follow them carefully. Click OK once permissions are granted.
-
Step 5 Monitor Backup Progress
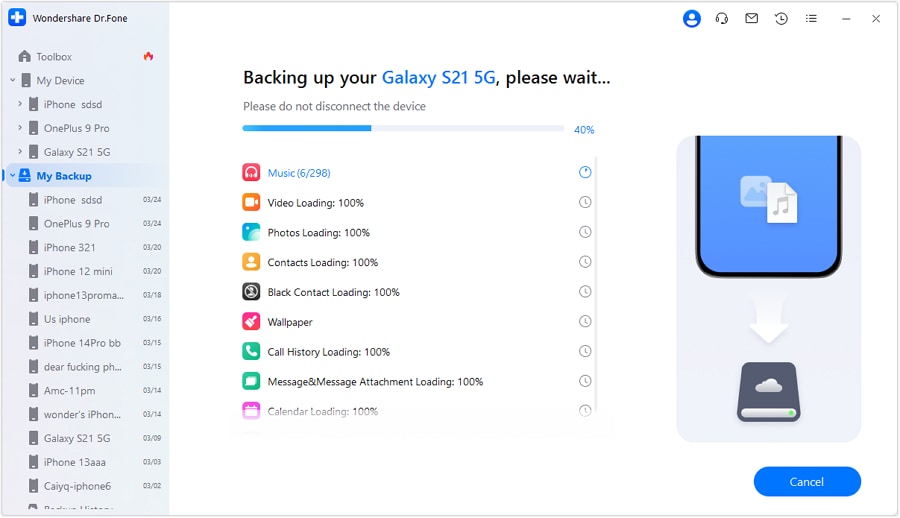
Allow Wondershare Dr.Fone to safely encrypt and transfer your media and data to your hard drive. Ensure the cable remains connected during this vital phase.
-
Step 6 Verify Data Integrity
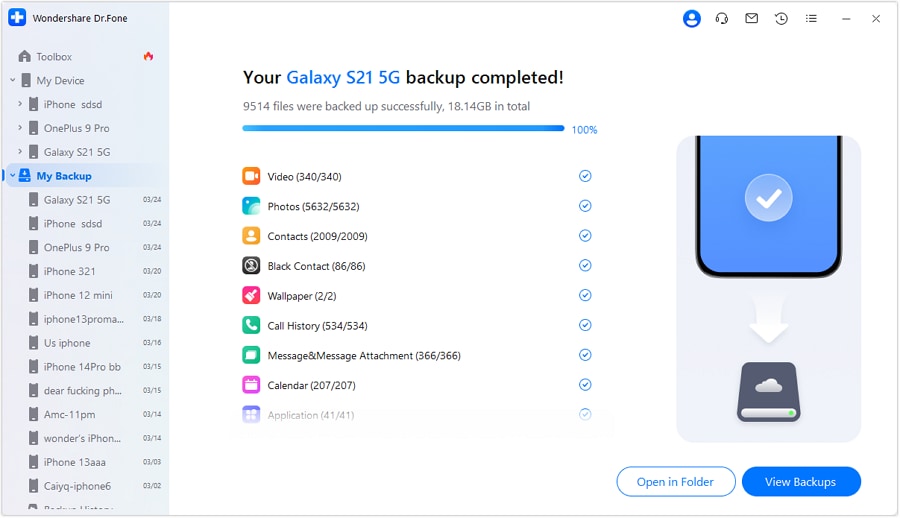
Upon completion, the software will display a success prompt. Click View Backups or Open in Folder to confirm that all your precious photos have been successfully archived.
Conclusion
The internal storage on modern Android smartphones represents one of the most reliable and powerful mediums for keeping files safe. Yet, the persistent risk of data loss via accidental deletion, software corruption, or formatting makes understanding recovery protocols indispensable. When confronted with missing pictures, utilizing built-in Trash systems or fixing hidden directory errors can yield immediate results. For severe cases, leveraging a deep-scan utility guarantees you the best chance to recover deleted photos on Android internal storage safely. Equipping yourself with industry-leading desktop and mobile solutions, such as Wondershare Dr.Fone, ensures you possess the capability to perform highly advanced data restorations and preventative backups whenever needed.
FAQ
-
1. Are photos permanently erased immediately after I delete them from my Android?
No, deleted photos are not immediately wiped from your phone's memory. Android file systems first remove the directory pointer to the file, marking the space as "available" for new data. Until this exact sector is overwritten by fresh information, the raw photo data remains intact and can be extracted using advanced deep-scan recovery software. -
2. How long do files stay in the File Manager Trash folder?
Most default Android File Managers and Gallery applications retain items in the Trash or Recently Deleted folder for exactly 30 days. Some OEM-specific interfaces might extend this period to 60 days. After the expiration window concludes, the system automatically triggers a permanent deletion command to clear up internal storage space. -
3. Why did a ".nomedia" file suddenly hide my camera photos?
The ".nomedia" file is a core Android system command that instructs media scanners to skip a specific directory to prevent cache files or app assets from cluttering your main Gallery view. If an app update, an erratic third-party tool, or manual user error places this file into the DCIM or Pictures folder, all visual assets inside are immediately hidden from standard viewing apps. -
4. Does running a deep data recovery scan require my Android device to be rooted?
Not inherently. Standard recovery of cached thumbnails or lightly deleted files can proceed on unrooted devices. However, to access the deepest system partitions for heavily fragmented raw image files, rooting grants the data recovery software administrative access, significantly increasing the likelihood of a successful restoration. Tools like Wondershare Dr.Fone can perform robust standard scans without requiring root access.
 Add Wondershare Dr.Fone as a preferred source on Google



