Samsung ROM Download & Install: The Definitive Guide
Aug 27, 2025 • Filed to: Phone Repair Solutions • Proven solutions
Your Samsung smartphone operates through an essential component called a ROM, or "read-only memory," which refers to the operating system enabling all features to function seamlessly. Unlike iOS devices, Samsung devices give you the freedom to update or install different ROMs, such as Samsung stock ROMs or custom ones. Whether you've damaged your phone, encountered stubborn errors, or downloaded a virus, a Samsung ROM Download can help restore your device without the need for replacement. It's a bit like reinstalling Windows on your PC but tailored for your smartphone.
Beyond repairs, custom ROMs offer exciting possibilities. Designed by tech enthusiasts, these ROMs can enhance your phone’s performance or introduce specialized features. From Samsung stock ROMs to the most innovative custom options, this guide will walk you through Samsung ROM Download steps, how to use them, and the best custom ROMs available for your needs.

Part 1. Why You Need to Download and Install an Official/Custom ROM on Samsung

There are many reasons why you might want to install a new ROM on your Samsung smartphone. If your phone is buggy, infected with a virus, or has become unusable, installing a Samsung stock ROM can reset it to its factory state. This process removes bugs and viruses, giving your device a fresh start without needing costly repairs. Sure, you might lose your data in the process, but it’s a far cheaper way to get your phone running like new again.
Custom ROMs, on the other hand, offer a more exciting side to device management. They replace bloated software and unnecessary features with faster performance, extended battery life, and a smoother experience. You can even upgrade to the latest Android version or try out an entirely new interface. Updating to a Samsung stock ROM or custom ROM is simpler than you think and unlocks endless possibilities for your device.
Part 2. One-Click To Get And Install Samsung ROM Download
If you’re looking for a hassle-free way to replace your Samsung stock ROM with a clean, official version, Dr.Fone - System Repair (Android) makes it incredibly simple. This smart tool automatically scans your device to identify its make, model, and ROM version, ensuring you get the exact ROM compatible with your phone. No guesswork, no stress—just an easy, reliable process you can trust.
What makes Dr.Fone stand out is how beginner-friendly it is. You don’t need any prior technical knowledge to replace your ROM. Just connect your device, follow a few quick steps, and the software takes care of the rest. Plus, this is only one of the powerful features Dr.Fone - System Repair (Android) offers. Stay tuned to discover how it can make managing and repairing your Android device even easier!

Dr.Fone - System Repair (Android)
Android repair tool to download and flash Samsung stock ROM
- Get Samsung stock ROM downloaded to flash directly to phone.
- Can fix any error your Samsung device is experiencing in just one click!
- All Samsung devices supported, including all carriers, versions, and even latest models
- Every part of the process is automatic so you can fix everything quickly
- A 24/7 customer support team always on hand if you need them
A Step-by-Step Guide on How to Use Dr.Fone - System Repair (Android) Effectively
As mentioned before, Dr.Fone - System Repair (Android) is so simple; the entire process has been broken down into just three simple steps. Here they are so you can get started right away!
Step 1 – Getting Started with Dr.Fone - System Repair (Android)
Head over to the Dr.Fone - System Repair (Android) and click the download button. Choose the version for your Mac or Windows computer. Once downloaded, follow the installation wizard’s prompts. After installation, restart your computer and launch the software.
Step 2 – Preparing to Flash ROM Android
Open Dr.Fone and connect your Samsung phone to your computer using the official USB cable. From the main menu, select System Repair, then choose Android Repair from the left panel, and click Start.
You’ll now need to provide some details about your device, such as the make, model, carrier, and your region. Double-check this information to ensure accuracy. If unsure, contact your carrier for assistance.

Step 3 – Installing Your New ROM
Follow the on-screen instructions to put your phone into DFU mode (known as Recovery Mode). The process varies depending on whether your phone has a home button or not, but step-by-step pictures on the screen will guide you.

Step 4 – Download and Install New ROM
Once your phone is in Recovery Mode, the software will detect it and start downloading the correct firmware directly from Samsung’s official source. After downloading, Dr.Fone will safely install the new ROM on your device automatically.
Important: Don’t disconnect your device during this process, as it could lead to serious errors.

Make sure your device is not disconnected during any stage of this process because you risk causing an unrepairable error. You’ll receive a notification when the process is complete and when to disconnect your device. Once disconnected, you can use your phone as normal!

Part 3. Top 5 sources to find Samsung ROMs to Download
While you can replace your current Samsung operating system with the official ROM, some of you may be interested in some of the custom ROMs available to help you enhance your phone’s experience, as well as unlocking brand-new features, functions, and capabilities.
However, you’ll need to make sure you’re downloading high-quality ROMs that work, and that you’re downloading them from legitimate places. To help you out here, here’s a list of the top five sources where you can find the best custom ROMs.
1 – SamMobile
If you’re looking for basically any Samsung ROM that has ever been released, regardless of what version or model you need, or what country the ROM is based on, SamMobile has the complete database with everything you need.
Here, you’ll find most carriers and providers are supported, and there’s a seemingly endless number of pages full of high-quality ROMs with fast download times. You’ll also find that even the latest Samsung S10 models are supported.
Pros
- A wealth of ROMS to download covering a range of models, versions, and supported countries
- Regularly updated with new Samsung stock ROM downloads as they are made available
- Fast download times and easy accessibility and navigation
- Multiple country Samsung stock ROM downloads are supported
- Ideal for European phone users (or those looking to flash their phone to a European device)
Cons
- No custom Samsung stock ROM downloads to add functionality to your phone
- No easy search features to download ROM Samsung you want
- Not all Samsung devices are supported
2 – Updato
Updato is another fantastic resource if you’re looking for practically any Samsung stock ROM that has ever been released. The database here is extensive, to say the least, and all ROMs are official releases. While you won’t find any custom ROM stock Samsung here, if you’re looking to overhaul your device completely, Updato is a great place to start.
Pros
- High-quality search features to find the exact ROM stock Samsung you’re looking for
- All ROMs are official releases, so you know you’re getting a fully functional ROM
- One of the fastest download servers to download ROM Samsung updates in the world
- Download ROM Samsung flashes available from over 500 different regions of the world
Cons
- No custom ROMs available here
- Only ROM stock Samsung available
3 – Samsung Updates
As the title suggests, Samsung Updates is an archive of all the other official Samsung ROMs that have been released over the years, very similar to the two websites we’ve listed above. While this website takes a classic archive approach to hosting ROMs, the site is easy to use and download from, and you’re sure to find what you’re looking for.
Pros
- Most official ROM updates for all models available and from many different regions
- All information detailed to help you quickly find the compatible ROM for your device
- Multiple new firmware’s are added to the website every single day
Cons
- A rather basic website with no real dedicated search or filtering features
- The selection of Samsung official ROMs is limited compared with other websites
- No custom ROMs hosted here; only official ones
4 – XDA Developers
If you’re looking to take your Samsung device to the next level and unlock your phone’s full potential using a custom ROM, XDA Developers should easily be the first place to check out. The site is renowned for being the internet’s hub for custom ROMs, no matter what device you’re using, and you’re sure to find an active community that has everything you need to get started.
Pros
- Most complete database of custom ROMs on the internet
- An active community to help and support you throughout the process
- New ROM updates and firmwares added to the website all the time
- Fast download servers and easy website navigation
Cons
- None!
5 – Samsung Firmware
If you’re looking for a pleasant ROM update experience while finding the Samsung ROMs best suited for your device, Samsung Firmware is a great place to start.
While this ROM update website doesn’t seem to have anything the latest devices, including the S8+, there are plenty of ROMs from all over the world here, all of which are easy to find using the built-in search bar on the homepage.
Pros
- Lots of Samsung official ROMs to choose from including ones from all other the world
- Easy to find the ROMs you’re looking for
- The website is extremely fast and easy to use
Cons
- Doesn’t have Samsung official ROMs for the latest Samsung devices
- Lots of ads and dead links to broken pages
Part 4. How To Install The Downloaded Samsung ROM

If you’re not using the Dr.Fone - System Repair (Android) software to flash an official ROM to your device, but you want to use your own ROM, or a custom ROM, you’re going to need to install the ROM differently. Easily the most effective and easiest way to do this is using a ROM flasher known as Odin.
Note: ‘flashing’ refers to installing the ROM on your device. It’s just another term for it.
Odin is a powerful ROM flashing tool to help you flash practically any ROM you want to install to your Samsung device. The process has been made as simple as possible, and it’s easy to see why it’s one of the most popular ROM flasher tools available.
However, you’ll still need to make sure you get the process right to prevent the risk of accidentally bricking your device and rendering your device useless. Below is the complete guide on how to use it alongside everything you need to know.
Preparations Before Using Odin
Before you start using Odin, you’ll want to make some preparations to ensure you can go from start to finish without a hitch. Fortunately, you can follow this guide, and you won’t go wrong!
Before you start, you’ll need to make sure you have access to;
- Your Samsung device
- A specific ROM or firmware file
- The official Odin installation file
- All the relevant Samsung drivers installed on your computer
- Make sure you back up your device with all your personal files before continuing
- USB debugging mode needs to be enabled on your device
Once you’ve done all these things, you’ll be ready to start using the Odin software to flash a ROM to your device. Here’s how;
Step 1 – Making the Final Preparations
Firstly, make a new folder on your computer to host all your files listed above in. This will make it easier to ensure that everything is organized, and you don’t lose anything. Start with the ROM/firmware file that you downloaded from one of the sources above into this folder.
Now open your Odin tool, making sure that you’re running in your computer’s administrator mode. Restart your Samsung device in DFU/Download mode (following the same instructions as Step 3 when using the Dr.Fone - System Repair tool).

Step 2 – Connecting Everything Up
Once your device has booted into Download Mode, connect it to your computer using the official USB data cable. Odin will now automatically detect that your phone has been connected, and all the relevant information will be displayed in the text boxes.
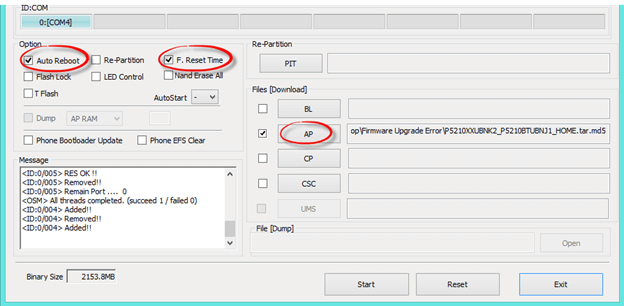
On the Odin screen, make sure that the ‘Auto Reboot’ and ‘F. Start Time’ options are ticked, and the rest of the options are not. Under the files tab on the right-hand side, you’ll want to check the ‘AP’ box, and then locate the firmware file we unzipped in the first step (which should be in the same folder you left it in)

Step 3 – Starting to Flash ROM with Odin
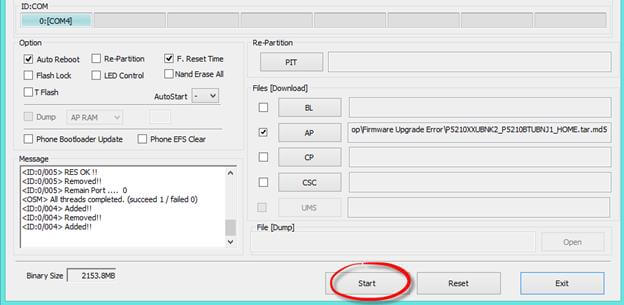
Once you’re ready to start, click the ‘Start’ button and the flashing process will begin. This entire process will take between 5 – 10 minutes, so it’s ideal to leave your computer, so you don’t actually press anything, nor disconnect either device.
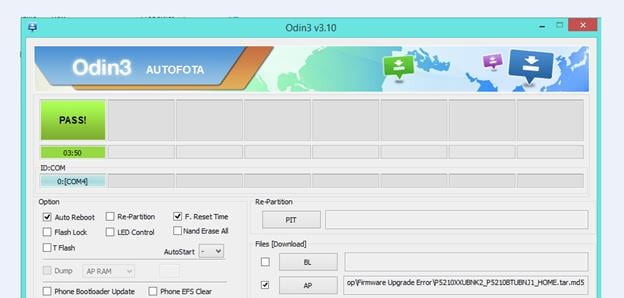
When the flash ROM with Odin process is complete, you’ll see a green ‘PASS’ image appear in the Odin window. When this is shown, you’ll be able to disconnect your device and use it like normal! That’s all there is to it when it comes to learning how to flash ROM with Odin!

You Might Also Like
Samsung Issue
- Samsung Phone Issues
- 1. Fix Samsung Camera Failed
- 2. Fix Samsung Phone Hang
- 3. Samsung Phone Not Displaying Incoming Calls
- 4.Fix a Bricked Samsung
- 5. Downloading Do Not Turn Off Target
- 6. Fix Samsung Stuck in Download Mode
- 7. Fix Samsung S5 Won't Turn On
- 8. Fix Samsung Pay Not Working
- 9. Samsung ROM Download & Install
- 10. Samsung Firmware Download
- 11. Fix Samsung Sudden Death
- 12. Fix Samsung Stuck on Boot Screen
- 13. Fix Samsung Frozen on Startup
- 14. Full Guide to Fix 'Samsung Galaxy Phone Keeps Restarting'
- 15. Fix Samsung S3 Won't Turn On
- 16. Fix Samsung J7 Problems
- 17. Fix Samsung S10 Gone Dead
- 18. Fix Samsung S10 Won't Turn On
- 19. Fix Samsung Galaxy S7
- Samsung Screen Issues
- 1. Fix Unresponsive Touchscreen
- 2. Fix Black Screen After Dropping
- 3. Resolve Screen Stuck on Boot Issue
- 4. Fix Samsung Fold Screen Issues
- 5. Fix Samsung Black Screen
- 6. Fix Samsung Screen Not Working
- 7. Fix Half of Screen Not Working
- 8. Fix Samsung Stuck on Bootloop
- 9. Fix Samsung Screen Blacked Out
- 10. Fix Screen Blacked During a Call
- 11. Fix Samsung Stuck on the Screen
- 12. Solve Samsung TV Blackout
- 13. Fix Samsung Flip Screen Not Working
- 14. Fix Screen Won't Respond
- Samsung Tablet Issues
- 1. Fix Samsung Tablet Problems
- 2. Fix Samsung Stuck on Logo
- 3. Fix Samsung Tablet Won't Turn On
- 4. Fix Touch Screen Not Working
- Samsung Update
- 1. Flash a Samsung phone
- 2. Samsung Mobile Software Update
- 3. Update Samsung Kies for Mac
- 4. Update Samsung to Android Oreo
- 5. Update Samsung Kies on PC
- 6. Update Android 6.0 for Samsung
- Samsung Useful Tricks
- 1. Remove Google Account Bypass
- 2. Hard/Factory Reset Samsung
- 3. Samsung Root Software
- 4. Transfer Files from Samsung to PC
- 5. Top 5 Samsung Kies Alternatives
- 6. Bypass Samsung Lock Screen Pin
- 7. SIM Network Unlock PIN
- 8. Transfer Whatsapp to iPhone
- 9. Samsung Auto Backup
- 10. Recover File on Samsung


Alice MJ
staff Editor
Generally rated4.5(105participated)