Resolve common problems and system crashes on both iPhone and Android devices.

 100% Security Verified | No Subscription Required | No Malware

 :
: 
 ChatGPT
 Perplexity
 Gemini
 Claude
 Grok
Grok
Samsung Galaxy smartphones and tablets are globally recognized for their cutting-edge camera capabilities and vibrant displays. However, even premium devices are not entirely immune to software glitches. A highly reported issue among users is the sudden appearance of the warning camera failed error when attempting to launch the camera application. This perplexing glitch often forces the app to close immediately, leaving you with a single, unhelpful option: tapping "OK".
Encountering a situation where your Samsung camera failed can be incredibly frustrating, especially when you are trying to capture an important moment. Fortunately, this error is typically software-related rather than a hardware malfunction. In this comprehensive guide, we will explore the root causes of the camera failed Samsung issue and provide seven proven methods to restore your camera's functionality.
In this article
- Part 1. Why Does the Warning: Camera Failed Error Occur?
- Part 2. How to Fix Samsung Camera Failed in One Click
- Part 3. Fix Camera Failed Error by Clearing Camera Data
- Part 4. Fix Camera Failed Error by Removing Third-Party Apps
- Part 5. Fix Camera Failed Error by Wiping the Cache Partition
- Part 6. Fix Camera Failed Error by Resetting Settings
- Part 7. Fix Camera Failed Error via Factory Reset
Part 1. Why Does the Warning: Camera Failed Error Occur?
Like any sophisticated operating system, Android is susceptible to occasional bugs and conflicts. Understanding the underlying triggers can help you apply the correct troubleshooting technique. Here are the most common culprits behind the Samsung camera failed error:
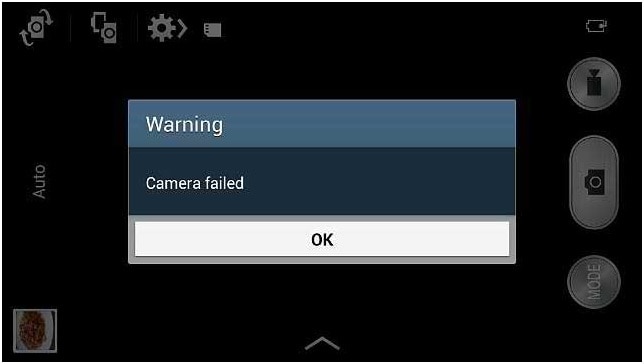
- Interrupted or Buggy OS Updates: If you recently upgraded your Android version in 2026, compatibility bugs or an incomplete firmware download might be disrupting the camera module's operations.
- Insufficient Storage Space: When your device's internal storage is pushed to its absolute limit, the camera app lacks the necessary temporary space to cache data or save new media, leading to a crash.
- Corrupted App Cache: Over time, temporary files (cache) can become corrupted. If you haven't cleared this data, the app may struggle to launch properly.
- System Setting Alterations: Unintended modifications to the device's internal settings or permissions can block the camera app from functioning.
- Outdated Camera Application: Failing to install available system and app patches can result in software decay, reducing the efficiency and stability of your device's native camera.
Part 2. How to Fix Samsung Camera Failed in One Click
If you prefer a hassle-free, automated solution to resolve complex system anomalies—like the camera failed error, black screens, or app crashes—utilizing a dedicated system repair software is highly recommended. Dr.Fone - System Repair (Android) is engineered precisely to tackle deep-rooted firmware issues without requiring any advanced technical knowledge.
By executing a thorough system repair, this tool can completely refresh your device's OS, ensuring that stubborn errors like warning camera failed are eradicated in just a few clicks.
 Fix Android instantly – no skills needed.
- Solve boot loop, black screen, won’t turn on, etc.
- High success rate for all system issues.
- User-friendly interface with easy-to-follow steps.

Follow this straightforward guide to permanently eliminate the camera error:
-
Step 1 Launch Android Repair
After downloading and installing the software on your computer, open it and select the "System Repair" function from the home interface. Connect your Samsung device using a reliable USB cable and navigate to the "Android Repair" module.

-
Step 2 Input Device Details
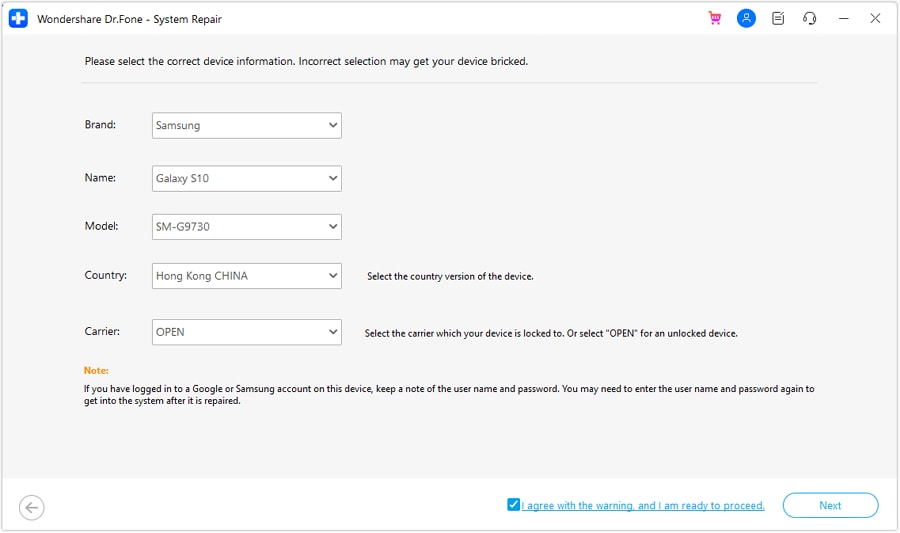
To ensure the software downloads the correct firmware, carefully select your device's exact brand, name, model, country, and carrier from the dropdown menus. Confirm your choices and agree to the terms.
-
Step 3 Enter Download Mode
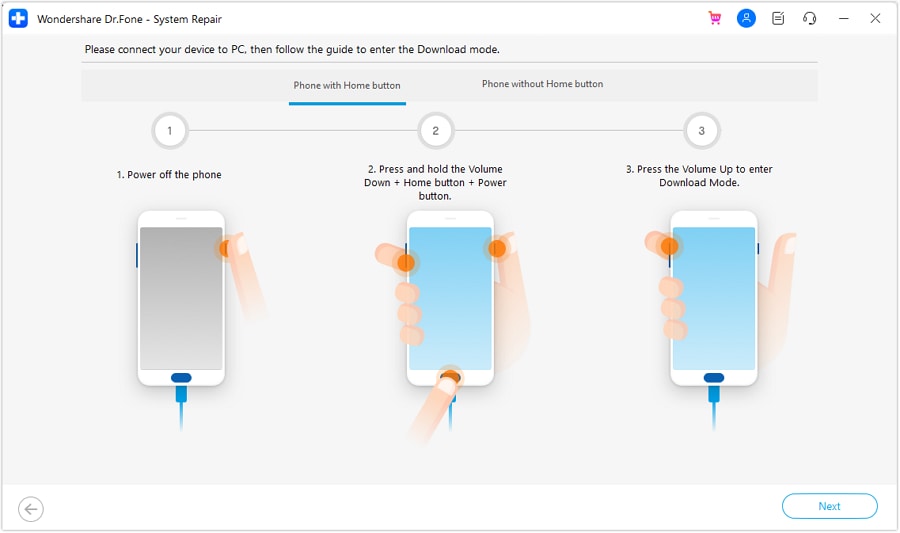
The application will provide on-screen visual instructions to help you boot your Samsung phone into Download Mode. Once in Download Mode, the firmware download will commence automatically.
-
Step 4 Complete the Repair
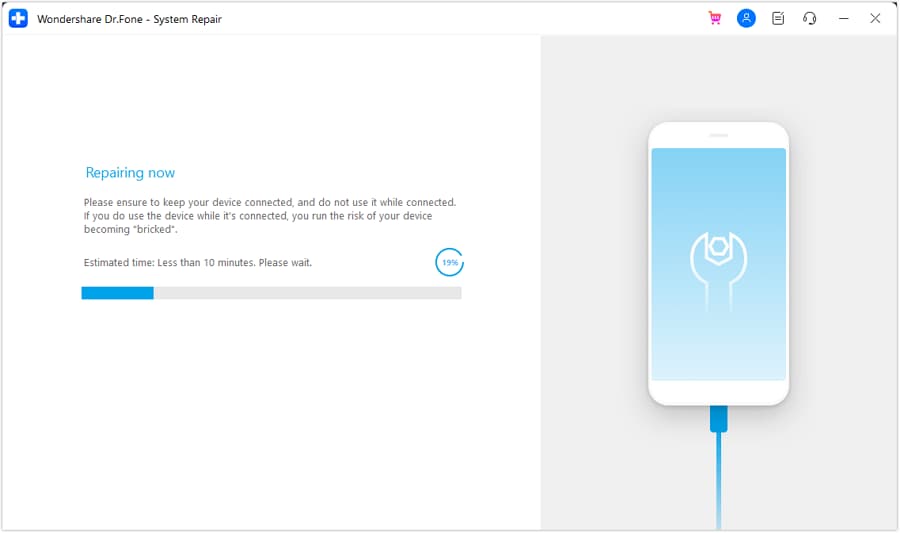
Once the firmware package is fully downloaded, Dr.Fone will immediately trigger the system repair sequence. You can track the progress on the screen. Upon completion, your device will reboot, and the camera should function normally.
Part 3. Fix Camera Failed Error by Clearing Camera Data
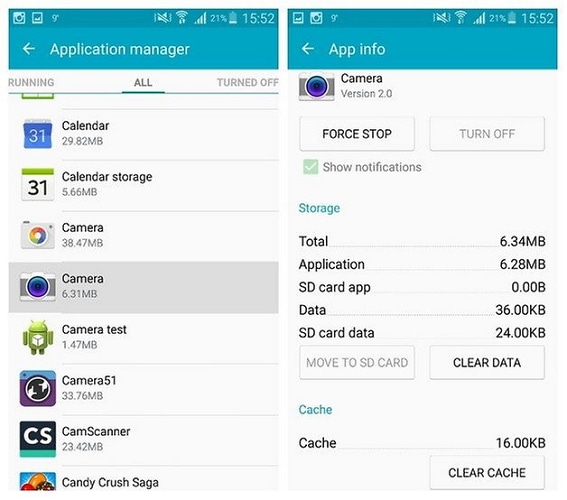
A simple yet highly effective maintenance habit is to regularly clear the app data for your camera. Over time, temporary files accumulate and can easily become corrupt, resulting in erratic behavior. Rest assured, clearing app data will not delete any of your precious photos or videos saved in the gallery.
-
Step 1 Access Application Settings
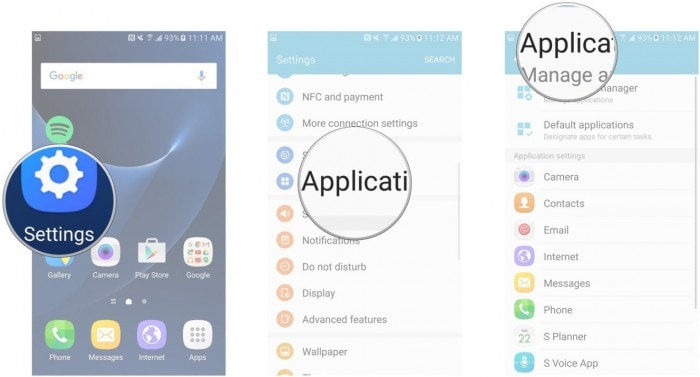
Navigate to the Settings app on your Samsung Galaxy device and locate the Apps or Application Manager section.
-
Step 2 Find the Camera App
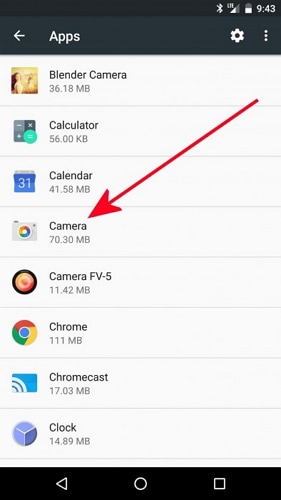
Scroll through the alphabetical list of installed software until you find the native Camera app. Tap on it to open its specific information panel.
-
Step 3 Clear the Data
Tap on the Storage option (if prompted), then select Clear Data. Once completed, return to your Home Screen and attempt to launch the camera again.
Part 4. Fix Camera Failed Error by Removing Third-Party Apps
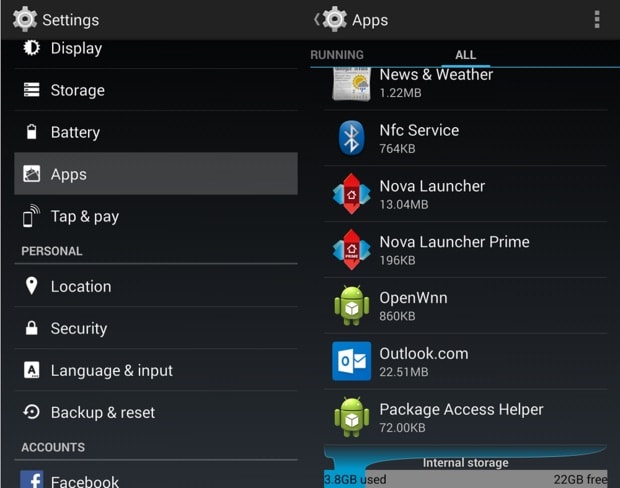
In many instances, newly installed third-party applications—especially those requiring camera permissions (like alternative camera apps, social media filters, or flashlight widgets)—can interfere with the native app. Freeing up internal storage by deleting unneeded apps can also give your camera the processing room it desperately needs to operate smoothly.
-
Step 1 Open the App List
Launch Settings from your Home Screen or app drawer and tap on Apps or Application Manager to view all downloaded software.
-
Step 2 Uninstall Suspicious Apps
Identify any apps you installed right before the warning camera failed error started appearing. Tap on the app, select Uninstall, and confirm the action on the pop-up prompt.
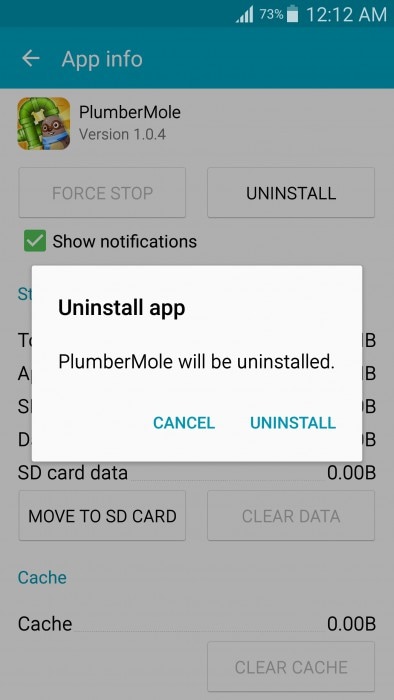
After uninstalling these conflicting applications, restart your device to ensure all residual background processes are terminated.
Part 5. Fix Camera Failed Error by Wiping the Cache Partition
While wiping the cache partition might sound like an intimidating, deeply technical process, it is remarkably effective and perfectly safe. This procedure cleans out the entire device's system cache repository, removing stale system files that might be causing conflicts without deleting any of your personal data, media, or settings.
-
Step 1 Power Off the Device
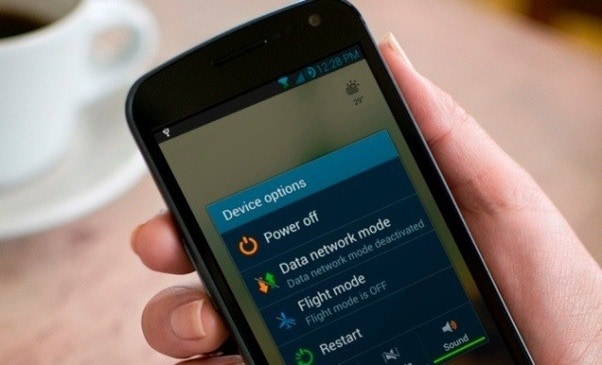
Hold down the Power button and select Power Off from the on-screen menu. Wait for the display to turn off completely.
-
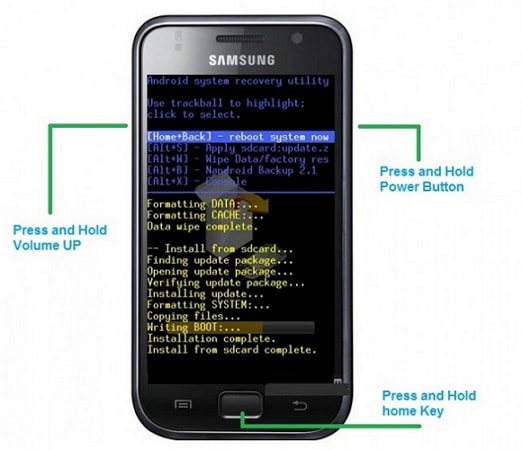
Step 2 Boot into Recovery Mode
Simultaneously press and hold the Power, Home (or Bixby/Volume Up on newer models), and Volume Up buttons. Release only the Power button once you feel the device vibrate, but keep holding the other keys until the Android Recovery screen appears.
-
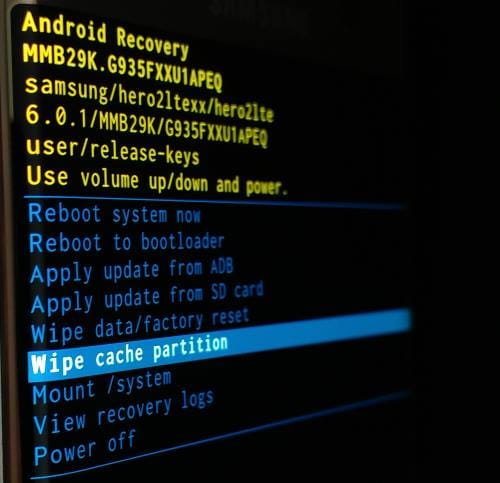
Step 3 Execute the Cache Wipe
Use the Volume Down key to navigate the menu until Wipe Cache Partition is highlighted. Press the Power button to execute the command.
-
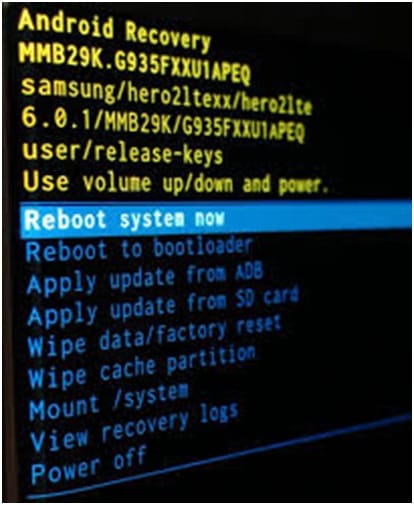
Step 4 Restart Your Phone
Once the operation concludes, the menu will default back to Reboot system now. Press the Power button to restart your device normally.
Part 6. Fix Camera Failed Error by Resetting Settings
If you've recently tinkered with your camera's internal resolution, grid, or lighting settings, you may have inadvertently triggered a software loop. Returning these preferences to their factory defaults solves the camera failed Samsung bug surprisingly often.
-
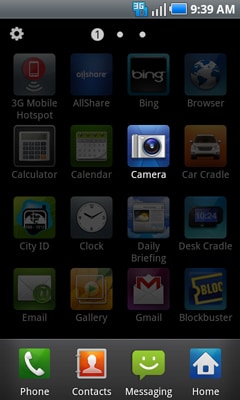
Step 1 Launch the Camera
Open the camera app. If it crashes immediately, try this method right after rebooting your phone when the system is fresh.
-
Step 2 Access Camera Settings
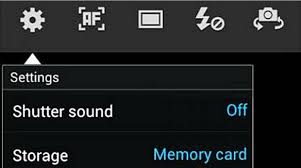
Tap on the gear icon, usually located in the top corner of the viewfinder, to enter the internal settings menu.
-
Step 3 Reset to Defaults
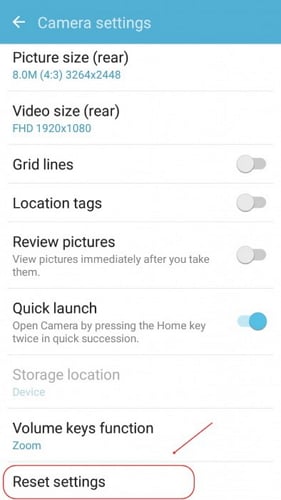
Scroll down to the bottom of the list and tap on Reset Settings. Confirm your choice to restore the app's default configuration.
Part 7. Fix Camera Failed Error via Factory Reset
If all previous interventions fail, the core system files managing the camera might be irreparably corrupted. In such dire scenarios, a complete Factory Reset is the final frontier. This process wipes the phone completely clean, restoring it to the exact state it was in when you first unboxed it.
-
Step 1 Go to General Settings
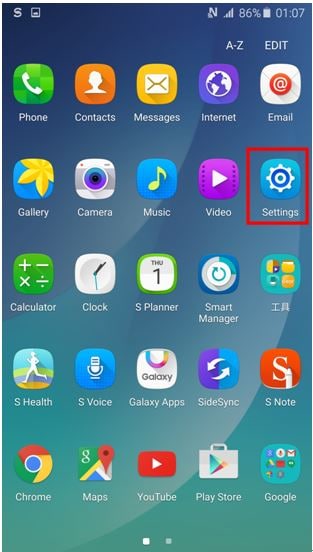
Open your device's Settings app.
-
Step 2 Locate the Reset Option
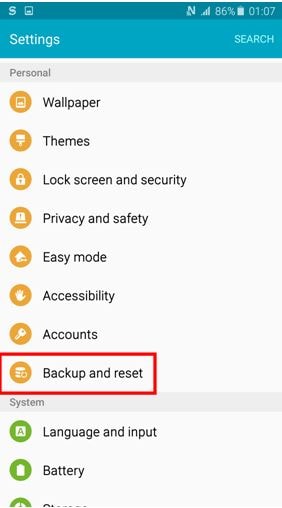
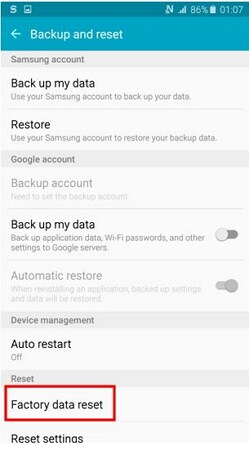
Navigate to Backup and reset (or General Management > Reset on newer UI versions).
-
Step 3 Initiate Factory Data Reset
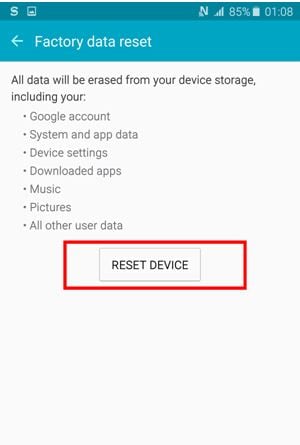
Select Factory data reset from the available choices. Read the disclaimer carefully, then tap on Reset Device.
-
Step 4 Erase Everything
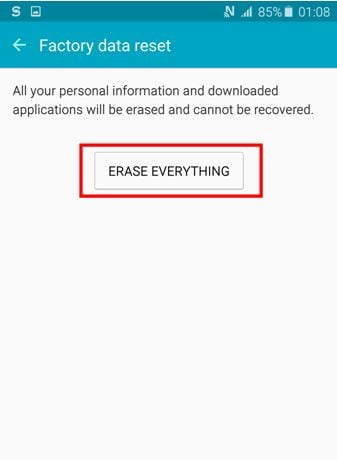
Finally, tap on Erase Everything. Your phone will reboot multiple times during this process. Once finished, you will need to set up the device from scratch.
Conclusion
The warning camera failed error is undeniably a common nuisance among Samsung Galaxy users, but it is rarely a symptom of permanent hardware failure. By methodically applying the steps detailed above—starting from basic data clearing to utilizing robust repair platforms like Dr.Fone - System Repair (Android)—you can efficiently reclaim your camera's functionality. There is usually no need to panic or immediately seek out an expensive technician. With a little patience, you can resolve the Samsung camera failed issue and get back to capturing your favorite moments effortlessly.
FAQ
-
1. Will clearing the camera data delete my saved photos and videos?
No, tapping "Clear Data" in the camera app's settings only resets the application's temporary files and internal configurations. Your media gallery, including all previously taken photos and videos, remains completely untouched and safe on your device's internal storage or SD card. -
2. What should I do if the camera still fails after a factory reset?
If you have performed a complete factory reset and the camera failed Samsung error persists, it is highly likely that the camera module itself has sustained physical hardware damage (such as a disconnected internal ribbon or a shattered sensor). In this scenario, you should contact official Samsung Support or visit an authorized repair center for a hardware evaluation. -
3. Can low battery levels trigger the camera failed error?
Yes, in some instances, if your Samsung device's battery is critically low, the operating system may restrict high-power consumption features like the camera sensor and flash to conserve energy. Charging your phone above 15% and restarting the camera app often resolves this temporary block. -
4. Does Dr.Fone - System Repair work on the latest Samsung models?
Yes, Dr.Fone - System Repair (Android) is continually updated and fully supports an extensive range of Samsung devices, including the latest flagship models operating on the newest Android and One UI firmware available in 2026.
 Add Wondershare Dr.Fone as a preferred source on Google