
Samsung Stuck in Download Mode? 7 Ways to Get Back to Normal

Nov 03, 2026 • Filed to: Phone Repair Solutions • Proven solutions
 TL;DR:
How to get out of Samsung Download Mode
- Entered it accidentally? If the screen offers Volume Down: Cancel (restart phone), use that displayed option. Otherwise, when no flash is running, try the 7-second force restart.
- It comes straight back? Remove a case that presses the keys and follow the repeat-entry checks before considering a reset.
- Power/Side key is broken? Do not pry out a sealed battery. See the buttonless and no-computer options, including when service is preferable.
- Android still will not boot? A factory reset erases data but does not reinstall firmware. Guided Samsung firmware repair is a separate, Windows-only, data-erasing option.
Ask AI for a summary
 ChatGPT
 Perplexity
 Gemini
 Claude
 Grok
If your Samsung is stuck in Download Mode and no firmware installation is running, press and hold Volume Down + Power together for about 7 seconds. On phones with a Side key instead of a separate Power button, use Volume Down + Side. Release the buttons when the phone restarts. A force restart does not perform a factory reset.
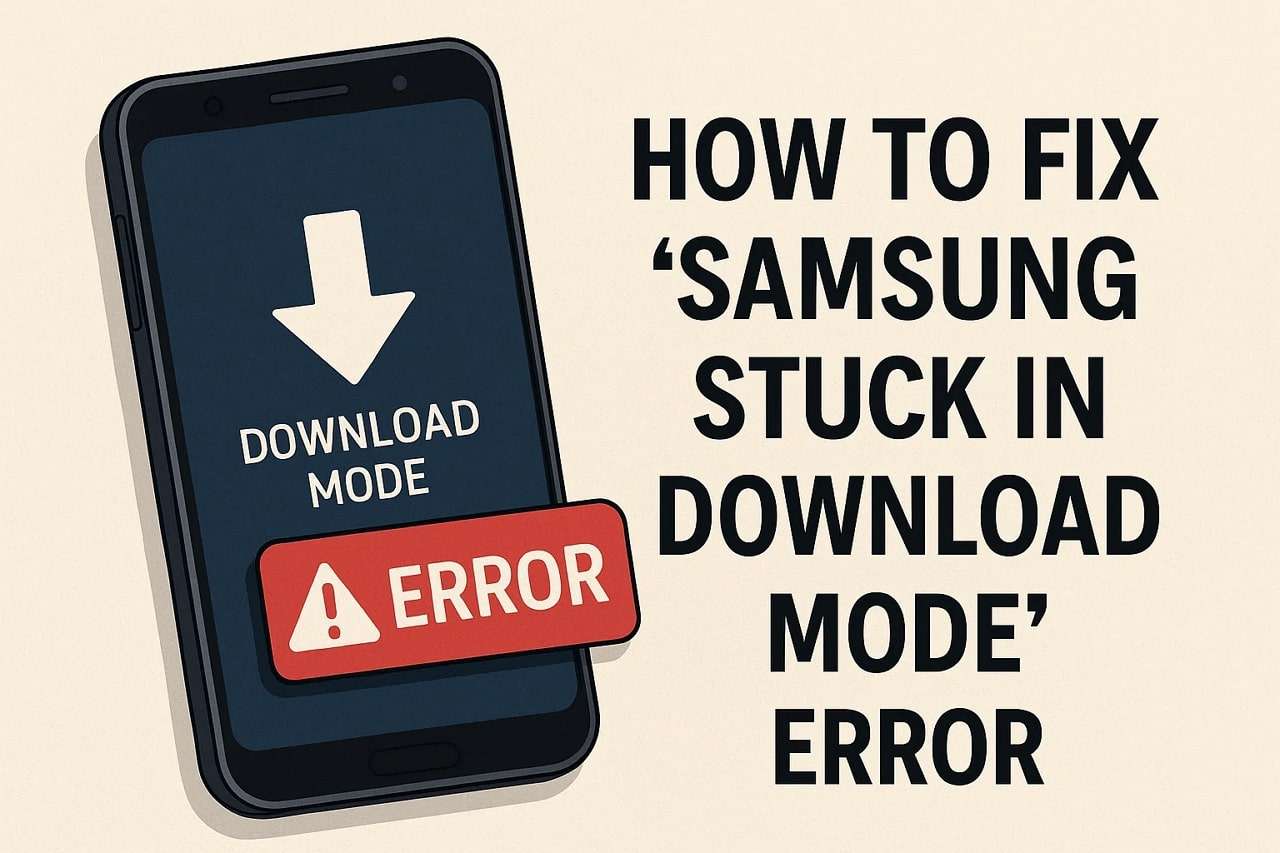
Download Mode, also called Odin Mode, is a firmware-flashing environment, not an ordinary app download. The message Downloading... Do not turn off target alone does not tell you whether firmware is being written. If you started a repair or flash on a computer, check that program's progress and status first; do not interrupt an active installation by restarting, disconnecting USB, or removing power.
- Part 1. Why Does Your Samsung Phone Get Stuck in Download Mode?
- Part 2. Samsung Stuck in Downloading Mode: 7 Options and When to Use Them
- Fix 1. Remove a User-Removable Battery Only
- Fix 2. Force Restart the Samsung Phone
- Fix 3. Let the Battery Drain Only as a Last Resort
- Fix 4. Factory Reset from Recovery: Data-Loss Decision
- Fix 5. Consider an Odin Firmware Reinstall: Advanced Option
- Fix 6. Guided Samsung Firmware Repair with Dr.Fone

- Fix 7. Contact Samsung Support for a Solution
- Part 3. Best Practices to Ensure Your Phone Does Not Get Stuck in Download Mode
Part 1. Why Does Your Samsung Phone Get Stuck in Download Mode?
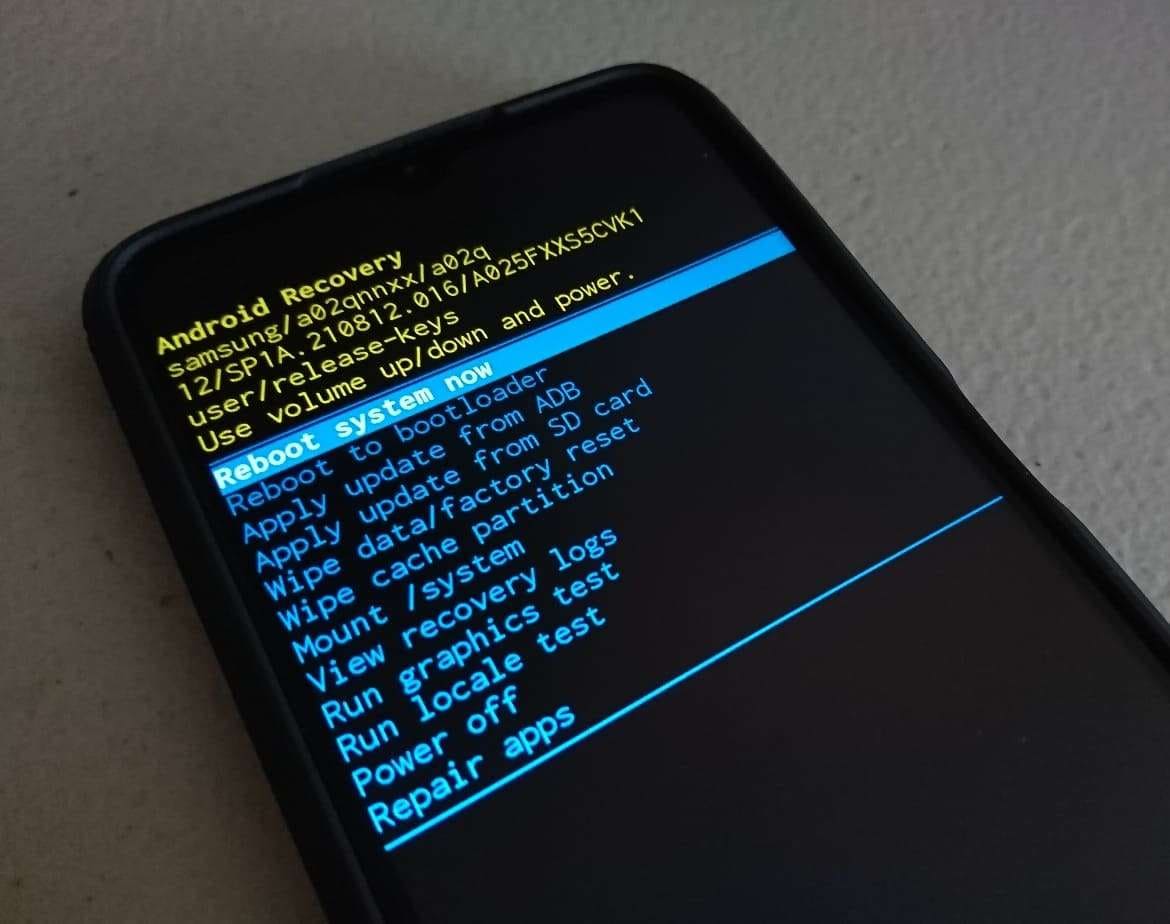
Download Mode lets a computer communicate with a Samsung device for firmware work. A blue or teal screen with Downloading..., Odin Mode, or device information can appear even when no transfer has started. It is different from Android Recovery, the menu containing Reboot system now and Wipe data/factory reset.
If you have not connected a computer or started a firmware tool, accidental mode entry is a reasonable first possibility. If a repair tool is open, distinguish a firmware package downloading to the PC from firmware being installed on the phone. Use the tool's actual status and progress, not the phone's warning text or an arbitrary number of minutes, to decide whether it is safe to attempt an exit.
- Accidental or repeated key input: A model's Download Mode shortcut may have been triggered. Check for a tight case or stuck key if the screen returns after a restart.
- Interrupted update or repair: A failed firmware operation can leave Android unable to start. Record what the computer and phone display before attempting another operation.
- Incompatible or damaged firmware: A wrong model package, unsupported firmware revision, or failed write needs a different response from accidental mode entry.
- Software modifications: A recent rooting or custom-firmware attempt is relevant history. An ordinary app-install problem is not the same as bootloader Download Mode.
- Possible hardware trouble: A faulty key, damaged USB connection, or other hardware fault may require service. This screen alone does not diagnose a damaged motherboard.
Part 2. Samsung Stuck in Downloading Mode: 7 Options and When to Use Them
For a Samsung phone stuck in Download Mode, start with Fix 2: force restart when no installation is active. The seven options below serve different situations; they are not seven guaranteed cures or a sequence you must complete. Keep reset and firmware repair for a deliberate escalation after non-erasing exit attempts.
Fix 1. Remove a User-Removable Battery Only
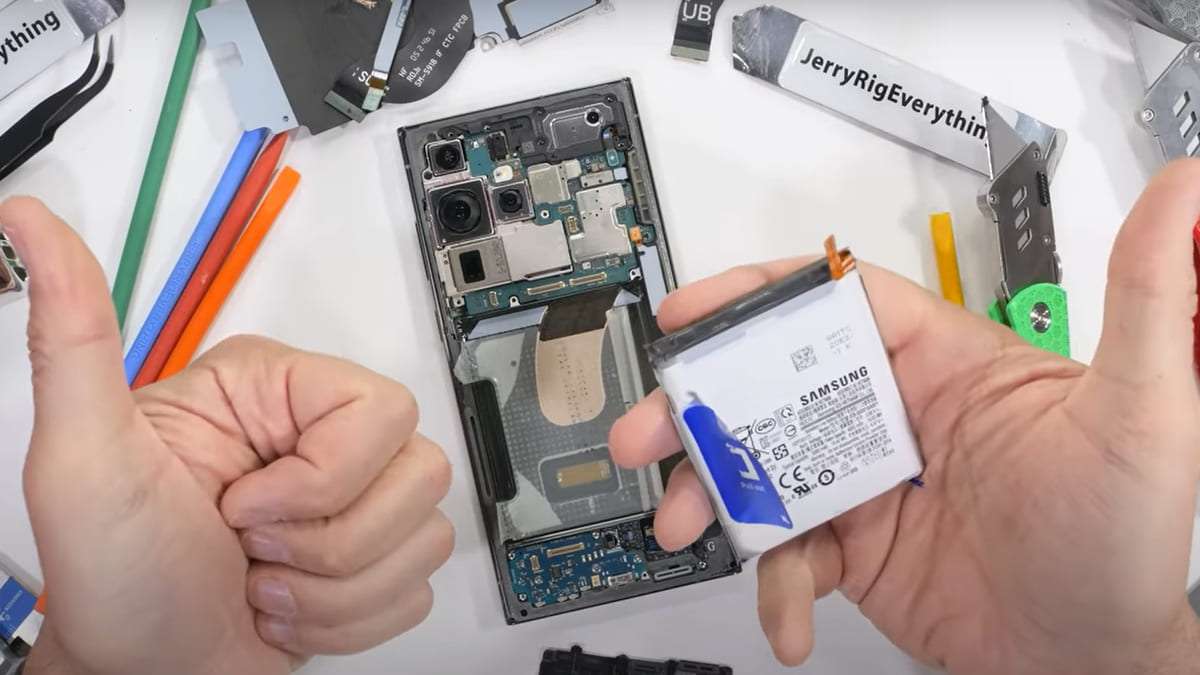
This applies only to older phones designed with a user-removable battery. With no firmware write running, remove the back cover as intended for that model, take out the battery, reinsert it, refit the cover, and turn the phone on. Check whether Android reaches the lock screen rather than returning to Download Mode.
Do not pry open a sealed Galaxy phone or remove an internal battery to follow this method. If the battery is swollen, hot, or damaged, stop handling it and arrange service.
Fix 2. Force Restart the Samsung Phone
A force restart is the first non-erasing attempt for an idle Download screen. It restarts the device; it does not reinstall Android or intentionally wipe your photos and apps. Do not use it to interrupt an active firmware write.
Step 1. If you are still on a warning/confirmation screen, use its displayed Cancel (restart phone) key if available. Otherwise, hold Volume Down + Power together for about 7 seconds; use the Side key on models that name it that way.
Step 2. Release the keys as the device restarts and let it boot. Reaching the lock or home screen is the useful result, not just seeing the display turn black.
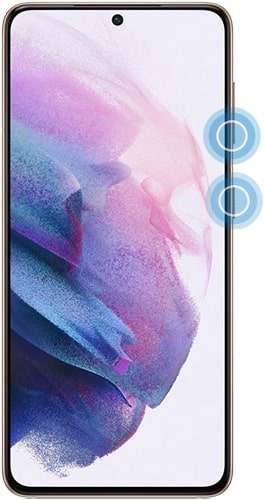
If it returns immediately: Remove the case and check that the volume and Power/Side keys are not held down or physically jammed. Once you have confirmed no computer write is active, disconnect an idle USB connection and retry the restart once with the keys released afterward. If the same screen returns, move to service or firmware assessment rather than repeating key combinations indefinitely.
Fix 3. Let the Battery Drain Only as a Last Resort
If the keys do not respond, there is no user-removable battery, and no update or firmware write is running, letting an otherwise undamaged phone power down naturally is a passive last resort. Leave it unused and disconnected from charging until it switches off. Do not try to speed this up by heating the phone, repeatedly pressing keys, or opening it.
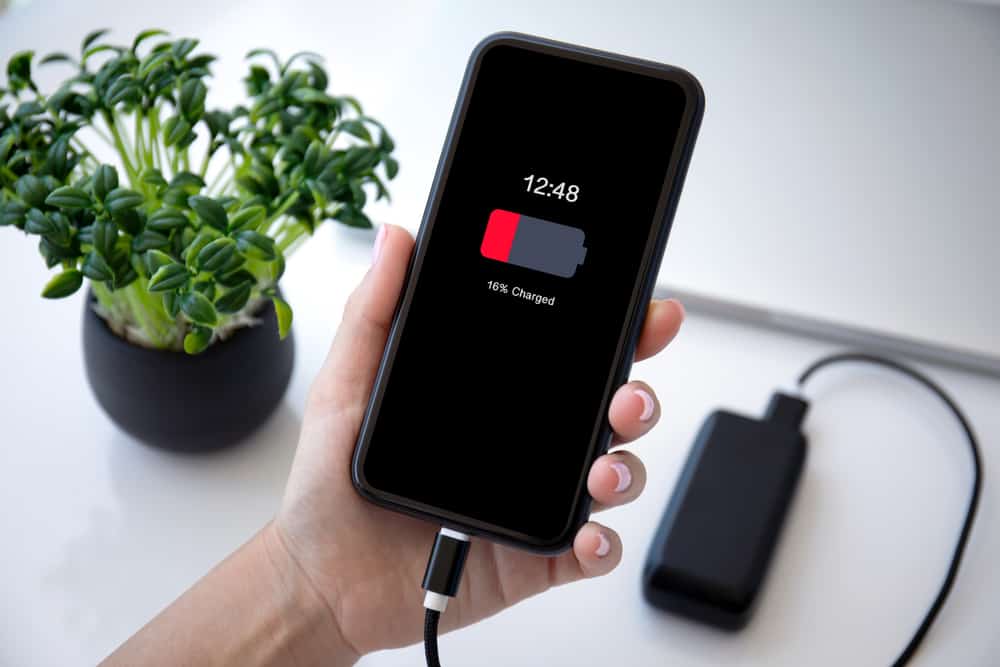
After it powers off, connect a suitable charger, allow it to regain charge, and try a normal startup. This only forces a power cycle; it does not repair corrupt firmware or a broken key. If the phone is hot, damaged, or repeatedly returns to the same screen, use Samsung service. Do not deliberately drain a device while a firmware installation is active.
Fix 4. Factory Reset from Recovery: Data-Loss Decision
A factory reset removes user data and settings; it is not the same as exiting Download Mode and does not reinstall firmware. Consider it only if Android still cannot boot, Recovery is accessible, and you accept losing unbacked-up files. If keeping the data matters more than attempting a reset, stop here and discuss the options with Samsung service.
A Recovery reset erases personal data and can require the Google account previously used on the phone during setup. Have that account's credentials and, where requested, the previous screen lock available. Back up first only if the phone becomes accessible; do not assume files can be backed up from the Download screen. A reset is not an account-lock bypass.
Reach the correct menu first. Download Mode has no Wipe data/factory reset option. Exit the idle Download screen and power off before using the Recovery entry method for your model. On Galaxy S6/S7 models with a physical Home button, use Volume Up + Home + Power; release Power at vibration, then the other keys when Recovery appears. On S8/S9/S10 models with a Bixby key, use Volume Up + Bixby + Power and release at the Samsung logo. Newer models without those keys have different entry requirements, sometimes including a USB connection to a computer; do not apply the Home/Bixby sequence to them. If Recovery is not accessible, use the service route instead of guessing a wipe command.
Step 1. In Android Recovery, first try Reboot system now if you have not already done so. If you have deliberately chosen to erase the phone, use the volume keys to highlight Wipe data/factory reset, then press Power/Side to select it.
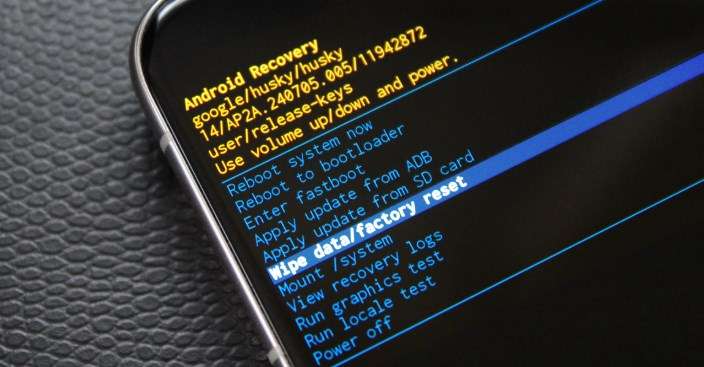
Step 2. Read the confirmation and select Factory data reset only if you accept the erasure. After the reset completes, choose Reboot system now. If Android starts, complete setup and account verification. If it returns to Download Mode, do not keep resetting it; the reset has not resolved the underlying startup problem.
Fix 5. Consider an Odin Firmware Reinstall: Advanced Option
Odin is an advanced Windows firmware-flashing route, not a necessary tool for every accidental Download screen. It puts file selection and flashing decisions in your hands. A guided tool such as Dr.Fone instead organizes device identification, firmware preparation, and repair prompts in one workflow. Neither route fixes physical damage or guarantees a successful boot.
Manual flashing can erase data or leave the phone unable to boot if the package or procedure is wrong. Do not proceed without instructions and firmware for the exact model number, region/carrier configuration, and compatible bootloader revision. A marketing name such as “Galaxy A” is not enough. Do not bypass verification or force an older bootloader; if you cannot establish compatibility, use Samsung service.
Step 1. Validate the package and connection. Record the model and any current error shown on the phone. On the Windows PC, use a reliable data cable and confirm Odin detects the device in Download Mode before starting. If it does not, address the cable, direct USB port, and Samsung USB driver first; an undetected phone is not ready to flash.
Step 2. Match files to the verified procedure. Typical multi-file packages use BL, AP, CP, and CSC fields. Load only the files specified by the exact-model procedure. CSC and HOME_CSC are not a guarantee of data preservation, and some packages use different layouts. Do not fill missing slots with files from another model or enable repartitioning as a generic fix.
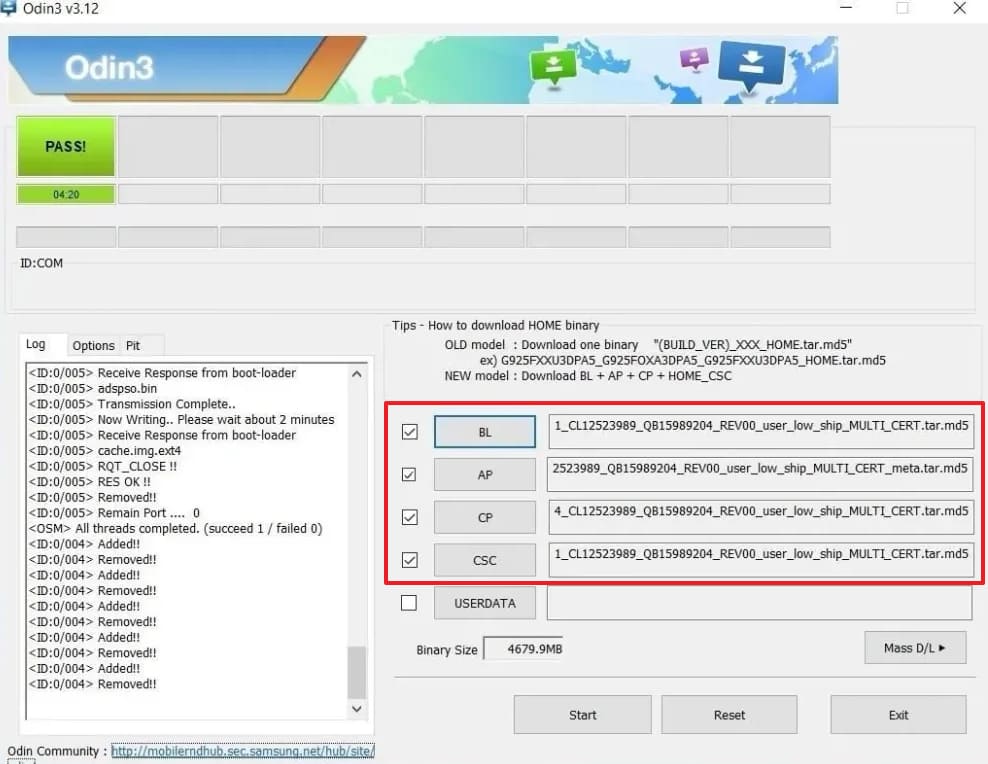
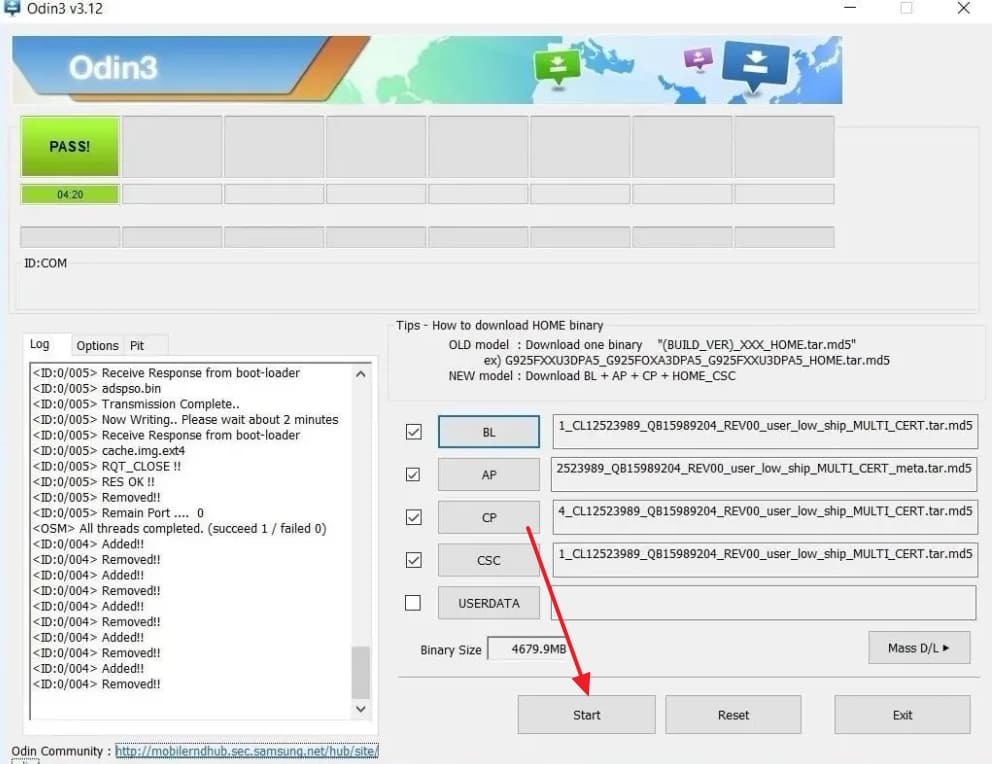
Step 3. Start only after the checks pass. If all files and settings match the device-specific procedure and you accept its data-loss risk, select Start and leave cable and power undisturbed through completion. Wait for the tool's completion status and the phone's restart before disconnecting. If Odin reports FAIL!, record the preceding error lines and follow the failure checks; do not repeatedly flash the same unverified package.
Fix 6. Guided Samsung Firmware Repair with Dr.Fone - System Repair (Android)
If a supported Samsung phone still cannot boot after the non-erasing exit checks, Dr.Fone - System Repair (Android) brings device identification, matching firmware download, and repair progress into a guided Windows workflow. This reduces the manual file handling involved in Odin and gives you visual instructions at each stage.
Its Android repair workflows address supported software problems such as startup loops, failed updates, and frozen or black screens. For this Samsung procedure, select the exact model and available firmware rather than assuming every Galaxy variant is supported. It does not repair a damaged button, USB port, or motherboard.
Need only a Samsung Download Mode exit tool? Dr.Fone's Android Enter/Exit Download/Odin Mode utilities are free and separate from paid firmware repair. A mode-exit utility is not a firmware reinstall and still needs a supported, recognized connection. Do not start the full repair below merely to leave an accidentally opened Download screen.

Dr.Fone - System Repair (Android)
Guided Firmware Repair for Supported Samsung Startup Problems.
- Follow visual repair instructions instead of organizing a manual firmware flash yourself.
- Address supported software issues such as boot loops, black screens, or a phone that will not start.
- Use model and carrier details to prepare the appropriate available firmware.
- Review firmware information and repair prompts before installation.
- Track the installation and completion status in one interface.


How to Use Guided Samsung Firmware Repair
This Samsung firmware-repair workflow erases the phone's data and requires a Windows PC; Android System Repair is not available on Mac. Full repair requires a paid license. Back up accessible data before proceeding. If the phone cannot boot, do not assume the tool can first extract its files from Download Mode; if those files are essential, discuss data-preservation options with Samsung service before repair.
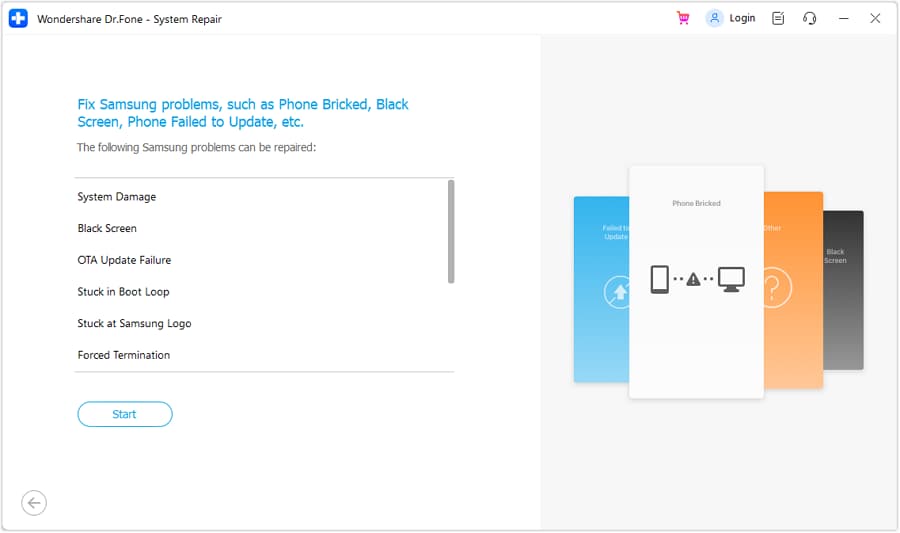
Step 1. Open Android Repair and choose Samsung
Connect the phone to your Windows PC with a reliable USB data cable. In Dr.Fone, open Toolbox > System Repair > Android, select Android Repair and Repair Now, then choose Samsung. Review the repair screen and select Start.
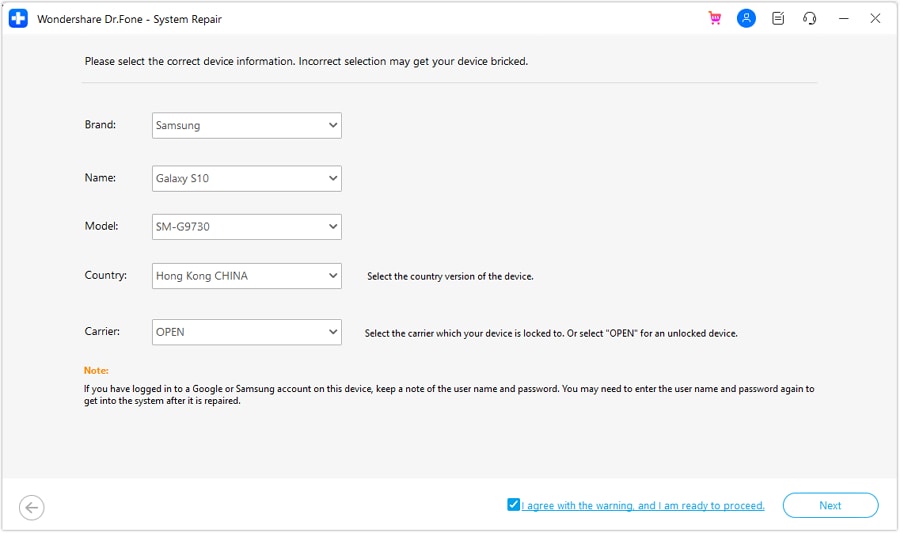
Step 2. Confirm the exact device and warning
Check the detected brand, then select the correct Name, Model, Country, and Carrier from the available options. Use OPEN only when the device is carrier-unlocked. Read the displayed warning, select I agree with the warning and I am ready to proceed only if you accept it, and choose Next. If your exact device is unavailable, stop rather than selecting a similar model.
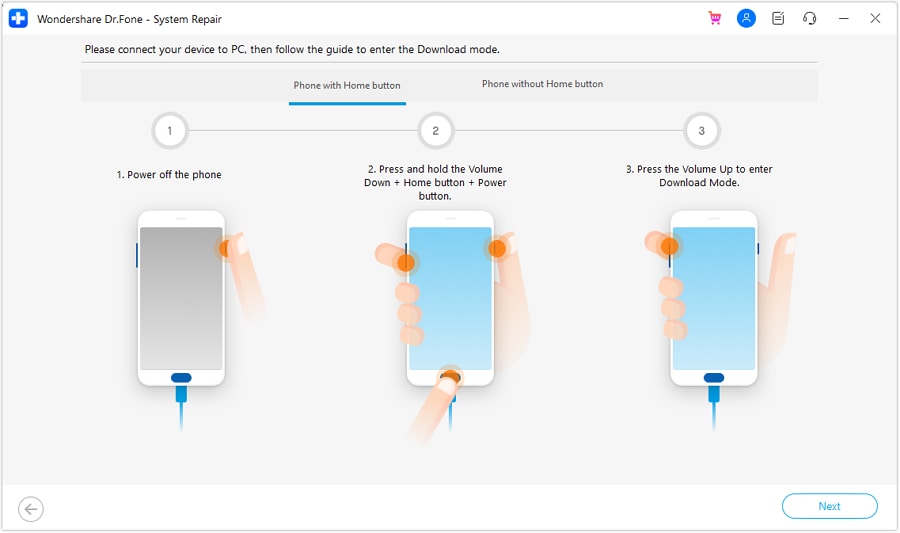
Step 3. Establish Download Mode and download the firmware
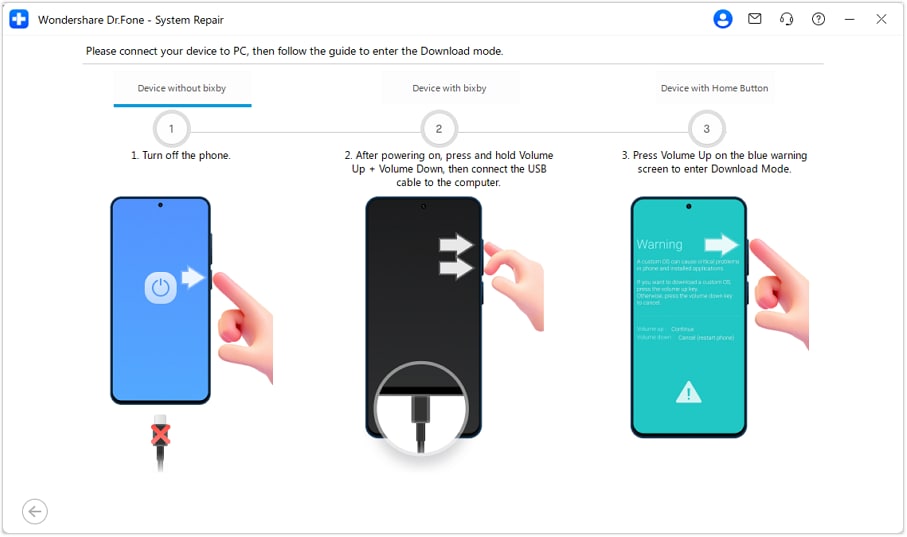
If the phone is already in Download Mode, keep it connected and check whether the program recognizes that state. Otherwise, choose the illustrated branch matching its buttons. For a phone with a physical Home button, the Guide shows Volume Down + Home + Power from power-off, followed by Volume Up at the warning screen.
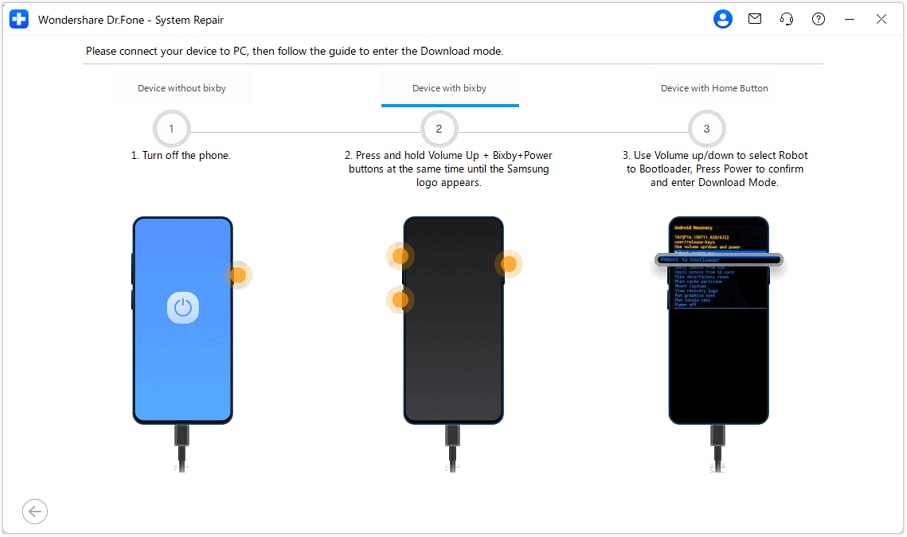
For a phone with a Bixby key, use the program's Bixby-specific branch, including its bootloader selection when shown; do not reuse the Home-button shortcut.
For a phone without Home/Bixby, the Guide shows powering off and disconnecting it, then holding both Volume Up + Volume Down while connecting USB to the computer, followed by Volume Up at the warning screen. Use this branch only when it matches the instructions displayed for your device. Once recognized, Dr.Fone downloads the firmware package to the PC.
Step 4. Verify, confirm, and wait for completion
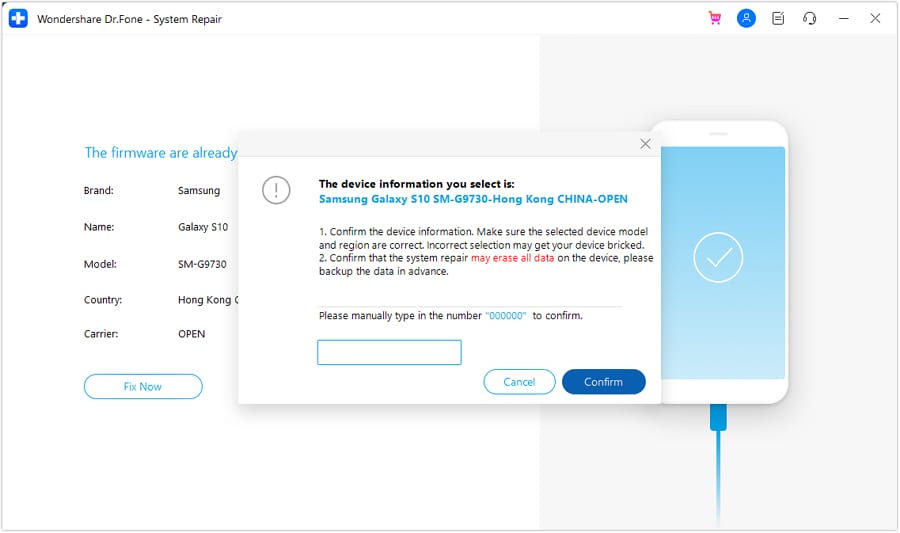
After the download and verification finish, review the firmware details and select Fix Now. At the data-erasure confirmation, type 000000 and choose Confirm only when ready to proceed. Keep USB and power stable while installation runs. When the program reports completion and the phone starts normally, select Done and complete phone setup. If it still cannot boot, record the result and seek support rather than immediately repeating a destructive repair.
 safe & secure
4,624,541 people have downloaded it
Fix 7. Contact Samsung Support for a Solution
Use Samsung support when the phone repeatedly returns to Download Mode, a key or USB port is damaged, a correctly matched repair still fails, or the data is too important to risk a reset. Persistent failure can involve firmware or hardware; it does not by itself prove a motherboard fault.
Before contacting support, record the exact model number, photograph the screen, and note the last update/flash attempt plus any computer error. Describe whether the 7-second restart changes the screen and whether the same mode returns. Use Samsung's US service locator to arrange an assessment, and ask about possible erasure before authorizing repair. Service is not a guarantee that inaccessible data can be recovered.
Part 3. Best Practices to Ensure Your Phone Does Not Get Stuck in Download Mode
No one wants to face the same vexing issue again after going through and solving it once. Hence, it helps to adopt some practical habits to reduce the chances of the Samsung phone stuck in download mode dilemma:
- Check that the case leaves the volume and Power/Side keys free, and have a damaged or sticking key assessed.
- Install system updates through official channels with adequate charge. Do not interrupt a firmware installation or disconnect its USB cable.
- Keep regular backups while Android is working, rather than waiting until the phone can only open Download Mode.
- If undertaking advanced firmware work, retain the exact model and package details. Avoid mixing firmware variants, forcing unsupported downgrades, or repeatedly retrying an unexplained failure.
- Protect the phone and its USB port from damage, liquid, and unreliable cables. These habits reduce avoidable problems but cannot prevent every startup failure.
Conclusion
For a Samsung stuck in Download Mode, first establish whether the screen is idle or a computer is actively writing firmware. An idle screen often needs only the displayed cancel option or a 7-second Volume Down + Power/Side restart. Repeated entry calls for button and firmware checks, not an automatic factory reset.
If supported software repair is the next appropriate step, Dr.Fone offers a guided alternative to manual firmware handling. Its Samsung firmware-repair workflow runs on Windows, requires a paid license, and erases data; choose it only after accepting that trade-off. When hardware is damaged or irreplaceable files are at stake, use Samsung service before a destructive repair.
safe & secure4,624,541 people have downloaded it
Frequently Asked Questions
FAQs
 Q1. Why does my Samsung remain stuck in Download Mode even after trying button combinations?
First confirm no firmware installation is running, remove a case pressing the keys, and try Volume Down + Power/Side for about 7 seconds. If the Power/Side key is broken, there is no universal on-phone buttonless command that works for every Samsung in Download Mode.
Without a computer, a genuinely user-removable battery can be reinserted as described in Fix 1; for a sealed, undamaged phone, natural battery depletion is only a passive last resort. Do not pry it open. With a supported connection to a Windows PC, Dr.Fone's free Download/Odin Mode exit utility is distinct from data-erasing full repair. If the key is damaged or the tool cannot recognize the phone, arrange service rather than assuming a reset is required.
Q2. If Odin keeps failing to flash firmware, what should I check?Record the exact phone message and the Odin log lines before FAIL!. If the device is not detected or the log stops at SetupConnection, check the data cable, direct USB port, and Samsung USB driver before any retry. If it reports FAIL! (Auth) or SW REV CHECK FAIL, recheck the exact model, firmware region/carrier package, and bootloader revision; do not bypass verification or force a downgrade.
A write failure can involve the connection or firmware, so the final word FAIL! alone is not a diagnosis. Use the Odin error troubleshooting guide for the matching error family. Stop repeated flashes if compatibility is uncertain, the connection drops, or the same failure persists with known-correct files, and seek Samsung service. Switching tools does not remove data-loss risk.
Q3. My phone reboots into recovery after exiting Download Mode - What now?If the screen says Android Recovery, use the volume keys to highlight Reboot system now, then press Power/Side to confirm. This restart does not select a factory reset. If Android loads, back up your files before further troubleshooting.
If Recovery or Download Mode returns, photograph any error text and use Samsung support. Reaching Recovery does not by itself prove that the recovery image is missing or incompatible. Choose Wipe data/factory reset only after the separate erasure and account-verification decision.


Samsung Issue
- Samsung Phone Issues
- 1. Fix Samsung Camera Failed
- 2. Fix Samsung Phone Hang
- 3. Samsung Phone Not Displaying Incoming Calls
- 4.Fix a Bricked Samsung
- 5. Downloading Do Not Turn Off Target
- 6. Fix Samsung Stuck in Download Mode
- 7. Fix Samsung S5 Won't Turn On
- 8. Fix Samsung Pay Not Working
- 9. Samsung ROM Download & Install
- 10. Samsung Firmware Download
- 11. Fix Samsung Sudden Death
- 12. Fix Samsung Stuck on Boot Screen
- 13. Fix Samsung Frozen on Startup
- 14. Full Guide to Fix 'Samsung Galaxy Phone Keeps Restarting'
- 15. Fix Samsung S3 Won't Turn On
- 16. Fix Samsung J7 Problems
- 17. Fix Samsung S10 Gone Dead
- 18. Fix Samsung S10 Won't Turn On
- 19. Fix Samsung Galaxy S7
- Samsung Screen Issues
- 1. Fix Unresponsive Touchscreen
- 2. Fix Black Screen After Dropping
- 3. Resolve Screen Stuck on Boot Issue
- 4. Fix Samsung Fold Screen Issues
- 5. Fix Samsung Black Screen
- 6. Fix Samsung Screen Not Working
- 7. Fix Half of Screen Not Working
- 8. Fix Samsung Stuck on Bootloop
- 9. Fix Samsung Screen Blacked Out
- 10. Fix Screen Blacked During a Call
- 11. Fix Samsung Stuck on the Screen
- 12. Solve Samsung Yellow Screen
- 13. Fix Samsung Flip Screen Not Working
- 14. Fix Screen Won't Respond
- Samsung Tablet Issues
- Samsung Update
- 1. Flash a Samsung phone
- 2. Samsung Mobile Software Update
- 3. Update Samsung Kies for Mac
- 4. Update Samsung to Android Oreo
- 5. Update Samsung Kies on PC
- 6. Update Android 6.0 for Samsung
- Samsung Useful Tricks
- 1. Remove Google Account Bypass
- 2. Hard/Factory Reset Samsung
- 3. Samsung Root Software
- 4. Transfer Files from Samsung to PC
- 5. Top 5 Samsung Kies Alternatives
- 6. Bypass Samsung Lock Screen Pin
- 7. SIM Network Unlock PIN
- 8. Transfer Whatsapp to iPhone
- 9. Samsung Auto Backup
- 10. Recover File on Samsung
- ● Manage/transfer/recover data
- ● Unlock screen/activate/FRP lock
- ● Fix most iOS and Android issues
- Free Download Free Download Free Download



Daisy Raines
staff Editor
Generally rated4.5(105participated)