
iPhone Screen Flickering, Glitching, or Shaking?
Why It Happens & 8 Ways to Fix It (2026)
Feb 11, 2026 • Filed to: Phone Repair Solutions • Proven solutions
"My new iPhone 17 Pro screen started flickering randomly after the iOS 26.1 update. It's not the camera flicker I read about on Reddit, but the actual display is glitching. Is this a software bug or hardware?" - An iPhone User, 2025
If you're seeing your iPhone screen flickering, glitching, or strobing, you're not alone. This is a common frustration for users on all models, from the iPhone 14 to the new iPhone 17. It's important to distinguish this from the "camera flicker" issue (often seen under LED lights), which is a separate problem.

This guide focuses on fixing the display flicker. We'll cover why your iPhone screen is shaking and provide 8 step-by-step solutions to fix it, starting with the safest method for your data.
Part 1. Why Is My iPhone Screen Flashing?
There are many reasons why you might be experiencing this problem. However, most iPhone screen flashing or glitching issues can be reduced to faulty hardware or software bugs.
Although there's not much you can do yourself when it comes to hardware problems, there are things you can try if you suspect the software is causing your problems. Before trying hardware fixes and taking your iPhone to a repair shop or Apple's Genius bar, which will cost you a lot of money, you should try our software solutions and see if they fix the issue.
If it's a software issue, the few possible fixes we'll discuss below will undoubtedly fix it, and you'll avoid a trip to the repair shop and keep the money you've intended to waste on a repair to yourself.
Part 2. iPhone Screen Flashing: Types of Problems
iPhone screen issues can be divided into two types depending on what's causing them:
- Software issues– These problems are often caused by malfunctioning applications, incorrect screen settings, or corrupted system files. Frequently, these glitches appear after a major update, such as being symptoms of known bugs in iOS 26. Such software-related cases will be covered below and can be repaired for free.
- Hardware issues– Often caused by dropping an iPhone, hardware issues include problems with your phone's screen component and other tiny connectors inside the phone's chassis. If software solutions don't resolve your screen issues, you should take your phone to a repair shop, at which point you can expect it to cost you quite a bit.
Regardless of whether these are caused by hardware or software, iPhone users can face three types of screen issues. These include:
- Flashing– It's a brightness issue, causing your iPhone's screen to become more or less bright at random.
- Glitching– If you're seeing weird anomalies and various things pop up and disappear, you're experiencing iPhone screen glitching issues.
- Shaking– As the name suggests, a shaking iPhone screen is self-explanatory.
Part 3: Screen Flicker vs. Camera Flicker (A Common Confusion)
We've seen discussions on platforms like Reddit about "flickering" on new iPhone 16/17 Pro models. It's crucial to identify your issue:
- Screen Flicker: The entire display is flashing, glitching, or shaking. **This is what our guide solves.**
- Camera Flicker: You only see flickering when using the Camera app or viewing its recording. This is often caused by indoor LED lighting and is usually not a phone defect.
If you are experiencing this issue, you can find the dedicated fixes in our guide: Flickering issue on iPhone 17 Pro/Pro Max cameras.
This guide is focused purely on fixing **iPhone screen flicker**. Let's move on to the solutions.
Part 4. How To Fix the iPhone Screen Flashing On and Off
Step A: Quick & Zero-Risk Software Fixes
These initial steps are easy to perform and carry virtually no risk of data loss. They are the most effective against random software errors.
1. Force Restart Your iPhone
Why it Works: A force restart clears out all temporary memory glitches and runaway software processes, often resolving display issues that have no clear cause. This is the first and most critical diagnostic step.
As phone manufacturers have long given up on removable phone backsides, the battery on all newer phone models is no longer removable. That took some functionality off the table, and when people's phones became unresponsive, they couldn't do anything.
However, manufacturers soon realized this and included a new, built-in equivalent option for dealing with an unresponsive phone, and that's a force restart.
Whenever your phone is stuck and unresponsive, dealing with an issue such as screen flashing on an iPhone or whichever other anomaly it's experiencing, you can quickly fix it with a force restart and here's how:
- Step 1: Press and quickly release the Volume Up button on the phone's left side.
- Step 2: Press and quickly release the Volume Down button on the same side.
- Step 3: Press the Powerbutton on the phone's right side and hold it until you see an Apple logo.
- Step 4: Once the logo appears, release the Power
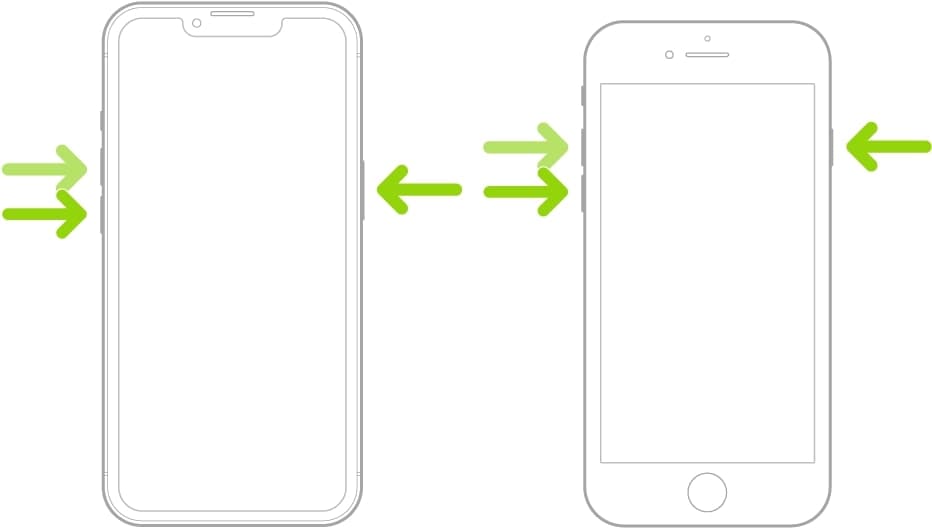
Next Step Context: Forcing a restart is an excellent way to deal with an unresponsive iPhone and fix various software errors causing your iPhone to act up. If a simple restart doesn't stop the screen from flickering, the problem might be tied to an aggressive display setting. We need to check those settings next.
2. Turn Off "Reduce White Point"
Why it Works: "Reduce White Point" lowers the intensity of bright colors on the screen. While useful for eye comfort, this feature has been known to cause perceived or actual flickering on OLED displays at lower brightness levels.
Here's how to turn the Reduce White Point feature off:
- Step 1: Go to Settings > Accessibility.
- Step 2: Tap Display & Text Size.
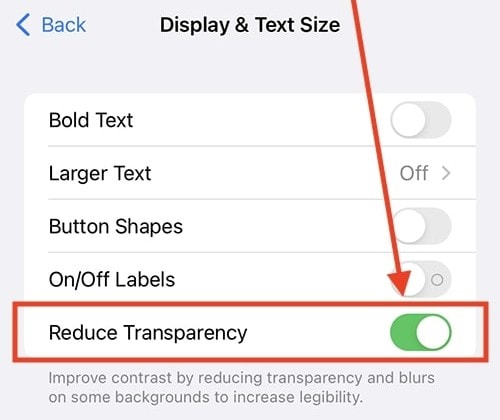
- Step 3: Scroll down and toggle OFF the Reduce White Point switch.
Next Step Context: Although the setting should immediately take effect, restarting your iPhone at this point can be beneficial. It ensures the new screen setting is applied and can help fix various iPhone screen-shaking issues. If it doesn't help, move on to other fixes.
Step B: System-Level Settings Adjustments
If the problem persists after the quick fixes, the issue is likely rooted in system configurations or corrupted apps.
3. Disable Auto-Brightness
Why it Works: The ambient light sensor sometimes causes the system to adjust the display brightness too rapidly or erratically, which can manifest as persistent flickering. Disabling it can rule out the sensor as the root cause.
All iPhones have a built-in auto-brightness feature, which comes pre-enabled when you first turn on and set up your phone. It regulates brightness levels, as the latest iPhones can reach 1,200 nits.
Although it's something you'll need in direct sunlight, it's certainly not something you want while browsing the internet before bed, and that's why the auto-brightness option is helpful.
However, there's a possibility that the iPhone's auto-brightness feature is causing your screen anomalies. Fortunately, that's an easy fix, and you can quickly disable auto-brightness by following these steps:
- Step 1: Go to Settings > Accessibility.
- Step 2: Tap Display & Text Size.
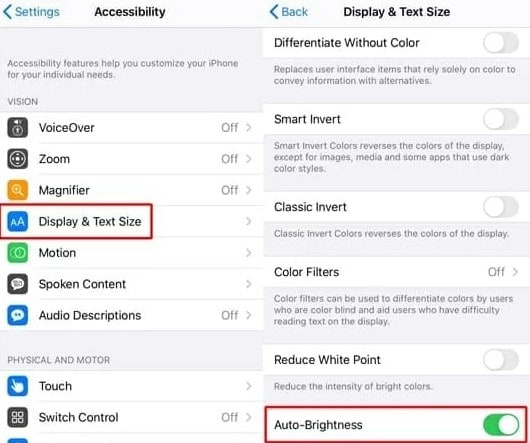
- Step 3: Scroll to the very bottom and toggle OFF the Auto-Brightness switch.
Next Step Context: After turning the auto-brightness feature off, check whether your iPhone screen flashing or glitching continues. If it does, try the other possible fixes from our list. Moreover, although not necessary, restarting your iPhone at this point would be beneficial for applying new settings thoroughly.
4. Check for and Delete Faulty Applications
Why it Works: An outdated or resource-intensive third-party app (especially those with high-end graphics) can conflict with the latest iOS system, causing display instability when it runs.
As mentioned above, iPhone screen glitching can manifest in various ways. However, if you're experiencing iPhone's screen flashing only when using specific apps, chances are, those apps are causing your problem. You'll need to remove them to restore your iPhone's functionality.
App removal on iPhones is a relatively straightforward process requiring only a few steps. Nevertheless, there's a short guide below on how to do it. Here's what you need to do:
- Step 1: Find the app you want to remove and see whether it's on the home screen or the App Library.
- Step 2: Press and hold the app until a little menu pops up.
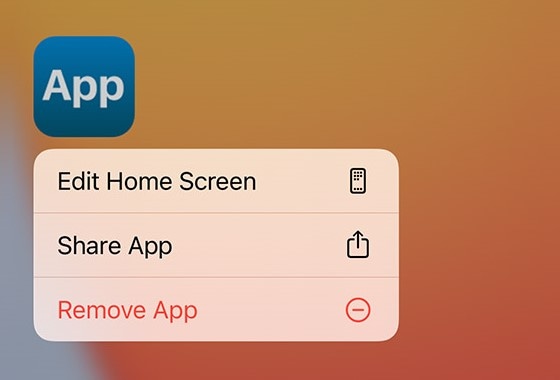
- Step 3: Tap Remove App> Delete to altogether remove the app from your iPhone.
Everything you delete can easily be re-installed, and even your app settings might be saved if you've connected an Apple ID or a Google account while using the app.
However, some iPhone apps can't be removed as they're likely system apps essential to the iPhone's functionality. If screen flickering or glitching happens inside one of those apps, this solution won't help, and you can move on to the next one.
Next Step Context: If the issue isn't tied to a specific app, you must ensure the entire operating system is stable.
5. Check for and Install iOS Updates
Why it Works: Screen issues are a common symptom of system bugs (as mentioned in Part 2 concerning known iOS 18 bugs). Apple frequently releases minor updates specifically to patch these display and software stability glitches.
- Step 1: Go to Settings > General > Software Update.
- Step 2: Download and install any available updates.
Next Step Context: Most software issues should be resolved by now. If the screen flickering still persists, you need to perform a deeper system reset or use a professional tool.
Step C: Advanced and Professional System Repair
If standard troubleshooting fails, the core iOS system files may be corrupted. These steps involve a deeper level of system intervention.
6. Reset All Settings
Why it Works: If you are unsure which specific setting is causing the conflict, resetting all settings restores default values without deleting your personal data (photos, apps, etc.).
- Go to Settings > General > Transfer or Reset iPhone.
- Tap Reset > Reset All Settings.
Next Step Context: If resetting all settings fails to resolve the issue, the iOS system files themselves may be damaged beyond simple configuration fixes, requiring a more thorough repair.
7. Use Dr.Fone - System Repair (iOS) for a Deep Fix
Why it Works: For deep-seated system corruption, where the iOS firmware is damaged beyond the fix of a standard reset, Dr.Fone - System Repair (iOS) offers a secure method to reinstall a clean copy of the iOS operating system without any data loss. This is the definitive software solution for persistent display and stability issues.
Wondershare Dr.Fone - System Repair (iOS) can help repair your iPhone's system, which will effectively fix the iPhone screen flashing issue, boot loops, Apple logo problems, the 1110 error, and any of the 150 other known issues. Moreover, it works with iPods and iPads, too, and can fix your Apple devices regardless of the iOS system version, as it can also handle system upgrades and downgrades.
Dr.Fone - System Repair (iOS)
Fix iOS System Issues on Your Own
- Fixes various iOS issues like iPhone stuck on Apple logo, white screen, stuck in recovery mode, etc.
- Works smoothly with all versions of iPhone, iPad, and iPod touch.
- Retains existing phone data during the fix.
- Easy-to-follow instructions provided.
Fix iPhone Screen Glitching Without Data Loss (Recommended)
Before you get started with repairing your iPhone's system, ensure you have a decently charged iPhone and then follow these steps:
- Step 1: Launch the Wondershare Dr.Fone app on your PC.
- Step 2: Choose Toolbox and then click System Repair.

- Step 3: Choose iPhone, as we're fixing iPhone screen flashing issues.
- Step 4: Select iOS Repair,as that's the option that will deal with iPhone screen issues.

- Step 5: On the following screen, select Standard Repair, as this option can fix most iPhone issues without deleting any data from the iPhone.

- Step 6: Follow the steps to put the iPhone into Recovery Mode.

- Step 7: Select which iOS software version you want to download. Once the download completes, click the Repair Now. Wait for Wondershare Dr.Fone to repair your iOS system.

- Step 8: When it's done, you'll see a “Repair complete!” message. Click Done.

When repairing the iOS system with Wondershare Dr.Fone, you should always begin with a Standard Repair, which can fix most of your issues, including iPhone screen shaking, glitching, and flashing. Choose Advanced Repair only if Standard Repair doesn't work, and know that it'll delete all your phone's data.
4,624,541 people have downloaded it
Next Step Context: If your iPhone screen is still flickering after exhausting all non-destructive software solutions, including a professional system repair, the last resort software fix is a complete factory reset.
8. Perform a Factory Reset (Erase All Content and Settings)
Why it Works: A factory reset, also known as a hard reset in some contexts, completely wipes the iPhone and reinstalls a fresh, pristine copy of the operating system. It eliminates every possible software configuration or corrupted file causing the flicker.
If you're still willing to try it, charge your iPhone's battery beforehand. A hard reset will need more than a few minutes of constant work and restarts to complete. Once you're ready, follow these steps:
- Step 1: Tap your iPhone's Settingsapp to go into settings.
- Step 2: Head into General> Transfer or Reset iPhone > Erase All Content and Settings.
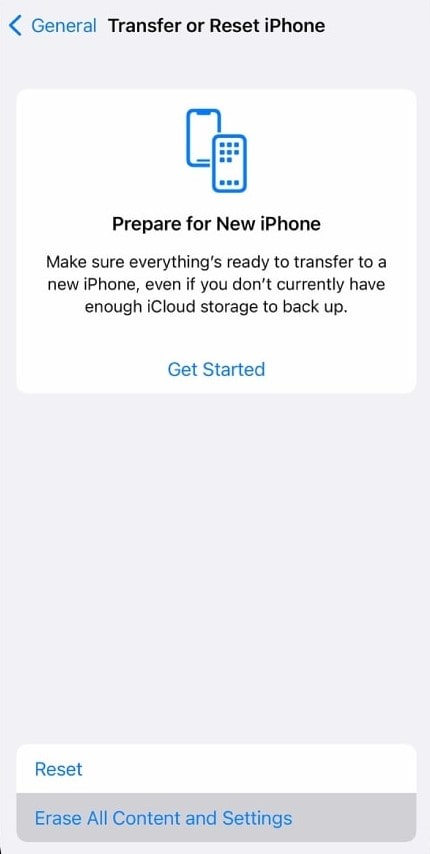
- Step 3: Proceed by tapping the Continue
- Step 4: Tap the Erase iPhonebutton, let the iPhone restart, and it'll do the rest.
It's worth noting that the hard or factory reset might take a while, and your iPhone will likely restart multiple times. There's nothing to worry about. Just give your phone some time to finish resetting all your settings.
Final Context/Conclusion Transition: If the screen continues to flash even after a complete factory reset, the problem has been confirmed to be caused by a hardware failure.
⚠️ Step D: Hardware Fault Diagnosis
If you have tried every software fix listed above, your issue is likely due to hardware failure (e.g., a loose display cable, a damaged screen, or liquid damage).
- Your Action: Contact Apple Support or schedule an appointment at an Apple Genius Bar for professional hardware diagnosis and repair.
Frequently Asked Questions (FAQ)
Why is my iPhone screen glitching after the iOS 26 update?
Software bugs in new iOS updates are a common cause. A conflict during the update can make the iPhone screen start flashing. Try a Force Restart or use a System Repair tool to resolve the bug without data loss.
How do I fix my iPhone screen strobing or shaking?
This is often related to accessibility settings. Try turning on "Reduce Transparency" or checking "Auto-Brightness". If it's a software glitch, your iPhone screen shaking should stop after a force restart.
Conclusion
Dealing with iPhone screen flickering is frustrating, but remember that the vast majority of these issues—including shaking, glitching, and flashing—are caused by **software bugs**, not expensive hardware failure.
We guided you through the full spectrum of solutions, starting with simple adjustments (Force Restart, Auto-Brightness) and progressing to deep system repairs. For users facing persistent problems, the most reliable and data-safe solution is dedicated software.
Instead of risking data loss with a full factory reset, trust Dr.Fone - System Repair (iOS). It is engineered to fix the underlying iOS system corruption that causes display issues, providing a permanent solution that **preserves all your data**.
Fix your display glitches from home today and keep your repair money in your pocket.
4,624,541 people have downloaded it
iPhone Issues
- iPhone Storage Full
- 1. Stuck on Apple Logo Storage Full
- 2. Erase Content Settings not Working
- 3. iPhone Lagging
- 4. iPhone Running Slow
- iPhone Update Problems
- 1. Stuck on Updating iCloud Settings
- 2. iPhone Frozen During iOS Update
- 3. iPhone Checking for Update Stuck
- 4. iPhone Cellular Update Failed
- 5. iPhone Software Update Failed
- 6. iPhone Stuck on Update Requested
- 7. iPhone Update Error 1110
- 8. iPhone Stuck On Verifying Update
- 9. iPhone Won't Update
- 10. Update Server Couldn't Be Contacted
- 8. iPhone & iPad Security Updates
- 9. Update iPhone with/without iTunes
- 10. Can't Download or Update Apps
- iPhone Media Problems
- 1. Apple Music Song Not Available
- 2. iPhone Not Ringing
- 3. iPhone Echo Problem
- 4. iPhone Ringer Problems
- 5. iPhone Plays Music by Itself
- 6. Ringer Volume Changes by Itself
- 7. Music Won't Play on iPhone
- 8. Blurry Photos & Videos on iPhone
- 9. iPhone Volume Problems
- iPhone Sound Problems
- 1. YouTube no Sound
- 2. iPhone Microphone Problem
- 3. Test iPhone Microphone
- 4. Headphones No Sound from iPhone
- 5. No Sound on iPhone Game
- 6. iPhone Sound Not Working
- 7. iPhone Screen Recording no Sound
- iPhone Calling Problems
- 1. iPhone No Sound on Calls
- 2. Screen Goes Black During Call
- 3. iPhone Recent Calls Not Showing
- 4. iPhone Dropping Calls Issue
- 5. iPhone Calling Problem
- iPhone Camera Problems
- 1. iPhone Camera Black
- 2. iPhone Camera Blurry
- 3. iPhone Camera Not Working
- 4. iPhone Front Camera Not Working
- 5. TrueDepth Camera Not Working
- 6.Out-of-Focus Photos on iPhone 15
- iPhone Network Problems
- 1. Airpods Won't Connect to iPhone
- 2. iPhone Disabled Connect to iTunes
- 3. iPhone Not Syncing Problems
- 4. iPhone Internet Not Working
- 5. iPhone Keep Disconnecting from Wifi
- 6. iPhone WIFI Not Working
- 7. PC Not Recognizing iPhone
- 8. iPhone Stuck on Connect to iTunes
- 9. iPhone Not Showing up in iTunes
- 10. iTunes Not Detecting Your iPhone
- 11. iPhone Bluetooth Disconnect
- 12.Apple CarPlay Keeps Disconnecting
- iPhone Screen Problems
- Other iPhone Problems
Why It Happens & 8 Ways to Fix It (2026)


Alice MJ
staff Editor
Generally rated4.5(105participated)