How to Move Photos from Camera Roll to Album
Oct 24, 2025 • Filed to: Mobile Tips & Tactics • Proven solutions
Dr.Fone Basic:
Better Control for Your Phone
Manage, transfer, back up, restore, and mirror your device
Every time I try to move a picture from my Camera Roll to a new album, it only copies it. And when I try to delete the pictures from my Camera Roll since they are in the other album, it only gives me the option to delete it everywhere. How do I only have it in the different album?
Here are two easy solutions to move photos from Camera Roll to an album. Solution 1 tells you how to transfer photos from Camera Roll to another album without any third-party tool. You can do it for free on your iPhone, iPod touch, and iPad. However, if you delete the photos in the Camera Roll, the same photos that you have copied to the album will also be deleted. The solution 2 offers you an iTunes companion, which lets you move your wanted photos from Camera Roll on your iPhone, iPad and iPod touch to an album easily. And more importantly, it enables you to delete the photos in the Camera Roll with no effect on those in an album.
iPhone SE has aroused wide attention around the world. Do also you want to buy one? Check the first-hand iPhone SE unboxing video to find more about it!
Solution 1: Move photos from Camera Roll to the album directly on your iDevice
To move Camera Roll photos to an album, you can directly do it on your iPhone, iPad and iPod touch. Follow the steps below.
Step 1. Tap "Photos" on your iPhone, iPod touch or iPad. Choose an existing album under Photo Library. Or you can create a new album on your iPhone, iPad or iPod touch. On the top right corner, click "Edit". On the following screen, click "Add". Name your new album and click "Save". Then, click "Done".
Step 2. Open the album and click the icon on the top right corner. Then, you get four choices. Choose "Add". On the following screen, click "Camera Roll" to show all photos that you have taken. Scroll down to find and check your wanted photos. Then, click "Done" on the top right corner. As you see, photos on Camera Roll are moved to the album. That’s the tutorial on how to export Camera Roll photos to an album.

Pros:
- It is free and without any third-party tool.
- Easy to use.
Cons:
- Be sure that you can NEVER delete the original photos in the Camera Roll. Once you delete them, the same photos that you have moved to the album will also be erased.
- It is not appropriate for moving a large number of pictures to different albums. If all the photos are stored in your Camera Roll, it will take up too much space of your iPhone.
Solution 2: Move pictures from Camera Roll to an album with Dr.Fone
Dr.Fone - Phone Manager (iOS) is an excellent iPhone manager and iOS Transfer tool. It's used to manage photos, contacts, music, videos and SMS on your iPhone, iPad and iPod touch. Both versions enable you to transfer photos from the Camera Roll and save them in an album under Photo Library. And more importantly, when the transfer is done, you can delete the original photos on Camera Roll. The photos in the album won't be removed. Moreover, it has a lot of other good and useful functions, all key features are below:

Dr.Fone - Phone Manager (iOS)
Move Photos from Camera Roll to Album
- Transfer, manage, export/import your music, photos, videos, contacts, SMS, Apps etc.
- Backup your music, photos, videos, contacts, SMS, Apps etc. to computer and restore them easily.
- Transfer music, photos, videos, contacts, messages, etc from one smartphone to another.
- Transfer media files between iOS devices and iTunes.
- Fully compatible with iOS 7, iOS 8, iOS 9, iOS 10, iOS 11 and iPod.
We'll show you how to export pictures from iPad/iPhone/iPod touch Camera Roll and save them to another album on the Windows computer. If you use a Mac, you should download the Mac version and take similar steps.
Step 1. Connect your device with PC after running this program
In the beginning, run Dr.Fone on your PC after installing it. Choose "Phone Manager" and connect your iPhone, iPod touch or iPad to your computer via a USB cable. Once your iPad/iPhone/iPod touch is connected, this program will detect it immediately. Then, you get the primary window.

Step 2. Move pictures from Camera Roll to a new album
To export Camera Roll photos to a new album, first of all, you need to export these photos to your PC. Then, import it back to another album on your iPhone, iPod touch or iPad.
- Click the "Photos" tab at the top of the main interface.
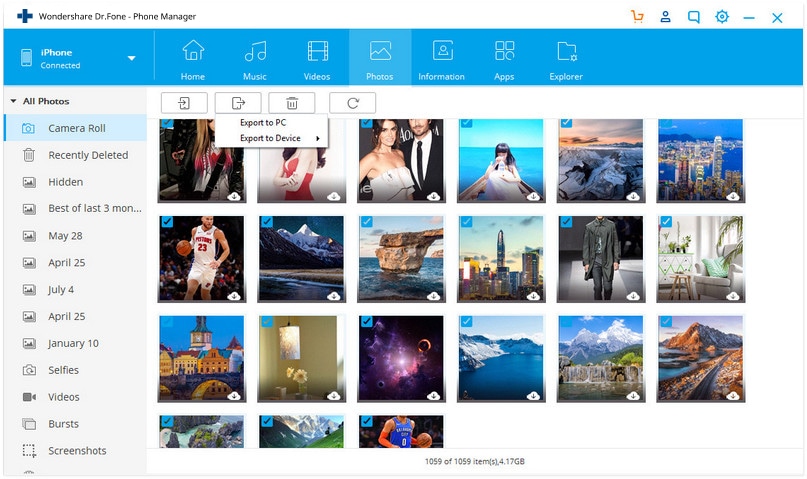
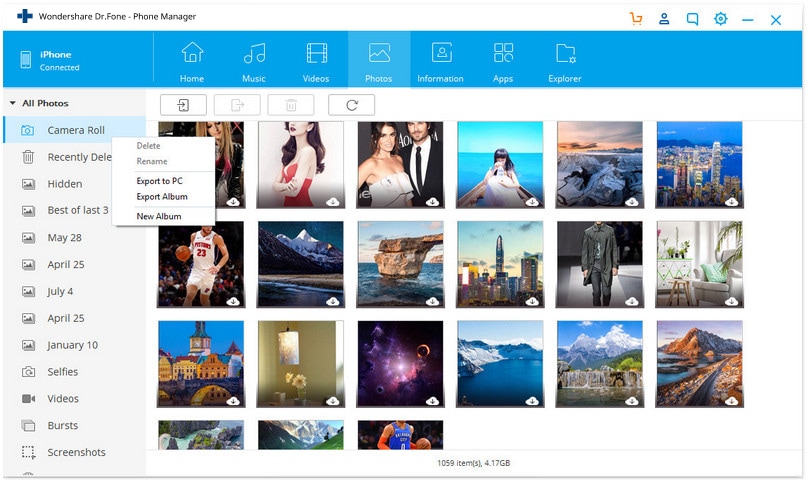
- Right-click on the "Camera Roll" and select "Export to PC" from the drop-down list. Or Open the Camera Roll album and choose your wanted photos, and then right-click the selected photos and select "Export to PC" from the drop-down list.

- In the pop-up file browser window, select a location to save the exported Camera Roll album or Camera Roll photos.
Then, let's move images from Camera Roll to another album.
- Right-click on the left sidebar and select "New Album" to create a new album on your iPhone, iPod touch or iPad.

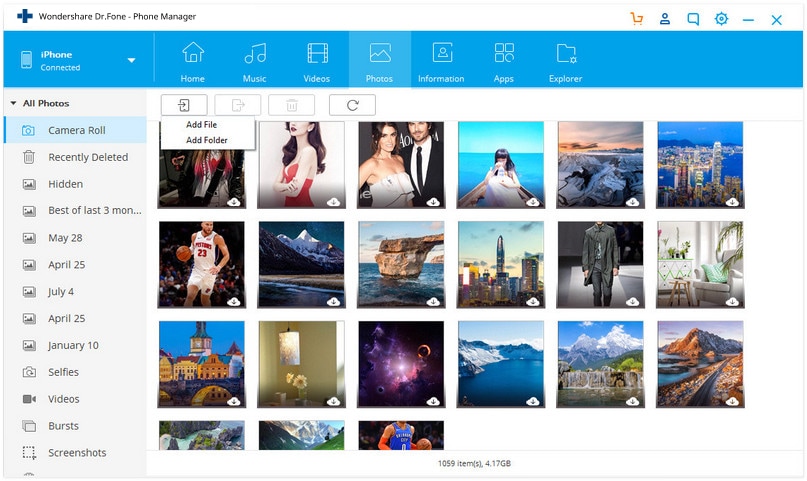
- Open the album. Then click "Add" and then select "Add File" or "Add Folder" to add photos.
- Navigate to the location where you save the Camera Roll album or Camera Roll photos.
- Import the Camera Roll or the photos to the album.

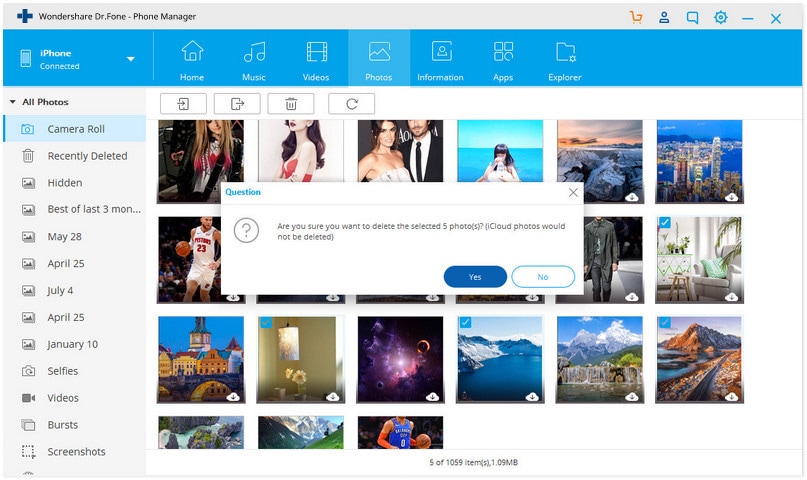
Well done! That's the way about how to move camera roll pictures to a different album on iPhone, iPad and iPod touch. Now, you can delete these photos in the Camera Roll to free up space. Open the Camera Roll, and select photos that you want to delete. Then, click the Trash button to delete the photos.

After the deletion, you can check the album that you save the Camera Roll photos. The photos are still there. Amazing, isn't it? Besides, if you get two Apple devices, you can also export the Camera Roll photos from one Apple device to another.
Dr.Fone - Phone Manager (iOS) could also help you add photos from PC to iPhone Camera Roll easily. Simply download and have a try.
Dr.Fone Basic:
Better Control for Your Phone
Manage, transfer, back up, restore, and mirror your device
iPhone Photos
- Convert HEIC to JPG
- 1. Convert HEIC to JPG on Linux
- 2. Convert HEIC to JPG Windows
- 3. Best HEIC Converter Online
- 4. Convert HEIC to JPG High Quality
- Export iPhone Photos
- 1. Upload iPhone Photos to Google Drive
- 2. Transfer Photo from iPhone to PC
- 3. Transfer Photo from iPhone to iPhone
- 4. Transfer from iPhone to iPhone
- 5. Transfer from iPhone to iPad
- 6. Move iPhone Photo to External Drive
- 7. Transfer from iPhone to Flash Drive
- 8. Extract Photos from iPhone
- 9. Download Photo from iPhone
- Import Photos to iPhone
- 1. Transfer from Laptop to iPhone
- 2. Transfer Photo from Camera to iPhone
- 3. Transfer Photo from Mac to iPhone
- 4. Transfer Photos from PC to iPhone
- 5. Transfer from iPhone to PC
- 6. Transfer from Android to iPhone
- 7. Transfer from Samsung to iPhone
- Manage iPhone Photos
- 1. Back up iPhone Photos
- 2. Get Photos off iPhone
- 3. Send Large Size Photos from iPhone
- 4. Photo/Video Compressor Apps
- 5. Delete Photos from iPhone/iPad
- 6. iPhone Photos Disappeared Suddenly
- 7. iPhone Photoshop Alternatives
- Recover iPhone Photos
- 1. Restore Deleted Photos from iPhone
- 2. Recover Photos from iPod Touch
- 3. Recover Deleted Picture from iPhone
- Transfer iPhone Photos to Mac
- Transfer iPhone Photos to PC
- 1. Transfer Data from iPhone to PC
- 2. Transfer Photo to Computer
- 3. Transfer Photo to PC without iTunes
- 4. Transfer Library to Computer
- 5. Send Photo from iPhone to Computer
- 6. Import Photo from iPhone to Windows
- 7. Transfer Photo to Windows
- Transfer Photos from Google Drive
- 1. Download from Google Drive to iPhone
- 2. Transfer from Google Photo to iPhone
- 3. Download from iCloud to iPhone
- Transfer Photos to Google Drive
- Image Convert Tips
- ● Manage/transfer/recover data
- ● Unlock screen/activate/FRP lock
- ● Fix most iOS and Android issues
- Learn More Learn More


Bhavya Kaushik
contributor Editor