SIM Card Is Not Detected? 8 Quick Solutions To Fix It
Aug 27, 2025 • Filed to: Data Recovery Solutions • Proven solutions

"I was messaging my friends when my SIM card was suddenly not detected. What can I do to fix it?"
We know how important a SIM card is for mobile phone users. Every mobile phone requires either a physical SIM card or an eSIM to facilitate phone calls, text messaging, and internet connectivity while on the go. If your SIM card is not recognized, you can’t do any of these.
Here, we'll explore the common causes of why this problem happens, provide troubleshooting steps to resolve it, and offer additional tips to safeguard your data.
- Part 1. Why Your Android Phone Might Not Detect a SIM Card?
- Part 2. How To Fix a "No SIM Card" Error on Android Phones?
- Solution 1: Reboot or Restart Your Phone
- Solution 2: Remove and Put Back the SIM card
- Solution 3. Toggle Airplane Mode On and Off
- Solution 4: Clean the SIM Card
- Solution 5: Test the SIM Card in Another Phone
- Solution 6: Change the Network Type
- Solution 7: Clear SIM Toolkit App Data
- Solution 8: Reset Network Settings

- Part 3. Bonus Tip: Recover Data From Android Device in Case of Data Loss?
Part 1. Why Your Android Phone Might Not Detect a SIM Card?
When your Android phone is saying "no SIM card", your initial instinct might be to consider replacing it. But before taking such drastic measures, it's essential to explore various potential causes of the issue.
Network connections can sometimes fail on your device due to various factors. If you've recently installed a new SIM card in your phone, it's possible that the card wasn't inserted properly, leading to a "no SIM card detected" error. Additionally, issues such as physical hardware damage, software glitches, or problems with your service provider can also cause connectivity problems.
To address this no SIM card issue, there are several troubleshooting steps you can take. In the next part, we'll explain these steps in detail to help you diagnose and resolve the error on your Android phone.
Part 2. How To Fix a "No SIM Card" Error on Android Phones?
Finding out the cause and resolving the "no SIM card detected" error on an Android can sometimes need a process of trial and error. Each situation may require a different approach, so it's important to keep trying until you find what works for your phone.
Solution 1: Reboot or Restart Your Phone
Restarting your device is often the first step in troubleshooting any issues with your Android device. This simple action can help reset various software components and clear temporary glitches that may be causing the no SIM card problem on Android.
To restart your phone, hold the Power button and select the Reboot/Restart option from the menu that appears. Your device will then power off and restart automatically.

Solution 2: Remove and Put Back the SIM card
In case the SIM wasn't put in right or if the tray holding it is loose, you can try removing it from your phone and then putting it back in. This action ensures that the SIM card is properly seated in its slot and makes sure there are no issues with the SIM card not being installed properly.
To do this, you'll need to eject the SIM card tray from your phone and take out the SIM card. Wait for a short while, put the SIM card back in, and then slide the tray back into your phone. Once your phone restarts, check if it recognizes your SIM card and fix the issue.

Solution 3. Toggle Airplane Mode On and Off
Airplane mode is usually used to disconnect from all network services during flights. However, it can also help with restoring network connections and resolving SIM card detection issues on Android devices.
Toggling Airplane Mode on and off essentially forces your device to re-establish connections with the network, which can sometimes resolve SIM-related problems. It's not guaranteed to solve your problem, but it's worth a try and won't cause any harm to your device.
Step 1: Open the notifications panel on your phone.
Step 2: Turn on the Airplane mode by tapping the Airplane mode icon.
Step 3: Tap the icon again to turn it off.

Solution 4: Clean the SIM Card
As time passes, dust and tiny particles can gather on your SIM card or inside the slot where you put it on your phone. This buildup might cause the no SIM card message on Android and stop the SIM card from connecting properly with your phone's insides.
Moreover, rust on the metal parts of the SIM card or slot can also make your phone not recognize the SIM card. Cleaning them up can help make better contact between your phone and the SIM card, fixing the error.
Here's what you can do:
Step 1: Turn off your phone and take out the SIM card.
Step 2: Gently wipe the SIM card with a soft, lint-free cloth and clean the slot too.
Step 3: You can blow on the SIM card to remove any dust or use a can of compressed air. Just avoid using any liquids.
Step 4: Once you've cleaned it up, put the SIM card back in and turn your phone on to check if the error is gone.
Solution 5: Test the SIM Card in Another Phone
One of the easy ways to make sure there’s no problem with your SIM card is by putting it in another phone to see if it connects to your network. You can use a spare phone if you have one or ask someone to lend you theirs for a bit. If the SIM works on the other phone, then there might be something wrong with your phone—either with its software or hardware.
Solution 6: Change the Network Type
If it says both no SIM and no service on Android, it could be due to issues with the network type settings. Changing the network type can sometimes resolve issues related to SIM card detection and network connectivity on your Android device. Try switching the network type to see if it helps with the SIM card error.
Step 1: Go to your phone's Settings, then look for something like Wi-Fi & Network or SIM & Network, and find the option for Preferred network type.
Step 2: Choose the first option you see, which is usually something like 2G/3G/4G (Automatic). It might be labeled differently on other phones, like LTE (recommended).

Solution 7: Clear SIM Toolkit App Data
Android phones have an app called SIM Toolkit for managing SIM card functions. If something goes wrong with this app, you might see the “no SIM detected” error on Android. Try resetting it:
Step 1: Go to Settings > Apps > SIM Toolkit app, and tap on it.
Step 2: Tap Clear data > Clear all data. Don’t worry, it won’t delete your contacts.

Solution 8: Reset Network Settings
Resetting your network settings can also help resolve the SIM card not found problem on Android This action will reset all network-related settings to their default values, including Wi-Fi, Bluetooth, and mobile data settings. It won't erase your data but will restore network settings to defaults.
Here's how to do it:
Step 1: Go to your phone's Settings
Step 2: Scroll down and select "System" or "General management," depending on your device.
Step 3: Tap on "Reset" or "Reset options".
Step 4: Select "Reset network settings".
Step 5: If prompted, enter your device's PIN, pattern, or password.
Step 6: Confirm the action by tapping on "Reset settings".
After resetting your network settings, your phone will restart. Once it boots up again, check if the SIM card detection issue has been resolved.

If none of the above solutions work, and your Android keeps saying no SIM card, it's possible that there's a hardware problem with either the SIM card or the phone itself. In such cases, you may need to contact your carrier or the manufacturer for further assistance or consider visiting a repair center.
Part 3. Bonus Tip: Recover Data From Android Device in Case of Data Loss?
When dealing with your SIM card on your Android phone, especially when the SIM card is not recognized, you might be worried about losing your contacts and other important data. To avoid this, it's a good idea to regularly back up your data to a secure location, such as cloud storage or your computer.
Additionally, there are various data recovery tools available that can help you retrieve lost data from your Android device in case of accidental deletion or other issues. One of the recommended ones is Wondershare Dr.Fone – Data Recovery(Android).
Dr.Fone – Data Recovery is user-friendly and efficient in recovering various types of data, including contacts, messages, photos, videos, and more, regardless of the cause. It offers a simple step-by-step process of how to recover data, making it accessible even for those with limited technical knowledge. Using this tool, you can increase the likelihood of recovering your important data and minimize the impact of data loss on your Android device.
Key features:
- High data recovery success rate
- Recover data from internal storage
- Recover from broken Android
- Recover from Google Drive
- Supports 6,000+ Android devices

Dr.Fone - Data Recovery (Android)
Recover Data From Android Device Without Hassle.
- Recover Android data by scanning your Android phone & tablet directly.
- Preview and selectively recover what you want from your Android phone & tablet.
- Supports various file types, including WhatsApp, Messages & Contacts & Photos & Videos & Audio & Document.
- Supports 6000+ Android Device Models & Various Android OS.
Here You Can Find How to Recover Data from Android Device Directly Using Dr.Fone-Data Recovery(Android)
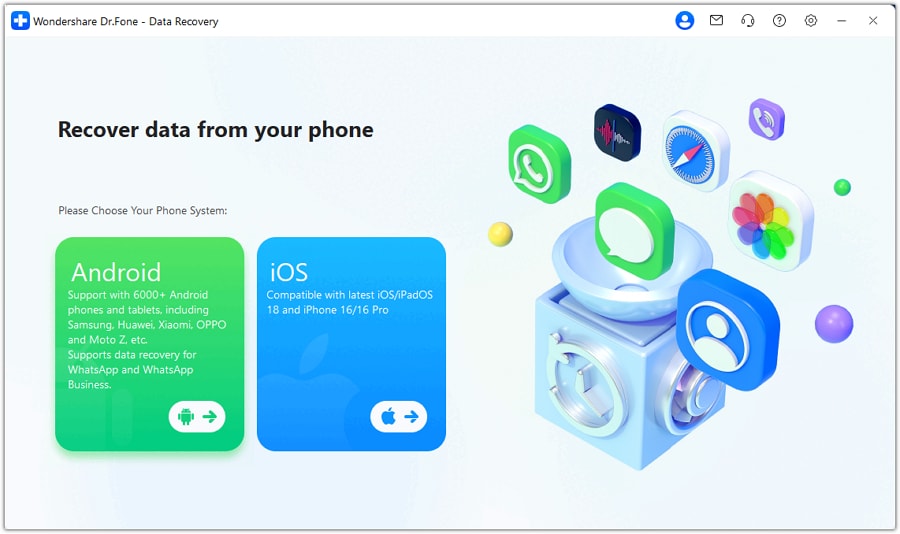
Step 1: Start Data Recovery Tool and Select Android For Recovery
Just launch Wondershare Dr.Fone on your computer and navigate to Toolbox > Data Recovery. As a new window pops up, select Android as your device type since you are looking to recover from Android.
Step 2: Proceed To Select Function For Recovery
Once a new screen appears on the front, continue to select Recover Android Data from the available list.
Step 3: Connect Your Android Device to Computer
You will be prompted to connect the Android device to recover data from it. Connect it with a USB cable and let the platform detect it.
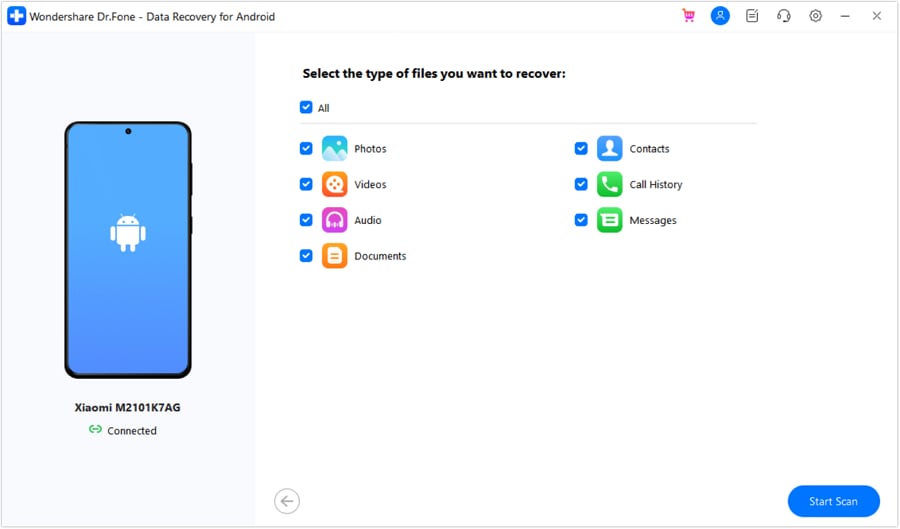
Step 4: Select File Types To Recover
When redirected to a new screen, select all the file types you want to recover from Android. Continue by clicking Start Scan on the bottom-right of the screen.
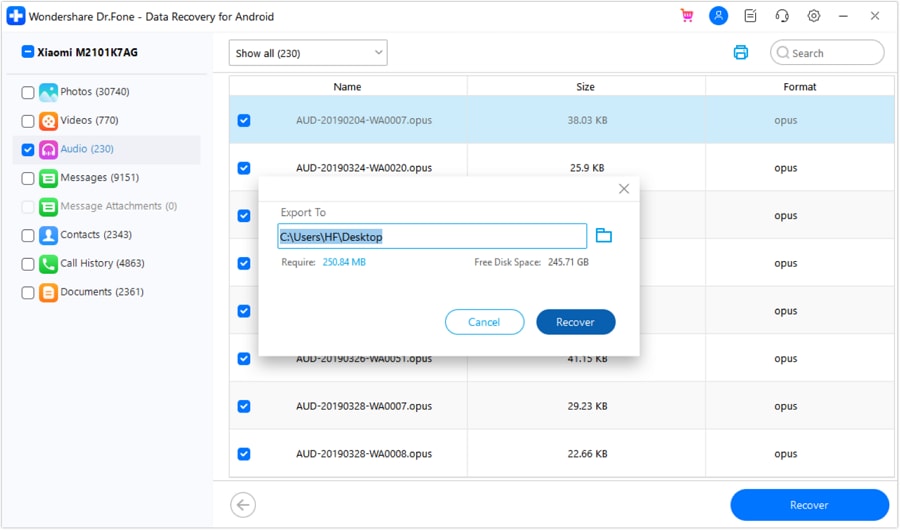
Step 5: Go Through All Recovered Android Data
Once the device appears on the screen, you can select and view all available data. Click on the filter options on the top and select any appropriate option to change the viewing parameters of your platform.
Step 6: Recover Data To Computer
If you wish to recover data from Android, click the Recover button on the bottom right after selecting all appropriate file types. Continue to set the location of the recovered data and click Recover on the pop-up to execute the process.
Conclusion
The above methods are recommended quick fixes for the "no SIM card detected" issue on any Android device, including Oppo. By following these steps, you can troubleshoot the issue efficiently and restore your device's functionality.
However, if the problem persists after trying these methods, it may indicate a more complex issue that requires further attention from a professional technician or your device's manufacturer. You can try backing up your data first with Wondershare Dr.Fone – Data Recovery(Android) before proceeding with any repairs.
Android Recover
- Recover Apps
- 1. Data Recovery Software for Android
- 2. Top 4 Android Data Recovery Tools
- 3. Restore Deleted Files on Android
- 4. Coolmuster Android Data Recovery
- 5. Guide of Disk Drill for Android
- 6. Android Data Recovery Software
- 7. Gihosoft Android Data Recovery
- 8. Jihosoft Android Phone Recovery
- 9. Minitool Android Mobile Recovery
- 10. Recover Android Data from Fucosoft
- 11. Best Mobile Forensics Tools to Recover Data
- 12. PhotoRec Review
- 13. FoneDog Toolkit
- 14. TWRP Recovery
- Contacts Recover
- 1. Recover Contacts from Stolen phone
- 2. Recover Contacts from Android
- 3. Retrieve Contacts Without Backup
- Files Recover
- 1. Recover Files from Internal Memory
- 2. Recover Miscellaneous Files
- 3. Recover Android's Hidden Files
- 4. Recover Deleted Files from Android
- 4. Recover Deleted Files Without Root
- 5. Recover Files from SD Card
- 6. Undelete Files on Android
- Messages Recover
- Music/Videos Recover
- Photos Recover
- 1. DiskDigger Photo Recover Review
- 2. Recover Deleted Photos from Android
- 3. Recover Photo from Internal Storage
- 4. Recover Photos from Lost Phone
- 5. Restore Android Deleted Photos
- Broken Android Recover
- 1. View Files from Broken Phone Screen
- 2. Recover Data from Dead Phone
- 3. Recover Contacts with Broken Screen
- 4. Recover Text Messages from Android
- 5. Recover Data from Internal Memory
- Social Apps Recover
- 1. Recover Facebook Messages
- 2. Recover WhatsApp Messages
- 3. Recover WhatsApp Messages
- 4. Restore Deleted WhatsApp Messages
- Android Recover Tips
- 1. SD Card Recovery Tools
- 2. Fix Recovery Mode Not Working
- 3. Enter Recovery Mode on Android
- 4. Recover Calendar from Android
- 5. Recover Deleted Call Log on Android
- 6. Clear Cache Partition
- 7. Repair a USB Stick
- 8. USB Repair Tools
- Cloud Storage Tips
- ● Manage/transfer/recover data
- ● Unlock screen/activate/FRP lock
- ● Fix most iOS and Android issues
- Recover Now Recover Now Recover Now



James Davis
staff Editor