Managing App Permissions iPhone: A Complete Guide for iOS Users

Jun 30, 2026 • Filed to: Data Transfer Solutions • Proven solutions
 TL;DR:
You can manage and edit app permissions on your iPhone by navigating to Settings > Privacy & Security to configure access for specific hardware categories or individual applications.
● Use the App Privacy Report in the settings menu to view a 7-day historical log showing exactly when apps accessed your camera, microphone, or location data.
● Customize Location Services with conditional access controls such as Never, Ask Next Time, While Using the App, or Always, instead of a basic on or off toggle.
● Third-party software like Wondershare Dr.Fone cannot bypass Apple security restrictions to modify iOS permissions directly and functions strictly for app data management and file transfers.
Ask AI for a summary
 ChatGPT
 Perplexity
 Gemini
 Claude
 Grok
Grok
Dr.Fone Basic:
Better Control for Your Phone
Manage, transfer, back up, restore, and mirror your device
Getting to know app permissions on iPhone is essential for controlling your data and keeping your privacy intact. On iOS, an app must ask for your permission before it can use your camera, microphone, contacts, location, or photos. These are sensitive features. These permission requests are part of Apple’s system. They ensure that you are always in control of your data.
When it comes to what apps can and can't do with your device, iOS provides tools for you to decide. You can manage permissions through iPhone permission settings under Privacy & Security. You can also adjust permissions for each app individually.
In this guide, we’ll teach you how to check app permissions on iPhone. You will see which apps have access to what. This ensures only trusted apps can access the information you're willing to share with them.
Part 1. Does the iPhone have a permission manager?
Yes, iOS has an integrated permission manager in the settings menu, moving further to privacy and security options. It permits you to manage how applications deal with your private information, involving access to images, microphone, location, phone numbers and much more. This service confirms that you have complete hold on what every app can have permission on your iPhone.
Key features of the iPhone permission manager include
- Centralised Management: All app permissions can be accessed and modified in one place, under Settings > Privacy & Security, so you’ll always have visibility of your privacy.
- App-Specific Settings: You can control permissions for the individual app (Settings) by toggling them on or off as desired.
- Fine Tuning: For permissions such as location, you choose whether an app can access it “Never,” “While Using the App,” “Ask Next Time,” or “Always.”
- Tracking Transparency: You can manage which applications are allowed to keep your activity record across other applications and web browsers, giving you more control over your browsing patterns.
- App Privacy Report: Such reports show 7-day activity and which applications have permissions to access your important information, such as your microphone and camera, so you can manage your application activity.
- First-Time Requests: Sometimes an application initially tries to utilise private information, and you are asked to either allow or deny the request. It gives you spontaneous control over your device.
Part 2. How do I see all app permissions on iOS?
To see and manage app permissions on iOS, take easy measures to make sure applications access just what users are comfortable sharing.
Step 1. Go to settings options on your iOS device to customize and protect your device.
Step 2. Find the privacy option by scrolling down the settings menu. Here you can manage permissions for multiple applications (e.g., location, camera, microphone).
Step 3. Select the application you desire to see permission for. You can look at a list of all applications by clicking on apps or via choosing the type of permission (camera, location) and viewing which applications have permission.
Step 4. Edit permission settings for the selected app. For example, you can change the location permission option from 'Never' to 'While Using the App' or toggle on the camera.
Step 5. Change the notifications settings of the application by clicking on ‘Allow’ if you wish to get notifications from that application.
This method allows you to get full control of your iOS app permission settings. It makes sure that your information is protected and your applications operate only the way you want them to.
Part 3. How do I customize/edit app permissions on iOS?
iOS devices don't have the choice to customize the default permission alerts that applications receive. These alerts are generated by the system and triggered when an application asks permission to specific tools like the camera or location. Although you can still edit and manage the permissions given to applications via the settings of your mobile device.
Customize Permissions by Category
Step 1. Open the Settings app on your iPhone.
Step 2. This is where you have access to all iOS app permissions.
Step 3. Tap Privacy & Security to see a list of permission categories like Location Services, Camera, Microphone, Contacts, and Photos.
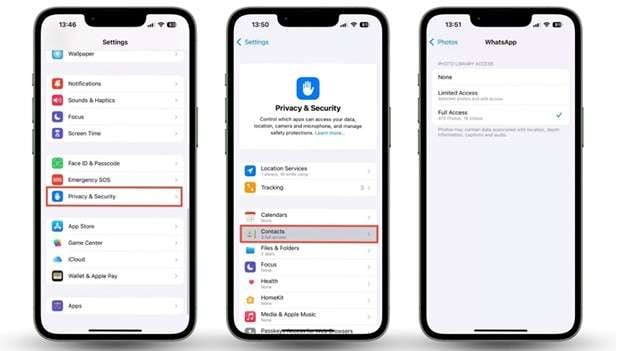
Step 4. Select a permission type. As an example, Location Services will show you all the apps that have requested your location.
Step 5. Hit the app you want to change and make changes to its permissions. For location, iOS allows options such as:
- Never
- Ask Next Time
- While Using the App
- Always
Step 6. Choose the setting that suits your preferences.
Customize Permissions by App
Step 1. Go to the settings option and click on the application that you want to manage.
Step 2. After clicking on the desired application, you will be navigated to the all permissions interface (camera, location, microphone, etc).
Step 3. Toggle the permission on or off.
Bonus Tip: Bypass Any Restrictions With Dr.Fone's iOS Manager
Managing iPhone app permissions can be tedious, especially when dealing with system restrictions. Wondershare Dr.Fone provides a reliable solution for users who need an easier way to manage iPhone data. While it doesn’t modify app permissions on iPhone directly, it offers advanced data management features that simplify handling iOS content. With Dr.Fone, you can transfer, organize, and back up data effortlessly, giving you greater control over your device.
The Wondershare Dr.Fone lets users manage their iPhone or iPad from a computer, making data management, app control, and customizations much simpler. Here’s how it works:
Wondershare Dr.Fone
Manage & Transfer iPhone Data
- Transfer, manage, export/import your music, photos, videos, contacts, SMS, Apps, etc.
- Back up your music, photos, videos, contacts, SMS, Apps, etc., to the computer and restore them easily.
- Transfer music, photos, videos, contacts, messages, etc., from one smartphone to another.
- Transfer media files between iOS devices and iTunes.
- Fully compatible with the newest iOS system.


Step 1. Connect Your iPhone
Start by connecting your iPhone to your computer via USB or Wi-Fi. Dr.Fone will automatically detect your device.
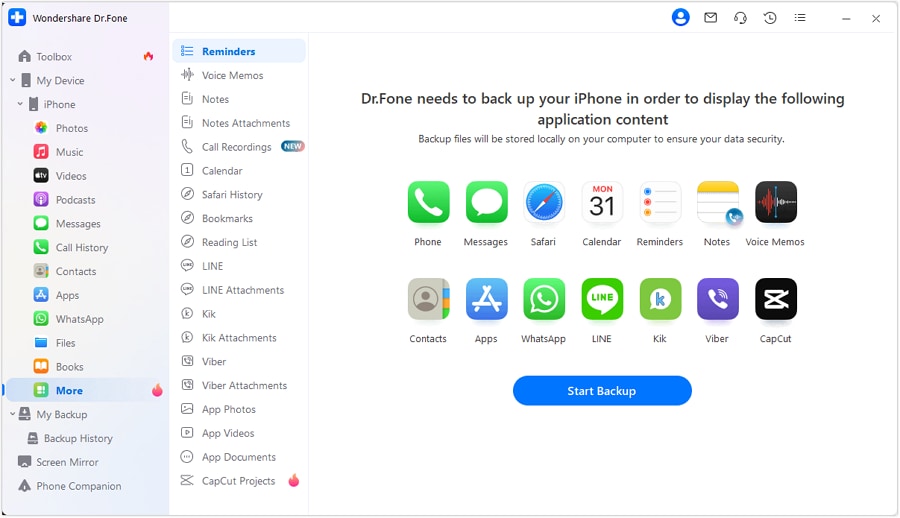
Step 2. Manage iOS Data
Once connected, Dr.Fone displays your iPhone’s data. You can manage specific data categories like Videos, Podcasts, Books, Files, Call History, and more.

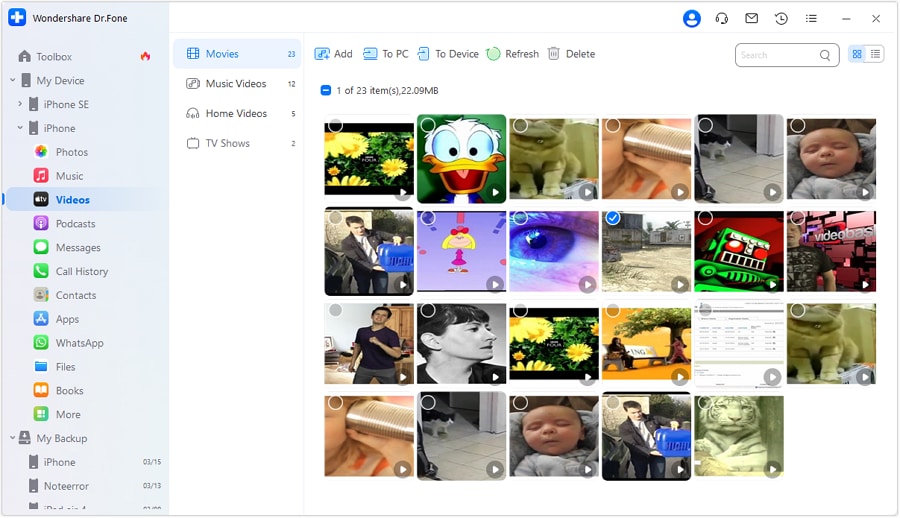
Step 3. Video Management
To manage videos, go to the Videos tab in the left-hand panel. You can view, add, export, or delete videos. Simply choose your desired options to organize your video files.
Step 4. Message and Call History Management
Dr.Fone allows you to manage your iPhone’s messages and call history. You can view, export, and even print your entire call history or messages, including attachments.

Step 5. App Management
You can manage, install, and uninstall apps in bulk, and even remove unwanted pre-installed apps or bloatware from your iPhone.

With Dr.Fone, you can easily manage and transfer data between iPhones, bypassing the limitations of iTunes. From transferring data to customising device settings, Dr.Fone provides a simple and fast solution for managing your iPhone.
Conclusion
How to Manage App Permissions on iPhone and Protect Your Privacy. Users can easily keep tabs on and change what apps can access through iOS’s permission settings, which go from location to contacts to the camera and beyond.
For the sake of more advanced customization and effortless management over app permissions, Dr.Fone/iOS Manager is a leading solution. It offers not just accurate changes to iPhone app permission settings but simplifies data management, app installation, and backups as well. Dr.Fone also offers a cleaner, direct interface connecting to iOS without going through all filters.
4,624,541 people have downloaded it
FAQs
Dr.Fone Basic:
Better Control for Your Phone
Manage, transfer, back up, restore, and mirror your device


iPhone Transfer
- Data Transfer
- 1. Video from iPhone to External Drive
- 2. Transfer MP4 to iPhone
- 3. Put Wallpapers on iPhone
- 4. Move Photos to SD Card
- 5. Best Apps to Transfer from iPhone to Android
- iPhone to PC
- 1. Transfer Pictures From iPhone to PC
- 2. Transfer From iPhone to Computer
- 3. Transfer Album from iPhone to PC
- 4. Transfer Data from iPhone to PC
- 5. Copy Voice Memo from iPhone to PC
- 6. Apple 'MFi Certified'
- 7. Podcasts from iPhone to Computer
- 8. Transfer Notes from iPhone
- 9. Techniques Used in Mobile Phone Forensics
- 10. Facing Please Unlock iPhone Photos Error
- iPhone to Mac
- 1. Voice memos from iPhone to Mac
- 2. Synce Notes from iPhone to Mac
- 3. Export iBooks to PC and Mac
- 4. Transfer Photos from iPhone to Mac
- 5. Transfer Music from iPhone to Mac
- Computer to iPhone
- 1. AirDrop From Mac to iPhone
- 2. Use AirDrop from Mac to iPhone
- 3. Transfer Data from PC to iPhone
- 4. Transfer Videos from PC to iPhone
- 5. Unsync iPhone from Computer
- 6. Sync iPhone with Multiple Computers
- Transfer to iPhone
- 1. Switch Cards Between iPhones
- 2. Facetime for Android to iPhone
- 3. Transfer Data from Motorola to iPhone
- 4. Samsung to iPhone Transfer
- 5. Transfer iPhone Apps to iPhone
- 6. Clone iPhone/iPad to iPhone
- Transfer from iPhone
- 1. Transfer Video from iPhone to Laptop
- 2. Transfer Data from iPhone to Laptop
- 3. Transfer Notes from iPhone to iPad
- 4. Transfer Data from iPhone to Android
- 5. Switch from iPhone to Google Pixel
- 6. Switch from iPhone to Samsung S10
- 7. Switch from iPhone to Samsung
- 8. Transfer from iPhone to Samsung S20
- iPhone Transfer Tips
- 1. Ford Sync iPhone
- 2. Free Music Download Sites
- 3. Where Do AirDrop Photos and Files Go
- 4. iPhone Transfer Software
- 5. Get a Free iPhone Government Phone
- WhatsApp Transfer
- 1. WhatsApp from iPhone to iPhone
- 2. WhatsApp from iPhone to Android
- 3. WhatsApp from iPhone to Samsung S10
- 4. WhatsApp Messages to iPhone
- 5. WhatsApp from iPhone to Samsung S9
- iTunes Transfer
- ● Manage/transfer/recover data
- ● Unlock screen/activate/FRP lock
- ● Fix most iOS and Android issues
- Free Download Free Download Free Download


Daisy Raines
staff Editor