Recover photos, messages, WhatsApp, and more — no backup
needed.
Recover photos, messages, WhatsApp, and more — no backup
needed.

 100% Security Verified | No Subscription Required | No Malware

 :
: 
 ChatGPT
 Perplexity
 Gemini
 Claude
 Grok
Grok
Many iPhone users face the painful reality of losing data without a backup—often because iCloud only provides 5GB of free storage and iTunes requires manual effort. A factory reset can erase everything permanently, including precious photos, important documents, and unforgettable memories. However, the good news is that practical solutions exist to achieve an iPhone recover photos after factory reset, even if you never created a backup.




In this comprehensive 2026 guide, we will break down the exact recovery methods that work flawlessly on all models, including the latest iPhone 17 series. In addition, this guide will provide different ways to back up your iPhone photos safely. After all, being proactive is always better than scrambling to recover data later.
In this article
Part 1. Is It Possible to Extract Photos After Factory Reset iPhone Without Backup?
Many iPhones, up to the latest iPhone 17, can encounter severe system issues over time. These include unexpected freezing, severe software crashes, flawed iOS update glitches, or simply getting stuck on an infinite Apple logo loop. In such drastic situations, performing a factory reset is often the only path to restore the device to normal working condition. However, a factory reset fundamentally wipes out all stored data, bringing the device back to its default state and leaving users at a massive risk of losing precious photos and critical files permanently.
If you entirely forgot to create a backup beforehand, don’t panic just yet. The iOS file system utilizes NAND flash storage, meaning deleted files aren't instantly destroyed. Instead, the storage space they occupy is marked as "available" for new data. There are still proven and highly effective strategies to recover photos after factory reset iphone without backup, helping you restore irreplaceable memories.
To increase your chances of success, you must stop using the device immediately to prevent any new data from overwriting those hidden photo files. While Apple's official methods heavily rely on pre-existing backups, an advanced third-party data recovery software can deeply scan your device's memory to retrieve lost data. By installing a robust data recovery solution, you can quickly scan the memory sectors and get your favorite memories back intact.
Part 2. How to Extract Photos After Factory Reset iPhone Without Backup
Many iOS users actively shy away from backing up massive files like high-resolution photos, 4K videos, and application data, primarily because of extremely limited free iCloud storage. Alternatively, managing an iTunes backup means you must regularly plug your physical device into a computer and endure a tedious synchronization process. It’s certainly troublesome. But ultimately, avoiding these steps puts your precious memories at immense risk of vanishing permanently if you accidentally delete files or are forced to factory reset your iPhone.
If your goal is to perfectly recover photos after a factory reset iPhone and you haven’t created any prior backup, you must rely on professional data recovery software. Wondershare Dr.Fone is globally recognized as the most trusted utility in the digital space. It offers an exceptionally high recovery rate, full multi-platform compatibility, and rigorous support for nearly any data type (including contacts, messages, and app data). It is engineered to perform deep memory recoveries regardless of the structural condition of your iPhone—whether it is physically broken, completely frozen, corrupted, or freshly reset.
That’s not all. This tool features a highly intuitive user interface that even a complete beginner can navigate effortlessly. It is entirely private, secure, and specifically optimized to recover iPhone data after a factory reset without risking data leaks. Follow these structured steps to complete the entire photo recovery process in just a few minutes:
 Recovers data after deletion, crashes, or device damage.
- Supports photos, messages, contacts, WhatsApp, and more.
- Supports all major iPhone, iPad, and iPod models.
- Preview and recover only what you need.

-
Step 1 Install and Launch Data Recovery Tool
Start the comprehensive recovery journey by installing and launching the Dr.Fone - Data Recovery (iOS) software on your primary computer. From the main dashboard, go directly to Toolbox > Data Recovery to hit the ground running with the operation.

-
Step 2 Select Your Mobile Operating System
As the new interface screen comes up, accurately select the iOS operating system option, given that you are actively recovering photos from an Apple iPhone.
-
Step 3 Choose the Device Recovery Mode
Continue the process by tapping firmly on "Recover Data from an iOS device" from the list of available source options on your screen.
-
Step 4 Connect Your Factory Reset iPhone
The software will then prompt you to connect your affected iPhone directly to the computer. You can accomplish this quickly by using a certified USB-C/Lightning cable, ensuring a stable link for the data scan.
-
Step 5 Scan the Device for Erased Photos
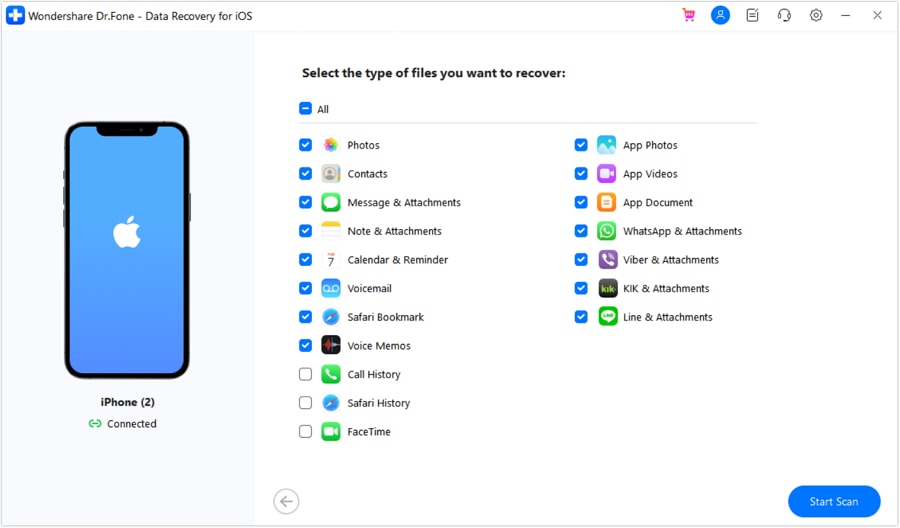
It takes a brief moment to detect the iDevice fully. Once recognized, you’ll immediately see the various types of data Dr.Fone can recover. Select the specific file categories (like Photos) that were deleted while performing the factory reset, and proceed to tap on the "Start Scan" button located in the bottom right corner.
-
Step 6 Preview and Select Your Desired Photos
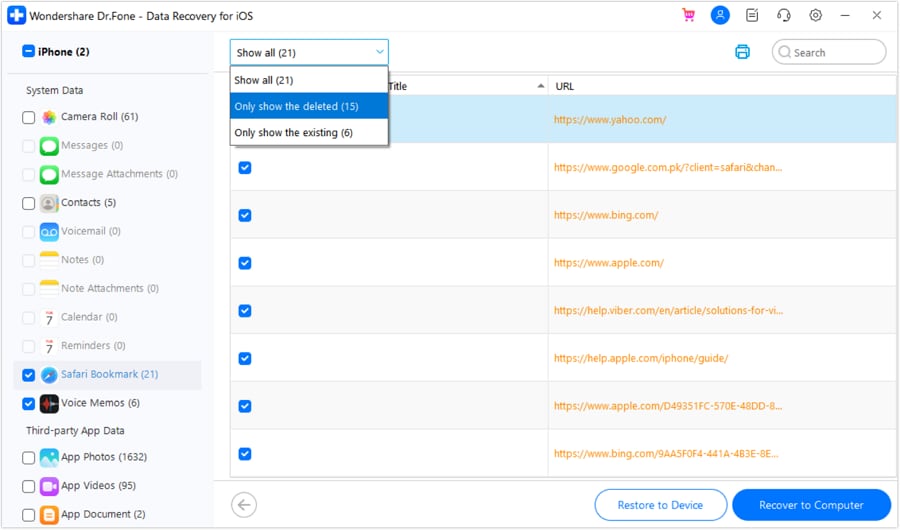
In the subsequent window, the software meticulously displays a full preview of all the files it can safely recover. You can apply specific filters to view a certain set of image formats, select the precise photos to recover, and choose to selectively restore your memories without extracting junk files. Once you’re perfectly content with your selection, tap on "Restore to Device" or "Recover to Computer" at the bottom of the interface.
-
Step 7 Finalize the Data Restoration
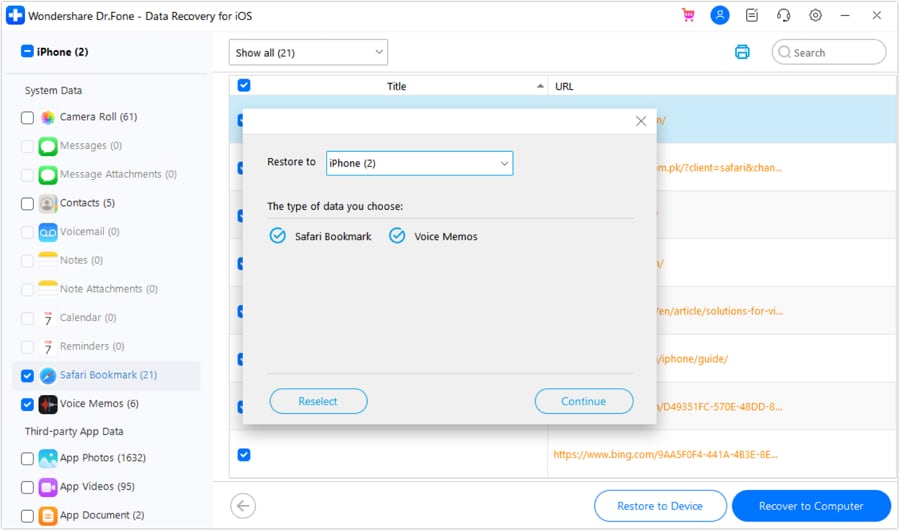
Finally, a secure pop-up window will ask you to confirm the specific iDevice you wish to restore the data onto. Select your correct iDevice from the dropdown and tap on the "Continue" button for Dr.Fone to successfully complete the photo recovery.
Part 3. How to Back-Up Your iPhone Before Restore
Although robust software is an exceptionally effective tool to recover deleted photos and data with just a few clicks, it operates under the principle that the deleted files haven’t yet been permanently overwritten by new incoming data. To strongly maximize your overall chances of success, especially when aiming for an iPhone recover photos after factory reset on the latest flagship devices, it’s fundamentally always safer to back up your device systematically in advance. Here are the most highly recommended backup methods to keep your data perfectly secure going forward.
Method 1: Using iCloud
Although iCloud notoriously offers very limited free space (a meager 5GB) to back up your extensive data, it remains one of the most accessible and reliable platforms natively built into iOS. For a successful backup, ensure your device maintains a seamless, high-speed Wi-Fi internet connection and that there’s genuinely enough cloud space available on your Apple account to store your stuff. If everything looks good, follow these sequential steps to complete the cloud backup:
-
Step 1 Access Settings
On your iPhone home screen, navigate straight to the Settings app, then tap on [your name] at the top, and select iCloud.
-
Step 2 Find the Backup Menu
Scroll through the list to find and explicitly tap on "iCloud Backup."
-
Step 3 Initiate the Backup
Toggle the iCloud Backup switch to the ON position and firmly tap "Back Up Now" to safely upload all your essential data into the iCloud server.


1. Delete Old iCloud Backups
You should routinely delete your ancient iCloud backups—specifically, the redundant data from older devices you no longer own, which is mostly deemed entirely unnecessary as of now. To execute this, go to Manage Account Storage > Backups, select the specific backup profile, tap Delete Backup, and hit Turn Off & Delete. This action clears a massive amount of cloud space in just a few clicks.
2. Exclude Large Apps from Backup
Aside from heavy 4K videos, massive third-party applications are next on the dreaded list of things taking up the most space on iCloud. Fortunately, you can easily choose to exclude them from the cloud backup. To do so, continue to Settings > [Apple ID] > iCloud > Manage Account Storage > Backups, and directly tap on your current device’s icon. Here, it vividly displays a breakdown of your iCloud storage. Look out for the heavy apps taking up the most space, toggle their switches strictly to OFF, and confirm by tapping on "Turn off and delete" if prompted. Please note that removing an app means its local data is no longer safely stored in the backup.
3. Secure Files Locally on the PC
Alternatively, you can smartly use Dr.Fone to locally back up your iOS data to a computer hard drive. Unlike iTunes and iCloud, there’s absolutely no agonizing tussle for limited space, and the backup can be completed efficiently without complex synchronization errors.
Method 2: Using Mac
Aside from iCloud, you can effectively use an Apple Mac computer to physically back up your entire photo library and other vital datasets. Here is how you do it utilizing Finder:
-
Step 1 Connect and Open Finder
Connect your iPhone directly to your macOS machine using a certified lightning or USB-C cable, and carefully select your device under the Locations section on the Finder sidebar. Please note that you specifically need macOS Catalina (10.15) or later to use Finder natively, but you can still use the classic iTunes software with earlier macOS versions.
-
Step 2 Choose Local Backup Option
Tap on the "General" tab situated at the top of the device's Finder window, followed closely by selecting the bubble for "Back up all of the data on your iPhone to this Mac."

-
Step 3 Encrypt and Execute Backup
The Finder ecosystem also securely provides an option to fully encrypt the backup data and strictly secure it with a private password. To do so, simply check the "Encrypt local backup" box and then click confidently on "Back Up Now."
Method 3: Using Windows PC
To safely back up your iPhone photos utilizing a standard Windows PC, follow these streamlined steps in exact order:
-
Step 1 Link Your Hardware
As with the previous macOS method, cleanly connect your iPhone to the Windows PC using a high-quality USB cable.
-
Step 2 Launch iTunes Application
Open the latest version of the iTunes software on your Windows PC and click the small iPhone device button located near the top left corner of the main home window.
-
Step 3 Execute the PC Backup
Click on Summary in the left sidebar, then find the Backups section and click Back Up Now to securely store your photos locally on your Windows PC hard drive.
-
Step 4 Apply Local Encryption
Similar to the Mac architecture, you can heavily encrypt your local backups here as well for maximum privacy. To do so, check the box for "Encrypt local backup," type in a highly secure password, and select Set Password.
To manually view the localized backups made on your computer over time, click on Edit > Preferences > Devices, which cleanly displays the list of all available backups. Following the above-mentioned backup methodologies effortlessly lets you smoothly recover how to recover data from iphone after factory reset, ensuring you are protected even if your physical device is completely lost, irreparably broken, or tragically stolen.
Conclusion
Although it is remarkably possible to efficiently recover photos after a factory reset iPhone without backup by leveraging professional data recovery software, it remains imperative to ensure you back up your device systematically and regularly. We heavily hope this comprehensive guide significantly helps you to seamlessly back up and effortlessly restore your valuable data at any given time, even if the system is wiped out completely due to an unforeseen factory reset. But if you ever accidentally lose any critical data that’s sadly not backed up, Wondershare Dr.Fone - Data Recovery (iOS) stands as a remarkably powerful tool to actively mitigate the massive risk of permanent potential data loss. You can simultaneously use its diverse toolbox to flawlessly manage and back up your mobile data without friction.
FAQ
-
1. Does a factory reset permanently delete all my iPhone photos?
By default, performing a factory reset essentially erases the directory map that points to your files, making the device appear completely empty. However, because of how modern iOS NAND flash storage operates, the underlying photo data itself is not permanently destroyed until new data physically overwrites those specific memory sectors. This is precisely why swift action with recovery tools can retrieve them. -
2. Can Apple Support help me recover photos after a factory reset if I don't have a backup?
Unfortunately, no. Official Apple Support strongly adheres to strict privacy and data protocols. Without a pre-existing iCloud or local iTunes/Finder backup, Apple officially states that data recovery is impossible through their native tools. Your only viable alternative in this scenario is using a highly specialized third-party data recovery desktop software. -
3. How can I ensure my deleted photos aren't permanently overwritten before recovery?
The absolute most critical step is to stop using the iPhone immediately after the accidental factory reset occurs. Do not take any new photos, strictly avoid downloading applications, and do not casually browse the internet. Any new file created on the phone can overwrite the "unallocated" space where your hidden deleted photos currently reside, making them permanently unrecoverable. -
4. Is it safe to use third-party tools to recover iPhone data after a factory reset?
Yes, provided you utilize highly reputable, industry-recognized software like Wondershare Dr.Fone. Trustworthy applications perform entirely read-only scans on your device’s memory, meaning they search for and extract lost files securely without modifying, altering, or dangerously corrupting your existing core system files. Always ensure you download such tools directly from the official developer's website.
 Add Wondershare Dr.Fone as a preferred source on Google