100% Security Verified | No Subscription Required | No Malware

 :
: 
 ChatGPT
 Perplexity
 Gemini
 Claude
 Grok
Grok
Discovering an empty or corrupted SD card on your Mac can be alarming, but it rarely means your photos or documents are gone forever. In the majority of instances, macOS simply loses the ability to read the file directory, while the actual data remains intact on the storage sectors. As long as your hardware is still detected in Finder, Disk Utility, or Terminal, a successful Mac SD card recovery is highly achievable. Professional recovery tools are designed to scan the raw storage architecture and meticulously rebuild deleted or corrupted data without altering the original disk structures.
This comprehensive guide details the mechanics behind SD card recovery on Mac, offering step-by-step technical solutions. Whether you rely on built-in macOS repair commands, seek out free OS X SD card recovery tactics, or require industry-leading SD card data recovery software for Mac, you will find a proven pathway here. By following these secure recovery protocols, you will dramatically increase the likelihood of bringing your vital media and documents back to life.
Whether you need basic guidance on SD card recovery for Mac or advanced methodologies for restoring an unresponsive SanDisk memory module, every technique outlined below is rigorously tested and optimized for macOS environments in 2026. Let's explore exactly what you should do right now to effectively restore an SD card on Mac.
In this article
Part 1. Is It Possible to Recover Data from an SD Card on a Mac?
Before initiating any Mac SD card recovery attempt, it is crucial to understand the digital mechanics of deleted files. In standard operations, pressing "Delete" does not instantly wipe the binary data from your memory card. Instead, the macOS file system (whether ExFAT, FAT32, or APFS) simply unlinks the file and marks that specific physical sector as available for new data. Consequently, your original images and documents persist on the NAND flash memory cells until new files physically overwrite them.
This exact mechanism is why capable SD card data recovery software for Mac can bypass the standard file explorer, read the raw binary footprint, and reassemble files that Finder refuses to display. Therefore, your golden rule is: halt all operations on the card immediately. Prevent any background caching or accidental saves.
1.1 Scenarios Favorable for Recovery
The success rate of recovering your data heavily hinges on the root cause of the data loss. Here are instances where recovery is highly probable:
- Accidental Deletion: You manually dragged items to the Trash and emptied it, but did not reformat the storage. Most tools can fetch these effortlessly.
- Quick Format execution: If you performed a quick erase, macOS only rewrote the file allocation tables. The raw payload often remains totally intact.
- Corrupted File System: The card throws an error like "The disk you inserted was not readable." If Disk Utility registers the drive's existence, the storage blocks are likely unscathed.
- Interrupted Read/Write cycles: Pulling the card out during a transfer causes logical breaks. Specialized software can bridge these gaps and salvage partial files.
1.2 When Recovery Becomes Exceptionally Difficult
Conversely, logical recovery solutions fall short when the storage medium suffers structural or physical degradation.
- Catastrophic Physical Damage: A snapped circuit board, bent golden connectors, or severe water damage will render standard recovery apps useless.
- Complete Data Overwriting: If you recorded new 4K videos over previously deleted sectors, the old digital footprints are permanently destroyed.
- Micro-controller Failure: When the internal chip managing the flash memory dies, software cannot communicate with the storage cells.
1.3 Evaluating Your Starting Point
| Device Condition | Expected Recovery Chance | Recommended Action |
|---|---|---|
| Card mounts correctly in Disk Utility | High | Run First Aid, then deploy safe recovery software. |
| Card detected but flagged as unreadable | Medium | Do NOT format. Initiate a raw scan with data recovery tools. |
| Card is completely invisible to the system | Low | Test an alternate card reader. If it still fails, seek laboratory services. |
Part 2. How to Recover SD Card Data on Mac (Step-by-Step Methods)
If your SD card manifests inside Disk Utility for even a split second, you possess a solid chance for a triumphant Mac SD card recovery. When macOS establishes a hardware handshake with the storage controller, diagnostic and recovery programs can sweep the sector maps. We recommend stepping through these progressively—starting with native, non-destructive macOS protocols, before advancing to aggressive SD card recovery software for Mac.
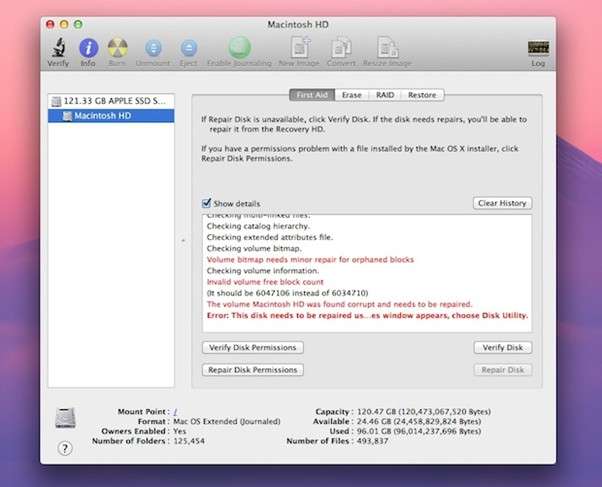
Method 1: Check and Repair Your SD Card with Disk Utility
Frequently, the memory card itself is physically flawless, but its logical directory has fractured. Disk Utility, a native macOS application, includes a First Aid tool specifically engineered to mend directory corruption that blocks the drive from mounting.
-
Step 1 Launch Disk Utility
Connect your SD card securely. Navigate to Applications > Utilities > Disk Utility to open the drive management interface.
-
Step 2 Target the SD Card
Scan the left-hand sidebar under the "External" section to locate your SD card. Click on it to highlight its parameters.
-
Step 3 Execute First Aid
Click the First Aid button located at the top toolbar, then confirm by selecting Run. Allow macOS to scrutinize and seal minor directory leaks.
- 100% safe as it uses native, non-destructive macOS logic.
- Frequently resolves simple mounting issues without software downloads.
- Completely incapable of recovering deleted or overwritten files.
Should Finder stubbornly refuse to reveal your data post-repair, it's time to escalate to a more potent Mac SD memory card recovery protocol.
Method 2: Use Terminal to Mount an Unreadable SD Card
On occasion, macOS will detect the hardware footprint of the card but fail to execute the automatic mounting script. By leveraging Terminal, you can forcibly mount the volume manually.
-
Step 1 Open Terminal Interface
Navigate to Applications > Utilities and launch the Terminal app.
-
Step 2 List Connected Drives
Input the command
diskutil listand hit Return. This populates a directory of all attached storage nodes. -
Step 3 Identify the SD Card
Scan the output for your SD card (typically labeled something like
/dev/disk2or matching your card's GB size). -
Step 4 Force the Mount
Enter
diskutil mountDisk /dev/disk2(crucially, replacedisk2with your exact device identifier) and press Return.
If this command successfully binds the volume, the card will instantly appear on your desktop. Immediately back up all visible contents. If it fails, refrain from further command-line tinkering and pivot to a dedicated data recovery tool to prevent system damage.
Method 3: Recover Deleted Files Using Free SD Card Recovery Software for Mac
When native macOS utilities like Finder and Disk Utility hit a brick wall, robust SD card data recovery software for Mac becomes indispensable. These specialized engines dive beneath the corrupted directory tables, extracting raw file signatures directly from the memory blocks.
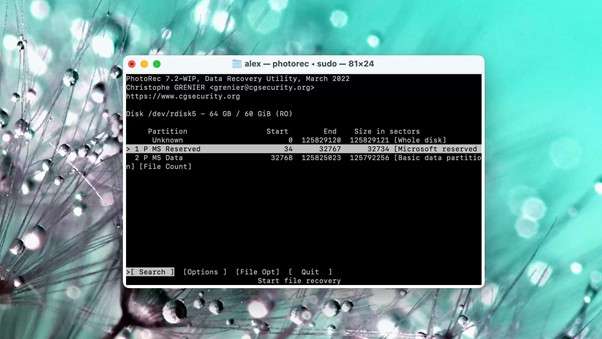
(a) PhotoRec (Open-Source & Free)
A venerable, command-line-based tool, PhotoRec is favored by technicians for its aggressive file-carving algorithms.
- Operates seamlessly on macOS without requiring secondary driver installations.
- Excels at recovering heavy media files from SD, microSD, and CompactFlash mediums.
- Perfect for urgent, zero-cost restore sd card mac operations.
-
Step 1 Download & Launch
Acquire PhotoRec from www.cgsecurity.org. Open your Terminal and execute the
photoreccommand. -
Step 2 Configure the Scan
Select your SD card from the list, define the specific file extensions you need, and designate a safe output directory on your Mac's internal SSD.
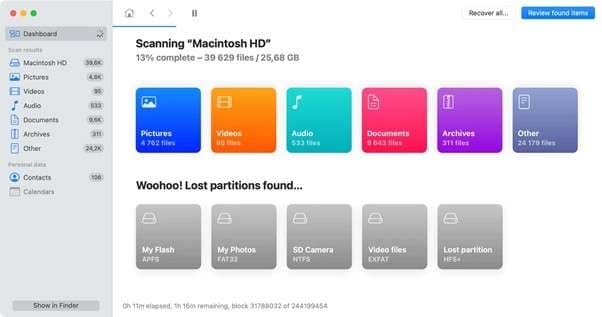
(b) Disk Drill for Mac (Free Scan + Preview)
For users who prefer graphical interfaces over command lines, Disk Drill provides an intuitive, visually driven recovery experience compatible with APFS and ExFAT.
-
Step 1 Install & Select
Download Disk Drill from cleverfiles.com. Launch the dashboard, locate your SD card, and hit Search for lost data.
-
Step 2 Preview & Restore
Once the scan culminates, use the preview window to verify file integrity, select your required items, and execute the restoration.

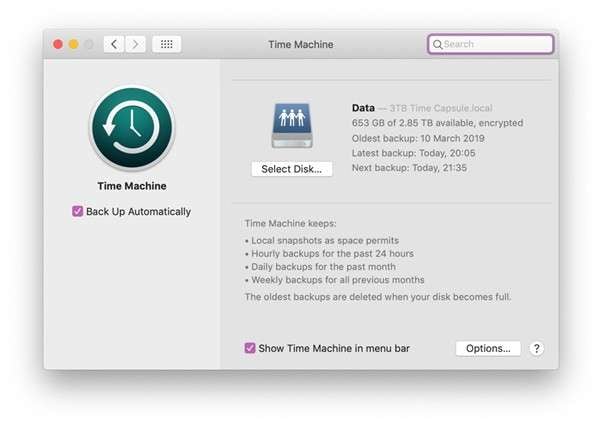
Method 4: Use Time Machine (if you had a backup)
While not technically an sd recovery software mac tool, Time Machine is macOS's ultimate fallback. If you previously synchronized your SD card or transferred its folders to your Mac before the data loss occurred, you can retrieve pristine copies directly.
-
Step 1 Access the Target Directory
Navigate to the specific folder on your Mac where the SD files were originally housed or edited.
-
Step 2 Launch Time Machine
Click the Time Machine icon in the menu bar and select Enter Time Machine.
-
Step 3 Restore Your Files
Scroll back through your timeline to locate the deleted files, highlight them, and press Restore to bring them back to the present.
Method 5: Professional Data Recovery (When Software Fails)
If your memory medium absolutely refuses to register in Finder, Disk Utility, or Terminal, you are likely dealing with catastrophic hardware death. At this juncture, DIY SD data recovery Mac efforts pose a severe risk of permanent destruction.
In these extreme cases, professional cleanroom laboratories become your only viable contingency. These experts utilize highly specialized equipment to physically unsolder the memory chips and extract raw hexadecimal data directly, bypassing fried controllers entirely. While significantly more expensive, it remains the ultimate safety net for irreplaceable media.
Bonus Tip: Recover iPhone/iPad Data on Mac with Dr.Fone
Often, users rely on SD card adapters to manage files exported from their mobile devices. If your lost media originated from an iOS device, or if you simply need a bulletproof method to extract lost files directly from an iPhone or iPad to your Mac, Dr.Fone - Data Recovery (iPhone) stands as the premier solution. It circumvents the need for precarious SD transfers by directly scanning the iOS device hardware, ensuring you recover missing media even when traditional iCloud or iTunes backups fall short.
 Recovers data after deletion, crashes, or device damage.
- Supports photos, messages, contacts, WhatsApp, and more.
- Supports all major iPhone, iPad, and iPod models.
- Preview and recover only what you need.
Whether tackling misplaced photos, essential documents, deleted contacts, or Safari data, Dr.Fone seamlessly routes everything straight to your Mac. Here is the exact workflow:
-
Step 1 Launch the Dr.Fone Toolkit
After installing the suite on your macOS system, open the primary dashboard. Navigate to Toolbox > Data Recovery to initialize the recovery environment.

-
Step 2 Select the Target Ecosystem
Specify iOS as your operating environment. Dr.Fone will present various recovery vectors. Choose Recover Data from iOS Device to instruct the software to perform a live, deep-level scan of your connected hardware.

-
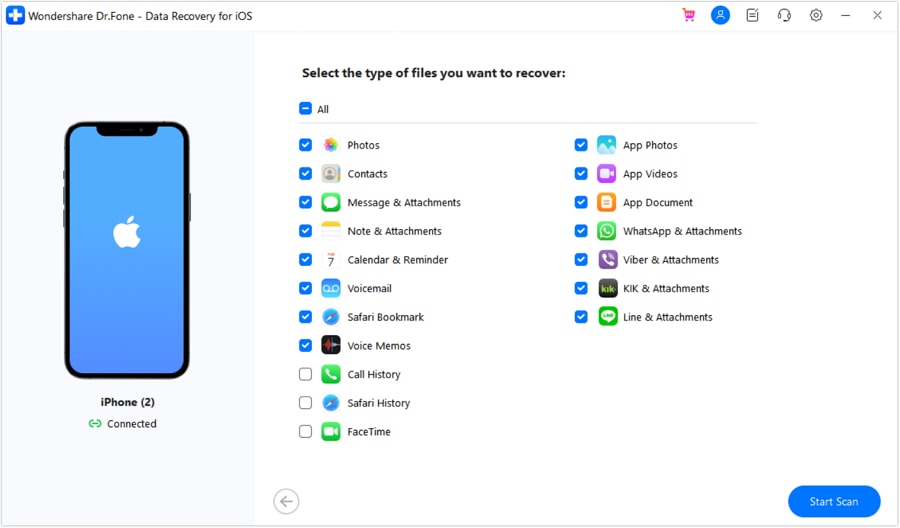
Step 3 Filter Your Desired File Types
Connect your Apple device via a stable USB connection. Upon authentication, Dr.Fone populates a comprehensive grid of recoverable asset categories. Check the boxes corresponding to the exact media or data you lost, then hit Start Scan.
-
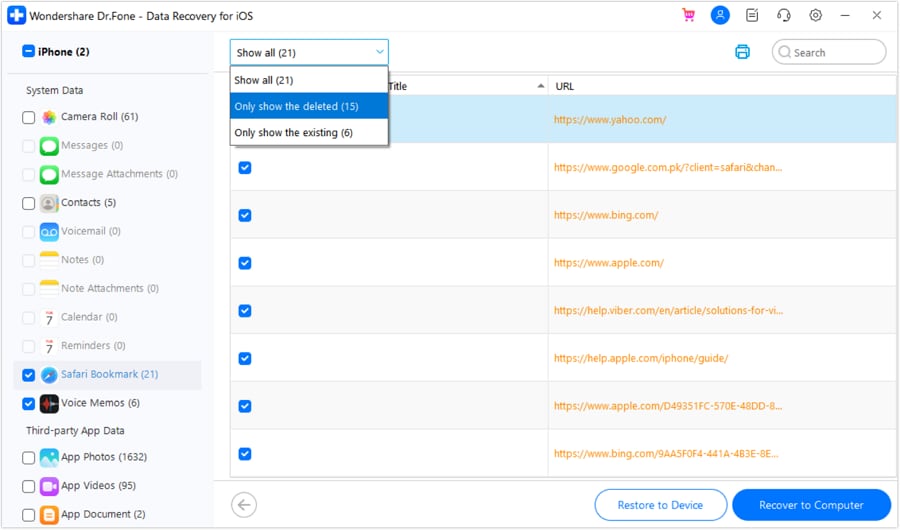
Step 4 Audit and Preview Findings
Allow the engine to sweep the storage architecture. Once compiled, meticulously preview the surfaced files. Mark the precise items required and click Restore to Device or extract them directly to your Mac.
-
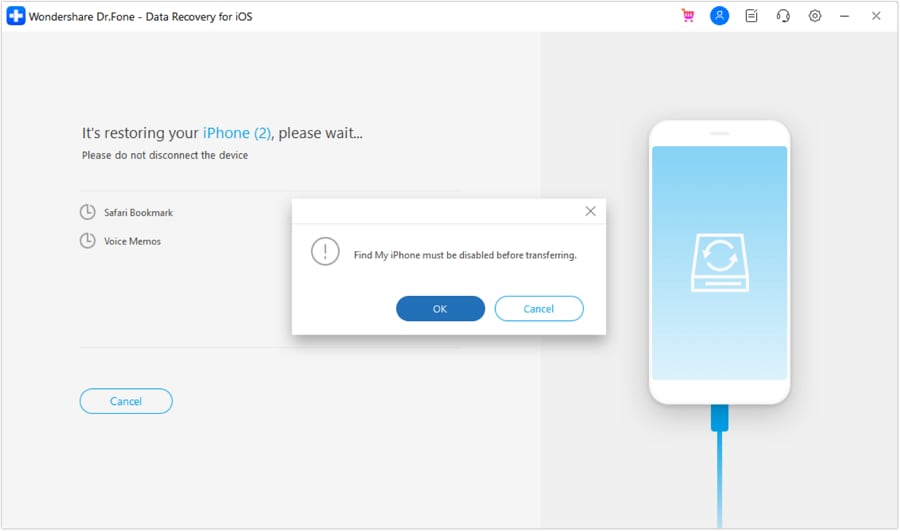
Step 5 Disable Security Interferences
Prior to injecting the recovered data back into the iOS framework, temporarily disable the Find My iPhone/iPad feature. This grants Dr.Fone the requisite write permissions without triggering iCloud security blockades.
-
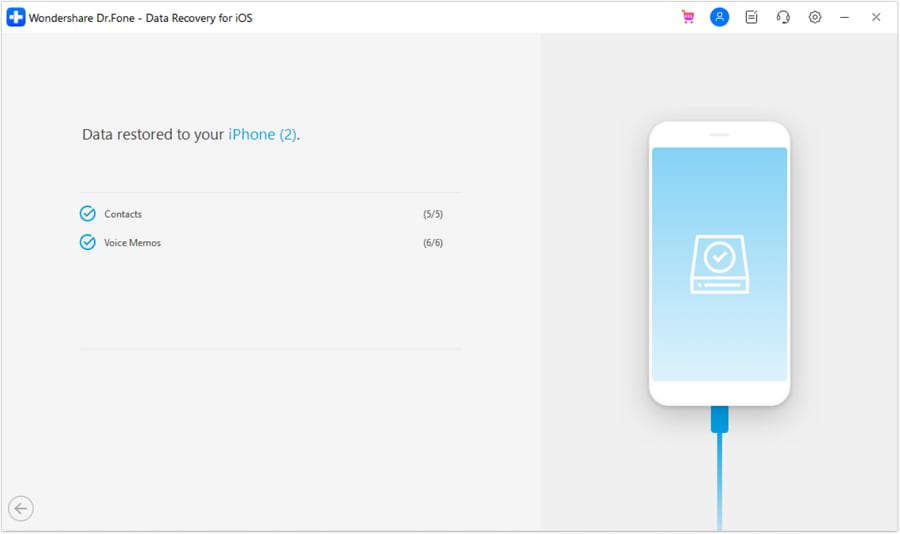
Step 6 Finalize the Restoration
Dr.Fone will securely transplant the salvaged assets back to your device, presenting a success prompt once the integrity of the transfer is verified.
Conclusion
Executing a successful file restoration from a damaged or erased SD card on macOS is vastly more attainable than it initially appears. In nearly all scenarios lacking physical destruction, the binary data survives beneath the surface, hidden only by logical corruption or misaligned directory mapping. By methodically deploying native macOS utilities like Disk Utility's First Aid or Terminal mounting commands, you can often correct these logical breaks instantly. Should these surface-level tactics fail, deploying dedicated SD card data recovery software for Mac provides the deep-sector scanning required to extract raw image, video, and document signatures.
Crucially, swift action and strict adherence to the "no new data" rule will drastically amplify your success rate, preventing fatal file overwrites. And for users whose critical files originate strictly within the iOS ecosystem rather than standalone cameras, robust tools like Dr.Fone – Data Recovery (iOS) offer an expedited, direct-to-device rescue pipeline.
Your Mac possesses immense diagnostic capabilities—equip it with the correct tools, follow the protocols, and restore your digital life today.


FAQ
-
1. Is it practically possible to recover data from an SD card on a Mac?
Yes. If your Mac can establish a connection with the SD card via Disk Utility or Terminal, data recovery is highly feasible. Even when the drive refuses to mount in Finder, specialized raw-scanning software can analyze the storage blocks directly and rebuild the unlinked files perfectly. -
2. What’s the best free SD card recovery software for Mac available today?
Two of the most reliable options are PhotoRec (a completely free, open-source command-line tool) and Disk Drill (which provides a highly visual interface with free deep scanning and file preview features prior to purchase). Both excel at navigating complex APFS, ExFAT, and FAT32 file systems. -
3. Can I recover missing media if my SD card isn’t detected by the system at all?
If the SD medium completely fails to populate within Finder, Disk Utility, and Terminal, it has likely suffered fatal hardware damage to its controller chip or connectors. At this stage, software solutions are ineffective, and you must consult a professional Mac SD memory card recovery laboratory capable of direct memory chip extraction. -
4. Will executing a quick format on my SD card erase my data permanently?
A quick format typically rewrites the logical file directories rather than erasing the underlying binary data. Your files are generally recoverable after a quick format, provided you do not save any new data to the card, which would physically overwrite the original sectors.
 Add Wondershare Dr.Fone as a preferred source on Google