All Options for Transferring Data From Android to Android
Oct 24, 2025 • Filed to: Data Transfer Solutions • Proven solutions
Dr.Fone Basic:
Better Control for Your Phone
Manage, transfer, back up, restore, and mirror your device

Getting a new phone is always exciting. You can play around with new features, explore its capabilities, test different settings, and more. However, one thing that’s always been a nuisance for Android users getting a new phone is the data transfer.
With iPhones, the transfer is as easy as possible, thanks to the Apple ID and iCloud. With Androids, it’s a different story.
If you want to transfer data from Android to Android and don’t know what you’re doing, you could spend hours on the process and even risk losing or corrupting important files. To ensure that that doesn’t happen, take a look at the top tips to transfer data to a new Android phone.
- Transfer Data From Android to Android Using Dr.Fone Phone Transfer

- Transfer Data From Android to Android Using AirDroid
- Using Xender Android File Transfer App
- Transfer Data to Android Using SHAREit
- Transfer Data From Android to Android Using Your Google Account
- Transfer Data From One Android to Another Using Wi-Fi
- Transfer Data Using Bluetooth
- Transfer From Android to Android Using NFC
Transfer Data From Android to Android Using Dr.Fone Phone Transfer

The simplest way to move data between your Android devices is by using third-party tools like Wondershare Dr.Fone. Since Androids don’t have native apps like iCloud to back up and transfer files quickly, using this tool is the best alternative.
Wondershare Dr.Fone is an all-around phone management app that you can use for processes such as data repair and recovery, data erasing, system repairs, and more. With its phone transfer option, you can move your data between devices with the utmost ease. It works with Android-to-Android transfers, iOS-to-iOS, and even between iOS and Androids.
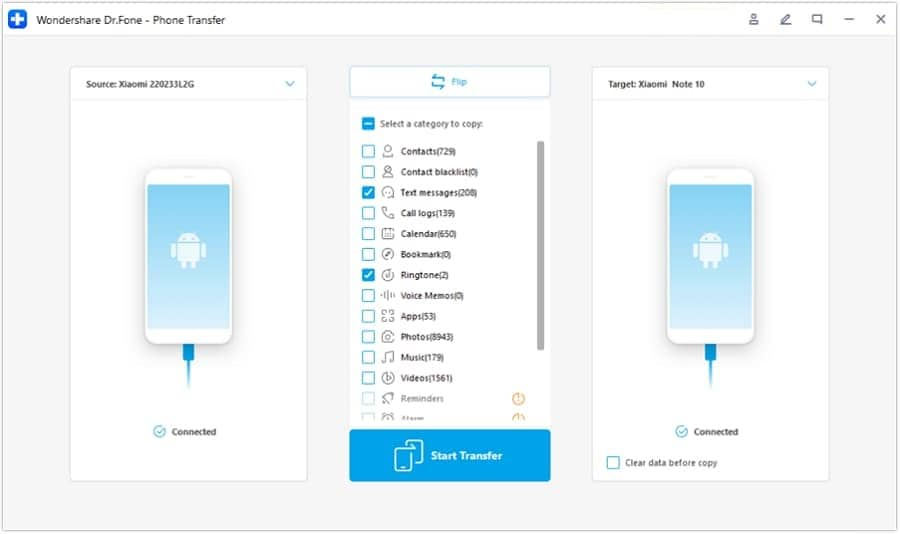
With this Android file transfer app, you just have to follow a few steps to complete the process:
- Download and launch Wondershare Dr.Fone on your PC;
- Connect your two Androids to your PC;
- Go to Toolbox > Phone Transfer;

- Choose your Sourcedevice and your Destination device;
- From the drop-down menu, select the data types you want to transfer;
- Select Start Transfer;

- You’ll see a progress bar, and you can cancel the process at any time if needed;
- When the process is complete, click OK.
You can then disconnect your phones from your PC and check if all the data has been successfully transferred.
Transfer Data From Android to Android Using AirDroid

Another popular tool for a droid transfer is AirDroid. Available as a web-based tool and through the Google Play Store, it’s completely free to use and works wonders for quick file transfers, though it does require you to use your PC and the same WiFi network on all your devices.
To transfer your files between your Android devices using AirDroid, you’ll have to follow these steps:
- Download the AirDroid app from the Google Play Store and launch it;
- In the pop-up asking you to enable real-time sharing with your PC, click Enable;
- When you’re taken to the AirDroid homepage on your PC, provide your email and password;
- Alternatively, sign up using Facebook, Twitter, or Google Account;

- After signing in on your PC, sign in to AirDroid on your Android;
- On the AirDroid app on your phone, select Transferand choose your device;
- Click on the Attachmenticon and select where you want to transfer files;

- Check the files you want to transfer and click Send.
It could take a moment for all your files to be transferred. When the process is complete, you’ll have access to the files on the device you’ve chosen as your destination.
Using Xender Android File Transfer App

Xender is a great file transfer tool for Android and iOS devices. It’s fast, efficient, and reliable, though it does take some getting used to.
To transfer your files between Android devices with Xender, follow these steps:
- Download and launch the Xender app on both your Androids;
- On your old device, select the files you want to transfer and click Send;
- Choose the new device to which you want to send the files;
- On your new device, open Xender and click Receive.
If your Androids have the Personal hotspot feature, you can also exchange files between them by creating a group in Xender. Once the devices are connected through the group, you can seamlessly exchange files between them.
Transfer Data to Android Using SHAREit

SHAREit is among the most popular apps for Android file transfers, boasting over a hundred million downloads on the Google Play Store. It enables you to transfer almost any file type you want, be it images, videos, documents, apps, or anything in between.
To transfer data between Androids on SHAREit, you’ll need to follow these steps:
- Go to the Google Play Store and download the SHAREit app on both your Androids;
- Connect the Androids to the same WiFi and turn on Bluetooth;
- On your source device, go to the SHAREit app and tap on Send;

- Select the files you want to transfer;
- Launch the SHAREit app on the recipient device and tap Receive.

While SHAREit is generally considered reliable, it could sometimes encounter glitches during file transfers. If the transfer is frozen, simply restart the devices and try again.
Transfer Data From Android to Android Using Your Google Account

The Google account is the closest thing that Android has to iCloud. Therefore, you can use your Google account to transfer data between your Androids if you don’t want to bother with data transfer apps (or you simply don’t have enough space on your phone for a new app).
The process is relatively straightforward:
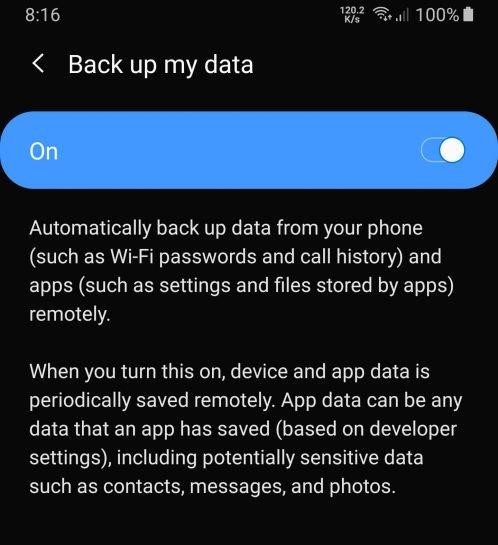
- On your source device, go to Settings > Backup and Reset > Backup my data;
- Under Backup my data, toggle the option On;

- Select your backup option and check the folder with your device name in Google Drive;
- Check the time of the last backup and ensure that the latest version of your files is in Google Drive;
- Sign in to the same Google account using your new phone;
- Click Restore from backup.
All the files you’ve backed up should be available through your Google account. Check to see if everything is there, and continue using your new device as usual.
Transfer Data From One Android to Another Using Wi-Fi
If you prefer, you can also transfer data between your Androids using your WiFi. As long as both phones are connected to the same network, all you have to do is enable WiFi Direct and get started. Here are the complete steps you’ll need to follow:
- Connect to the same WiFi network on both your devices;
- Tap and hold the WiFi icon in your Quick Settings menu;
- Tap on the three dotsin the upper right-hand corner of the screen;
- Select Wifi Directon both Androids;

- On your source device, tap on the destination Android you want to connect with;
- Accept the connection invitation on the destination device;
- Select the files you want to transfer and tap Send;
- On the destination device, tap Receive.
It can take a moment for all the files to transfer. You can connect up to four devices this way and transfer data between them with the utmost ease.
Transfer Data Using Bluetooth
While it’s not the fastest option, transferring files between your Android devices using Bluetooth is a reliable method. It doesn’t require you to install any additional apps that could take up space. It only requires that your devices are physically close to each other.
To transfer files using Bluetooth, follow these steps:
- Turn on Bluetoothon both your devices;
- From the list of available devices, select the one you want to pair with;
- Click Pairand input the passkey you received;
- Select the files you want to transfer and send them to the paired device;
- On the destination device, accept the file transfer.
Bluetooth data transfers are notoriously slow, so be patient and let the devices complete the process.
Transfer From Android to Android Using NFC

If both Android phones support Near Field Communication, aka NFC, you can use this feature for a seamless data transfer. Similarly to using Bluetooth, you’ll need to ensure that both your devices are physically close to each other.
To transfer data using NFC, follow these steps:
- Turn NFC on on both of your devices;

- Keep both devices unlocked and place them back to back (don’t separate them);
- On your source device, open the content you want to transfer;
- When the devices have connected to each other, tap the display to start transferring data;
- Don’t separate the devices until the process is complete.
You’ll hear an audio notification indicating that the process is complete. Though this approach is much faster than Bluetooth, it can become somewhat time-consuming as you’ll have to repeat these steps for each file you want to transfer.
Conclusion
Transferring data from Android to Android can be a challenge at times. Fortunately, you have access to plenty of apps and other native Android features to simplify the process. Whether you’re using solutions like Wondershare Dr.Fone, your Google account, or even Bluetooth, always double-check the data you’ve transferred and see whether it’s all there.
Dr.Fone Basic:
Better Control for Your Phone
Manage, transfer, back up, restore, and mirror your device
Android Transfer
- Android to Android
- 1. Transfer Files to Android
- 3. Transfer Contacts to Android
- 4. Data Transfer Apps to Switch Phone
- 5. Transfer Data to Android
- 6. Transfer Text Messages to Android
- 7. Transfer Music to Android
- 8. Transfer Contacts Using Bluetooth
- 9. Transfer Apps to Another Android
- 10. Migrate Data to New Android
- 11. Best Clone Apps for Android
- Android to iPad/iPod
- Android to iPhone
- 1. Transfer Files to iPhone 13
- 2. Transfer Contacts to iPhone 13
- 3. Transfer Music to iPhone
- 4. Transfer Contacts to iPhone
- 5. Android to iPhone Transfer Apps
- 6. Transfer Text Messages to iPhone
- 7. Transfer Photos to iPhone
- 8. Transfer Messages to iPhone 13
- 9. Transfer Contacts to iPhone XS/11
- 10. Transfer Messages to iPhone 12
- 11. FaceTime for Android and iPhone
- 12. Move Data From Android to iPhone After Setup
- 13. Transfer Data from OnePlus to iPhone
- 14. Move Contacts From Android to iPhone
- 15. Transfer Data From Android To iPhone
- 16. Top Apps To Transfer Data From Android To iPhone
- Contacts Transfer
- 1. Sync Contacts to Gmail
- 2. Transfer Contacts from Outlook
- 3. Transfer Contacts to Outlook
- 4. Import Contacts from Excel
- 5. Import Contacts to Android
- 6. Export Contacts to Android Phones
- 7. Merge Contacts in Phones
- 8. Export CSV Contacts for Android
- iOS to Android
- 1. Transfer Files from iPad
- 2. Move Custom Ringtones from iPhone
- 3. Transfer Data from iPhone
- 4. Transfer Music from iPhone
- 5. Transfer Contacts from iPhone
- WhatsApp Transfer
- 1. Transfer WhatsApp from Android
- 2. Transfer WhatsApp Messages
- 3. Transfer WhatsApp Messages to PC
- 4. Transfer Messages to Android
- 5. Transfer WhatsApp Data to Android
- Transfer Tips
- 1. Android USB File Transfer Software
- 2. Android Apps to Transfer Files
- 3. Android Sync Managers
- 4. Android File Transfer Apps
- 5. Fix Transfer Files Not Working
- 6. Simplify Android File Transfer
- 7. Transfer Photos to USB
- 8. Transfer Data to BlackBerry
- 9. Transfer Data From ZTE
- 10. Transfer Data From Windows phone
- 11. Clone Phone and Copy Data
- 11. 12 Best Phone Clone Apps
- 12. Transfer Torrents from PC to Phone
- 13. Send Large Files Through Outlook
- ● Manage/transfer/recover data
- ● Unlock screen/activate/FRP lock
- ● Fix most iOS and Android issues
- Transfer Now Transfer Now


Daisy Raines
staff Editor