5 Foolproof Ways to Transfer Data from OnePlus to iPhone
Dec 31, 2025 • Filed to: Data Transfer Solutions • Proven solutions
Getting a new iPhone is great until it comes to transferring data from your old device to the new one! This issue becomes even more problematic when you are transferring data from Android to iPhone.
The reason? Different operating systems, compatibility issues, etc. However, with advancing technology, it has become very common and easy to transfer data across different devices.
In this article, we will take you through 5 easy ways for OnePlus to iPhone data transfer. So, let's get straight to it!
- Part 1: Data Transfer from OnePlus to iPhone via Move to iOS
- Part 2: Data Transfer OnePlus to iPhone via Google Drive
- Part 3: OnePlus to iPhone Data Transfer via Google Account
- Part 4: One Plus to iPhone Data Transfer via iCloud

- Part 5: Transfer Data from OnePlus to iPhone with Dr. Fone - Phone Transfer
Part 1: Data Transfer from OnePlus to iPhone via Move to iOS
The first and most common method to transfer data from OnePlus to iPhone is via “Move to iOS.”
Move to iOS is an app from Apple that helps you transfer data from your Android device to a new iOS device. It's a simple and secure way to move your most important content, including contacts, messages, WhatsApp content (excluding media), photos, videos, email accounts, and calendar entries.
To use Move to iOS, follow the steps below:
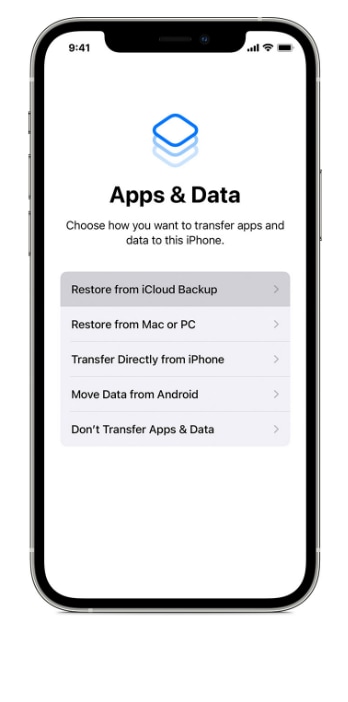
Step 1: Power on your iPhone and start setting it up with the help of the on-screen instructions, till you reach the “Apps & Data” option.
Step 2 In the “Apps & Data” section, you will come across 5 options for data transfer. Select the “Move Data from Android” option.
Step 3: On your OnePlus, download and install the “Move to iOS” app from the Google Play Store.
Step 4: Once “Move to iOS” has finished installation, tap “Continue” on your OnePlus and iPhone.
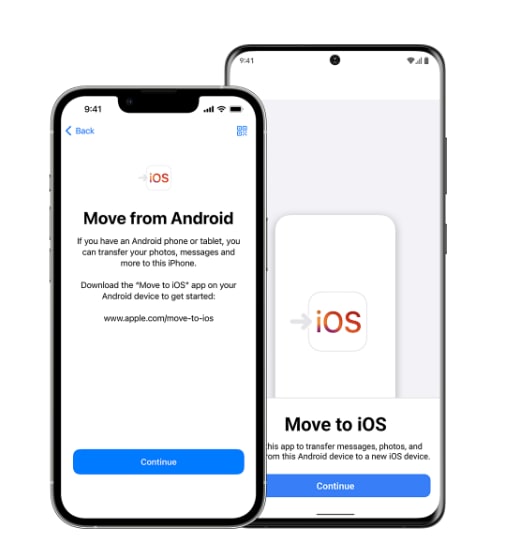
Step 5: The next step involves connecting both devices via a peer-to-peer Wi-Fi connection. For this, you’ll have to enter the 6-digit code from your iPhone on your OnePlus, and click “Connect > Continue on Android Device.”
Step 6: Select all the data you want to transfer from your OnePlus to your iPhone, like contacts, camera roll, messages, etc., and tap “Continue.”
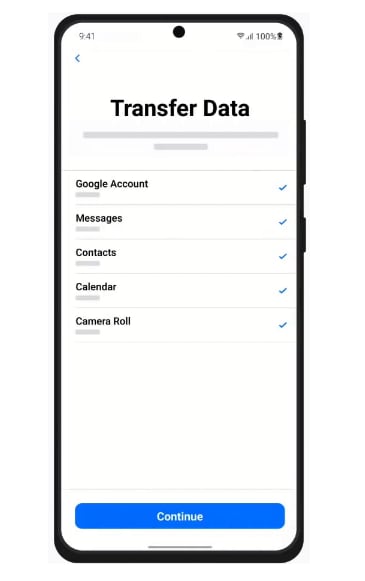
Step 7: Now the One Plus to iPhone data transfer will begin. It might take from several minutes to hours, depending on how much data there is to transfer.
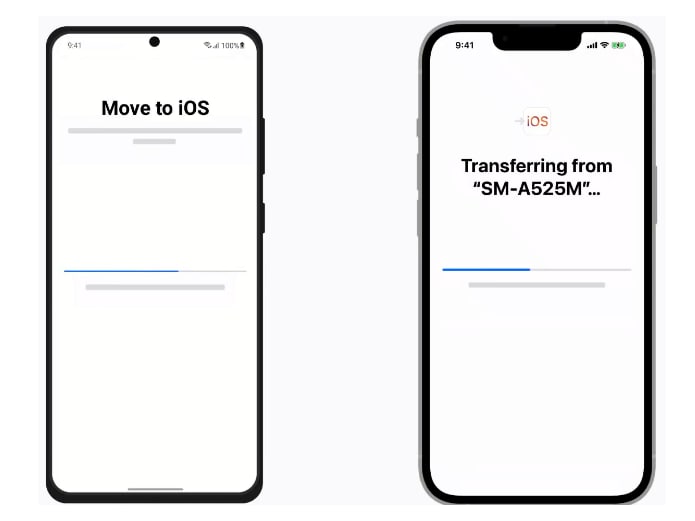
Step 8: Once the transfer process is complete, tap “Continue” to finish setting up your iPhone. And that’s how you carry out the OnePlus to iPhone Transfer via Move to iOS.
Part 2: Data Transfer OnePlus to iPhone via Google Drive
Did you know that there’s a lot more to your Google account than sending emails and setting up your device? That’s right! You can also use it to transfer data from OnePlus to iPhone free!
Using Google’s cloud service, Google Drive, you can seamlessly transfer photos from OnePlus to iPhone. It is also good for moving documents, music, and videos.
Here are the steps to use your Google account for OnePlus to iPhone transfer:
Step 1: On your OnePlus, open Google Drive, click on the “+” icon and upload the images, videos, documents, and music that you want to move to your iPhone.
Step 2: Download Google Drive on your iPhone and log in using your Google account. Here. you will find all the uploaded files in your Drive.
Step 3: Tap the file you want to save on your iPhone, click on the 3 dots next to it, and tap “Download” to save it to your files.
This method is free and easy; however, it only transfers media and documents. Therefore, if you want to transfer Notes from OnePlus to iPhone, you can use the next method on our list.
Part 3: OnePlus to iPhone Data Transfer via Google Account
If you want to move only your contacts, notes, calendar entries, and emails to your iPhone, you can use your Google account’s syncing feature. This is one of the quickest and easiest ways to transfer data between devices.
Below are the steps to transfer data from OnePlus to iPhone using a Google account:
Step 1: On your OnePlus, go to “Settings > Accounts” and turn on the toggle for syncing your Google account.
Step 2: On your iPhone, go to “Settings > Mail > Accounts > Add Account” and add your Google account.
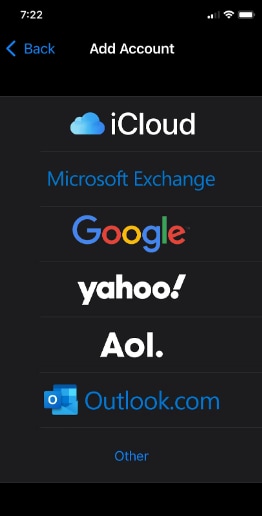
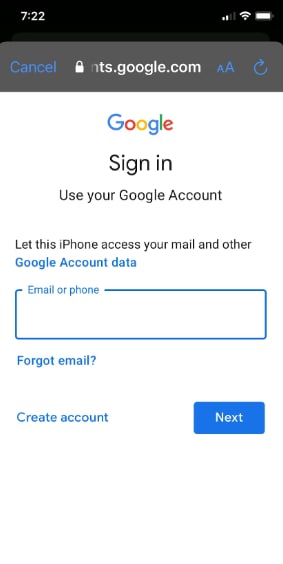
Step 3: This will redirect you to the Google sign-in page. Sign in to your Google account.
Step 4: Turn the toggle on for the apps you want to sync and tap “Save.”
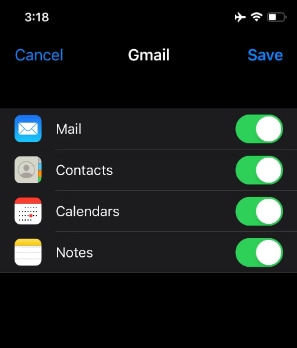
This will sync your emails, contacts, calendar entries, and notes from your Google account to your iPhone.
Part 4: One Plus to iPhone Data Transfer via iCloud
If you want to transfer only your contacts from OnePlus to iPhone, you can easily do it via iCloud. For this method, you need to use your PC as a transfer medium.Here’s how it works:
Step 1: On your OnePlus, go to “Contacts > Settings > Manage Contacts.”
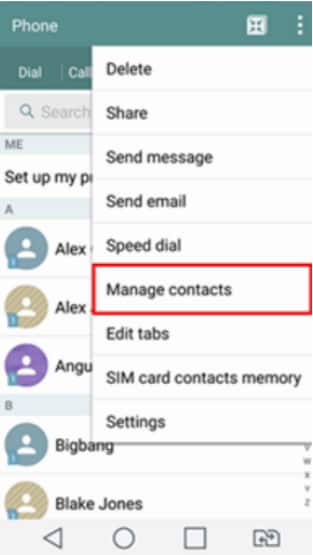
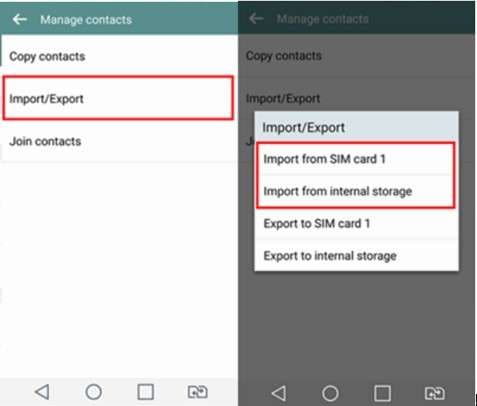
Step 2: Tap “Import/Export > Export as .vcf File” and select your SIM or internal storage, depending on where you have saved your contacts.
Step 3: Now connect your OnePlus to your PC using a USB cable, open the File Explorer, and copy the .vcf file from the OnePlus folder to the desktop.
Step 4: Launch your browser, go to the iCloud website, and log in using your Apple ID.
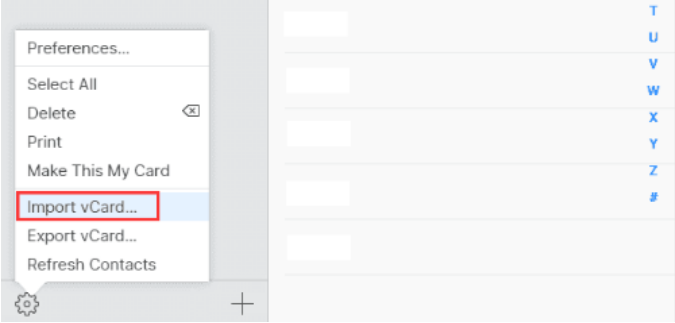
Step 5: Go to “Contacts > Settings > Export vCard.”
Step 6: On your iPhone, go to “Settings > Apple ID > iCloud” and turn on the toggle for Contacts.
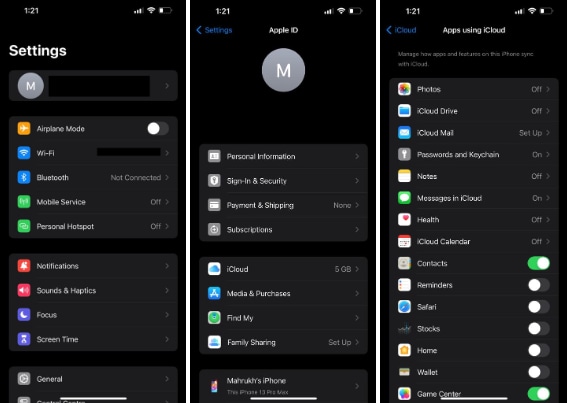
This will sync the contacts from the vCard to your iPhone.
These were 4 different methods to transfer data from OnePlus to iPhone. However, you can also use a OnePlus to iPhone data transfer app for this purpose.
Part 5: Transfer Data from OnePlus to iPhone with Dr. Fone - Phone Transfer
Dr. Fone - Phone Transfer is a tool that lets you easily transfer data between smartphones, tablets, and computers. It supports a wide range of devices, including Android, iOS, and Windows Phone. Dr.Fone Phone Transfer makes it easy to transfer data between your devices. It is a great option for anyone who wants to switch to a new phone or back up their data.
Dr.Fone - Phone Transfer
1 Click to Copy One Phone to Another
- Move data between devices with different OSs, i.e. iOS to Android.
- Transfer contacts, SMS, photos, videos, music, and more types.
- Simple, click-through process
- Compatible with Android 14 (Win) and the latest iOS 17.
Here are the simple and easy steps for OnePlus to iPhone data transfer:
Step 1: Download Dr. Fone - Phone Transfer on your PC.
Step 2: Launch it and select “Toolbox > Phone Transfer” from the options on the left.

Step 3: Now select the source (OnePlus) and target device (iPhone).
Step 4: Put a check in the boxes in front of the data you want to transfer from OnePlus to iPhone and click “Start Transfer.”
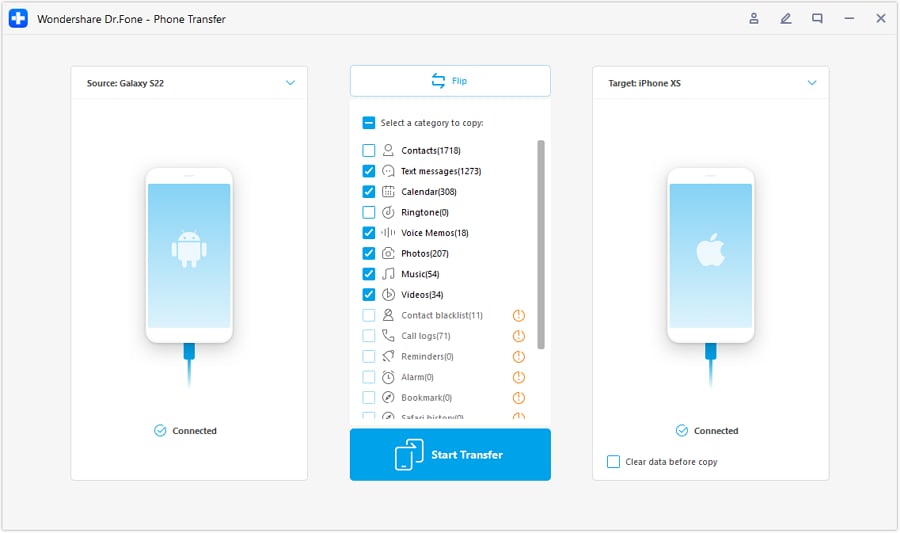
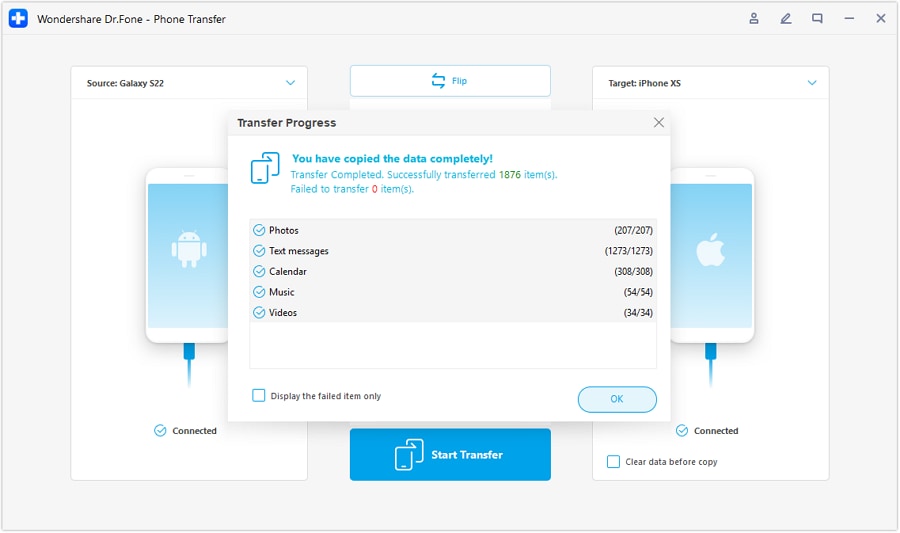
Step 5: It will take several minutes for the transfer process to complete, after which all the data from your OnePlus will be moved to your iPhone.
FAQs
To Sum It Up…
One of the most difficult decisions is to switch your smartphone from one operating system to the other. Due to compatibility issues, it gets a bit challenging to transfer data across devices.
In this comprehensive guide, we have discussed 5 ways for OnePlus to iPhone data transfer. This includes using the Move to iOS feature in the setup process, your Google account, Google Drive, and iCloud. However, for better results, you can also use the third-party tool, Dr.Fone Phone Transfer.
So, the next time you’re contemplating how to transfer data from OnePlus to iPhone, this guide is here to save the day!
Android Transfer
- Android to Android
- 1. Transfer Files to Android
- 3. Transfer Contacts to Android
- 4. Data Transfer Apps to Switch Phone
- 5. Transfer Data to Android
- 6. Transfer Text Messages to Android
- 7. Transfer Music to Android
- 8. Transfer Contacts Using Bluetooth
- 9. Transfer Apps to Another Android
- 10. Migrate Data to New Android
- 11. Best Clone Apps for Android
- Android to iPad/iPod
- Android to iPhone
- 1. Transfer Files to iPhone 13
- 2. Transfer Contacts to iPhone 13
- 3. Transfer Music to iPhone
- 4. Transfer Contacts to iPhone
- 5. Android to iPhone Transfer Apps
- 6. Transfer Text Messages to iPhone
- 7. Transfer Photos to iPhone
- 8. Transfer Messages to iPhone 13
- 9. Transfer Contacts to iPhone XS/11
- 10. Transfer Messages to iPhone 12
- 11. FaceTime for Android and iPhone
- 12. Move Data From Android to iPhone After Setup
- 13. Transfer Data from OnePlus to iPhone
- 14. Move Contacts From Android to iPhone
- 15. Transfer Data From Android To iPhone
- 16. Top Apps To Transfer Data From Android To iPhone
- Contacts Transfer
- 1. Sync Contacts to Gmail
- 2. Transfer Contacts from Outlook
- 3. Transfer Contacts to Outlook
- 4. Import Contacts from Excel
- 5. Import Contacts to Android
- 6. Export Contacts to Android Phones
- 7. Merge Contacts in Phones
- 8. Export CSV Contacts for Android
- iOS to Android
- 1. Transfer Files from iPad
- 2. Move Custom Ringtones from iPhone
- 3. Transfer Data from iPhone
- 4. Transfer Music from iPhone
- 5. Transfer Contacts from iPhone
- WhatsApp Transfer
- 1. Transfer WhatsApp from Android
- 2. Transfer WhatsApp Messages
- 3. Transfer WhatsApp Messages to PC
- 4. Transfer Messages to Android
- 5. Transfer WhatsApp Data to Android
- Transfer Tips
- 1. Android USB File Transfer Software
- 2. Android Apps to Transfer Files
- 3. Android Sync Managers
- 4. Android File Transfer Apps
- 5. Fix Transfer Files Not Working
- 6. Simplify Android File Transfer
- 7. Transfer Photos to USB
- 8. Transfer Data to BlackBerry
- 9. Transfer Data From ZTE
- 10. Transfer Data From Windows phone
- 11. Clone Phone and Copy Data
- 11. 12 Best Phone Clone Apps
- 12. Transfer Torrents from PC to Phone
- 13. Send Large Files Through Outlook
- ● Manage/transfer/recover data
- ● Unlock screen/activate/FRP lock
- ● Fix most iOS and Android issues
- Transfer Now Transfer Now



Daisy Raines
staff Editor