How to Transfer Photos from Android to USB Flash Drive in 4 Practical Ways?

May 22, 2026 • Filed to: Device Data Management • Proven solutions
 TL;DR:
You can securely transfer photos from an Android phone to a USB flash drive by connecting them directly with an OTG adaptor, using a PC as a middleman via USB "File Transfer" mode, or downloading them wirelessly through Google Drive or AirDroid.
● For direct transfers without needing a computer or internet connection, connect a USB-C OTG adaptor from the phone to the flash drive and copy files using the "USB Drive" option in the Android notification tray.
● When using a PC, the wired drag-and-drop method requires selecting "File Transfer" mode upon connecting the phone, whereas the wireless AirDroid method requires both the computer and Android device to be connected to the same local network.
● For extensive gallery organization, Wondershare Dr.Fone offers dedicated Windows and Mac software to bulk-export Android photos to a computer, but all finalized flash drive backups should utilize file encryption to secure private images.
Ask AI for a summary
 ChatGPT
 Perplexity
 Gemini
 Claude
 Grok
Grok
Dr.Fone Basic:
Better Control for Your Phone
Manage, transfer, back up, restore, and mirror your device
Looking for a simple way to transfer photos from Android to a flash drive? No need for tech skills here!
No matter if it’s your precious wedding snapshots or important work photos, we’ll show you how to keep them safe.
With our guide, you can easily use a cable or go wireless to back up your memories. We detail four easy methods to ensure your photos are secure and organized.
Ready to protect your photo collection and free up space on your phone?
Let’s discuss how to transfer photos from Android to a flash drive efficiently. So you can ensure your memories are preserved and accessible anytime.
- Part 1. Can I transfer Photos from Android to Flash Drive?
- Part 2. Transfer Pictures from Android to Flash Drive via Google Drive
- Part 3. Transfer Photos from Android to USB Flash Drive by Drag and Drop
- Part 4. Move Pictures From Android To Flash Drive via OTG Adaptor
- Part 5. Transfer Photos from Android to Flash Drive Via AirDroid

- Bonus Tip. Manage Your Photos on Android Effortlessly with Dr.Fone
Part 1. Can I transfer Photos from Android to Flash Drive?
Absolutely! You can easily move pictures from your phone to a flash drive. This is great for keeping photos safe, like those from weddings or important meetings. You don't need to be a tech expert to do it.
One way is to use an OTG cable for Android phones. Just connect it, and you're ready to transfer without needing any software.
Or, you can move the pictures to a computer first and then to a flash drive. Just make sure both devices have enough space for all your files!
Now, let’s discuss the practical ways to transfer photos from Android to flash drive in detail.
Part 2. Transfer Pictures from Android to Flash Drive via Google Drive
Choosing a wireless method to transfer pictures from Android to a flash drive is a great idea. Using Google Drive or another cloud service makes it easy. Cloud storage is becoming more popular because it's a simple way to keep files safe. You can get your files from any device with the internet.
This approach eliminates the need for cables or extra equipment. Just upload your photos to the cloud and download them whenever you want. It's a secure and easy way to handle your pictures. Moreover, you can access your photos from anywhere, as long as you have an internet connection.
If you are thinking about how to transfer photos from Android to USB stick. worry not! Just follow the easy steps below:
Step 1: First of all, download the Google Drive application and sign in.
Step 2: Open the application, and tap the “+” icon. Then select “Upload.” Now select the photos you want to transfer from your phone’s gallery.

Step 3: Choose your photos within Google Drive.
Step 4: Tap “Upload” to transfer your photos to Google Drive.
Step 5: Into your computer, insert the flash drive. In a web browser, open Google Drive and download the photos to your flash drive.

This method ensures your pictures are safely stored in the cloud and effortlessly accessible on any device.
However, if you don’t wanna go with this method, fret not! We have enlisted another potential solution for you.
Part 3. Transfer Photos from Android to USB Flash Drive by Drag and Drop
It is quite easy to transfer photos from Android to USB stick using the drag-and-drop method. It provides a quick way to back up or share photos without needing special software.
This method is appreciated for its simplicity and efficiency. Thus, allowing for easy management of files. It's an ideal solution for quickly saving memories or important images with minimal hassle.
Following the below steps to transfer photos from Android to thumb drive via drag and drop.
Step 1: With a USB cable, connect your Android phone to a computer.
Step 2: Click “Charging this device via USB” when it shows up.
Step 3: Select “File Transfer” from “Use USB for.”
Step 4: When a file transfer window appears on your PC, move ahead to the folder with the videos or pics you want to transfer.
Step 5: Insert your USB drive into the computer.
Step 6: Copy and paste your desired files to the USB storage.

That’s all about this method! Now let’s move to the next part on how to transfer photos from Android to flash drive.
Part 4. Move Pictures From Android To Flash Drive via OTG Adaptor
Using an OTG adaptor to transfer pictures from Android to thumb drive is a practical option. It bridges your phone and flash drive directly, allowing for easy file transfers. This method is convenient for those without access to a computer or cloud services.
It's fast, easy, and does not require internet connectivity. Ideal for quick backups or when you need to free up space on your device. Hence, it simplifies file management on the go.
Here are the steps on how to transfer photos from Android to flash drive via OTG Adaptor.
Step 1: Connect your flash drive to the adaptor using the full-size USB port.
Step 2: Insert the USB-C end of the adaptor into your Android phone.
Step 3: Swipe down from the top of the screen to open the notification tray.
Step 4: Click on "USB Drive." Then choose "Internal Storage" to view your phone's files.
Step 5: Find the items you want to copy and select them.

Step 6: Click the three-dot menu, followed by Copy.
Step 7: Now paste the files to the USB flash drive and click Done.

That’s it! If you don’t want to transfer pictures from Android to a USB flash drive with OTG, worry not! You can still transfer files to a flash drive. Have a look at the next method!
Part 5. Transfer Photos from Android to Flash Drive Via AirDroid
Transferring photos from Android to a flash drive through AirDroid is a modern and efficient method. It allows for wireless file sharing, bypassing the need for cables. AirDroid provides a user-friendly platform to access, manage, and transfer files effortlessly.
This method enhances flexibility, enabling transfers from anywhere, as long as there's an internet connection. It's particularly useful for managing photos and files across multiple devices. Thus making it a favorite for seamless digital organization.
Follow the steps to learn how to transfer photos from Android to Pendrive via AirDroid.
Step 1: Install AirDroid on your phone and allow permissions after running it.
Step 2: Ensure your Computer and phone are within the same network.
Step 3: Go to the AirDroid Web and it will lead you to a page with an IP address.
Step 4: Open the AirDroid address in your browser. Allow permissions as asked.
Step 5: Click "Files" to see options for copying.
Step 6: Find "Upload file" and "Upload Folder."
Step 7:Connect your USB flash drive to the PC. Right-click on the file or folder to transfer.
Step 8: Choose to download as a "zip" file.
That is all about this method! If you are still wondering how to manage photos on Android, we have listed another solution for you.
Bonus Tip. Manage Your Photos on Android Effortlessly with Dr.Fone
Wondering how to manage your photos on Android effortlessly? Wondershare Dr.Fone is the answer. It streamlines photo management, making backup and restoration super easy. With its user-friendly interface, keeping your memories safe is easy.
Whether you're looking to recover lost images or keep your gallery organized, Dr.Fone has you covered. It's a must-have tool for every Android user, ensuring that managing your visual content is hassle-free. You can trust Dr.Fone to keep your photos accessible and secure, always.
Dr.Fone - Phone Manager (Android)
One-Stop Solution to Manage and Transfer Data on Android Phone
- Transfer files between Android and computer, including contacts, photos, music, SMS, and more.
- Manage, export/import your music, photos, videos, contacts, SMS, Apps, etc.
- Transfer iTunes to Android (vice versa).
- Manage your Android device on the computer.
- Fully compatible with the newest Android OS.


Follow the steps below to manage photos on your Android device.
Step 1: First of all, download and install Dr.Fone on your Android device. Then, connect your Android to the computer through a USB connection.
Step 2: Now, from the left-hand panel, go to Android device > Photos. Click Add to import more pictures to your Android device. To export selected images to the computer, use the To PC option. Moreover, you can use the Delete option to delete specific images on your Android device.
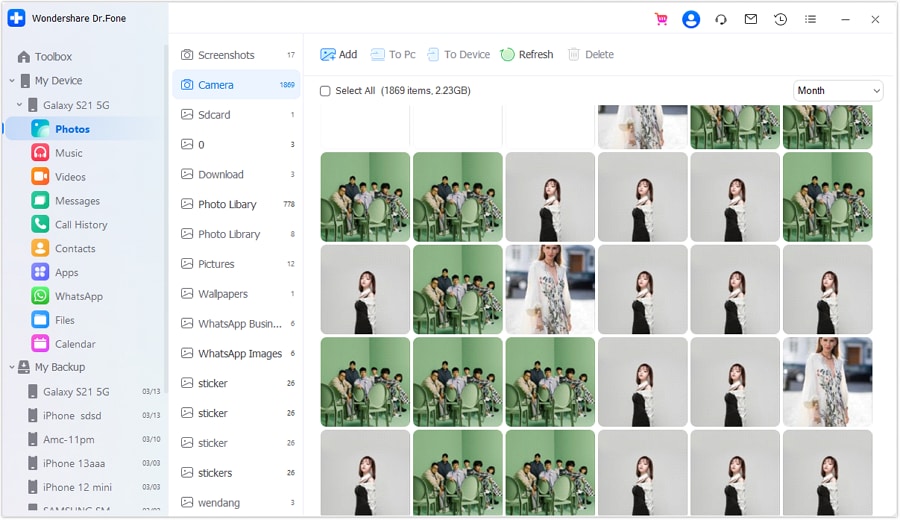
Step 3: Choose a particular image and open it to preview. It opens up a new window where you can zoom and rotate according to your requirements.

That’s all about using Dr.Fone for managing photos on your Android device. Hopefully, it will be a great asset in your Android toolkit. Now, let’s have a look at some frequently asked questions.
FAQs
Round Off!
Have you learned how to transfer photos from Android to a flash drive? It's super easy and fun! We have shown you four cool ways to keep your photos safe and secure, whether you use Google Drive or reliable third-party tools such as Dr.Fone.
Now, you can save all those special moments without worrying about losing them or running out of space on your phone. Our tips ensure your photos are safe, organized, and easy to find. So, don't delay!
Start moving your precious memories to a flash drive today. It's a simple yet effective step to ensure your favorite moments are preserved safely for years. Furthermore, it's a great way to share those memories with friends and family.
Dr.Fone Basic:
Better Control for Your Phone
Manage, transfer, back up, restore, and mirror your device


Android Transfer
- Android to Android
- 1. Transfer Files to Android
- 3. Transfer Contacts to Android
- 4. Data Transfer Apps to Switch Phone
- 5. Transfer Data to Android
- 6. Transfer Text Messages to Android
- 7. Transfer Music to Android
- 8. Transfer Contacts Using Bluetooth
- 9. Transfer Apps to Another Android
- 10. Migrate Data to New Android
- 11. Best Clone Apps for Android
- Android to iPad/iPod
- Android to iPhone
- 1. Transfer Files to iPhone 13
- 2. Transfer Contacts to iPhone 13
- 3. Transfer Music to iPhone
- 4. Transfer Contacts to iPhone
- 5. Android to iPhone Transfer Apps
- 6. Transfer Text Messages to iPhone
- 7. Transfer Photos to iPhone
- 8. Transfer Messages to iPhone 13
- 9. Transfer Contacts to iPhone XS/11
- 10. Transfer Messages to iPhone 12
- 11. FaceTime for Android and iPhone
- 12. Move Data From Android to iPhone After Setup
- 13. Transfer Data from OnePlus to iPhone
- 14. Move Contacts From Android to iPhone
- 15. Transfer Data From Android To iPhone
- 16. Top Apps To Transfer Data From Android To iPhone
- Contacts Transfer
- 1. Sync Contacts to Gmail
- 2. Transfer Contacts from Outlook
- 3. Transfer Contacts to Outlook
- 4. Import Contacts from Excel
- 5. Import Contacts to Android
- 6. Export Contacts to Android Phones
- 7. Merge Contacts in Phones
- 8. Export CSV Contacts for Android
- iOS to Android
- 1. Transfer Files from iPad
- 2. Move Custom Ringtones from iPhone
- 3. Transfer Data from iPhone
- 4. Transfer Music from iPhone
- 5. Transfer Contacts from iPhone
- WhatsApp Transfer
- 1. Transfer WhatsApp from Android
- 2. Transfer WhatsApp Messages
- 3. Transfer WhatsApp Messages to PC
- 4. Transfer Messages to Android
- 5. Transfer WhatsApp Data to Android
- Transfer Tips
- 1. Android USB File Transfer Software
- 2. Android Apps to Transfer Files
- 3. Android Sync Managers
- 4. Android File Transfer Apps
- 5. Fix Transfer Files Not Working
- 6. Simplify Android File Transfer
- 7. Transfer Photos to USB
- 8. Transfer Data to BlackBerry
- 9. Transfer Data From ZTE
- 10. Transfer Data From Windows phone
- 11. Clone Phone and Copy Data
- 11. 12 Best Phone Clone Apps
- 12. Transfer Torrents from PC to Phone
- 13. Send Large Files Through Outlook
- ● Manage/transfer/recover data
- ● Unlock screen/activate/FRP lock
- ● Fix most iOS and Android issues
- Free Download Free Download


Alice MJ
staff Editor