How to Transfer Photos from iPhone to Chromebook: A Comprehensive Guide
Oct 24, 2025 • Filed to: Device Data Management • Proven solutions
Dr.Fone Basic:
Better Control for Your Phone
Manage, transfer, back up, restore, and mirror your device
In an increasingly digital world, our devices are often jam-packed with precious memories in the form of photos and videos. While Apple and Google operate in their unique ecosystems, sometimes we need to bridge the gap between these worlds. For instance, how to transfer photos from iPhone to Chromebook can be a common yet perplexing question for many users. Whether you're switching devices, backing up your photos, or simply trying to access your pictures on a different platform, knowing how to transfer photos seamlessly is essential.
In this guide, we'll explore multiple methods to transfer photos from an iPhone to a Chromebook, providing detailed step-by-step instructions along the way. We'll cover using Google Drive, USB, Google Photos, iCloud, and OneDrive, and also introduce you to Wondershare Dr.Fone as a bonus tip. Let’s dive in!
- Method 1: Transfer Photos from iPhone to Chromebook Using Google Drive
- Method 2: Transfer Photos from iPhone to Chromebook Via USB
- Method 3: Transfer Photos from iPhone to Chromebook Using Google Photos
- Method 4: Transfer Photos from iPhone to Chromebook Through iCloud
- Method 5: Transfer Photos from iPhone to Chromebook Through OneDrive

- Method 6: Transfer Photos from iPhone to Chromebook With Wondershare Dr.Fone (Overall Best)
Method 1: Transfer Photos from iPhone to Chromebook Using Google Drive
Google Drive is a versatile and widely used cloud storage service offered by Google. It allows you to store photos, documents, and other files securely on the cloud, making them accessible from any device with an internet connection. If you're looking to transfer photos from your iPhone to your Chromebook, Google Drive can be an efficient and straightforward method.

In this section, we'll walk you through the steps to seamlessly upload your photos to Google Drive from your iPhone and then access them on your Chromebook. This approach is particularly useful if you need to transfer a large number of photos or wish to ensure that your images are safely backed up in the cloud.
Step-by-Step Instructions:
Step 1: Install Google Drive on iPhone
Begin by downloading and installing the Google Drive app from the App Store. Once installed, open the app and sign in using your Google account credentials.
Step 2: Upload Photos to Google Drive
To transfer your photos to Google Drive, start by opening the app and logging in with your Google account. Tap on the "+" icon located at the bottom right corner of the screen and select "Upload." Choose "Photos and Videos" from the options provided. Browse through your photo gallery, select the photos you wish to upload, and then tap "Upload." This will transfer your selected photos to Google Drive, making them accessible across all your devices.
Step 3: Access Google Drive on Chromebook
On your Chromebook, open the Google Drive app or go to the Google Drive website. Sign in with the same Google account you used on your iPhone. Navigate to the folder where your photos were uploaded. If you need offline access or prefer to have a local copy, you can download the photos to your Chromebook by selecting the photos and clicking the download button. This way, you can easily manage and view your photos directly from your Chromebook.
Method 2: Transfer Photos from iPhone to Chromebook Via USB
Transferring photos via USB is a classic and reliable method that doesn’t rely on an internet connection. This approach involves directly connecting your iPhone to your Chromebook using a USB cable. It’s particularly useful for those who prefer not to use cloud storage or have limited internet access. By transferring photos via USB, you can swiftly move your images from your iPhone's internal storage to your Chromebook, ensuring that you have a direct copy of your files on another device.
Step-by-step instructions to transfer photos from iPhone to Chromebook:
Step 1: Connect Devices
First, take a reliable USB cable and use it to connect your iPhone to your Chromebook. Ensure both devices are powered on and that the cable is securely plugged into both the iPhone and the Chromebook's USB port. Double-check that the connections are firm to avoid any interruptions. You may see a prompt on your iPhone asking for permission to trust the connected computer; make sure to grant this access to establish a proper connection.

Step 2: Enable File Transfer
Unlock your iPhone and ensure it is connected to your computer using a compatible USB cable. When prompted on your iPhone, grant permission to allow file transfer by selecting "Allow." If this is your first time connecting the device to your computer, you may need to tap "Trust" and enter your device passcode to establish a secure connection. Confirm that your computer recognizes the iPhone to proceed with the file transfer.

Step 3: Transfer Photos
On your Chromebook, open the "Files" app by clicking on the launcher and selecting "Files" from the list of apps. Once the app is open, locate your iPhone under the "Devices" section on the left sidebar. Browse the DCIM folder, which is where your photos are stored, and select the photos you want to transfer. You can either click and drag your mouse to select multiple photos or hold down the Ctrl key while clicking to select individual photos. After selecting the photos, you can copy and paste them by right-clicking and choosing "Copy" and then navigating to the desired folder on your Chromebook and right-clicking again to choose "Paste". Alternatively, you can drag and drop the photos directly into a folder on your Chromebook for easy transfer.
Method 3: Transfer Photos from iPhone to Chromebook Using Google Photos
Google Photos is another excellent tool offered by Google that simplifies photo management and transfer. It not only allows you to store a vast number of photos and videos in the cloud but also provides powerful search and organization features. On how to transfer pics from iPhone to Chromebook, syncing your iPhone photos with Google Photos ensures that they are readily accessible on any device, including your Chromebook.
This method is particularly useful for users who frequently take photos and want an automatic and organized way to manage their image libraries. In this section, we will guide you through the process of using Google Photos to transfer your photos from an iPhone to a Chromebook seamlessly.
Step 1: Install Google Photos on iPhone
Start by opening the App Store on your iPhone. Search for "Google Photos" and tap the download button to install the app. Once installed, open the app and you will be prompted to sign in with your Google account. If you don't have a Google account, you can create one directly from the app. After signing in, you can start backing up and organizing your photos.

Step 2: Backup Photos to Google Photos
Open the Google Photos app on your device. Go to the settings menu and enable "Back up & sync" to ensure all your photos and videos are automatically saved to your Google Photos account. This will help protect your memories and free up space on your device.
Step 3: Access Google Photos on Chromebook
To access your photos, first open the Google Photos app on your Chromebook. Make sure you are signed in with the same Google account that you use to store your photos. Once signed in, you will see your entire photo library. You can easily view, download, and organize your photos as needed. If you're looking for specific images, use the search bar to quickly find them based on date, location, or keywords. Additionally, you can create albums and share your favorite moments with friends and family directly from the app.
Method 4: Transfer Photos from iPhone to Chromebook Through iCloud
By enabling iCloud Photo Library, your photos are automatically backed up to iCloud, making them accessible from any device with an internet connection. This method simplifies the process of transferring photos by eliminating the need for physical cables or manual uploads. In this section, we'll outline how to leverage iCloud to transfer your photos from an iPhone to a Chromebook efficiently.
Step-by-Step Instructions on how to transfer iPhone pictures to Chromebook:
Step 1: Enable iCloud Photos on iPhone
To enable iCloud Photos, first open the "Settings" app on your iPhone. Next, tap on your name at the top of the screen to access your Apple ID settings. From there, select "iCloud" and then tap on "Photos." Finally, make sure to toggle on the "iCloud Photos" option to start syncing your photos and videos across all your Apple devices. This will ensure that your media is safely stored in the cloud and easily accessible from any device.

Step 2: Upload Photos to iCloud
Once you enable iCloud Photos, all your photos will automatically upload to iCloud, ensuring they are safely stored and accessible from any of your Apple devices.

Step 3: Access iCloud on Chromebook
Begin by opening a web browser on your Chromebook and navigating to the iCloud website. Once there, sign in with your Apple ID credentials. After logging in, you'll have access to various iCloud services. To browse and download photos, click on the "Photos" icon. From here, you can view your photo library, select the images you want, and download them directly to your Chromebook.
Method 5: Transfer Photos from iPhone to Chromebook Through OneDrive
OneDrive, Microsoft's cloud storage service, provides an efficient way to transfer your photos from an iPhone to a Chromebook. With automatic backup features, OneDrive ensures that your photos are safely stored in the cloud and easily accessible from any device.
This method is particularly beneficial for those with extensive photo libraries and who prefer using Microsoft’s suite of tools for management and storage. In this section, we’ll guide you through the process of transferring your photos from an iPhone to a Chromebook using OneDrive efficiently.
Step-by-step instructions on how to transfer pics from iPhone to Chromebook:
Step 1: Install OneDrive on iPhone
Start by opening the App Store on your iPhone. Search for "OneDrive" and download the app. Once the installation is complete, open the app and sign in using your Microsoft account credentials. If you don't have an account, you'll need to create one to proceed.

Step 2: Upload Photos to OneDrive
To upload photos to OneDrive, start by opening the OneDrive app on your device. Once the app is open, look for and tap the "+" icon, usually located at the bottom of the screen. From the menu that appears, select "Upload." Next, choose "Photos and Videos" to access your media files. Browse through your gallery and select the specific photos you want to upload. After making your selections, proceed by following the on-screen instructions to complete the upload process. This will ensure your photos are safely stored in the cloud and accessible from any device.

Step 3: Access OneDrive on Chromebook
To begin, open the OneDrive app or visit the OneDrive website on your Chromebook. Sign in with the same Microsoft account you use for OneDrive. Once logged in, you'll have access to all your files and photos stored in OneDrive. Browse through your folders, find the photos you need, and download them directly to your Chromebook. If you encounter any issues, make sure your internet connection is stable and you have the necessary permissions to download the files.
Method 6: Transfer Photos from iPhone to Chromebook With Wondershare Dr.Fone (Overall Best)
Wondershare Dr.Fone is a versatile tool designed to manage and transfer data effortlessly between devices, making it an ideal choice for iPhone users looking to transfer photos to a Chromebook.
The Phone Manager feature within Dr.Fone offers a straightforward, user-friendly interface that simplifies the process of moving media files, including photos and videos. Compatible with both Windows and macOS, this feature supports a wide range of iOS devices, ensuring that all your data management needs are met with ease. In the next section, we’ll guide you through using Wondershare Dr.Fone's Phone Manager to transfer your photos efficiently.

Dr.Fone - Phone Manager (iOS)
Transfer Photos from iPhone to Chromebook
- Transfer, manage, export/import your music, photos, videos, contacts, SMS, Apps, etc.
- Back up your music, photos, videos, contacts, SMS, Apps, etc., to the computer and restore them easily.
- Transfer music, photos, videos, contacts, messages, etc., from one smartphone to another.
- Transfer media files between iOS devices and iTunes.
- Fully compatible with the newest iOS system.
Step-by-step instructions on how to transfer iPhone photos to Chromebook:
Step 1: Install Wondershare Dr.Fone from their website.
Step 2: Connect your iPhone to your computer and open Dr.Fone's phone manager.
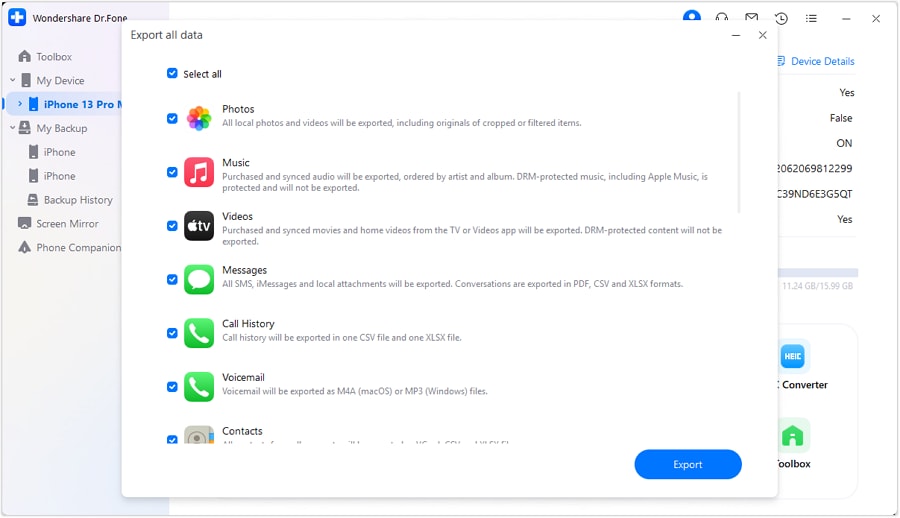
Step 3: Connect your iOS device to the computer using a USB cable. Once detected, its details will show on the home screen. Then, click the Export all data button in the Quick Start section.

Dr.Fone Mac version still has the old interface, but it does not affect the use of Dr.Fone function. We will update it as soon as possible.
Step 4: Choose File Types to Export.
When the new screen appears, select the file types you want to export. Check all relevant data types and click Export at the bottom of the screen to start the process. Then, choose where you want to save your exported data.
Note: Supported data types include Photos, Music, Videos, Podcasts, Ringtones, Books, Messages, WhatsApp, Call History, Voicemail, Safari data, Calendar, Contacts, Notes, Voice Memos, and App Data.

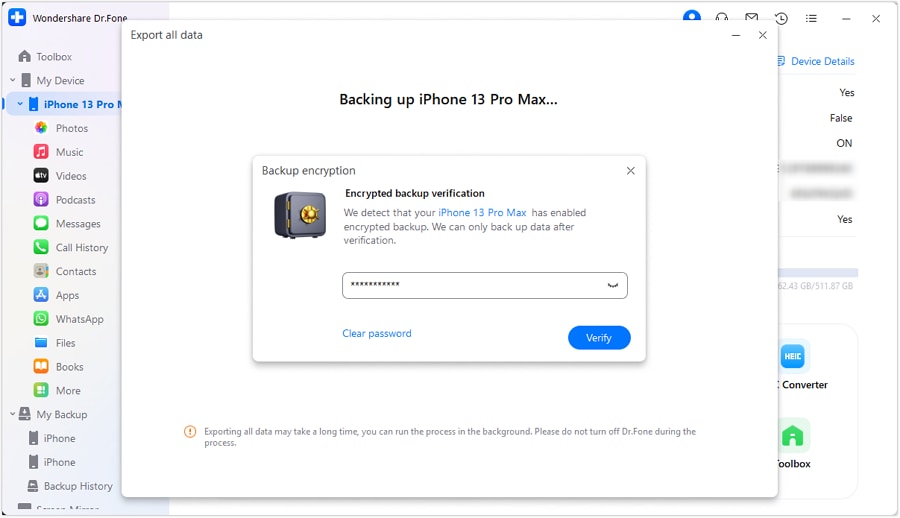
Step 5: Set Up the Password of the Backup File.
You will now need to create a password to encrypt the backup on your computer. Enter your password, confirm it, and click Done to finish. set an export backup password

Step 6: View the Progress of Exporting the Data.
The iOS device will begin exporting its data to the computer via Dr.Fone. The progress of this operation will be displayed on the screen.

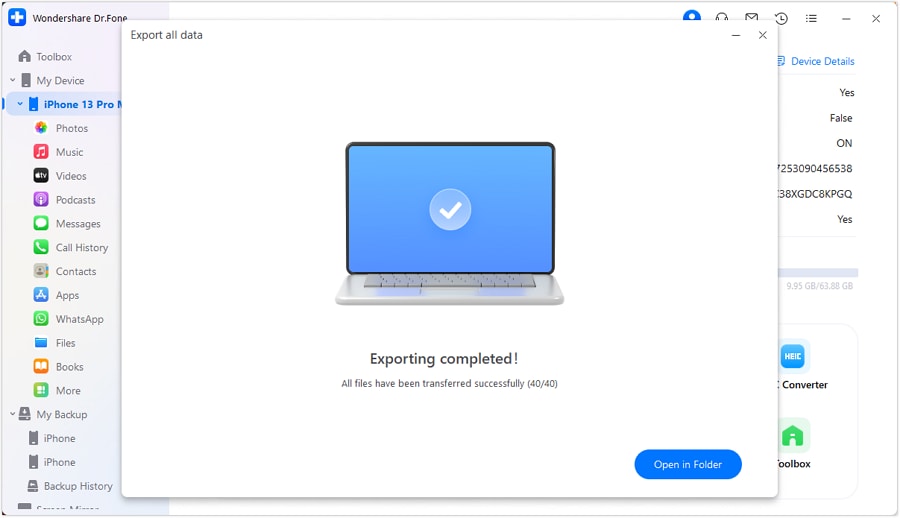
Step 7: Data Exported to Computer Successfully.
After the data is exported, a prompt will pop up on your computer. Click Open to see the data in the specified location.

Whether you need to transfer contacts, messages, or media files, Dr.Fone provides a comprehensive solution that streamlines the process and enhances your overall experience. Its robust set of features ensures that your data is always at your fingertips, and its reliable performance guarantees peace of mind, making Dr.Fone an indispensable tool for anyone looking to manage their iPhone data effectively.
Conclusion
Transferring photos from an iPhone to a Chromebook can be straightforward with the right method. Whether you prefer cloud services like Google Drive, Google Photos, iCloud, and OneDrive or direct methods like using a USB cable or Dr.Fone, each has its pros and cons depending on your needs.
By following the detailed steps provided on how to get pictures from iPhone to Chromebook, you can choose the method that suits you best and transfer your photos seamlessly. Remember, Wondershare Dr.Fone offers a versatile and user-friendly solution, especially for those looking to manage their mobile data efficiently.
Dr.Fone Basic:
Better Control for Your Phone
Manage, transfer, back up, restore, and mirror your device
iPhone Photos
- Convert HEIC to JPG
- 1. Convert HEIC to JPG on Linux
- 2. Convert HEIC to JPG Windows
- 3. Best HEIC Converter Online
- 4. Convert HEIC to JPG High Quality
- Export iPhone Photos
- 1. Upload iPhone Photos to Google Drive
- 2. Transfer Photo from iPhone to PC
- 3. Transfer Photo from iPhone to iPhone
- 4. Transfer from iPhone to iPhone
- 5. Transfer from iPhone to iPad
- 6. Move iPhone Photo to External Drive
- 7. Transfer from iPhone to Flash Drive
- 8. Extract Photos from iPhone
- 9. Download Photo from iPhone
- Import Photos to iPhone
- 1. Transfer from Laptop to iPhone
- 2. Transfer Photo from Camera to iPhone
- 3. Transfer Photo from Mac to iPhone
- 4. Transfer Photos from PC to iPhone
- 5. Transfer from iPhone to PC
- 6. Transfer from Android to iPhone
- 7. Transfer from Samsung to iPhone
- Manage iPhone Photos
- 1. Back up iPhone Photos
- 2. Get Photos off iPhone
- 3. Send Large Size Photos from iPhone
- 4. Photo/Video Compressor Apps
- 5. Delete Photos from iPhone/iPad
- 6. iPhone Photos Disappeared Suddenly
- 7. iPhone Photoshop Alternatives
- Recover iPhone Photos
- 1. Restore Deleted Photos from iPhone
- 2. Recover Photos from iPod Touch
- 3. Recover Deleted Picture from iPhone
- Transfer iPhone Photos to Mac
- Transfer iPhone Photos to PC
- 1. Transfer Data from iPhone to PC
- 2. Transfer Photo to Computer
- 3. Transfer Photo to PC without iTunes
- 4. Transfer Library to Computer
- 5. Send Photo from iPhone to Computer
- 6. Import Photo from iPhone to Windows
- 7. Transfer Photo to Windows
- Transfer Photos from Google Drive
- 1. Download from Google Drive to iPhone
- 2. Transfer from Google Photo to iPhone
- 3. Download from iCloud to iPhone
- Transfer Photos to Google Drive
- Image Convert Tips
- ● Manage/transfer/recover data
- ● Unlock screen/activate/FRP lock
- ● Fix most iOS and Android issues
- Learn More Learn More


James Davis
staff Editor