Guide-What To Do If You're Experiencing iPhone Screen Burn-In

May 18, 2026 • Filed to: Device Data Management • Proven solutions
 TL;DR:
iPhone screen burn-in is permanent OLED pixel degradation caused by static UI elements displayed at high brightness over time, which can be mitigated in its early stages through screen resting but requires physical panel replacement once fully set.
● Large and high-brightness devices like the iPhone 13 Pro Max and the 2,000-nit iPhone 16 Pro can develop permanent ghosting within 12 to 18 months of heavy use, which you can detect early by viewing solid white, red, green, and blue backgrounds at multiple brightness levels.
● Mild image retention can partially recover by powering off the iPhone for 6 to 12 hours or playing high-contrast pixel-cycling videos at full brightness for up to 4 hours, but permanent burn-in requires a $300 to $400 out-of-warranty screen replacement.
● You can prevent accelerated pixel wear by enabling Dark Mode to completely power off black pixels, setting Auto-Lock to 30 or 60 seconds to limit static exposure, and keeping daily screen brightness below 50 percent.
Ask AI for a summary
 ChatGPT
 Perplexity
 Gemini
 Claude
 Grok
Grok
Dr.Fone Basic:
Better Control for Your Phone
Manage, transfer, back up, restore, and mirror your device
iPhone screen burn-in is a persistent display problem that affects iPhones with OLED screens — from the iPhone X all the way through the latest iPhone 16 series. iPhone OLED burn-in occurs when static on-screen elements — such as the status bar, home indicator, or navigation buttons — cause certain pixels to degrade faster than others, leaving a faint ghost image permanently etched into the display. Understanding what causes screen burn-in on iPhone, how to test for it, and how to fix or prevent it can save you from costly screen replacements and keep your display looking its best.
In this guide, you'll explore everything you need to know about iPhone screen burn-ins: what causes them, which models are most susceptible (including iPhone 13 burn-in and iPhone 16 burn-in), how to run an iPhone screen burn-in test, and the most effective methods to fix and prevent the problem. By the end of this article, you'll have a clear, practical action plan to protect your iPhone's OLED display and restore screen quality if burn-in has already appeared.
Whether you're searching for a screen burn-in test for iPhone, wondering if your iPhone 13 Pro Max screen burn-in is fixable, or simply want to prevent OLED burn-in on your iPhone before it starts — this guide covers it all, step by step.
Part 1. All About iPhone Screen Burn-In: Whats, Whys, and Hows
iPhone screen burn-in — also called screen image retention or ghosting — is a condition where a faint, permanent shadow or residual image from previously displayed content remains visible on the screen, even after you've navigated away from that content. On iPhone OLED screens, this happens because each pixel is composed of organic light-emitting compounds that physically degrade over time. When the same pixels are illuminated at high brightness for extended periods, they age faster than surrounding pixels, producing an uneven display that manifests as a ghost image or color shift that cannot be dismissed like a temporary screen artifact.
Causes of Screen Burn-In
iPhone OLED burn-in occurs because of the fundamental chemistry behind how OLED displays work. Unlike LCD screens — which use a backlight that illuminates all pixels equally — each OLED pixel produces its own light using organic compounds. These organic materials have a finite lifespan and degrade faster when driven at high brightness or kept illuminated continuously. High-contrast static elements are the primary culprits: the white status bar at the top of the screen, the persistent home indicator bar at the bottom, bright app icons arranged in the same position for months, and navigation buttons that are always in the same location. Over time, individual pixels beneath these elements degrade faster than the pixels surrounding them, creating the characteristic ghost image of burn-in on iPhone screens. Extended screen-on time combined with maximum brightness levels dramatically accelerates this degradation process.
Recognizing the Symptoms
The most reliable way to recognize iPhone screen burn-in is to display a completely uniform, bright-colored screen — such as an all-white, all-red, or all-green background — and look for any faint discoloration, shadowing, or outline that doesn't belong to the current image. Common burn-in patterns on iPhones include a faint horizontal bar at the top of the screen (mirroring the status bar), a thin line at the bottom (the home indicator), the ghost of app icons from a frequently used home screen layout, or shadowing from a keyboard that was displayed for extended periods. These "ghost" images are most visible against light-colored or single-color backgrounds. In a normally lit room, mild iPhone screen burn may be nearly invisible; in a dimly lit environment or against a plain white background, even early-stage burn-in becomes clearly apparent.
iPhone Devices Prone to Burn-In
While OLED screens offer brilliant visual experiences, they are susceptible to burn-in. This issue isn't limited to specific iPhone models; it can affect various devices, from the latest iPhone releases to older ones with OLED screens. Recognizing that your iPhone screen could be prone to burn-in is the first step in preventing and mitigating this problem.
Here's a complete list of iPhones currently equipped with OLED displays — all of which are susceptible to iPhone OLED burn-in:
- iPhone X, XS / XS Max
- iPhone 11 Pro / iPhone 11 Pro Max
- iPhone 12, 12 mini, 12 Pro, 12 Pro Max
- iPhone 13, 13 Mini, 13 Pro, 13 Pro Max
- iPhone 14, 14 Plus, 14 Pro, 14 Pro Max
- iPhone 15, 15 Plus, 15 Pro, 15 Pro Max
- iPhone 16, 16 Plus, 16 Pro, 16 Pro Max
Are iPhone 13 and iPhone 13 Pro Max Burn-In Issues Common?
Among all iPhone models, iPhone 13 screen burn-in and iPhone 13 Pro Max burn-in are among the most widely reported in user communities. This is partly due to the iPhone 13 series' high adoption rate and, in the case of the Pro models, the always-on-adjacent ProMotion 120Hz display driving OLED pixels more aggressively. The iPhone 13 Pro Max, with its large 6.7-inch Super Retina XDR display, is particularly susceptible because the screen's size means pixels must sustain more complex static content — such as full-width navigation bars and large app icons — across a broader surface area. Users who frequently use navigation apps with persistent on-screen buttons, social media feeds with fixed bottom bars, or video streaming apps with persistent controls have reported iPhone 13 Pro Max screen burn-in appearing as early as 12–18 months into heavy daily use.
Similarly, iPhone 16 burn-in is an emerging concern for users of Apple's latest lineup. The iPhone 16 Pro models introduce Apple's most advanced OLED panels yet — with higher peak brightness (up to 2,000 nits) — which, while impressive, also means these panels are capable of driving pixels at greater intensity, potentially accelerating pixel degradation over time. If you own an iPhone 16 or iPhone 16 Pro Max, following the prevention tips in Part 4 of this guide is especially important.
Part 2. How To Detect Burn-Ins Before It's Too Late
Detecting iPhone screen burn-ins before they become severe is crucial to prevent long-term damage to your display. Early-stage iPhone screen burn-in is treatable and often reversible; advanced burn-in almost never is. By running regular checks using the methods below, you can catch oled burn-in on your iPhone at its earliest and most manageable stage.
Importance of Identifying Burn-Ins Early
Identifying screen burn-in on your iPhone early matters for two reasons. First, mild image retention — where pixels temporarily hold a ghost image but can recover — can be addressed with relatively simple remedies like screen rest and dynamic pixel-refreshing videos. True burn-in, where the pixel degradation is permanent, cannot be reversed through software means alone. Second, early detection preserves your options: a mild burn-in discovered at the 12-month mark may qualify your device for an Apple warranty repair or replacement, while ignoring it until it's severe leaves screen replacement as the only solution.
Using the "Dim Place" Method
The simplest and most accessible iPhone screen burn-in test requires no downloads and no special tools. Go to a dimly lit room and reduce your iPhone's screen brightness to its minimum setting. Then open a plain white image or set your screen to a solid white background (you can use Safari to open a white page, or go to Settings → Wallpaper and choose a white wallpaper for your lock screen). Study the screen carefully for 30–60 seconds. Look specifically at the top of the screen (where the status bar lives), the bottom edge (where the home indicator appears), and the area where your most-used app icons are positioned. Any faint discoloration, shadow, or outlined shape that doesn't belong to the white background indicates screen burn-in on your iPhone. Regularly performing this check — especially if your iPhone is more than a year old — can alert you to burn-in before it becomes severe.
How to Run an iPhone Screen Burn-In Test (Step-by-Step)
For a more comprehensive iPhone OLED burn-in test, follow this structured procedure that evaluates your display across multiple color channels:
- Search for "burn-in test image" online using Safari on your iPhone and open a full-screen, single-color test image in red, green, blue, white, and black.
- View each color in full-screen mode by double-tapping to zoom in Safari. Hold each color on screen for 30 seconds while looking for discoloration, shadow patterns, or outlines — especially around the status bar, navigation bar, and keyboard area.
- Use a dedicated burn-in test video from YouTube (search "OLED burn-in test iPhone"). These videos cycle through high-contrast color patterns that amplify even subtle burn-in artifacts, making them easy to spot.
- Check at multiple brightness levels: run the test at minimum brightness, 50% brightness, and maximum brightness. Some types of iPhone screen burn are only visible at specific brightness levels.
- Compare against a reference screen: if possible, compare your iPhone's display against a new or unaffected device of the same model. Side-by-side comparison is the most reliable way to confirm whether what you're seeing is burn-in on iPhone or just temporary image retention.
Using Burn-In Test Videos From the Internet
Dedicated iPhone screen burn-in test videos are one of the most effective tools for identifying image retention and true burn-in on iPhone OLED displays. These videos feature alternating high-contrast patterns — such as rapidly cycling black-and-white grids, pure color sweeps, and checker patterns — that make even subtle burn-in artifacts far more visible than they would be during normal screen use. Search for "OLED burn-in test" or "iPhone burn-in test" on YouTube, choose a video rated for 4K/full-screen viewing, and run it at full brightness for 3–5 minutes. The pattern cycling amplifies any pixel irregularities, effectively acting as a stress test that reveals iPhone screen burn-in that the dim-room method might miss.

What To Do If You Already Have a Burn-In
If you've confirmed screen burn-in on your iPhone using the methods above, there's no need to panic. The severity of the burn-in determines your best course of action: mild image retention often responds to screen rest and pixel-cycling remedies; true burn-in that does not improve with these methods may require professional screen replacement. The next section covers all available remedies in detail — from free DIY approaches to professional Apple repair options.
Part 3. What To Do With Screen Burn-Ins?
Discovering a screen burn-in on your iPhone can be disheartening, but several effective approaches can reduce or resolve the issue depending on its severity. Start with the least invasive methods and work toward the more intensive options only if needed. Here's a comprehensive overview of all available treatments for iPhone screen burn-in:
- Powering Off for Several Hours: The most immediate and cost-free approach to treating iPhone screen burn-in is to power your device completely off for 6–12 hours. When OLED pixels are not being driven, the organic compounds within them can partially recover, reducing the visibility of ghost images. This method is most effective for mild image retention — cases where the "burn-in" is actually temporary and the pixels haven't yet suffered permanent organic degradation. After powering back on, run the dim-room test again to assess whether the ghost image has faded. For early-stage iPhone OLED burn-in, this simple step alone can produce a noticeable improvement.
- Burn-In Remover Video: Burn-in remover videos are specifically engineered sequences of high-contrast, rapidly alternating patterns designed to "exercise" degraded OLED pixels back toward a more uniform state. The theory is that cycling pixels through their full color range — particularly in areas where burn-in has occurred — helps redistribute the organic material stress more evenly. To use this method, search for "OLED burn-in fixer" or "iPhone burn-in remover video" on YouTube. Play the video at full brightness, full screen, for 2–4 hours continuously. This approach shows the best results on mild-to-moderate screen burn-in on iPhone devices and can be combined with the power-off method for improved effectiveness.
- Third-Party Apps: A number of apps in the Apple App Store advertise the ability to reduce or eliminate iPhone screen burn-in using principles similar to burn-in remover videos — cycling pixels through color patterns to reduce uneven degradation. Results are inconsistent and depend heavily on the age and severity of the burn-in. For mild cases or early image retention on iPhone 13 or iPhone 13 Pro Max, these apps may offer a convenient automated alternative to manually sourcing and playing YouTube videos. Look for apps with recent positive reviews on devices with your specific iOS version, as compatibility matters for full-screen display capability.
- Reduce Screen Brightness and Static Exposure: If your iPhone screen burn-in is mild and caught early, reducing your regular screen brightness immediately — ideally to 50% or below — slows further pixel degradation and can give partially degraded pixels time to partially recover during periods of rest. This is not a cure but a meaningful harm-reduction step that can prevent a mild iPhone screen burn from progressing to a severe, permanent one while you evaluate your repair options.
- Contact Apple for Screen Replacement: If the burn-in is extensive, clearly visible in normal use, and has not responded to any of the above remedies, replacing the display is the only definitive solution. Contact Apple Support or visit an Apple Store for an assessment. If your iPhone is under AppleCare+ coverage, screen replacement costs may be significantly reduced or covered entirely. Without coverage, out-of-warranty screen replacement for iPhone 13 Pro Max or iPhone 16 Pro can cost $300–$400 at Apple. Third-party authorized repair centers may offer lower prices, but always ensure the replacement screen uses genuine OLED panels to avoid a recurrence of screen burn-in on iPhone with inferior parts.
By working through these methods in order, you give yourself the best chance of resolving iPhone OLED burn-in at minimal cost before resorting to professional screen replacement. Patience is key — pixel recovery methods can take hours or days to show measurable improvement.
Part 4. Preventive Measures so You Don't Get Burn-Ins Next Time
Preventing iPhone screen burn-in is far easier and cheaper than repairing it. All iPhone OLED screens — including those on the iPhone 13, iPhone 15, and iPhone 16 — are susceptible to burn-in given the right (or wrong) conditions. The following preventive practices, when followed consistently, can dramatically extend your display's lifespan and protect against oled burn-in on your iPhone.
Method 1. Adjust Screen Brightness / Use Auto-Brightness
The single most impactful thing you can do to prevent iPhone OLED burn-in is to keep your screen brightness as low as comfortably usable. OLED pixel degradation accelerates exponentially at high brightness — running your iPhone at maximum brightness all day is significantly more damaging than running it at 50%. Enable Auto-Brightness (go to Settings → Accessibility → Display & Text Size → Auto-Brightness) so your iPhone automatically lowers brightness in indoor environments. Additionally, consider enabling Reduce White Point (same menu) to further reduce peak brightness for white and light-colored content — one of the primary contributors to screen burn-in on iPhone.
Method 2. Set Screen Timeouts
Every second your iPhone's display remains illuminated with a static image is a second of unnecessary pixel wear. Configuring a short auto-lock timeout ensures your screen turns off quickly during inactivity. Go to Settings → Display & Brightness → Auto-Lock and set the value to 30 Seconds or 1 Minute. This single setting change minimizes the cumulative time that static UI elements — like the status bar and home indicator — remain lit on your iPhone OLED display, directly reducing your burn-in risk.
Method 3. Avoid Static Images
The most common cause of iPhone screen burn-in in everyday use is leaving the same app open with a static layout for extended periods — navigation apps with persistent buttons, social apps with fixed bottom bars, or an e-reader kept on the same page for hours. Be mindful of your screen habits. Periodically change your wallpaper, rearrange app icons on your home screen, and avoid keeping any single app with fixed, high-contrast elements open continuously for long periods. Using apps in landscape orientation occasionally can also redistribute pixel wear more evenly across the panel.
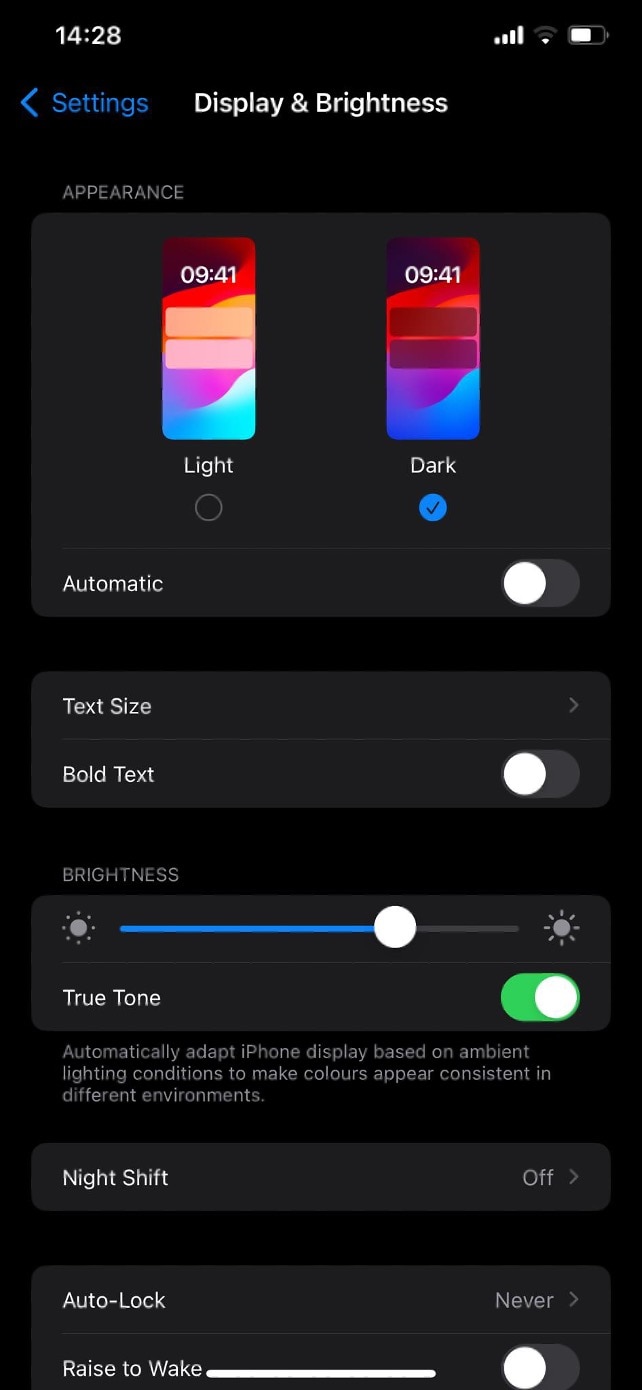
Method 4. Use Dark Mode
Dark Mode is one of the most effective long-term strategies to prevent iPhone OLED burn-in. Because OLED pixels produce their own light, a black pixel consumes zero energy and experiences zero degradation — the pixel is simply off. Dark Mode keeps the majority of the UI surface dark, massively reducing the operating burden on your OLED pixels. Enable it at all times or set a schedule (go to Settings → Display & Brightness → Appearance → Dark / Automatic). For users who spend significant time in apps like Messages, Mail, Notes, or Safari, switching to Dark Mode can cut average OLED pixel workload by 30–50%, meaningfully extending the time before any iPhone 13 or iPhone 16 burn-in becomes visible.
Method 5. Clean Your Screen
A clean, smudge-free screen allows your iPhone to display content accurately at lower brightness levels, reducing the need to push brightness higher to compensate for smears and fingerprints that obscure the display. Regularly wipe your screen with a clean, dry microfiber cloth to remove oils, fingerprints, and debris. Avoid harsh chemicals or abrasive materials that can damage the oleophobic (oil-resistant) coating on your OLED screen — once that coating wears off, fingerprints accumulate faster, potentially leading to habitual brightness increases that accelerate screen burn-in on iPhone.
Method 6. Use Wondershare Dr.Fone
Wondershare Dr.Fone is a versatile mobile utility that helps you manage your device's health and performance. It offers a range of features that can enhance your smartphone experience. Use Dr.Fone to regularly monitor your device's health to prevent screen burn-ins. It allows you to check the status of essential components like the CPU, battery, and storage. Overheating can contribute to screen burn-ins, so early detection and mitigation are crucial.
Dr.Fone provides tools for in-depth phone verification (exclusive to iPhones) and device details (available for both iPhones and Android phones). These features help you understand the current condition of your device, including CPU temperature, battery health, and storage usage. By staying informed about your device's well-being, you can take preventative actions to reduce the risk of screen burn-ins and other performance issues.
Here's how you can use these features:
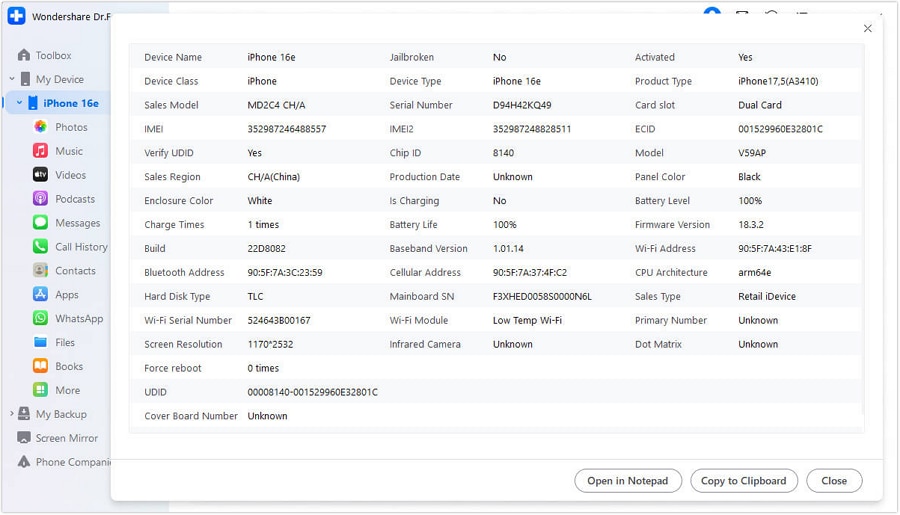
- Step 1: Connect the iPhone that needs to be checked with Dr.Fone using a cabled or wireless connection. Select it from the left panel under the My Device section.

- Step 2: Check the device details in general by selecting the Device Details option on the top right. You can access the device information by clicking the Open in Notepad or Copy to Clipboard options.
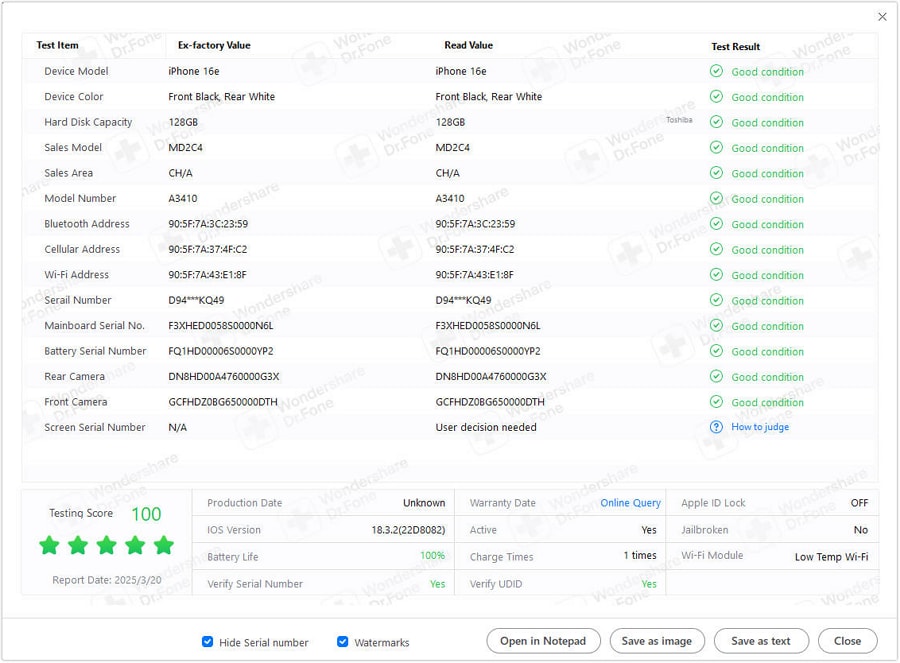
- Step 3: To verify the details of your iDevice, click the Verification Report button on the top-right side of the screen. This will display a comprehensive report with all the device details and comparisons. You can save the verified details using the respective options as an image or text.
Dr.Fone App (iOS) & Dr.Fone App (Android)
Your One-Stop Expert for Screen Unlock, Smart Clean, Data Recovery, Change Location, and Phone Management of Mobile Devices!
- Effortlessly unlock various locks on your device.
- Instantly free up storage space by smart clean.
- Rapidly recover different kinds of lost phone data and information.
- Easily changes GPS location on Android devices.
- Easily manage cluttered and private device content.


Conclusion
iPhone screen burn-in is a genuine and well-documented characteristic of OLED display technology — it affects every iPhone model from the iPhone X through the latest iPhone 16 Pro Max, and it's entirely preventable with the right habits. You've learned what iPhone OLED burn-in is, why it happens at the pixel level, which models (particularly the iPhone 13 and iPhone 13 Pro Max) are most frequently affected, and how to run a proper iPhone screen burn-in test to detect it early. You've also explored a full range of remedies — from free DIY approaches like powering off and using burn-in fixer videos to professional screen replacement for severe cases.
Prevention is always more effective than treatment. By adopting consistent screen care habits — enabling Auto-Brightness, using Dark Mode, setting short auto-lock timers, and monitoring your device's health with tools like Dr.Fone — you can significantly extend the lifespan of your iPhone's OLED display and avoid burn-in altogether. Early detection through regular iPhone OLED burn-in tests is equally important: catching image retention before it becomes permanent gives you access to the full range of repair options, including potential Apple warranty coverage.
Whether you're dealing with an existing burn-in on iPhone 13, concerned about iPhone 16 burn-in prevention, or simply want to protect your investment for years to come, the steps in this guide give you everything you need. Your iPhone's display quality is directly tied to how you use and care for it — make the most of these insights, and you'll enjoy a vibrant, burn-in-free iPhone screen for as long as possible.
FAQs
Dr.Fone Basic:
Better Control for Your Phone
Manage, transfer, back up, restore, and mirror your device


iPhone Issues
- iPhone Storage Full
- 1. Stuck on Apple Logo Storage Full
- 2. Erase Content Settings not Working
- 3. iPhone Lagging
- 4. iPhone Running Slow
- iPhone Update Problems
- 1. Stuck on Updating iCloud Settings
- 2. iPhone Frozen During iOS Update
- 3. iPhone Checking for Update Stuck
- 4. iPhone Cellular Update Failed
- 5. iPhone Software Update Failed
- 6. iPhone Stuck on Update Requested
- 7. iPhone Update Error 1110
- 8. iPhone is Findable and Won’t Turn On
- 9. iPhone Won't Update
- 10. Update Server Couldn't Be Contacted
- 8. iPhone & iPad Security Updates
- 9. Update iPhone with/without iTunes
- 10. Can't Download or Update Apps
- iPhone Media Problems
- 1. Apple Music Song Not Available
- 2. iPhone Not Ringing
- 3. iPhone Echo Problem
- 4. iPhone Ringer Problems
- 5. iPhone Plays Music by Itself
- 6. Ringer Volume Changes by Itself
- 7. Music Won't Play on iPhone
- 8. Blurry Photos & Videos on iPhone
- 9. iPhone Volume Problems
- iPhone Sound Problems
- 1. YouTube no Sound
- 2. iPhone Microphone Problem
- 3. Test iPhone Microphone
- 4. Headphones No Sound from iPhone
- 5. No Sound on iPhone Game
- 6. iPhone Sound Not Working
- 7. iPhone Screen Recording no Sound
- iPhone Calling Problems
- 1. iPhone No Sound on Calls
- 2. Screen Goes Black During Call
- 3. iPhone Recent Calls Not Showing
- 4. iPhone Dropping Calls Issue
- 5. iPhone Calling Problem
- iPhone Camera Problems
- 1. iPhone Camera Black
- 2. iPhone Camera Blurry
- 3. iPhone Camera Not Working
- 4. iPhone Front Camera Not Working
- 5. TrueDepth Camera Not Working
- 6.Out-of-Focus Photos on iPhone 15
- iPhone Network Problems
- 1. Airpods Won't Connect to iPhone
- 2. iPhone Disabled Connect to iTunes
- 3. iPhone Not Syncing Problems
- 4. iPhone Internet Not Working
- 5. iPhone Keep Disconnecting from Wifi
- 6. iPhone WIFI Not Working
- 7. PC Not Recognizing iPhone
- 8. iPhone Stuck on Connect to iTunes
- 9. iPhone Not Showing up in iTunes
- 10. iTunes Not Detecting Your iPhone
- 11. iPhone Bluetooth Disconnect
- 12.Apple CarPlay Keeps Disconnecting
- iPhone Screen Problems
- 1. White Spots in iPhone Screen
- 2. iPhone Bleeding Screen
- 3. Turn Off iPhone When Frozen
- 4. Fix Orange Dot on iPhone
- 5. iPhone Green Screen Flickering
- 6. Green Lines in iPhone Screen
- Other iPhone Problems
- ● Manage/transfer/recover data
- ● Unlock screen/activate/FRP lock
- ● Fix most iOS and Android issues
- Free Download Free Download Free Download


Daisy Raines
staff Editor