
How to Get Rid of Do Not Disturb on iPhone and Never Miss Calls Again

Dec 03, 2025 • Filed to: Phone Repair Solutions • Proven solutions
Your iPhone mutes calls and notifications without your knowledge, and it is already too late when you notice it. Important calls go unanswered and are left to go to voicemail, text messages are not read, and alarms simply do not go off. If you seem to miss notifications constantly, the chances are you could be thinking, “How do I turn off Do Not Disturb on iPhone?"
This is a common situation because Do Not Disturb can turn on by itself due to settings in Focus Mode, schedules, or even unintentional toggles. You may miss critical updates if you are focused on finding the right solution. This article will address how to take Do Not Disturb off your iPhone and step by step regain control of your alerts and stop missing what matters most.
- Part 1: Why does my iPhone keep going into do not disturb mode?
- Part 2: How Do I Turn Off Do Not Disturb On iPhone?
- Method 1: Restore iPhone via iTunes
- Method 2: Reset All Settings
- Method 3: Update Your iPhone
- Method 4: Turn Off Do Not Disturb On iPhone From Settings
- Method 5: Turn Off Do Not Disturb On iPhone On Control Center
- Part 3: How Do You Adjust Do Not Disturb Times On iPhone?
- Part 4: How to Fix Do Not Disturb Not Working On iPhone? Using Dr.Fone - System Repair (iOS)

- Bonus Tips - How to Unlock the iOS Lock Screen
Part 1: Why does my iPhone keep going into do not disturb mode?
For iPhone 11, 12, and 13 users, the error of getting stuck on Do Not Disturb has been prevalent. There can be various reasons for this error, such as the user missing all notifications. Below are some common reasons why this happens:
- Glitches: At times, a network malfunction temporarily freezes the Do Not Disturb option, meaning it cannot be removed on the iPhone, which leaves the device muted even after silencing.
- Outdated Version of iOS: When software is not current, bugs cause interferences with the settings, making it more difficult to disable Do Not Disturb on iPhone.
- Partial Disengagement of Settings: Quite a few people claim to disengage the Do Not Disturb option on the iPhone, but they leave the option switched on in the background.
- Focus and Driving Mode Restrictions: All standard voice settings, including Focus and Driving mode, may automatically set your phone to Do Not Disturb mode. It could obscure the fact that your phone is not in silent mode. If this becomes a challenge, then you really must learn how to turn off Do Not Disturb on your iPhone.
- Corrupt Settings: A misconfigured setting or system preferences conflict can make taking iPhone off Do Not Disturb difficult. Resetting the settings might be necessary to fix this.
Part 2: How Do I Turn Off Do Not Disturb On iPhone?
Now that you know why the iPhone gets stuck on "Do Not Disturb," Here are the possible solutions to fix this issue:
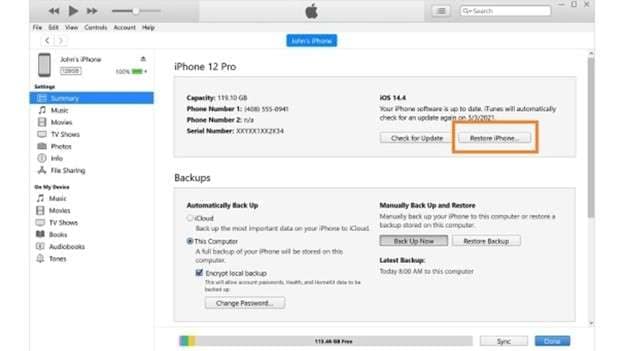
Method 1: Restore iPhone via iTunes
You can resolve the problem in certain situations by using iTunes to restore your device. If you haven't already backed up your data, you will lose it all when you restore your iPhone. Here's a tutorial on using iTunes to recover your iPhone.
Step 1: Launch iTunes on your computer before connecting your stuck iPhone since you will need to connect it later.
Step 2: Your iPhone will recover automatically upon iTunes detecting it after you have put it into Recovery mode.
Step 3: Restore your iPhone after selecting your device and heading to Summary by clicking the Restore iPhone button.
This method is useful if you cannot manually get rid of Do Not Disturb on iPhone through settings.
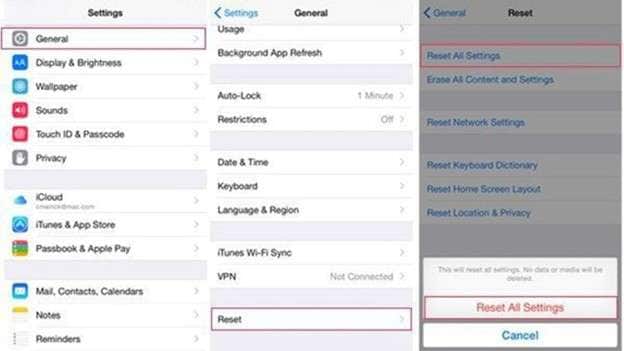
Method 2: Reset All Settings
Another approach to shutting off Do Not Disturb on iPhone is to reset your iPhone's settings. It gives your iPhone a new lease on life and restores all incompatible settings to their original factory settings. Unfortunately, any customized iPhone settings will be lost as a result of this process. It's important to note that your iPhone won't lose any papers or media files throughout this process. Steps to reset your iPhone's settings can be seen below:
Step 1: Access the Settings from the main menu (three dashes on the left).
Step 2: Find the General menu, then click Reset, then select Reset them all from the options provided.
Step 3: A passcode prompt will appear; type in your passcode to finalise the process.
Method 3: Update Your iPhone
You can also update the software system to turn do not disturb off on iPhone mode, as this issue is probably caused by an outdated version of iOS. In order to upgrade your iPhone follow the steps below
Step 1: Start by visiting Settings on your iPhone.
Step 2: Tap General; next, choose Software Update.
Step 3: For upgrading your iOS device, press Download and Install if a new update is offered.

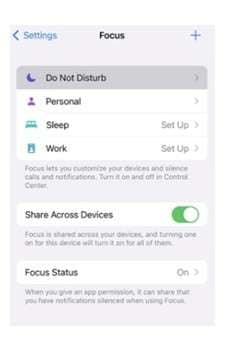
Method 4: Turn Off Do Not Disturb On iPhone From Settings
If the Do Not Disturb icon is not available, you can disable it from your iPhone settings directly.
Step 1: Launch the Settings app on your iPhone.
Step 2: Find and tap Focus.
Step 3: Choose from the list Do Not Disturb.
Step 4: Find the Do Not Disturb toggle switch and flip it off.

Method 5: Turn Off Do Not Disturb On iPhone On Control Center
The Control Center provides the easiest way to quickly switch off Do Not Disturb on an iPhone. The steps are slightly different depending on your iPhone model.
For the older iPhone SE, iPhone 7, iPhone 8, and iPhone XR:
Step 1: Open the Control Center by swiping up from the bottom of the screen.
Step 2: Check to see if Do Not Disturb is disabled by tapping that Half Moon icon.
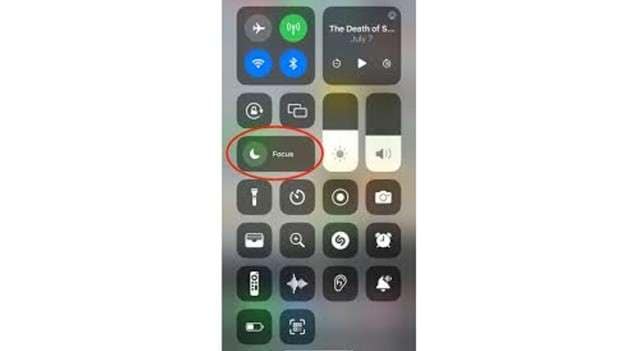
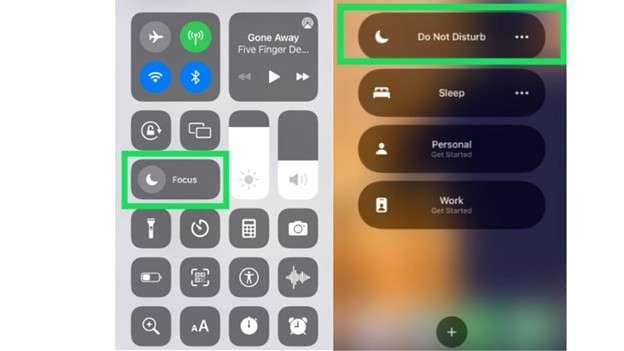
For more recent models, such as the iPhone 11, iPhone 12, iPhone 13, iPhone 14, and iPhone 15:
Step 1: Swipe down from the top-left side of the screen to access the Control Center
Step 2: Tap the Focus icon.
Step 3: Tap on Do Not Disturb to disable it.
Part 3: How Do You Adjust Do Not Disturb Times On iPhone?
The Do Not Disturb function allows calls, messages, and alerts to be muted during set hours. It can be set for automatic activation, and some contacts or applications can be allowed to send notifications. Follow these steps to adjust Do Not Disturb times on iPhone and customize settings.
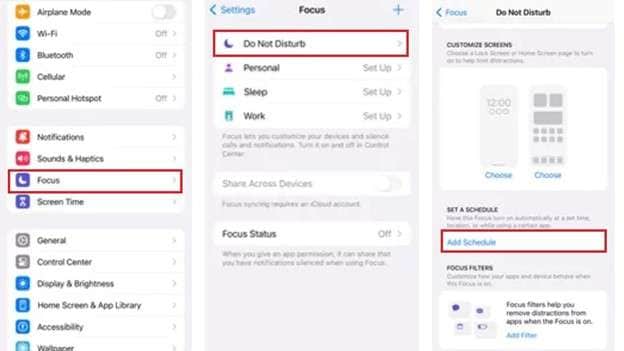
Step 1: Open Do Not Disturb Settings
Go to the Home Screen and open Settings. Scroll down and tap Focus. Select Do Not Disturb from the list.
Step 2: Set a Schedule for Do Not Disturb
Scroll down and tap Add Schedule. Select Time to schedule when Do Not Disturb should activate. Set the start and end time by scrolling up or down and confirming each selection. Choose the days for automatic activation, then tap Done.
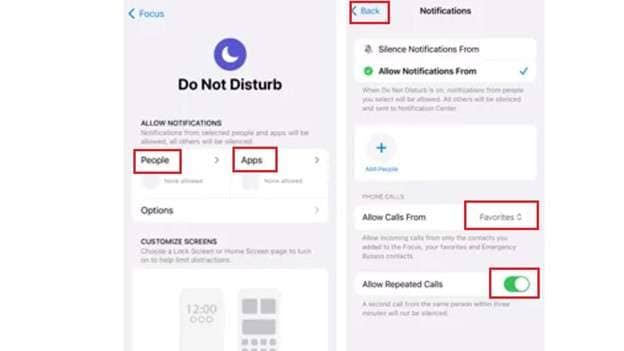
Step 3: Allow Calls and Notifications from Certain Contacts
Scroll up and tap People. Under Allow Calls From, select Favorites or Contacts Only to allow important calls through. If you don’t want repeated calls to bypass Do Not Disturb, toggle off Allow Repeated Calls.
Step 4: Manage App Notifications
Tap Apps, then select Add Apps. Choose an app, such as Messages, and tap Done to allow its notifications.
Step 5: Adjust Notification Previews
Go back to the Focus settings. Tap Settings, then select Notifications. Choose Show Previews, then select Never to hide notifications while Do Not Disturb is active.
Once set, Do Not Disturb will follow your schedule, keeping distractions away when needed. If you ever want to switch off Do Not Disturb on iPhone, simply toggle it off in Control Center or Settings.
Once scheduled, the Do Not Disturb feature will set your iPhone to the respective intervals. To turn Do Not Disturb off on iPhone, just toggle it off in Control Centre or Settings.

Part 4: How to Fix Do Not Disturb Not Working On iPhone? Using Dr.Fone - System Repair (iOS)
At times, the Do Not Disturb option does not turn off even if you change the settings. This activity may be a part of a severe iOS bug that stops the working of your device from normal functioning. Restarting the iPhone might solve the problem, but it also means your data is at risk. A better, quicker option is Dr.Fone - System Repair (iOS), whose function is to remove system errors without losing data.
Key Features of Dr.Fone - System Repair (iOS)
- Fixes Do Not Disturb stuck on iPhone and other iOS issues without data loss.
- Resolves problems like recovery mode loops, black screen, or Apple logo stuck issues.
- Corrects iTunes issues such as errors 4013, 9, and 27.
- Works with every iPhone, iPad, and iPod, including the iPhone 11, 12, and 13.
- Works with the latest iOS versions.
Dr.Fone - System Repair (iOS)
Fix Do Not Disturb Not Working On iPhone Without Data Loss.
- Only fix your iOS to normal, no data loss at all.
- Fix various iOS system issues stuck in recovery mode, white Apple logo, black screen, looping on start, etc.
- Upgrade and Downgrade iOS without iTunes at all.
- Work for all iPhone/iPad/iPod Touch, running on all iOS versions.


Follow these steps to learn how to turn off Do Not Disturb on iPhone using Dr.Fone - System Repair (iOS).
Step 1: Open Dr.Fone and Select System Repair
Launch Dr.Fone on your computer. On the home screen, click System Repair. Use the original lightning cable to connect your iPhone. Once detected, the software will show two options: Standard Mode and Advanced Mode.

Standard Mode fixes most iOS issues while keeping your data safe. If the issue persists, try Advanced Mode, but note that it erases all data.
Step 3: Select the Correct iOS Firmware
The software will detect your iPhone’s model. Choose the appropriate iOS firmware version and click Start.

Step 4: Download and Verify iOS Firmware
The software will begin downloading the required firmware. This may take a few minutes, depending on your internet speed. If the download fails, manually get the firmware through your browser and upload it using the Select option.

Step 5: Fix the iPhone System
Once the firmware is downloaded, Dr.Fone will validate it. Click Fix Now, and the tool will begin repairing your iPhone. After the repair, your iPhone will restart automatically. The Do Not Disturb " issue should be fixed.

Bonus Tips - How to Unlock the iOS Lock Screen
In case you’ve neglected to memorize your iPhone passcode or your device seems to malfunction with either Face ID or Touch ID, neither accessing nor disabling Do Not Disturb will be an option for you. In such cases, you need a reliable solution to unlock your iPhone first. Dr.Fone - Screen Unlock (iOS) can help you regain access to your device safely and effectively.
Dr.Fone - Screen Unlock (iOS)
Unlock iPhone/iPad Lock Screen Without Hassle.
- Simple, click-through, process.
- Remove screen passcodes, Face ID, Touch ID and Apple ID with ease.
- Bypass iCloud Activation Locks without Password.
- Bypass MDM and screen time without data loss.
- Supports the latest iOS version fully!

Conclusion:
Not being able to receive essential phone calls or notifications as a result of the Do Not Disturb status being on, can be very annoying. However, the solution is simpler than you might imagine. It could be a problem with the system, outdated settings, or even a toggle being set incorrectly, but knowing how to turn off Do Not Disturb on iPhone will make certain that you are never deprived of important notifications or calls.
If the issue persists, deeper iOS problems might be at play. Instead of factory resetting your phone, a more reliable fix exists. Dr.Fone - System Repair (iOS) provides a smooth way to resolve system errors without losing data. With the right approach, you can regain control of your notifications and ensure your iPhone works just as you need it to.
4,624,541 people have downloaded it


iPhone Issues
- iPhone Storage Full
- 1. Stuck on Apple Logo Storage Full
- 2. Erase Content Settings not Working
- 3. iPhone Lagging
- 4. iPhone Running Slow
- iPhone Update Problems
- 1. Stuck on Updating iCloud Settings
- 2. iPhone Frozen During iOS Update
- 3. iPhone Checking for Update Stuck
- 4. iPhone Cellular Update Failed
- 5. iPhone Software Update Failed
- 6. iPhone Stuck on Update Requested
- 7. iPhone Update Error 1110
- 8. iPhone Stuck On Verifying Update
- 9. iPhone Won't Update
- 10. Update Server Couldn't Be Contacted
- 8. iPhone & iPad Security Updates
- 9. Update iPhone with/without iTunes
- 10. Can't Download or Update Apps
- iPhone Media Problems
- 1. Apple Music Song Not Available
- 2. iPhone Not Ringing
- 3. iPhone Echo Problem
- 4. iPhone Ringer Problems
- 5. iPhone Plays Music by Itself
- 6. Ringer Volume Changes by Itself
- 7. Music Won't Play on iPhone
- 8. Blurry Photos & Videos on iPhone
- 9. iPhone Volume Problems
- iPhone Sound Problems
- 1. YouTube no Sound
- 2. iPhone Microphone Problem
- 3. Test iPhone Microphone
- 4. Headphones No Sound from iPhone
- 5. No Sound on iPhone Game
- 6. iPhone Sound Not Working
- 7. iPhone Screen Recording no Sound
- iPhone Calling Problems
- 1. iPhone No Sound on Calls
- 2. Screen Goes Black During Call
- 3. iPhone Recent Calls Not Showing
- 4. iPhone Dropping Calls Issue
- 5. iPhone Calling Problem
- iPhone Camera Problems
- 1. iPhone Camera Black
- 2. iPhone Camera Blurry
- 3. iPhone Camera Not Working
- 4. iPhone Front Camera Not Working
- 5. TrueDepth Camera Not Working
- 6.Out-of-Focus Photos on iPhone 15
- iPhone Network Problems
- 1. Airpods Won't Connect to iPhone
- 2. iPhone Disabled Connect to iTunes
- 3. iPhone Not Syncing Problems
- 4. iPhone Internet Not Working
- 5. iPhone Keep Disconnecting from Wifi
- 6. iPhone WIFI Not Working
- 7. PC Not Recognizing iPhone
- 8. iPhone Stuck on Connect to iTunes
- 9. iPhone Not Showing up in iTunes
- 10. iTunes Not Detecting Your iPhone
- 11. iPhone Bluetooth Disconnect
- 12.Apple CarPlay Keeps Disconnecting
- Other iPhone Problems


James Davis
staff Editor
Generally rated4.5(105participated)