
How To Fix iPhone Green Screen of Death Issue [iOS 27 Included!]

Nov 11, 2026 • Filed to: Phone Repair Solutions • Proven solutions
 TL;DR:
What to Do First
- Screen frozen or touch unavailable: try the model-specific force restart; this does not erase your iPhone.
- Phone usable but tinted: back up, then check display settings and install an available compatible update.
- Software recovery needed: Apple's Recovery Mode Update attempts to reinstall iOS without erasing personal data. Dr.Fone Standard Repair offers a guided, data-preserving repair option for supported software faults.
- Persistent green after a drop, or no improvement after software checks: arrange display service rather than repeatedly erasing the phone. Restore erases data; do not choose it just to test a suspected hardware fault.
Ask AI for a summary
 ChatGPT
 Perplexity
 Gemini
 Claude
 Grok
To troubleshoot the iPhone green screen of death, start with a force restart. If the screen becomes usable, back up your iPhone and check for a compatible iOS update. If it stays green, choose between software recovery and display service based on what happened before the problem and whether the phone still responds. A software repair cannot fix a physically damaged display.
A green tint, flashing green screen, and a solid green screen are symptoms, not a diagnosis. This guide covers four software troubleshooting routes, including what to do after an iOS 27 update, and explains when to stop and get the display inspected.


Part 1. What Causes iPhone Green Screen of Death Problem
An iPhone green screen issue can come from software, color settings, or a display component that needs repair. First note whether the screen is readable, whether the phone rings or vibrates, and whether the problem followed an update, drop, or liquid exposure. These clues help choose the next step, but they do not prove which component has failed.
1. Software Bugs and Updates
A temporary system freeze or an interrupted update can affect normal operation. If the screen turned green after an update, try the restart and update routes below; the timing alone does not establish an iOS bug or rule out a display fault. A tint that changes with settings is a different troubleshooting case from a solid green screen that blocks all use.
2. Display Hardware Issues
The display panel or its connections can develop faults, including after impact or liquid exposure. If the phone still rings or is recognized by a computer but the screen stays green, the phone may be running while the display path is malfunctioning. That is a reason for inspection, not proof that a software reset or a new screen will fix every case.
3. Power Management and Battery Issues
If the phone also shuts down, will not charge, or does not respond, power and battery checks may be needed. A green screen by itself is not enough to diagnose a worn battery or a power-management failure. For a completely unresponsive phone, check the charging cable and power source before assuming the display is the only issue.
4. Display Driver and GPU Malfunction
Display-control or graphics faults can affect the image, but you cannot identify a GPU or driver failure from the green color alone. Persistent lines, flickering, or a solid green display need a diagnosis that separates the panel, connections, and system behavior. Do not open the phone or press on the screen to test an internal connection.
If the Screen Works but Has a Green Tint
Use these reversible checks only if you can see and operate the screen. They can identify a color-setting effect; they do not repair a damaged OLED panel.
- Open Settings > Display & Brightness. Move the brightness slider and check whether the tint changes. Temporarily turn off True Tone and Night Shift to compare the colors.
- Open Settings > Accessibility > Display & Text Size > Color Filters. If a filter or Color Tint was enabled unintentionally, turn it off and check the display again. Restore any accessibility setting you rely on after the test.
- If colors return to normal, back up and check for a compatible update. If the tint or green flashing persists across screens, use the software-or-service choices below rather than treating a brightness change as a permanent repair.
When to Get the Display Inspected
If your iPhone screen turned green after a drop or liquid exposure, or stays green despite a restart and an appropriate software check, contact Apple or an Apple Authorized Service Provider. Tell them the model, what happened before the fault, whether it still rings, and which steps you tried. A working vibration or computer connection does not guarantee that the display is healthy.
If important data has no backup, say so before authorizing an erase or replacement. Do not repeatedly Restore a phone with signs of display damage. See the repair coverage and cost FAQ for the next service step.
Part 2. Four Software Fixes for iPhone Green Screen of Death
The following methods address software-related problems; none replaces a display repair. You do not need to complete every method in order. Start with a restart, then choose the route that fits the phone's condition and your data needs.
Choose an iPhone green screen fix:
- Force restart: first check for a frozen system, without erasing data.
- Normal software update: use it when the screen works well enough to back up and open Settings.
- Apple's Recovery Mode Update: a built-in computer route when the phone cannot start or you cannot operate it. Try Update before considering Restore.
- Dr.Fone Standard Repair: a guided desktop option for supported iOS faults, designed to preserve personal data.
No backup? Stay with non-erasing attempts first. Neither Apple's Update nor Standard Repair guarantees success or the safety of every file on a failing device. If the data is irreplaceable and a non-erasing attempt fails, seek service advice before choosing Restore or Advanced Repair.
Fix 1. Force Restart iPhone
A force restart uses physical buttons, so it can work even when you cannot use touch. It restarts the phone without erasing its contents and can clear a temporary freeze. It is not the same as a factory reset or entering Recovery Mode.
Use the combination for your model. For iPhone 14 Pro Max, use the iPhone 8-or-later sequence:
- iPhone 8 or later, including iPhone X and iPhone SE (2nd and 3rd generation): quickly press and release Volume Up, then Volume Down. Hold the Side button until the Apple logo appears, then release it. This can take longer than 10 seconds.
- iPhone 7 or 7 Plus: hold the Side and Volume Down buttons together until the Apple logo appears, then release them.
- iPhone 6s or earlier, including iPhone SE (1st generation): hold the Home and Side or Top buttons together until the Apple logo appears, then release them.

If the display returns, back up before further troubleshooting. If it stays green, use Update-first recovery for a suspected software problem, or choose service when the symptoms point to display damage.
Fix 2. Repair Supported iOS Issues with Dr.Fone - System Repair (iOS)
Still seeing a green screen after a force restart? If an iOS software fault is behind the problem, Dr.Fone - System Repair (iOS) gives you a guided repair route on Windows or Mac. Start with Standard Repair, designed to repair supported system issues while preserving your photos, messages, and other personal data, rather than choosing an erase-and-restore workflow first.
Dr.Fone brings device detection, compatible firmware download, verification, and repair progress into one interface, so you can follow the repair process without searching for firmware files yourself. It is an option for software troubleshooting, not a repair for a physically damaged display.
Why Select Dr.Fone - System Repair (iOS) as a Solution
- Put your personal data first: Standard Repair is designed to keep your files while addressing supported iOS faults. Data preservation is a design goal, not a guarantee on a failing device.
- Know what to do next: on-screen guidance takes you through mode selection, firmware preparation, and repair progress instead of leaving you to assemble a manual firmware workflow.
- No jailbreak required: troubleshoot the system through the repair interface without jailbreaking your iPhone.
For a guided software-repair attempt, download Dr.Fone below and follow the Standard Repair steps. If you prefer Apple's built-in computer route, see Recovery Mode Update; it does not require a third-party repair license. Full Dr.Fone system repair requires paid license access.
Dr.Fone - System Repair (iOS)
Take the next software-repair step when a restart has not cleared your green screen.
- Start with data-preserving Standard Repair before considering an erasing mode.
- Repair 150+ supported iOS system issues, including stuck in recovery mode, white screen, black screen, and restart loops on compatible Apple devices.
- Let Dr.Fone download and verify compatible firmware instead of finding system files manually.
- Follow on-screen repair instructions and track progress on Windows or Mac.


How to Use Standard Repair
Use a Windows or Mac computer, a USB cable, and a stable internet connection. If the phone is usable, back up your iPhone first. A new backup may not be possible if you cannot unlock the device or approve a connection. Mac interface labels can differ from the Windows screenshots below.
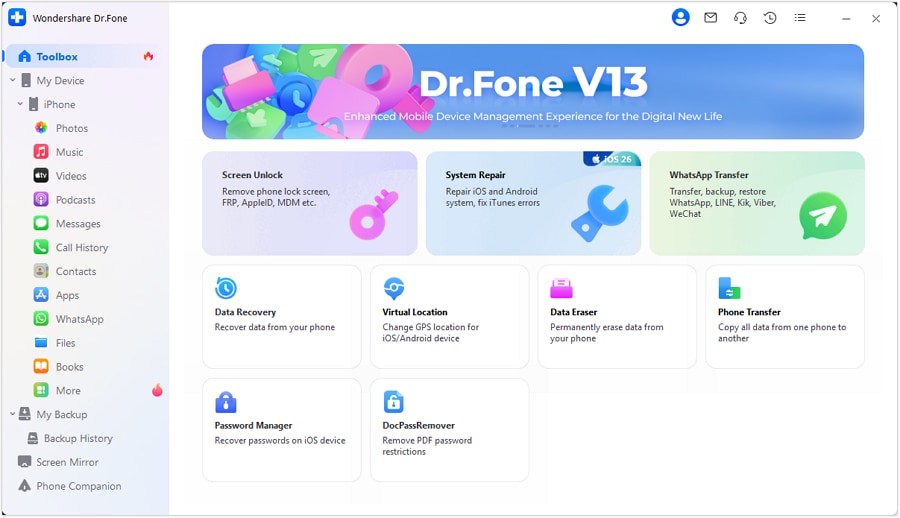
Step 1: Open System Repair and connect the iPhone. Launch Dr.Fone and open Toolbox > System Repair.
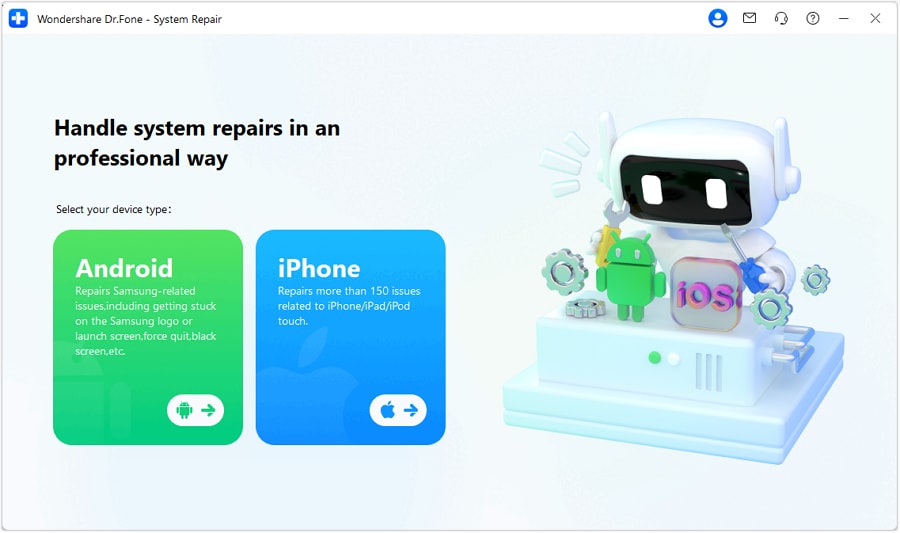
Connect the phone with the USB cable and select iPhone as the device type.
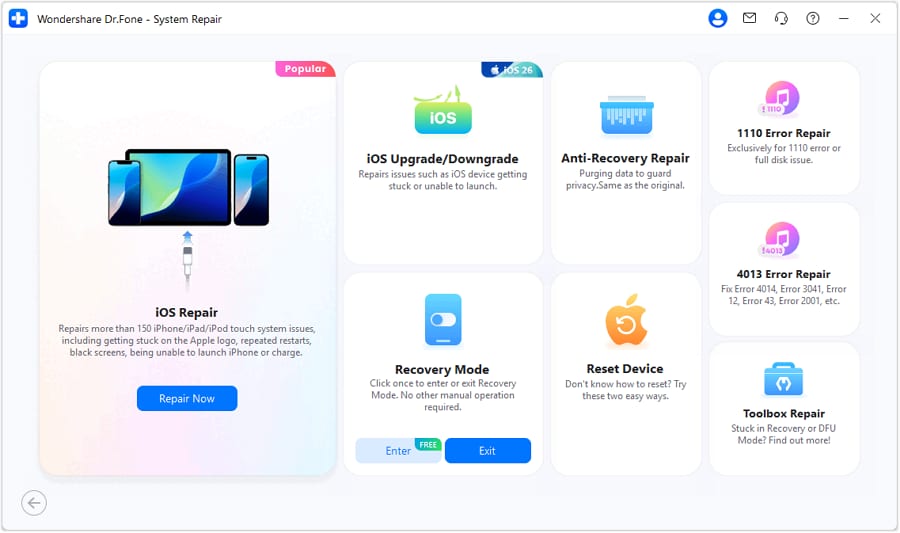
Step 2: Choose iOS Repair and Standard Repair. Select iOS Repair to open the repair-mode choices.
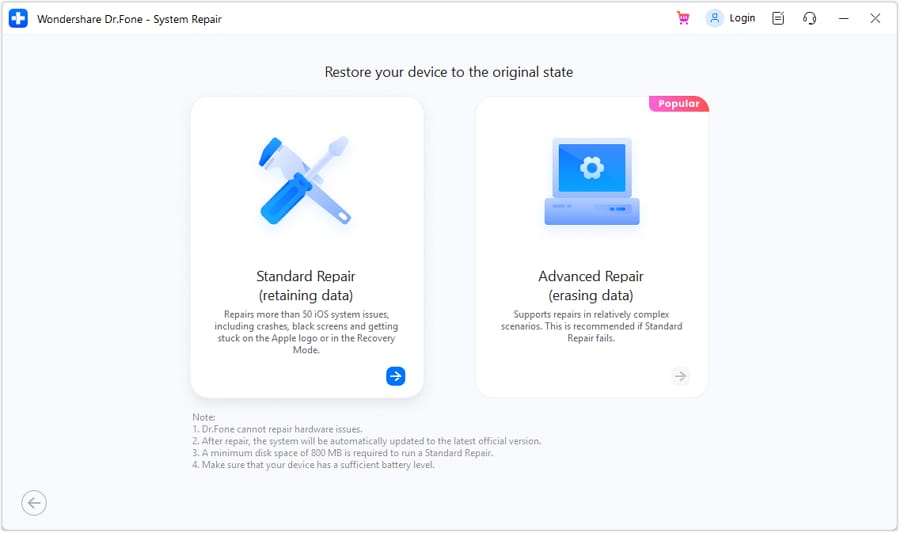
Choose Standard Repair for its data-preserving design. Advanced Repair erases data; do not select it as an automatic next step if Standard Repair fails, especially without a backup.
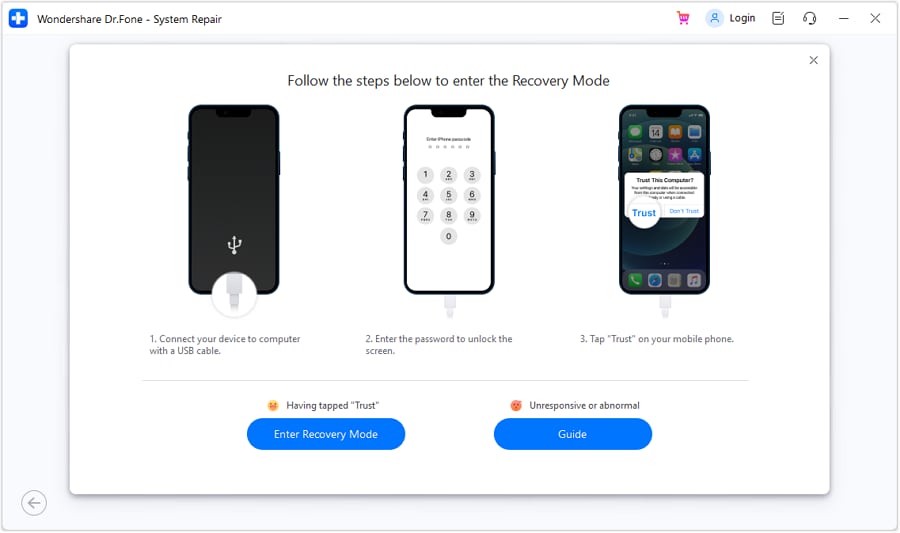
Step 3: Enter Recovery Mode and prepare compatible firmware. Follow the on-screen Enter Recovery Mode instructions. If the phone is unresponsive or cannot enter automatically, use Guide for the manual button sequence.
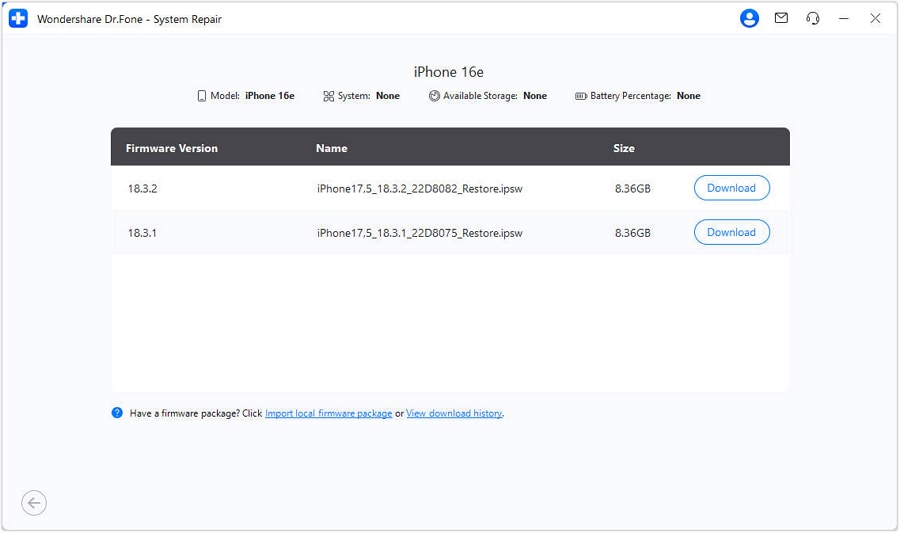
Confirm the detected device and a compatible firmware option, then click Download and wait for verification. Repair can update the installed iOS version; the listed options do not mean you can install any past version.
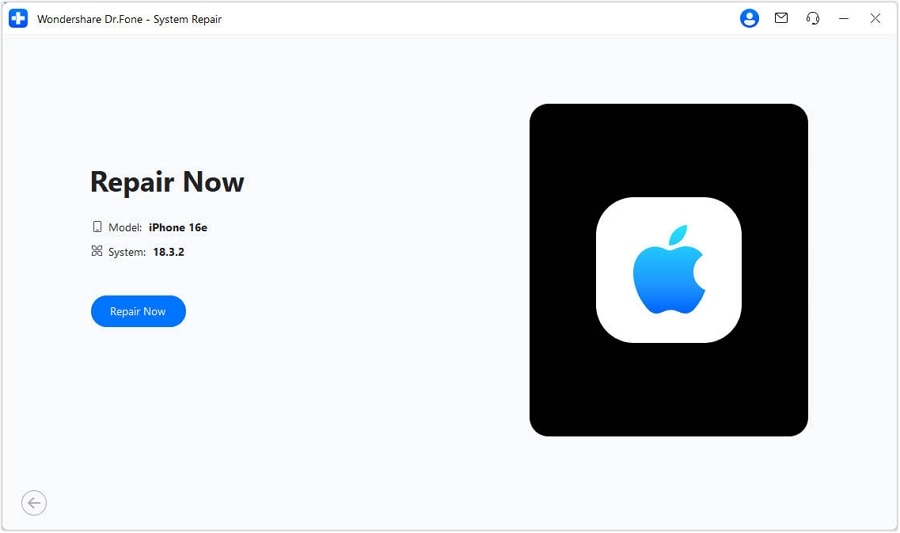
Step 4: Run the repair and check the display. Full system repair requires paid license access; the free download is not a promise of free repair. After firmware verification, click Repair Now and keep the cable connected throughout the process.
When completion appears, click Done. Let the phone restart, then check whether the display and touch work normally.
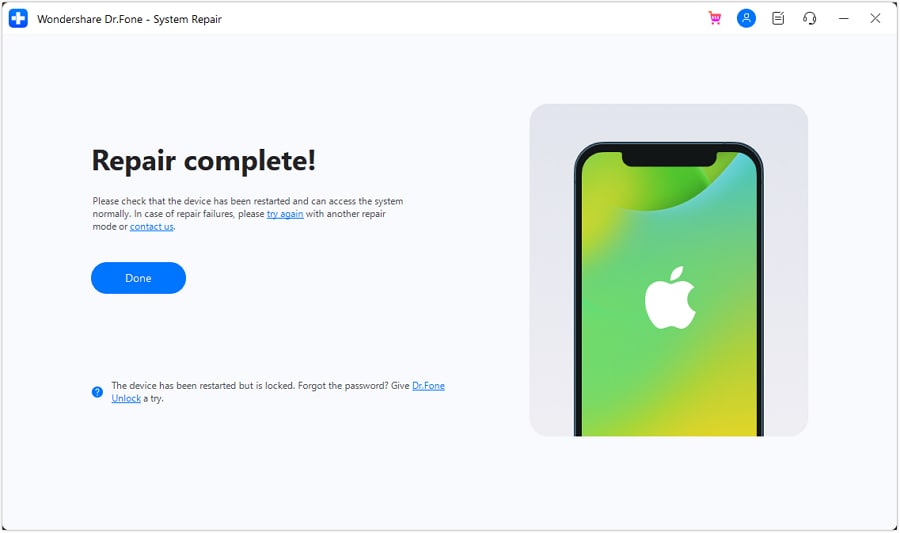
If the phone remains on the connect-to-computer screen, follow the Recovery Mode loop troubleshooting route. If it restarts but remains green, reconsider display service rather than repeating repairs or switching straight to an erasing mode.
Fix 3. Use Recovery Mode: Update Before Restore
Use Apple's computer-based route when the phone cannot start normally or you cannot operate it. Update attempts to reinstall iOS without erasing personal data; Restore erases the phone and reinstalls iOS. Try Update first if you have not already done so. Neither option repairs a physically damaged display.
Step 1: Connect to the computer. Update your Mac or the Apple Devices app on Windows. Connect the iPhone by USB, then open Finder on macOS Catalina or later, Apple Devices on Windows, or iTunes on an older supported setup.
Step 2: Enter Recovery Mode while connected. Unlike a force restart, keep holding the relevant button or buttons past the Apple logo until the Connect to computer screen appears:
- iPhone 8 or later, including iPhone SE (2nd and 3rd generation): quickly press and release Volume Up, then Volume Down; hold the Side button until the recovery screen appears.
- iPhone 7 or 7 Plus: hold Side and Volume Down together until the recovery screen appears.
- iPhone 6s or earlier, including iPhone SE (1st generation): hold Home and Side or Top together until the recovery screen appears.
If the display stays green, check whether the computer reports an iPhone in recovery mode; do not rely only on seeing the icon through the fault. If the computer does not detect it or a needed button is broken, seek service rather than repeatedly guessing the sequence.
Step 3: Choose Update first. Select the iPhone on the computer and choose Update when offered. Leave it connected while the software downloads and installs. If downloading takes more than 15 minutes and the phone leaves Recovery Mode, let the download finish, then repeat the Recovery Mode button sequence.
Step 4: Consider Restore only after reviewing the data loss. If Update fails and you accept erasing the phone, choose Restore and follow the computer's prompts. Without a usable backup, do not assume photos, messages, or app data can be recovered afterward. If the data is essential, stop for service advice before erasing.

After Restore, set up the phone and restore a compatible backup if you have one. If Update or Restore cannot complete, or a fresh system still shows green, get the device inspected instead of repeating an erase.
Fix 4. Update the iOS System to the Latest Version
If you are troubleshooting an iOS 27 green screen, or a similar symptom after an iOS 18 or iOS 26 update, do not assume the release itself caused hardware damage. A compatible maintenance update can address software bugs, but cannot repair a damaged panel. For release and preparation guidance, see the iOS update guide.
If Settings is usable: back up, connect to Wi-Fi and power, then open Settings > General > Software Update. Install the compatible public update offered for your model and check the display after restarting. If you cannot use the screen, choose Recovery Mode Update or the guided upgrade route below.
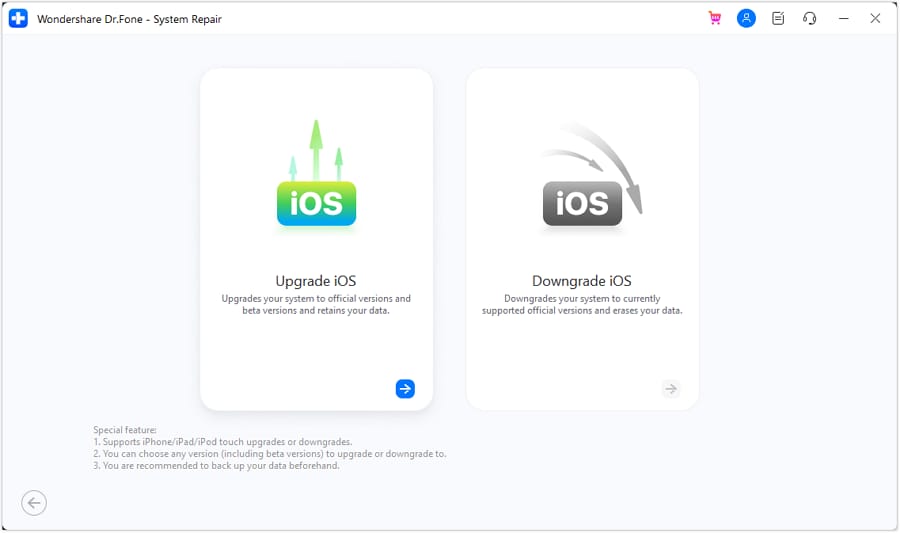
Dr.Fone - System Repair (iOS) also provides an iOS Upgrade/Downgrade workflow. For this troubleshooting route, use Upgrade iOS and a compatible available public firmware, not a beta or arbitrary older release. Back up when possible and review the selected upgrade option's data warning before starting; do not proceed with an erasing option if you need to preserve unbacked-up data.
Step 1: Open Upgrade iOS. In Dr.Fone, open Toolbox > System Repair > iPhone > iOS Upgrade/Downgrade > Upgrade iOS. Connect the iPhone with a USB cable when prompted and let the program detect it.
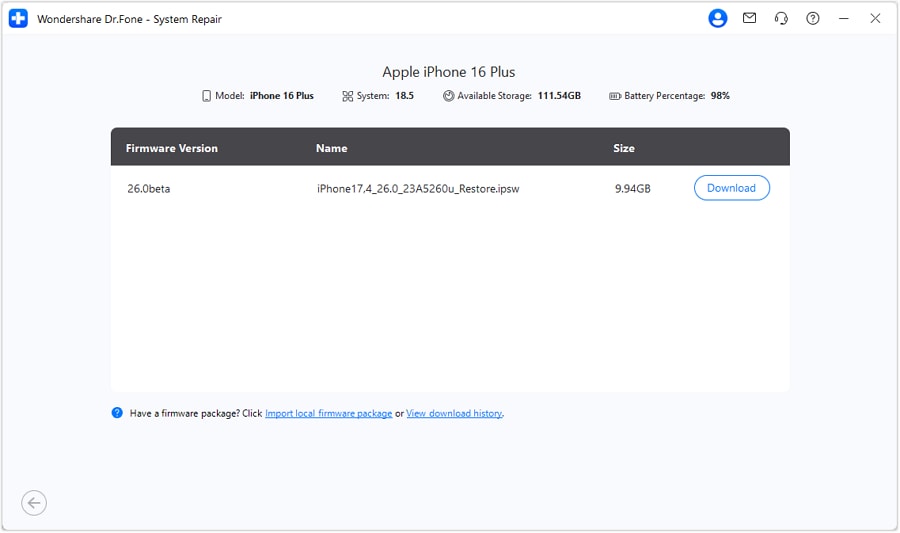
Step 2: Download the compatible update. Confirm the detected model and review the available firmware versions. Click Download for the compatible public version you intend to install, then wait for download and verification.
Step 3: Install and check the result. Review the displayed license and data conditions, then click Repair Now. Keep the cable connected until completion, click Done, and check the screen after startup. If green persists, use the service route.

Choosing a Repair Route for iOS 27 Issues
Tips: Match other iOS 27 update problems to their own symptoms. An update, Standard Repair, and a downgrade are different operations. Downgrading iOS depends on firmware availability and Apple signing, erases device data, and can leave you unable to restore a backup made on newer iOS. It is not a guaranteed green-screen fix.
 safe & secure
Conclusion
An iPhone green screen of death does not identify a single fault. Start with a force restart; if the phone becomes usable, back up and check settings or an available update. When software recovery is appropriate, choose a non-erasing route before considering Restore. Persistent green after impact or after software checks needs a display inspection.
For supported software problems, Dr.Fone - System Repair (iOS) offers guided firmware repair with Standard Repair's data-preserving design. Use the repair steps above to understand the mode and firmware choices before starting.
 safe & secure
4,624,541 people have downloaded it
FAQs About iPhone Green Screen
 1. What’s the difference between the "Green Screen of Death" and a simple green tint on my phone screen?2. Does Apple cover the green screen issue under warranty or AppleCare?3. Is it safe to downgrade my iOS to an older version to fix the green screen problem?


iPhone Issues
- iPhone Storage Full
- 1. Stuck on Apple Logo Storage Full
- 2. Erase Content Settings not Working
- 3. iPhone Lagging
- 4. iPhone Running Slow
- iPhone Update Problems
- 1. Stuck on Updating iCloud Settings
- 2. iPhone Frozen During iOS Update
- 3. iPhone Checking for Update Stuck
- 4. iPhone Cellular Update Failed
- 5. iPhone Software Update Failed
- 6. iPhone Stuck on Update Requested
- 7. iPhone Update Error 1110
- 8. iPhone is Findable and Won’t Turn On
- 9. iPhone Won't Update
- 10. Update Server Couldn't Be Contacted
- 8. iPhone & iPad Security Updates
- 9. Update iPhone with/without iTunes
- 10. Can't Download or Update Apps
- iPhone Media Problems
- 1. Apple Music Song Not Available
- 2. iPhone Not Ringing
- 3. iPhone Echo Problem
- 4. iPhone Ringer Problems
- 5. iPhone Plays Music by Itself
- 6. Ringer Volume Changes by Itself
- 7. Music Won't Play on iPhone
- 8. Blurry Photos & Videos on iPhone
- 9. iPhone Volume Problems
- iPhone Sound Problems
- 1. YouTube no Sound
- 2. iPhone Microphone Problem
- 3. Test iPhone Microphone
- 4. Headphones No Sound from iPhone
- 5. No Sound on iPhone Game
- 6. iPhone Sound Not Working
- 7. iPhone Screen Recording no Sound
- iPhone Calling Problems
- 1. iPhone No Sound on Calls
- 2. Screen Goes Black During Call
- 3. iPhone Recent Calls Not Showing
- 4. iPhone Dropping Calls Issue
- 5. iPhone Calling Problem
- iPhone Camera Problems
- 1. iPhone Camera Black
- 2. iPhone Camera Blurry
- 3. iPhone Camera Not Working
- 4. iPhone Front Camera Not Working
- 5. TrueDepth Camera Not Working
- 6.Out-of-Focus Photos on iPhone 15
- iPhone Network Problems
- 1. Airpods Won't Connect to iPhone
- 2. iPhone Disabled Connect to iTunes
- 3. iPhone Not Syncing Problems
- 4. iPhone Internet Not Working
- 5. iPhone Keep Disconnecting from Wifi
- 6. iPhone WIFI Not Working
- 7. PC Not Recognizing iPhone
- 8. iPhone Stuck on Connect to iTunes
- 9. iPhone Not Showing up in iTunes
- 10. iTunes Not Detecting Your iPhone
- 11. iPhone Bluetooth Disconnect
- 12.Apple CarPlay Keeps Disconnecting
- iPhone Screen Problems
- 1. White Spots in iPhone Screen
- 2. iPhone Bleeding Screen
- 3. Turn Off iPhone When Frozen
- 4. Fix Orange Dot on iPhone
- 5. iPhone Green Screen Flickering
- 6. Green Lines in iPhone Screen
- Other iPhone Problems
- ● Manage/transfer/recover data
- ● Unlock screen/activate/FRP lock
- ● Fix most iOS and Android issues
- Free Download Free Download Free Download

 > How-to > Phone Repair Solutions > How To Fix iPhone Green Screen of Death Issue [iOS 27 Included!]

James Davis
staff Editor
Generally rated4.5(105participated)