8 Ways to Fix iPad Touch Screen Not Working

Feb 11, 2026 • Filed to: Phone Repair Solutions • Proven solutions
For unknown reasons, many Apple users reported that the iPad touch screen not working. They were perplexed because they had no idea why this situation occurred on their iPad. And many victims were looking for practical solutions to their problems.
You should not be worried if you have faced the same issue. This article will guide you to analyze the most common causes of touchscreen failure and how to avoid them. Furthermore, we will provide you with complete guides to resolve your issue.

Part 1: Why is My iPad Touch Screen Not Responding to Touch?
- The iPad screen is dirty.
If there is dirt on the screen, it will not detect your finger or other contact. Therefore, you should remove the dirt with a towel. Furthermore, before pressing the screen, take off your gloves and sanitize your hand. This suggestion appears simple, yet it is possible to solve your situation.
- Software issues
Whether you believe it, the software is highly delicate and sensitive. They could fail with a minuscule hiccup. A software bug may be causing problems with another of your mobile applications or the tablet's background activities. If there is an issue with your software, your iPad touchscreen may stop operating.
- Operating systems problems
One of the causes of your iPad touchscreen failing is an issue with the iOS system. It is a severe problem that many Apple users have when using previous versions of the iOS operating system, particularly iOS 11. Your iPad will be more vulnerable to this risk if you continue to utilize an older version of the iOS operating system.
Furthermore, the iOS system can be infiltrated or attacked for unknown causes. You will need to use an iOS repair program to resolve the issue if this is the case. When finished, your iPad should resume regular operation.
- iPad is too hot or too cold
Protecting your device in terms of where it is kept must be addressed. Exposing your phone to extreme temperatures may cause the same issue with your iPad's touch screen.
Part 2: 8 Easy Methods to Fix iPad Touch Screen Not Working
1.Clean your iPad screen
Ensuring your screen is clean should be one of the first things to mind. If there is dirt on the screen, it will not detect your finger or other contact. As a result, you should clear up the dirt using a clean towel.
Additionally, before pushing the screen, remove your gloves and sanitize your hands. This solution appears straightforward, yet it can solve your problem. Nothing can be questioned.

2.Disconnect charging accessories
Another possibility is that your charger is delivering or consuming excessive power. Some chargers also function as data connectors, which may impact the quality of your connection.
If your iPad's touch screen does not work while charging, remove the USB cables or accessories and inspect them. If your iPad's touchscreen works appropriately after this, replace the accessories.
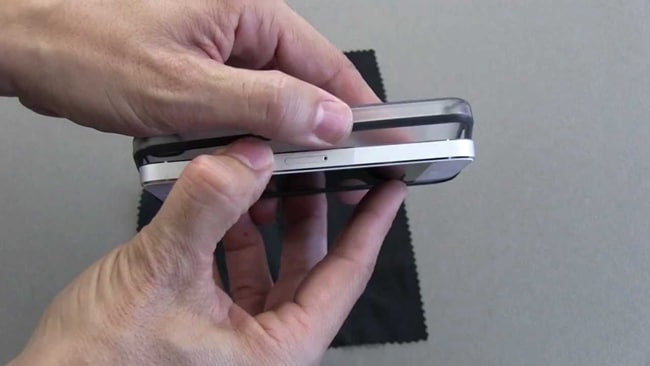
3.Take off your screen protector
Assume that the screen protector or case has peeled or broken after a lengthy period of use or that there is any improper contact between the screen protector and the screen. In that circumstance, the iPad screen not responding to touch properly.
You should remove your screen protector if it is damaged. Removing an ill-fitting cover or screen protector may address touchscreen troubles in rare cases.
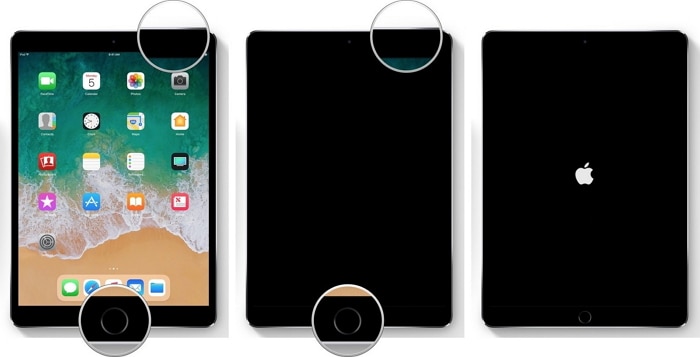
4.Force restart iPad
One easy-quick DIY method is to force restart any gadget when it hangs. It could also be helpful on your iPad. If the iPad screen not responding to touch, you can force restart it to address the problem. Here are the precise steps for restarting your iPad.
- To force restart an iPad using the Home button, press and hold the Power and Home buttons until you see the Apple logo.
- To restart an iPad without the Home button, push and release the Volume Up button, then the Volume Down button, and finally, the Power button until you see the Apple logo on the screen.
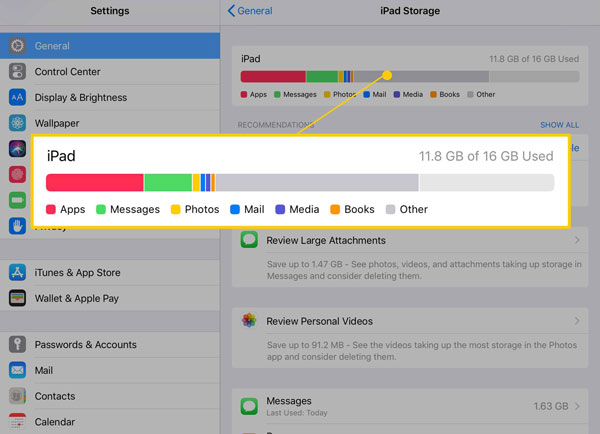
5.Free up its storage
Because the iPad requires enough capacity to function correctly, you must free up some space on the iPad. Go to Settings > General > Storage to free up some space. If the storage is insufficient, you must erase the programs you have used. You can easily remove and delete media files and images on your iPad and the issue iPad screen not responding to touch will be solved.
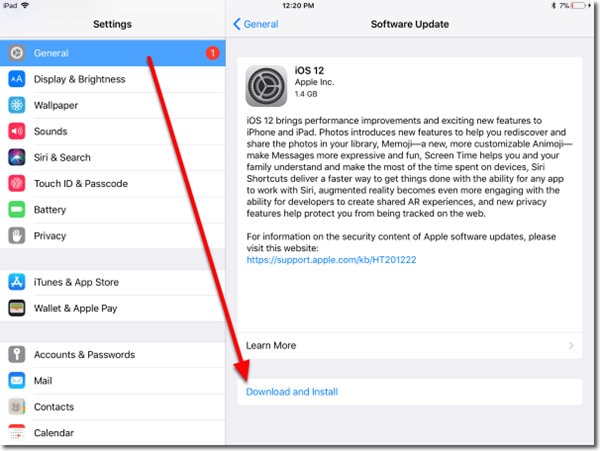
6.Update the iOS system
Because technical improvements are documented regularly, you must ensure that your system is up to date. Some iOS system issues can only be resolved if your iPad's iOS system is upgraded. Try updating your system, and you can find a solution.
Here are the steps for updating your iPad's iOS system to solve iPad not responding to touch.
Launch the Settings app—Tap General, followed by Software Update. Suppose an update is available; select Download and Install.
7.Seek Apple support for help
If you've exhausted your previous options and still feel stuck, you should seek professional help. If your iPad not responding to touch in some spots, it's most likely because a complicated item broke it. You should contact Apple Support to determine whether your iPad has a hardware problem.
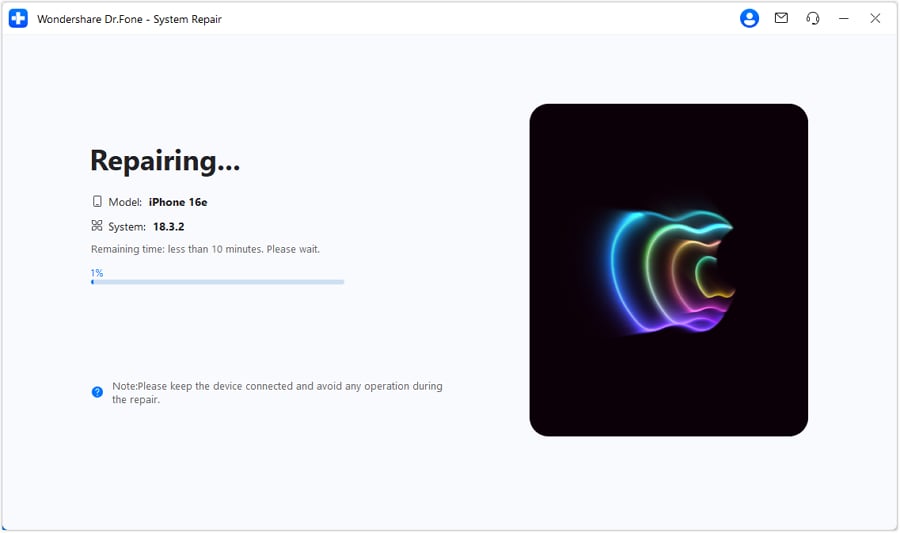
8.Dr.Fone-System Repair
In most cases, a factory reset will resolve the iPad touchscreen's unresponsiveness. However, the iPad touchscreen is still not working after a hard reset. In that circumstance, your iPad may have a very severe iOS system fault. Wondershare Dr.Fone-System Repair, a professional iOS system repair solution, would come in handy to solve all iOS system problems without data loss.
It can resolve over 150 iOS difficulties, such as the iPhone's inability to update apps and the iPad's inability to charge. Dr.Fone can resolve this issue in seconds without the time-consuming process of backing up.
Steps:
Step 1: Start Dr.Fone after it has been successfully installed. On the site, select "System Repair" from the drop-down menu.

Step 2: After that, you must specify the type of smartphone you are repairing. Choose "iOS" because iPhones are being dealt with.

Step 3: You will be taken to a new screen where you must pick "iOS Repair" to repair the iPhone's system faults.

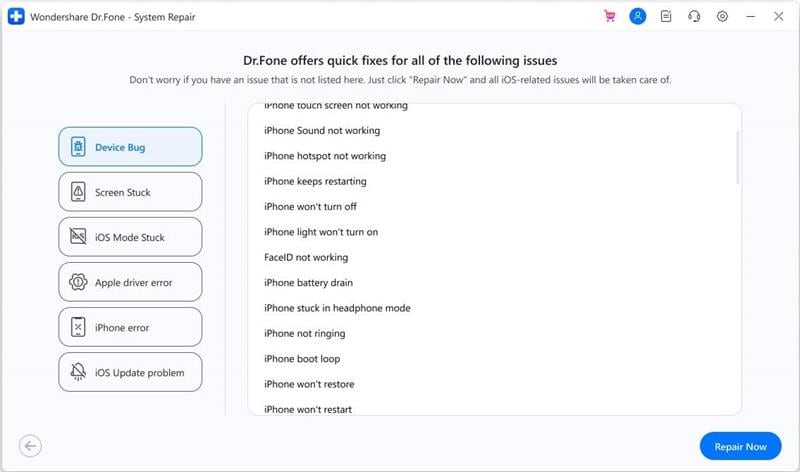
Step 4: Even if your iOS system problem isn't listed, you may select "Repair Now" and start the recovery process.
Step 5: To begin with the iOS repair, choose "Standard Repair" from the two options. This mode will attempt to fix your iOS device while protecting all data from loss.

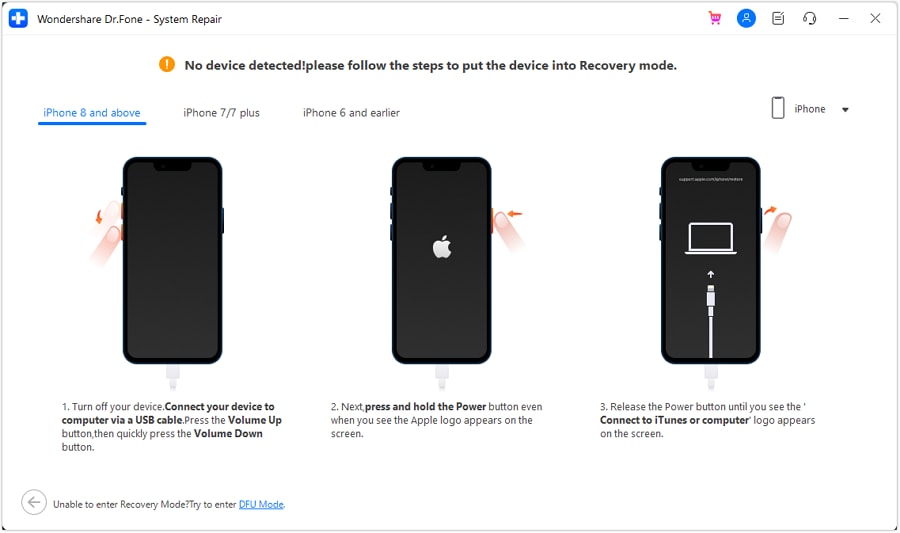
Step 6: You must boot your iOS device into Recovery Mode. You must first trust the computer to complete this process. To do so:
Connect the device to the computer using a USB cable and enter the password for the lock screen.
Tap the "Trust" option that appears in the pop-up window.
Following successful coverage, click "Enter Recovery Mode" to proceed. If your device is unresponsive or performing strangely, select the "Guide to Recovery Mode" option.

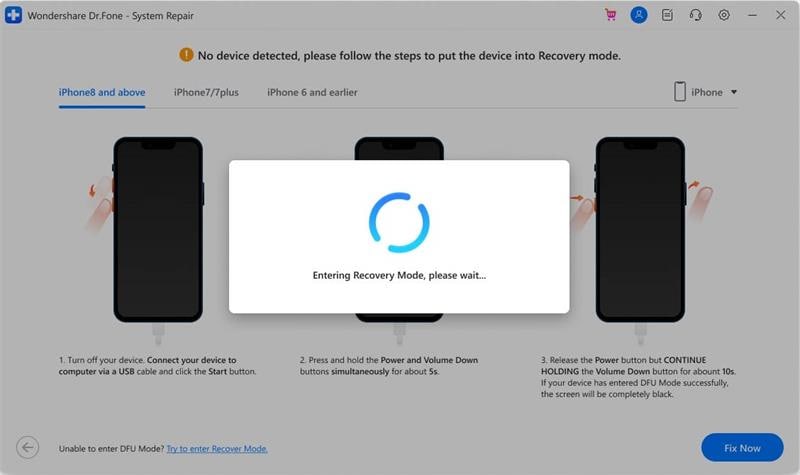
Step 7: Depending on your model, follow the on-screen instructions to boot your device into Recovery Mode.
Step 8: The platform recognizes the device as soon as it enters Recovery Mode.
Step 9: The following window displays a list of different iOS firmware that can be installed on the iOS device. Click "Download" to begin the installation process for any of them.

Step 10: The iOS firmware begins to download and is displayed in the progress bar across the PC.

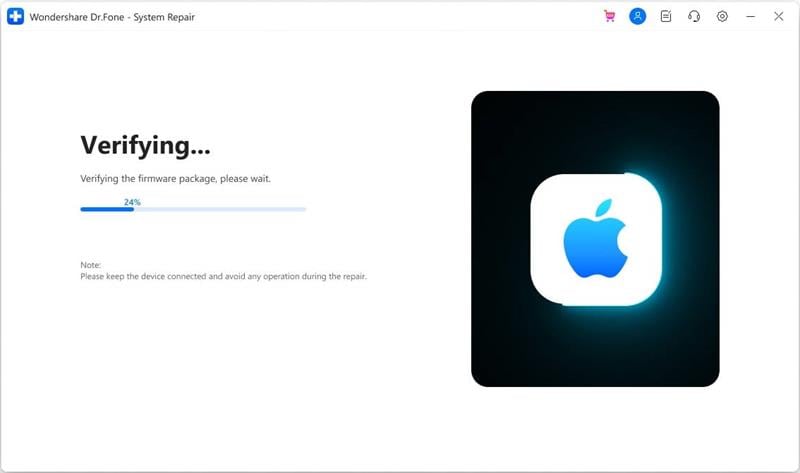
Step 11: After downloading the firmware, the platform validates it before installing it on iOS to avoid difficulties.
Step 12: After verifying the iOS firmware, select the "Repair Now" option to begin the iOS system recovery process. A progress bar depicts the repair procedure on the following screen.
Step 13: When you're finished, the prompt window displays the successful completion of the process. To finish the execution, press the "Done" button.

Conclusion
Aside from being intelligent, iPads are among the most expensive gadgets that provide excellent value for money. It's easy to get fired up over an iPad touch screen not working, and it may not be enjoyable. However, this does not mean you should throw it away.
Here are all of the best iPad touchscreen repair tips. You can choose which tips to follow based on your situation. After reading the steps above, you may always use Wondershare Dr.Fone-System Repair if you still need to learn how to solve iPad not responding to touch.


iPad Issues
- iPad Beta Install
- iPad DFU Mode
- 1. Backup iPad in DFU Mode
- 2. Put iPad in and get out of DFU mode
- 3. Restore iPad from DFU mode
- 4. Get iPad In and Out of DFU Mode
- iPad Recovery Mode
- 1. iPad Recovery Mode Not Working
- 2. Restore iPad Stuck in Recovery Mode
- 3. Put iPad in Recovery Mode
- iPad Update/Downgrade
- 1. Downgrade iPadOS 16 Beta to 15
- 2. Fix iPad Stuck on Preparing Update
- 3. Fix iPad Stuck On Update Requested
- 4. Fix iPad stuck at Verifying Update
- 5. Fix iPad not updating
- iPad Common Problems
- 1. 5 Ways to Fix iPad Boot Loop
- 2. Fix Poor Wi-Fi Signal on iPad
- 3. Fix iPad crashes
- 4. Fix Wifi keeps dropping on iPad
- 5. Fix iPad Not Connecting to Hotspot
- 6. Fix iPad Overheating
- 7. Fix Common iPad Problems Easily
- 8. Fix iPad Keeps Restarting
- 9. Fix iPad Stuck in Headphone Mode
- 10. Fix iPad Won't Connect to Wi-Fi
- 11.Solutions for iPad Won't Rotate
- 12.Solutions for iPad Won't Turn Off
- 13.Fix My iPad Won't Turn On
- 14.Ways to Speed Up the Slow iPad
- 15.Fix iPad Won't Sync with iTunes
- 16.Fixe Ghost Typing and False Touch
- 17.Repair iPad Touch ID Not Working
- 18.Fix iPad Keeps Freezing
- 19.Fix Disabled iPad
- iPad App Problems
- 1. Fix iPad Sound Not Working
- 2. Fix Wallpaper not Displaying
- 3. 12 Fixes for Apps Not Downloading
- 4. Fix All iPad Email Problems
- 5. Fixe iPad No Sound in Games
- 6. Ways to Fix No Sound on iPad
- 7. Fix iPad Not Receiving Emails
- 8. Fixe Safari Crashing on iPads
- 9. Fix YouTube Not Working on iPad
- 10. Force Quit Frozen Apps On iPad
- 11.Fix 'Cannot Connect to App Store'
- iPad Button Problems
- 1. Fix iPad Home Button Not Working
- 2. Fix iPad Power Button Not Working
- 3. Fixes for iPad Volume Button Stuck
- iPad Charging Problems
- 1. Fix iOS 16 Battery Drain Issues
- 2. Fixe iPad Battery Draining Fast
- 3. Ways to Speed Up iPad Charging!
- 4. Fixes for iPad Not Charging
- 5. Fix IPad Not Charging
- iPad Keyboard Problems
- 1. Fixe iPad Keyboard Not Working
- 2. Fix Keyboard Trackpad Not Working
- 3. Smart Keyboard Folio VS Magic Keyboard
- iPad Screen Problems


James Davis
staff Editor
Generally rated4.5(105participated)