
iPad Stuck in Recovery Mode? How to Get It Out Safely

Sep 24, 2026 • Filed to: Phone Repair Solutions • Proven solutions
 TL;DR:
- If the iPad is only temporarily frozen in Recovery Mode, a force restart is the fastest first step and usually does not erase data.
- If a force restart does not work, connect the iPad to a computer and choose Update before Restore. Update tries to reinstall iPadOS without erasing the device.
- Restore, DFU Mode, and advanced repair paths can erase data, so use them only after you understand the backup and data-loss risk.
- If the iPad keeps looping back to Recovery Mode, check the cable, USB port, computer, Finder/Apple Devices/iTunes version, and storage before repeating the process.
- If you only need to exit Recovery Mode but the manual button sequence is difficult, Dr.Fone - System Repair (iOS) provides a guided Enter/Exit Recovery Mode workflow. If the iPad still cannot start normally afterward, you can then consider its system repair options.
Ask AI for a summary
 ChatGPT
 Perplexity
 Gemini
 Claude
 Grok
Grok
Is your iPad stuck in Recovery Mode or restore mode and refusing to restart normally? Start with the lowest-risk fixes first: force restart the iPad, then connect it to a computer and choose Update in Finder, Apple Devices, or iTunes. Use Restore or DFU Mode only when the safer options fail, because those routes can erase the iPad.
This guide explains why the problem happens, how to get an iPad out of Recovery Mode step by step, and when Dr.Fone - System Repair (iOS) can be a useful optional path for guided iOS repair or entering/exiting Recovery Mode.
- Part 1. Why is the iPad Stuck in Recovery Mode?
- Part 2. Best Ways to Fix iPad Stuck in Recovery Mode
- Quick Method Selector
- Way 1. Force Restart Your iPad
- Way 2. Update iPad Using Finder, Apple Devices, or iTunes
- Way 3. Restore iPad via Finder, Apple Devices, or iTunes
- Way 4. Restore iPad through DFU Mode
- Way 5. Manually Exit iPad from Recovery Mode
- Way 6. Exit iPad Recovery Mode in One Click with Dr.Fone

- Part 3. Optional: Repair iPadOS Issues with Dr.Fone
- Part 4. The Bottom Line
Part 1. Why is the iPad Stuck in Recovery Mode?
An iPad can stay on the Recovery Mode screen when iPadOS cannot finish an update, restore, or startup process. The cause is usually software-related, but a bad cable, unstable connection, or interrupted download can keep the iPad cycling back to the same screen.
1-1. Interrupted iPadOS update or restore
If the update download fails, the USB connection drops, or the restore process is interrupted, the iPad may remain in Recovery Mode instead of completing startup.
1-2. Outdated Finder, Apple Devices, or iTunes
Older computer software may fail to detect the iPad or reinstall iPadOS correctly. Update macOS Finder, the Apple Devices app on Windows, or iTunes before repeating the recovery process.
1-3. Low storage or system file problems
Limited storage and corrupted system files can make an update fail and leave the iPad locked in Recovery Mode. If you regain access, free storage before installing another iPadOS update.
1-4. Cable, USB port, or computer detection issues
A damaged cable or unreliable USB port can stop the computer from completing Update or Restore. Try another Apple-certified cable, another USB port, or another trusted computer if the iPad is not detected.
1-5. Failed jailbreak or unsupported modification
A failed jailbreak or unsupported system change can also trigger a recovery loop. In that case, standard Update may not be enough, and Restore, DFU Mode, or a professional repair path may be required.
Once you know the likely cause, use the method selector below to choose the safest next step for getting the iPad out of Recovery Mode.
Part 2. Best Ways to Fix iPad Stuck in Recovery Mode
Work through these methods from least destructive to most destructive. Do not jump straight to Restore or DFU Mode unless you already have a recent backup or you accept that the iPad may be erased.
Quick Method Selector
| Situation | Try first | Data risk |
|---|---|---|
| The iPad just entered Recovery Mode after a failed update | Force restart, then Update | Low when Update works |
| The computer detects the iPad and shows Update / Restore | Choose Update first | Update tries to keep data |
| Update fails or the iPad remains locked in Recovery Mode | Restore the iPad | High; Restore erases the iPad |
| Restore fails or the device keeps looping | Use DFU Mode or contact Apple Support | High; backup is strongly recommended |
| You manually entered Recovery Mode and only need to exit it | Manually exit Recovery Mode | Low if no restore is started |
| The button sequence is difficult, or you want a guided way to exit Recovery Mode | Use Dr.Fone to exit Recovery Mode | Low; exiting Recovery Mode itself does not require a restore |
Way 1. Force Restart Your iPad
A force restart is the best first move when the iPad is stuck in Recovery Mode but you have not started a Restore. It does not intentionally erase the iPad; it simply forces the device to restart.
For iPad models without a Home button:
Step 1: Press and quickly release the volume button closest to the top button.
Step 2: Press and quickly release the volume button farthest from the top button.
Step 3: Press and hold the top button until the Apple logo appears, then release it.
For iPad models with a Home button:
Step 1: Press and hold the top button and Home button at the same time.
Step 2: Keep holding both buttons until the Apple logo appears, then release them.

If the iPad restarts normally, unlock it and make a backup before trying another iPadOS update. If it returns to the Recovery Mode screen, continue with the computer-based Update method.
Way 2. Update iPad Using Finder, Apple Devices, or iTunes
If force restart does not get the iPad out of Recovery Mode, connect it to a computer and choose Update first. Update attempts to reinstall iPadOS while keeping your data, which makes it the safer choice before Restore.
Guide to update an iPad in Recovery Mode:
Step 1: Update your computer software. On Mac, use Finder. On Windows, use the Apple Devices app or the latest iTunes version if Apple Devices is not available.
Step 2: Connect the iPad to the computer with a reliable USB cable. Keep the iPad connected during the full download and installation process.
Step 3: If the computer shows a message that the iPad needs to be updated or restored, choose Update.
Step 4: Wait for the computer to download and reinstall iPadOS. If the download takes a long time and the iPad exits Recovery Mode, keep the download running, then repeat the Recovery Mode connection step when needed.

If Update completes, the iPad should restart without erasing your content. If Update fails or the same Recovery Mode screen returns, move to Restore only after considering the data-loss risk.
Way 3. Restore iPad via Finder, Apple Devices, or iTunes
Restore is the next step when Update fails, the iPad remains locked in Recovery Mode, or the computer cannot reinstall iPadOS successfully. This method erases the iPad and installs a fresh copy of iPadOS, so use it only if you have a backup or you accept that unsaved data may be lost.
Step 1: Open Finder, Apple Devices, or iTunes and connect the iPad to the computer.
Step 2: When the recovery prompt appears, choose Restore instead of Update.
Step 3: Confirm the restore action and keep the iPad connected until the process finishes.
Step 4: After the iPad restarts, set it up again and restore your data from an iCloud, Finder, or iTunes backup if one is available.

If Restore cannot finish, try another cable, port, or computer before assuming the iPad has a hardware problem.
Way 4. Restore iPad through DFU Mode
DFU Mode is an advanced recovery state used when normal Recovery Mode troubleshooting fails. It can help when an iPad is stuck in a recovery loop, but it also involves a full restore and can erase data. Use it as a later option, not the first fix.
iPad with Face ID or no Home button:
Step 1: Connect the iPad to a computer and open Finder, Apple Devices, or iTunes.
Step 2: Press and quickly release the volume button closest to the top button, then press and quickly release the volume button farthest from the top button.
Step 3: Hold the top button until the screen goes black.
Step 4: Keep holding the top button and hold the volume button farthest from the top button for about 5 seconds.
Step 5: Release the top button while continuing to hold the volume button for several more seconds. If the screen stays black and the computer detects a device in recovery, follow the restore prompt.
iPad with a Home button:
Step 1: Connect the iPad to the computer and open Finder, Apple Devices, or iTunes.
Step 2: Hold the top button and Home button together until the screen turns black.
Step 3: Release the top button but keep holding the Home button until the computer detects the iPad.

If DFU Mode still fails, the problem may involve the cable, computer, port, security software, or hardware. At that point, contact Apple Support or a trusted repair provider.
Way 5. Manually Exit iPad from Recovery Mode
If you manually put the iPad into Recovery Mode and have not started an update or restore, you can try to exit Recovery Mode with the same force-restart button sequence. This is especially useful when you only need to cancel Recovery Mode and restart the iPad normally.
For iPad without a Home button: press and quickly release the volume button closest to the top button, press and quickly release the other volume button, then hold the top button until the Apple logo appears.
For iPad with a Home button: press and hold the top button and Home button together until the Apple logo appears.

If the button sequence is difficult or the device keeps returning to Recovery Mode, Dr.Fone - System Repair (iOS) can provide a guided Recovery Mode workflow and broader iOS system repair options. Use the tool as an optional helper, and still choose Update, Restore, or repair mode according to your data-risk situation.
Way 6. Exit iPad Recovery Mode in One Click with Dr.Fone
If pressing the iPad buttons in the correct sequence is difficult, you can also use Dr.Fone - System Repair (iOS) to exit Recovery Mode through a guided desktop workflow. Its dedicated Enter/Exit Recovery Mode feature lets you trigger the exit process without manually repeating the button combination.
This option is especially useful when you intentionally entered Recovery Mode but now want to return the iPad to its normal startup state. If the iPad still cannot start after exiting Recovery Mode, you can continue with the system repair options covered in Part 3 below.
 safe & secure
4,624,541 people have downloaded it
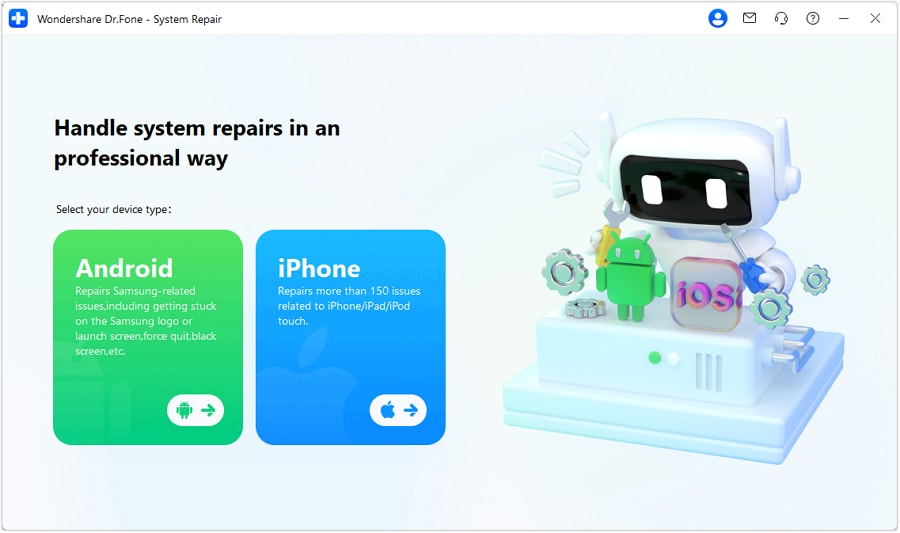
Step 1: Launch Dr.Fone on your computer. From the left panel, open Toolbox, and then select System Repair.

Step 2: Connect the iPad to the computer with a USB cable. When Dr.Fone asks you to select the device type, choose iPhone to continue with the iOS/iPadOS tools.
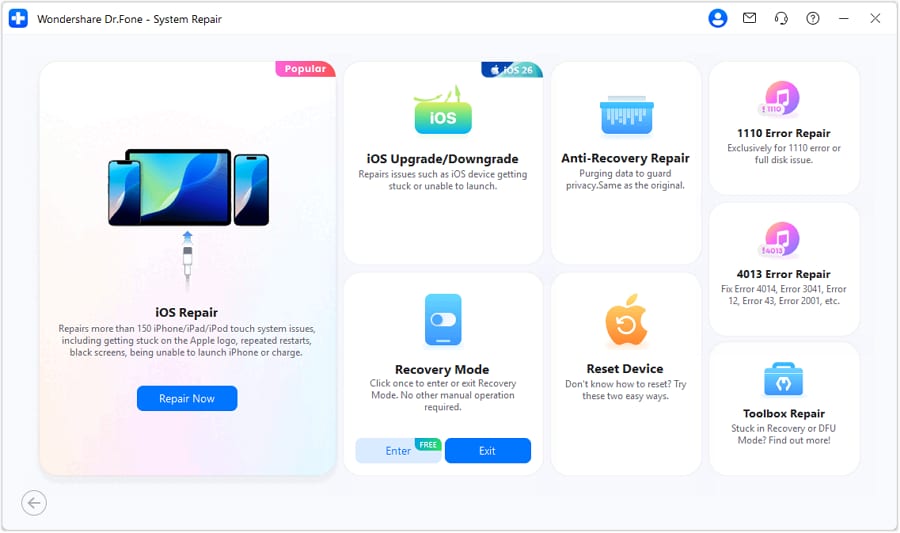
Step 3: On the next screen, select Enter/Exit Recovery Mode.
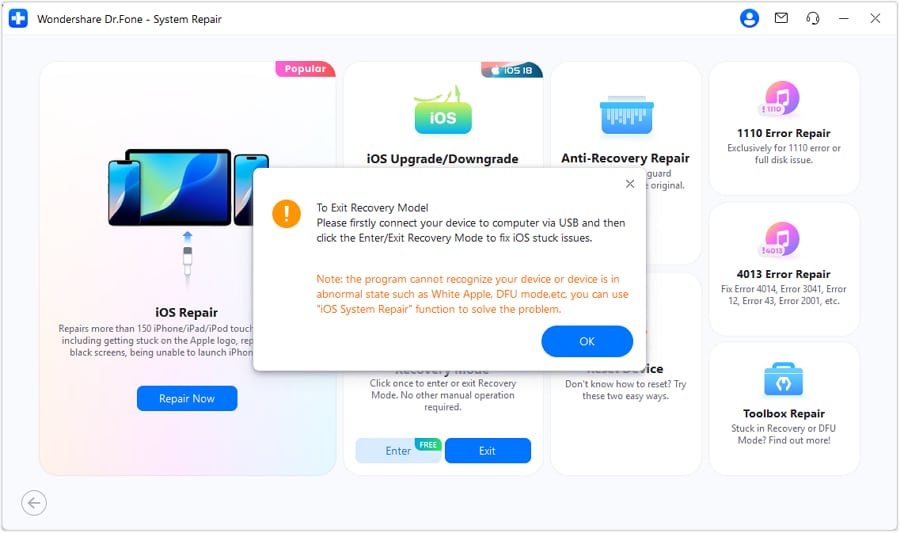
Step 4: Choose Exit Recovery Mode, click Exit, and then click OK to start the process. Keep the iPad connected while Dr.Fone performs the operation.
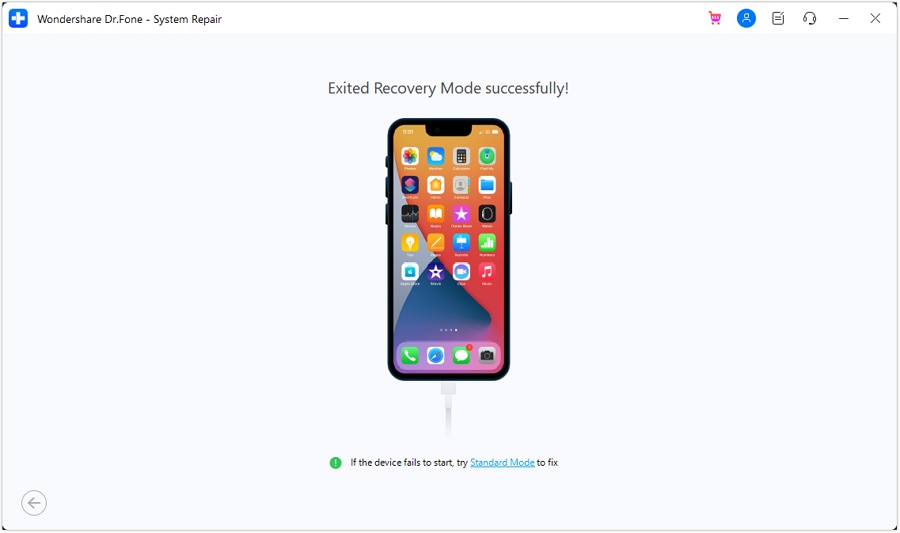
Step 5: When Dr.Fone shows that the process is complete, check whether the iPad restarts normally. If the device still cannot start, you can continue with Standard Repair to troubleshoot the underlying iPadOS issue.
For more details, see the official Dr.Fone guide to exiting Recovery Mode.
Part 3. Optional: Repair iPadOS Issues with Dr.Fone
When the iPad keeps returning to Recovery Mode after manual steps, a guided repair tool can reduce the number of button combinations and repeated computer prompts you need to manage. Dr.Fone - System Repair (iOS) is designed for common iOS and iPadOS system issues such as recovery mode loops, update failures, boot loops, Apple logo screens, black screens, and similar startup problems.
Use Standard Repair first when it is available for your device and issue. More advanced repair paths may erase data, so read each on-screen warning carefully before continuing. Dr.Fone can also help with related tasks such as iOS downgrade, iOS/iPadOS update, 1110 error repair, and boot loop troubleshooting.

Dr.Fone - System Repair (iOS)
Repair common iOS and iPadOS system issues, including recovery mode loops.
- Use Standard Repair first for common iOS system issues when you want a lower-risk repair path.
- Fix various iOS system issues such as stuck in recovery mode, white Apple logo, black screen, and boot loop problems.
- Upgrade and downgrade iOS without relying only on iTunes.
- Support iPhone, iPad, and iPod touch system repair workflows on Windows and Mac.


Steps to Repair iPadOS Issues with Dr.Fone
Step 1: Visit the Dr.Fone official website, download the desktop program, and install it on your Windows PC or Mac.
Step 2: Connect the iPad to the computer with a USB cable. Launch Dr.Fone and choose System Repair from the toolbox.
Step 3: Select iPhone as the device category, then choose iOS Repair to continue with iOS/iPadOS system repair.
Step 4: Choose Standard Repair Mode first when it fits your situation, then follow the on-screen instructions to put the iPad into the required mode.
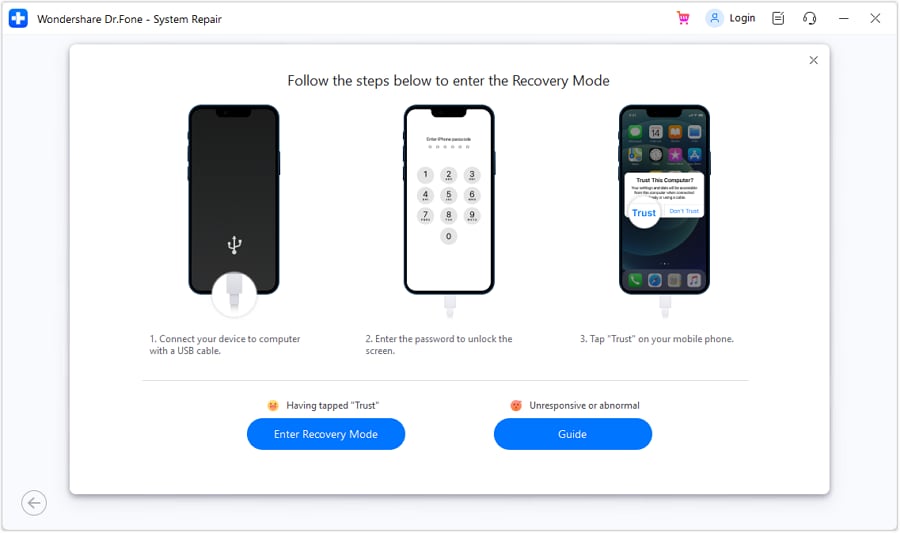
Step 5: Download the matching firmware package inside Dr.Fone, then click Repair Now.
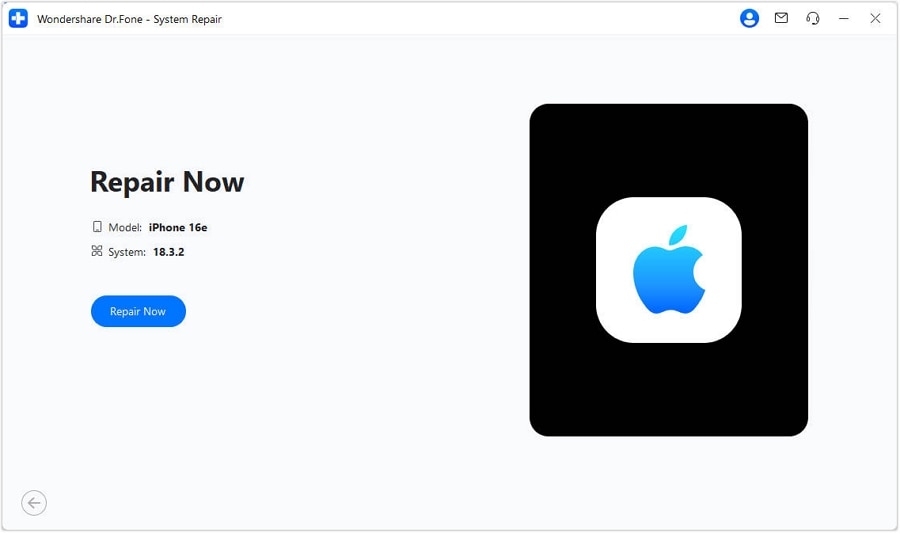
Step 6: Keep the iPad connected until the repair finishes, then click Done and check whether the device starts normally.
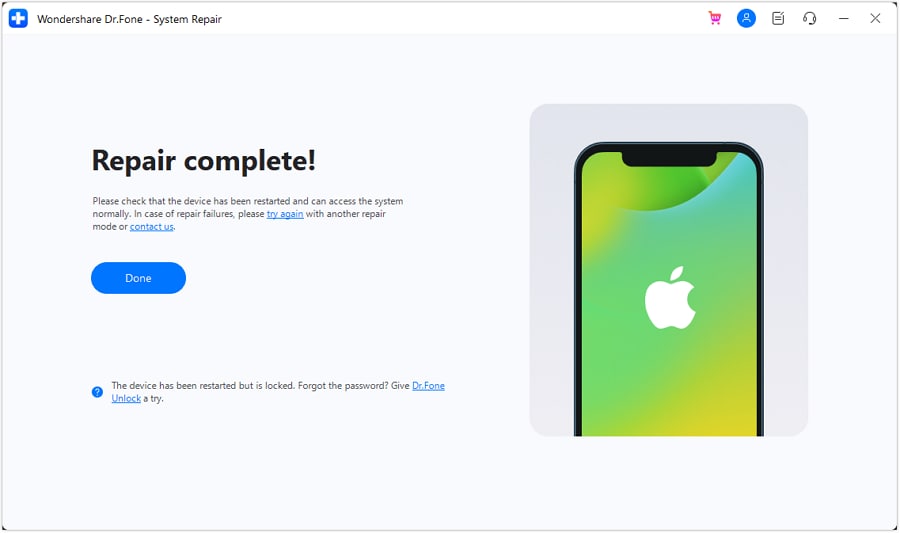
If the device is still stuck after Standard Repair, read the warnings carefully before using a more advanced repair path, because advanced repair can erase device data.
Part 4. The Bottom Line
When an iPad is stuck in Recovery Mode, start with a force restart and an Update through Finder, Apple Devices, or iTunes. These are the safest first steps. Use Restore, DFU Mode, or advanced repair only when the iPad still will not start normally and you understand the data-loss risk.
For a guided repair workflow, Dr.Fone - System Repair (iOS) can help with common iOS/iPadOS system issues and Recovery Mode-related workflows on Windows and Mac.
safe & secure4,624,541 people have downloaded it
FAQs
 What is iPad Recovery Mode?When should I use iPad Recovery Mode?What if my iPad is disabled, locked, or won't enter Recovery Mode?
You Might Also Like

iPad Issues
- iPad Beta Install
- iPad DFU Mode
- 1. Backup iPad in DFU Mode
- 2. Put iPad in and get out of DFU mode
- 3. Restore iPad from DFU mode
- 4. Get iPad In and Out of DFU Mode
- iPad Recovery Mode
- 1. iPad Recovery Mode Not Working
- 2. Restore iPad Stuck in Recovery Mode
- 3. Put iPad in Recovery Mode
- iPad Update/Downgrade
- 1. Downgrade iPadOS 16 Beta to 15
- 2. Fix iPad Stuck on Preparing Update
- 3. Fix iPad Stuck On Update Requested
- 4. Fix iPad stuck at Verifying Update
- 5. Fix iPad not updating
- iPad Common Problems
- 1. 5 Ways to Fix iPad Boot Loop
- 2. Fix Poor Wi-Fi Signal on iPad
- 3. Fix iPad crashes
- 4. Fix Wifi keeps dropping on iPad
- 5. Fix iPad Not Connecting to Hotspot
- 6. Fix iPad Overheating
- 7. Fix Common iPad Problems Easily
- 8. Fix iPad Keeps Restarting
- 9. Fix iPad Stuck in Headphone Mode
- 10. Fix iPad Won't Connect to Wi-Fi
- 11.Solutions for iPad Won't Rotate
- 12.Solutions for iPad Won't Turn Off
- 13.Fix My iPad Won't Turn On
- 14.Ways to Speed Up the Slow iPad
- 15.Fix iPad Won't Sync with iTunes
- 16.Fixe Ghost Typing and False Touch
- 17.Repair iPad Touch ID Not Working
- 18.Fix iPad Keeps Freezing
- 19.Fix Disabled iPad
- iPad App Problems
- 1. Fix iPad Sound Not Working
- 2. Fix Wallpaper not Displaying
- 3. 12 Fixes for Apps Not Downloading
- 4. Fix All iPad Email Problems
- 5. Fixe iPad No Sound in Games
- 6. Ways to Fix No Sound on iPad
- 7. Fix iPad Not Receiving Emails
- 8. Fixe Safari Crashing on iPads
- 9. Fix YouTube Not Working on iPad
- 10. Force Quit Frozen Apps On iPad
- 11.Fix 'Cannot Connect to App Store'
- iPad Button Problems
- 1. Fix iPad Home Button Not Working
- 2. Fix iPad Power Button Not Working
- 3. Fixes for iPad Volume Button Stuck
- iPad Charging Problems
- 1. Fix iOS 16 Battery Drain Issues
- 2. Fixe iPad Battery Draining Fast
- 3. Ways to Speed Up iPad Charging!
- 4. Fixes for iPad Not Charging
- 5. Fix IPad Not Charging
- iPad Keyboard Problems
- 1. Fixe iPad Keyboard Not Working
- 2. Fix Keyboard Trackpad Not Working
- 3. Smart Keyboard Folio VS Magic Keyboard
- iPad Screen Problems
- ● Manage/transfer/recover data
- ● Unlock screen/activate/FRP lock
- ● Fix most iOS and Android issues
- Free Download Free Download Free Download




James Davis
staff Editor
Generally rated4.5(105participated)