Effective Ways to Fix iPad Volume Button Stuck or Not Working
Oct 23, 2025 • Filed to: Phone Repair Solutions • Proven solutions
In search of a tutorial guide that explains how to fix a stuck or non-responding iPad volume button effectively? Here's the right spot!
The iPad volume button is a crucial component that allows users to effortlessly control the device's audio output, providing an optimal listening experience. However, it's not uncommon for the volume button to malfunction, leaving users frustrated when it becomes unresponsive or gets stuck. There are several underlying reasons that can cause an iPad volume button to stick, including software glitches, improper handling or usage, dirt or debris accumulation, and hardware damage.
Regardless of the reason, fixing this issue is easy when you have the right guide at hand. As experts in the tech industry, we’ve compiled one for you here in this article. Check it out!
Part 1. How to Adjust the iPad Volume if the Volume Button is Stuck or Not Working
Here we introduce the temporary solutions to adjust an iPad volume when the volume button gets stuck or does not work.
1. Use The Volume Slider
The volume slider is a built-in feature integrated into Apple devices including iPads to help users adjust the volumes. To use this option, follow the stepwise guide below:
Step 1. Open the 'Setting' > put ‘Volume Limit’ in the search bar. You will see the page as below on your screen:
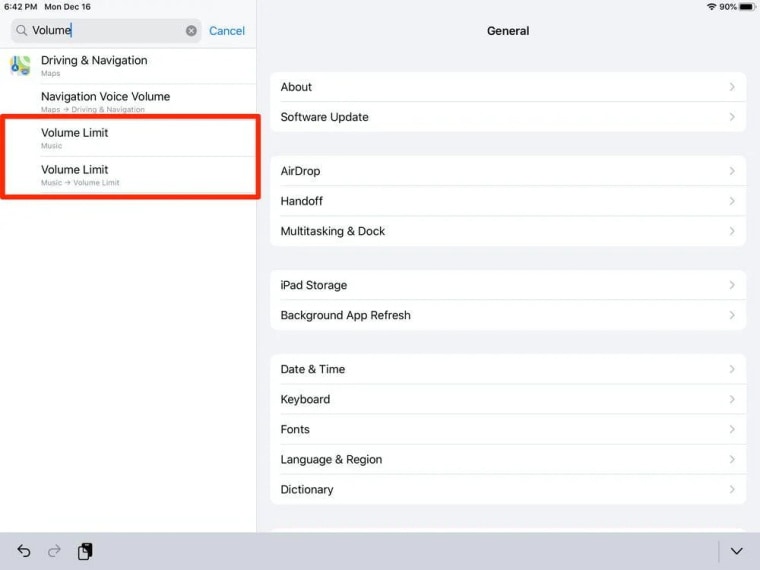
Step 2. Next, click either of the two Volume Limit icons. Once that's done, you have the interface below:
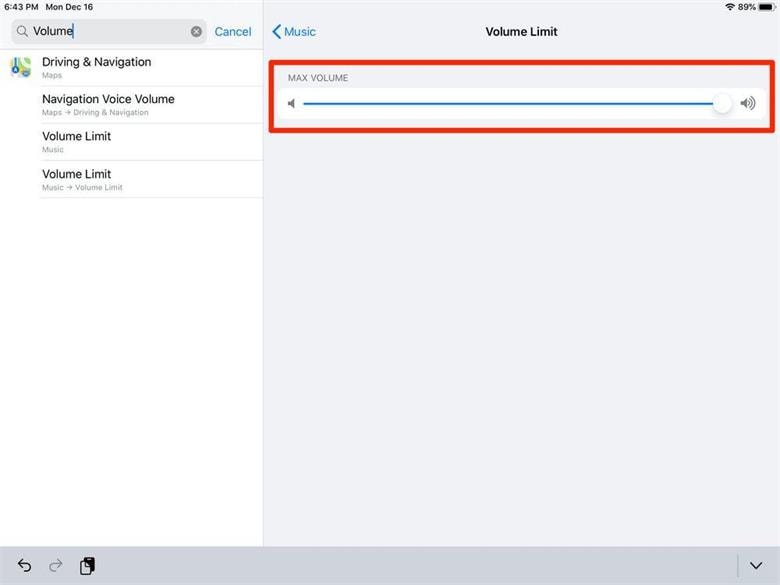
Now, move the volume slider button right or left to raise or lower the device volume respectively.
📱 iPhone Frozen? Fix It in 3 Steps – No Data Loss!
Struggling with a frozen iPhone screen? 🤔 Our guide covers 6 common causes, step-by-step fixes for all models (iPhone 6s to iPhone 17), and safe data recovery. 98.6% success rate! ✨
2. Use Assistive Touch
Assistive touch is another incredible built-in feature you can use to adjust the volume on your iPad in place of the volume slider.
Find below, the detailed stepwise guide you need to follow to use this feature to adjust your iPad volume:
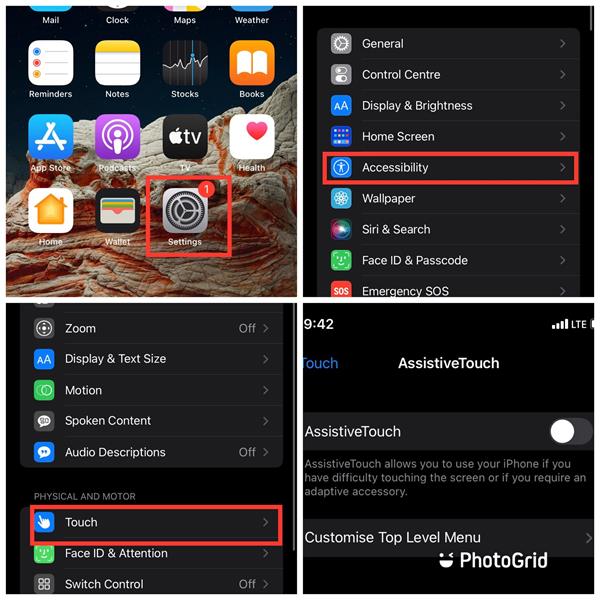
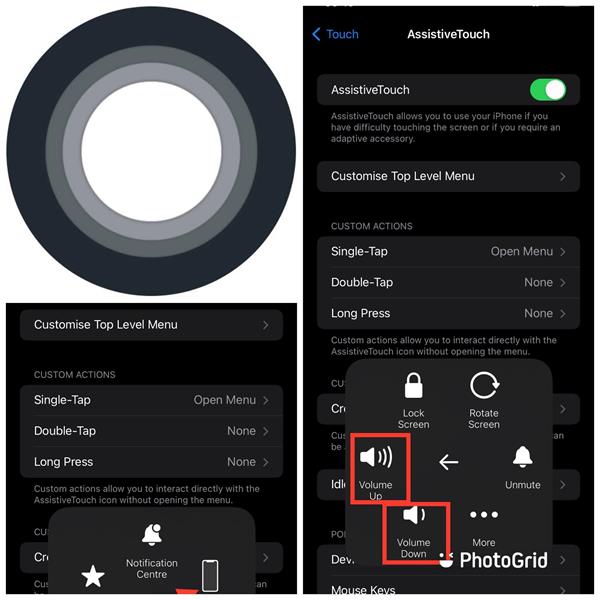
Step 1: Open ‘Settings’ > ‘Accessibility’ > ‘Touch’ > ‘AssistiveTouch’
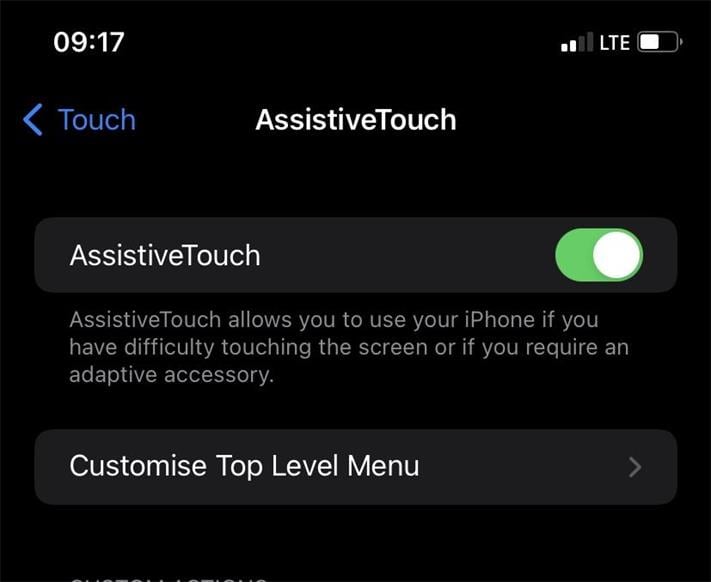
Step 2: Next, toggle the AssistiveTouch feature right to activate it just as shown below:
Step 3: Now locate and click on the AssistiveTouch feature (a circular icon), select ‘Device’, and a new feature showing Volume Up and Volume Down will pop up.
Adjusting your iPad volume using the two techniques introduced above is a temporal way to resolve the iPad volume button stuck issue. In cases where the buttons are completely stuck or non-responding at all, a permanent solution must be provided. And this leads us to:
Part 2. How to Permanently Fix iPad Volume Button Stuck or Not Working?
Here we discuss why your iPad volume button could be stuck or doesn't respond when you punch it. Also, a permanent solution would be introduced.
2.1 Stuck iPad Volume Button
If you're one of the many iPad users who utilize protective accessories such as cases or pouches to safeguard your device from external damage, scratches, or drops, you may occasionally encounter a stuck volume button. This common issue can be easily resolved, as it's often caused by the accessory itself, rather than a software glitch or hardware malfunction. To troubleshoot, simply remove the obstructing accessory, such as a bulky case or tight-fitting pouch, and test the volume buttons to see if they respond as usual.
Should you still have a stuck volume button after taking off the pouch or case from your iPad, you should consider cleaning the space around volume buttons as you might have dust in there.
2.2 Not Working iPad Volume Button
Experiencing an unresponsive iPad volume button can be frustrating, especially when you've checked that it's not physically stuck or obstructed. In many cases, a non-functional volume button can be attributed to a software-related issue, such as a glitch or bug, rather than a hardware problem. If you're facing this issue, don't panic or worry about incurring repair costs just yet. Fortunately, there are several cost-free DIY (Do It Yourself) solutions that can help you troubleshoot and potentially resolve the problem.
2.2.1 Hard Reset Your iPad
Hard resetting your iPad is one of the easiest and quickest solutions you can use to resolve this type of software-related issue. Follow the stepwise guide:
If your iPad Has Home Button
- Press down the Power button and Home button simultaneously till you notice a black screen with the Apple logo at the center
- Now, release both buttons immediately after you notice the Apple logo
If Your iPad Doesn't Have a Home Button
- Quickly press the Volume Up button, release it, press the Volume down button, release it, and then hold down the Power button until you notice a black screen with the Apple logo at its center.
2.2.2 Update iPadOS System
Updating your iPad operating system is another great way to resolve the non-responding volume button issue you have with your device. To do that, navigate your way to Settings > General > Software Update.
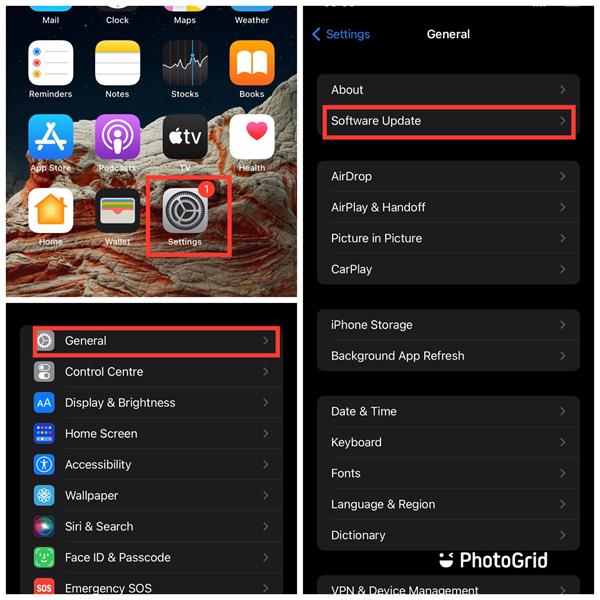
Confirm you are using the latest operating system, if not, try updating. Ensure that you are connected to WiFi before carrying out the update.
2.2.3 Fix System Errors to Get iPad Volume Button Work!

Dr.Fone - System Repair (iOS)
Repair iOS System Errors Without data loss.
- Only fix your iOS to normal, no data loss at all.
- Fix various iOS system issues stuck in recovery mode, white Apple logo, black screen, looping on start, etc.
- Downgrade iOS without iTunes at all.
- Works for all models of iPhone, iPad, and iPod touch.
- Fully compatible with the latest iOS 15.

Here, third-party softwares can fix your iPad volume problem. Countless software is developed for this purpose. However, just a few of them provide that top-notch service you seek, and Dr.Fone - System Repair (iOS) is one.
Dr.Fone is an all-in-one program designed for you to easily resolve any software-related issues you encounter on your device. The program is well-designed with an interactive user interface that makes it easy for both amateurs and professionals to navigate around and works perfectly with all mobile operating systems, whether iOS or Android. Isn't that amazing? Well, that's not all. You can also use Dr.Fone - System Repair (iOS) to fix most system errors without data loss.
Stepwise Guide to Fix System Error to Get Your iPhone Volume to Work Using Dr.Fone - System Repair (iOS)
Find below the set of instructions to fix the system error to get your iPad volume to work using Dr.Fone:
Step 1: On your computer (Win or Mac), visit the official website for Dr.Fone - System Repair (iOS) to download and install the latest version of the software. Or directly click the button below to download it. Launch the software after installation.
Step 2: Next, the interface below will pop up on your screen:

Locate and click on the System Repair tab.
Step 3: Connect your faulty iPad to your computer with the help of a lightning cable. You will see the page below:

Select Standard Mode as your desired software repair option.
Note: Standard Mode repairs your iOS system issues without losing any device data. Advanced Mode on the other hand repairs your iOS system issues and also deletes the device data.
Step 4: Next, confirm your device model details and then click on Start to proceed with firmware download.

Once the download is completed, hit the Fix Now icon to initiate firmware repair on your iPad.
Step 5: Wait a while for Dr.Fone to automatically repair the iPad. Once it's done, check your iPad to confirm the volume problem is resolved.

2.2.4 Put Your iPad in DFU Mode and Restore
DFU, also known as Device Firmware Update, is a popular troubleshooting method often used to restore or reset a device's firmware.
To set your iPad with Face ID to DFU Mode,
- Ensure that you have iTunes or Finder running on your computer. For macOS Catalina and later versions use Finder. However, if you use Windows or macOS Mojave or older versions, iTunes is a better option.
- Switch off your iPad and connect it to a computer (Windows or Mac) using a USB cord
- Hold down the Side button for 3 seconds
- Next, while you are still holding the Side button, hold down the Volume Down. Ensure both keys are held for roughly 10 seconds
- Now release the Side button and still hold down the Volume Down button for additional 5 seconds then release
Your iPad should show a blank screen with a background light to signal it's in DFU Mode. If your iPad doesn't show this, try the process again.
For the iPad with Home Button, here are the steps to get into DFU mode:
- Connect the iPad to the computer, and open iTunes or Finder.
- Press down both the Home button and Lock button for about 8 seconds.
- Release the lock button while keeping holding down the Home button for another 3-5 seconds. Then the iTunes/Finder will alert you that your iPad has been detected in recovery mode.
After your iPad is detected by iTunes/ Finder, you can free restore your iPad.
If you want to exit DFU Mode, Dr.Fone - System Repair (iOS) can help you get out of the DFU mode with one click.
2.2.5 Take your iPad to a local Apple Store to Repair your iPad
If the volume problem persists after employing all the recommended solutions above, you should consider taking your iPad to the nearest Apple Store around you for repair.
Bonus Tip: How to Disable the Volume Key if it is Keeping Volume Up iPad?
Ringtones and sound from notification alerts can be sometimes annoying. Do you want to disable the Volume Key to prevent it from volume up the iPad accidentally? To do that, navigate your way to Settings > Sounds > Change with Buttons. Toggle the switch off to disable it.
Conclusion
With the tutorial guide given above, fixing "iPad volume button stuck or iPad volume button not working" shouldn't be a problem anymore. We’ve introduced the best techniques to tackle the issue, kindly check which is convenient for you and then use it.
iPad Issues
- iPad Beta Install
- iPad DFU Mode
- 1. Backup iPad in DFU Mode
- 2. Put iPad in and get out of DFU mode
- 3. Restore iPad from DFU mode
- 4. Get iPad In and Out of DFU Mode
- iPad Recovery Mode
- 1. iPad Recovery Mode Not Working
- 2. Restore iPad Stuck in Recovery Mode
- 3. Put iPad in Recovery Mode
- iPad Update/Downgrade
- 1. Downgrade iPadOS 16 Beta to 15
- 2. Fix iPad Stuck on Preparing Update
- 3. Fix iPad Stuck On Update Requested
- 4. Fix iPad stuck at Verifying Update
- 5. Fix iPad not updating
- iPad Common Problems
- 1. 5 Ways to Fix iPad Boot Loop
- 2. Fix Poor Wi-Fi Signal on iPad
- 3. Fix iPad crashes
- 4. Fix Wifi keeps dropping on iPad
- 5. Fix iPad Not Connecting to Hotspot
- 6. Fix iPad Overheating
- 7. Fix Common iPad Problems Easily
- 8. Fix iPad Keeps Restarting
- 9. Fix iPad Stuck in Headphone Mode
- 10. Fix iPad Won't Connect to Wi-Fi
- 11.Solutions for iPad Won't Rotate
- 12.Solutions for iPad Won't Turn Off
- 13.Fix My iPad Won't Turn On
- 14.Ways to Speed Up the Slow iPad
- 15.Fix iPad Won't Sync with iTunes
- 16.Fixe Ghost Typing and False Touch
- 17.Repair iPad Touch ID Not Working
- 18.Fix iPad Keeps Freezing
- 19.Fix Disabled iPad
- iPad App Problems
- 1. Fix iPad Sound Not Working
- 2. Fix Wallpaper not Displaying
- 3. 12 Fixes for Apps Not Downloading
- 4. Fix All iPad Email Problems
- 5. Fixe iPad No Sound in Games
- 6. Ways to Fix No Sound on iPad
- 7. Fix iPad Not Receiving Emails
- 8. Fixe Safari Crashing on iPads
- 9. Fix YouTube Not Working on iPad
- 10. Force Quit Frozen Apps On iPad
- 11.Fix 'Cannot Connect to App Store'
- iPad Button Problems
- 1. Fix iPad Home Button Not Working
- 2. Fix iPad Power Button Not Working
- 3. Fixes for iPad Volume Button Stuck
- iPad Charging Problems
- 1. Fix iOS 16 Battery Drain Issues
- 2. Fixe iPad Battery Draining Fast
- 3. Ways to Speed Up iPad Charging!
- 4. Fixes for iPad Not Charging
- 5. Fix IPad Not Charging
- iPad Keyboard Problems
- 1. Fixe iPad Keyboard Not Working
- 2. Fix Keyboard Trackpad Not Working
- 3. Smart Keyboard Folio VS Magic Keyboard
- iPad Screen Problems


Daisy Raines
staff Editor
Generally rated4.5(105participated)