How to Delete Playlists from iPhone Instantly

Jul 12, 2024 • Filed to: Latest News & Tactics • Proven solutions
Many people like playing songs in accordance with the different playlists they have created. Playlists have a lot of benefits such as allowing you to listen your favorite tracks from different artists and genre in just one click. But some users face issues with the playlists on their iPhone. One issue is that users can’t delete playlists from iPhone to free up storage space when they don't need the playlists, and that's very annoying. In fact, there are several ways to delete playlists from iPhone, and in this article, the best ways to delete playlist from iPhone will be introduced. Check it out.
Part 1. Delete Playlists from iPhone Directly
iPhone Music app contains built-in playlists like Classical Music, 90s' Music and so on. These playlists are automatically generated within your iPhone Music app, and can't be deleted. But users can also have playlists created by themselves, and these playlists can be deleted in iPhone Music app directly. This part will introduce how to delete playlist from iPhone directly.
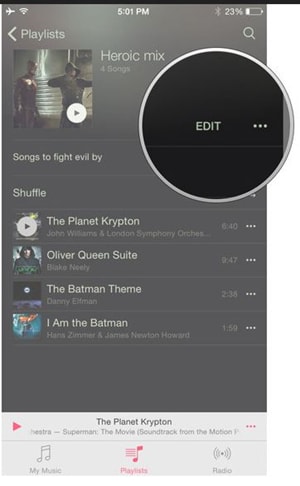
Step 1. Launch the Music app first on your iPhone and Tap on Playlists. Choose the playlist which you want to delete and tap on “…” icon beside the playlist.
Step 2. When you tap on “…” icon you will option of Delete. Tap on this it to delete playlist from iPhone.
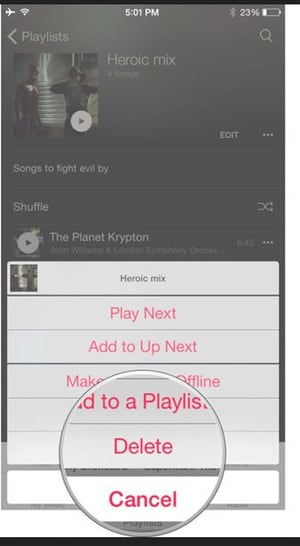
Step 3. You'll see a pop-up dialog asking whether you want to delete the playlist. Tap Delete Playlist to start removing the playlist from your iPhone.

So that's how to delete playlist from iPhone directly. Please note that you are able to delete one playlist only from your iPhone.
Part 2: Delete Multiple Playlists from iPhone at One Go
Wondershare Dr.Fone - Phone Manager (iOS) is an iPhone managing program which enables you to manage iPhone files on computer directly with easy process. Wondershare Dr.Fone - Phone Manager (iOS) helps you to manage iPhone data like adding songs, editing contacts, deleting messages, and more you want. Wondershare Dr.Fone - Phone Manager (iOS) enables you to delete multiple playlists or any other file directly in just one click. Moreover, this iPhone manager program allows you to delete playlists from iPad, iPod and Android devices as well. This part will introduce how to delete playlists from iPhone with Dr.Fone - Phone Manager (iOS) in detail.
Dr.Fone - Phone Manager (iOS)
Manage and Transfer Files on iPod/iPhone/iPad without iTunes
- Transfer, manage, export/import your music, photos, videos, contacts, SMS, Apps etc.
- Backup your music, photos, videos, contacts, SMS, Apps etc. to computer and restore them easily.
- Transfer music, photos, videos, contacts, messages, etc from one smartphone to another.
- Transfer media files between iOS devices and iTunes.
- Fully compatible with iOS 7, iOS 8, iOS 9, iOS 10, iOS 11, iOS 12, iOS 13 and iPod.


How to Delete Playlist from iPhone with Wondershare Dr.Fone - Phone Manager (iOS)
Step 1 Start Dr.Fone - Phone Manager (iOS) and Connect iPhone
Download and install Wondershare Dr.Fone - Phone Manager (iOS) on your computer, then start it. Now connect your iPhone to computer with the USB cable, and the program will automatically detect your device.

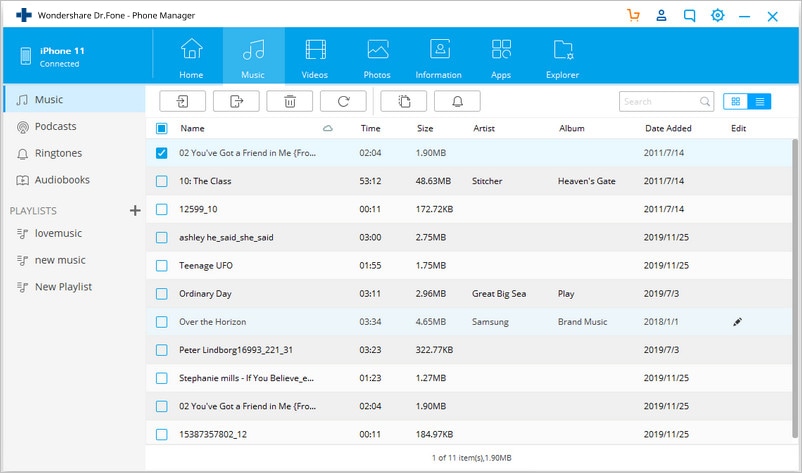
Step 2 Choose Music Category
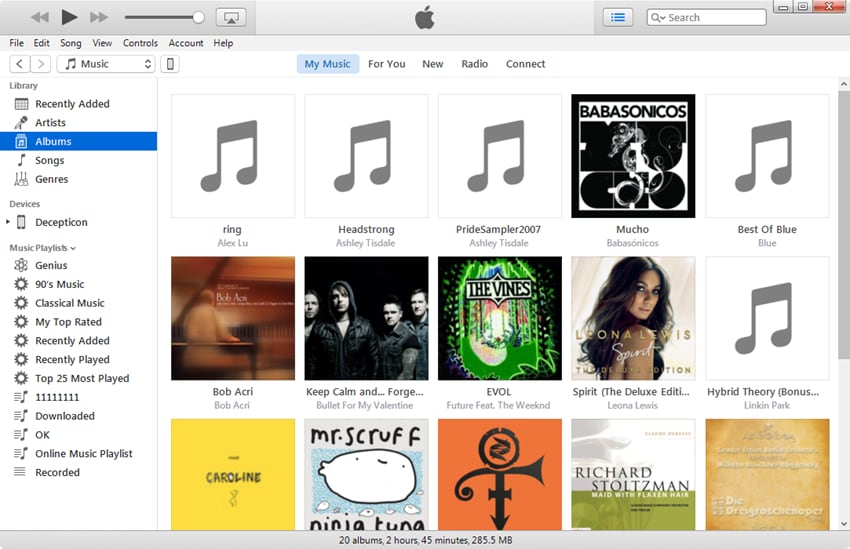
Choose the Music category at the top middle of the main interface. Then Dr.Fone - Phone Manager (iOS) will scan your iPhone music library, and displays all your iPhone music files in the main interface.
Step 3 Delete Playlist from iPhone
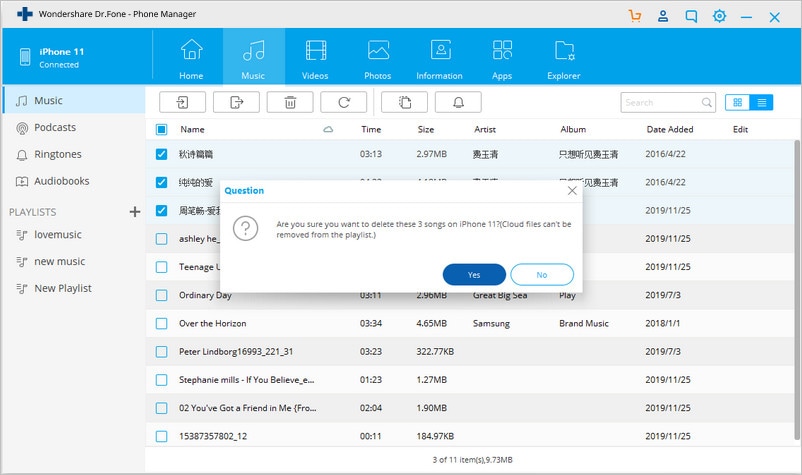
After Dr.Fone - Phone Manager (iOS) displayed your iPhone music files, you can see the iPhone playlists in the left sidebar. Select the playlist you don't need and right-click it, then choose Delete in the drop-down menu.
Step 4 Start Deleting Playlist
After choosing the Delete option, the program will whether you want to delete the playlist. Click Yes to Start deleting playlist from your iPhone.
Part 3. Delete Playlist from iPhone with iTunes
You can also delete playlist from iPhone using iTunes. Using iTunes to delete playlist from iPhone is good but a little harder when compared with Wondershare Dr.Fone - Phone Manager (iOS). You should be aware of the sync of iTunes. If you have turned on the auto sync of iTunes, your iPhone will sync with iTunes once it connects to computer. So you should be very careful while using iTunes to delete iPhone playlists. This part will show you how to delete playlists from iPhone with iTunes.
How to Delete Playlist from iPhone with iTunes
Step 1. Connect your iPhone to computer with the USB cable, and iTunes will start automatically. If iTunes doesn't start, you can manually start it on your computer.
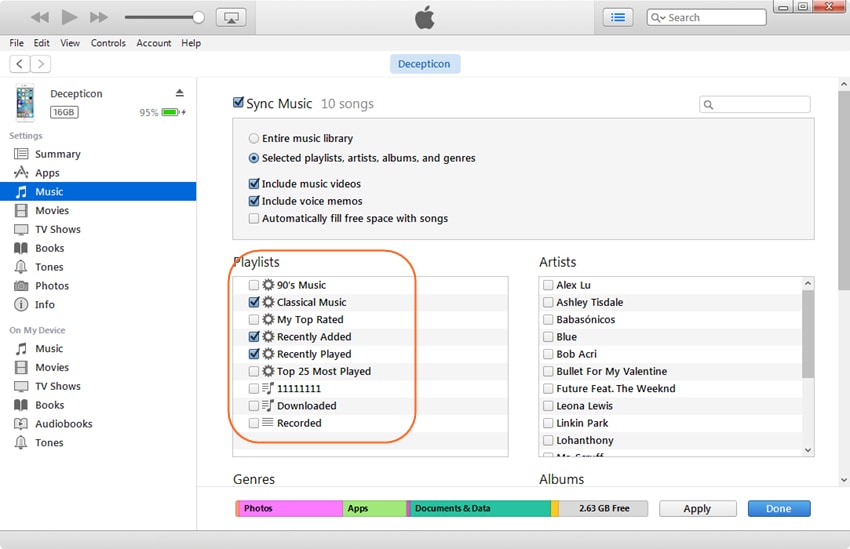
Step 2. Click the iPhone icon after iTunes detects it. Then choose Music category in the left sidebar. Check Sync Music and choose Selected playlists, artists, albums and genres. Then only select the playlists you want to keep on your iPhone, and click the Sync button at the right bottom. When the sync finishes, you'll only get the playlists you need on your iPhone.
With the help of the three mentioned methods, you are able to delete playlists from iPhone with ease. When you make a comparison among the three ways, you can easily find out that Wondershare Dr.Fone - Phone Manager (iOS) is the best option to delete playlists from iPhone. This program makes it easy for you to get the work done. Besides deleting playlists from iPhone, you are also able to manage iPhone music, photos and more files on your iPhone with Dr.Fone - Phone Manager (iOS) with ease. Therefore, if you are going to delete playlists from iPhone or manage your iphone files, just check Wondershare Dr.Fone - Phone Manager (iOS) out.
Why not download it have a try? If this guide helps, don't forget to share it with your friends.


iPhone Music
- Download Music to iOS
- 1. Download Music to iPhone
- 2. Download Songs on iPhone/iPad/iPod
- 3. Download Free Music on iPhone
- 4. Download on iPhone without iTunes
- Make iPhone Ringtones
- 1. Set Voice Memo a Ringtone on iPhone
- 2. Ringtone Apps to Download Ringtones
- 3. Add Custom Ringtones to iPhone
- 4. iPhone Ringtone Apps
- 5. Ringtone Maker Apps for iPhone
- 6. Change iPhone Alarm Volume
- 7. Set A Ringtone on iPhone
- 8. Set MP3 As Ringtone iPhone
- 9. Set Ringtone iPhone
- 10. Make Custom Text Tones for iPhone
- 11. Websites for Free iPhone Ringtones
- 12. Move Ringtone from iPhone to Android
- 13. Popular iPhone Ringtone Remix
- Transfer Audio Media to iPhone
- 1. Send Ringtone from iPhone to iPhone
- 2. Transfer MP3 to iPhone
- 3. Transfer Audiobook from PC to iPhone
- 4. Transfer Songs from CD to iPhone
- 5. Put Ringtones on iPhone
- Transfer Music from iPhone
- 1. Transfer Music from iPhone to computer
- 2. Transfer Music from iPhone to iCloud
- 3. Transfer Music from iPhone to Android
- 4. Transfer Music from iPhone to iPod
- 5. Put Music on iPhone from Computer
- 6. Add Music to iPhone from Computer
- 7. Sync Apple Music Library
- Transfer Music from iTunes
- 1. Transfer Music from iTunes to iPhone
- 2. Transfer Music from Mac to iPhone
- 3. Transfer Music from Laptop to iPhone
- Transfer Music to iPhone
- 1. Transfer Music from Computer to iPhone
- 2. Transfer Music from Mac to iPhone
- 3. Transfer Music from Mac to iPhone
- 4. Music from PC to iPhone
- 5. Music from PC to iPhone without iTunes
- 6. Transfer Music from Android to iPhone
- 7. Transfer Music from iPad to iPhone
- 8. Transfer Music from iPod/iPhone
- 9. Transfer Music from iPhone to iPhone
- 10. Transfer Music from External Hard Drive
- 11. Transfer to iPhone without iTunes
- 12. Transfer Music to Jailbroken iPhone
- 13. Transfer Music to iPhone
- Transfer Music to iTunes/PC
- 1. Transfer Music from iPhone to iTunes
- 2. Transfer Music from iPhone to PC
- 3. Transfer Music from iPhone to Mac
- 4. Transfer Music between PC and iPhone
- 5. Transfer Music from to PC without iTunes
- 6. Sync Apple Music from iPhone to Mac
- iPhone Music Problems
- 1. Song Missing After iOS Update
- 2. Music Won't Play on iPhone
- 3. iPhone Plays Music by Itself
- 4. Apple Music Song Is Not Available
- 5.Fix Apple Music Library Not Syncing
- iPhone Music Tips
- ● Manage/transfer/recover data
- ● Unlock screen/activate/FRP lock
- ● Fix most iOS and Android issues
- Transfer Now Transfer Now Transfer Now
Daisy Raines
staff Editor