Songs/Playlists Missing After iOS 15/14 Update: Follow Me to Get Back
Jul 12, 2024 • Filed to: Mobile Repair Solutions • Proven solutions
Apple regularly releases updates and new operating systems for both their iPhone and iPad devices to ensure that you’re getting the very best, most stable, and most secure experience possible. However, that doesn’t always mean that everything goes to plan.
Sometimes when you update your device you can experience problems, such as certain features not working, certain features not being able to be accessed, or certain aspects of your phone just not working. One of the most common ones is your songs or playlist not showing up or missing entirely after the most recent iOS 15/14 update.
There are many reasons why this can happen, but luckily, we’re going to detail everything you need to know to get it back. We’re going to go through multiple methods you can use to get everything working as it should! Let’s jump straight into it!
Part 1. Check if Show Apple Music is on
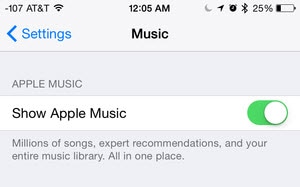
Sometimes, the Show Apple Music setting can be toggled automatically during the iOS 15/14 update. This can cause your Apple Music in your Library to be made invisible and not updated to your device. Fortunately, getting it back is no problem and can be completed in just a few steps.
Step 1 - Turn on your device and from the main menu navigate to the Settings Menu and then scroll down and select Music.
Step 2 - Under the Music tab, look for the ‘Show Apple Music’ toggle. If this is off, toggle it on, and if it’s on, toggle it off and then back on again. This should repair the error and get your Music showing again.
You can also access this option by navigating through your menus to iTunes > Preferences > General, and you’ll find the same option.
Part 2. Turn iCloud Music Library on and off on device and iTunes
Most of your Music will be updated, downloaded, and managed by your device using the iCloud Music Library feature. While this is managed automatically by your operating system, it can sometimes bug out when your device is updated using the iOS 15/14 update.
Fortunately, the solution is very simple to get this backup and running again. If your Music, songs, or playlists aren’t showing up after your iOS 15/14 update, this could be the solution you’ll want to try.
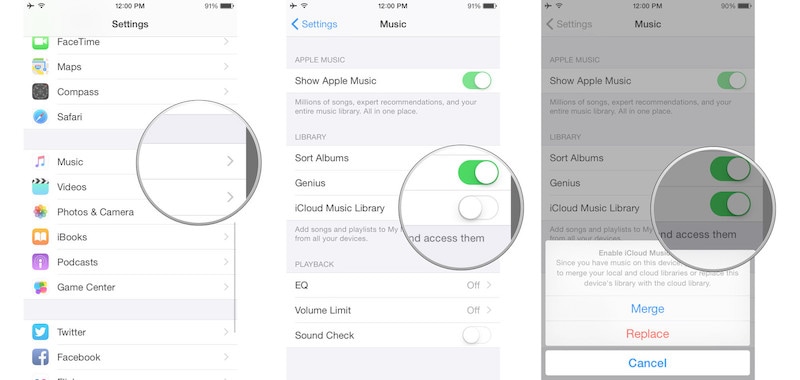
Step 1 - Close everything on your iOS device and make sure you’re at the main menu. Navigate to the Settings icon.
Step 2 - Under Settings, scroll down to Music and then tap the iCloud Music Library option. This should be enabled. If disabled, enable it, and if already enabled, disable it and reenable it again to make sure it’s working properly.
Part 3. Update the iCloud Music Library using iTunes
Another common reason why your Apple music might not be showing after an iOS 15/14 update is that your iTunes account has synced across your devices. If you use iTunes on your Mac or Windows computer and your sync your music files across automatically, your songs and playlists may not show because this hasn’t happened.
Below, we’ll explore how you to get this setting back, and how to update your music library using iTunes.
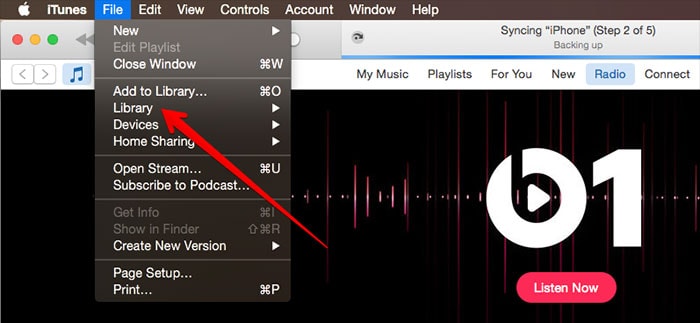
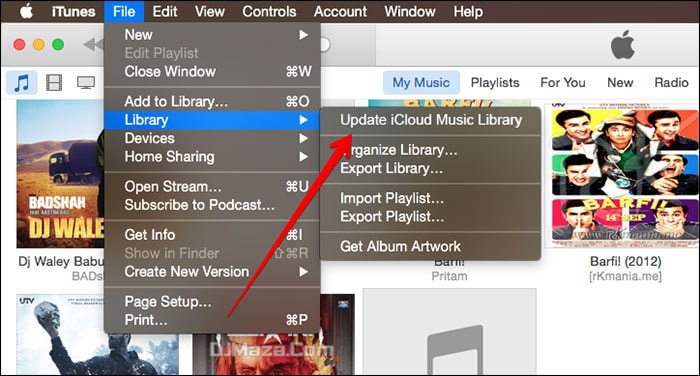
Step 1 - Open iTunes on either your Mac or Windows PC and have it open, so you’re on the main homepage. Click the File, followed by Library.
Step 2 - On the Library tab, click the top option titled ‘Update iCloud Music Library.’ This will then refresh your entire Library on all devices and should help you to get your songs and playlists back after an iOS 15/14 update if they’re missing.
Part 4. Check whether iTunes lists Music as “Other” media
If you’ve ever looked into the memory storage of your iTunes account or your iOS device, you’ll have noticed that there is sometimes a memory storage section titled ‘Other.’ This refers to other files and media that’s stored on your device that doesn’t come under the generic terms.
However, sometimes during an iOS 15/14 update, some of the files can glitch, causing your audio files to be titled as Other, therefore making them inaccessible. Here’s how to check and get them back.
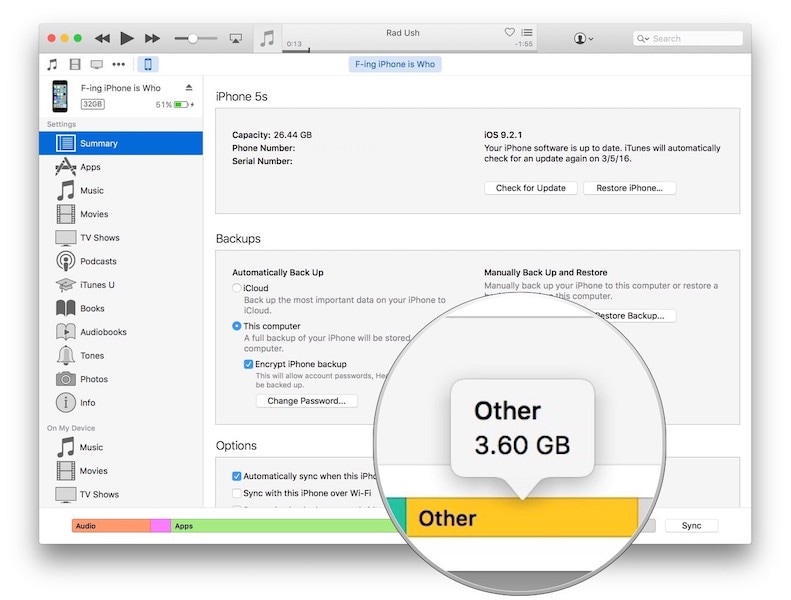
Step 1 – Open your iTunes software on your Mac or Windows computer via a USB cable and open your device in the window on the usual way. It may also open automatically once you connect your device.
Step 2 – Click on your device in the iTunes window and click the Summary option. On the next window to open, you’ll see and bar at the bottom of the screen with multiple colors and labels.
Step 3 – Here, check to see how big your audio files section is, and how big your Other section is. If the audio is small and the Other is big, you know your songs are being categorized in the wrong place.
Step 4 – To fix this, simply resync your device with your iTunes to make sure all your files are tagged correctly and appear in the right place, and you should be accessible once you disconnect and restart your device.
Part 5. Backup the whole device and select only Music to restore
The final approach you can take if all else fails is using a powerful piece of software known as Dr.Fone – Backup and Restore. Using your computer, you’ll be able to back up all the music files on your device, clear your device, and then restore everything, ensuring that everything is back where it should be.
This can be incredibly effective if you want to get your audio files back as quickly as possible, and you don’t want to mess around with settings. This can be especially helpful if you’re looking for a one-click solution. Here’s how it works.
Step 1 – Download and install the Dr.Fone – Backup & Restore software onto either your Mac or Windows computer and open it on the main menu after connecting your device using the official USB cable.

Step 2 – Once the software has recognized your device, click the Phone Backup option, followed by the Backup option on the next window.

Step 3 – On the next window, you can either choose to backup up all your files (which is the recommended approach), or you can back up just your music files. Select the options you want, and then click the Backup button.
You can choose your backup file save location and track the progress of the backup using the window onscreen.

Step 4 – Once the backup is complete, you can disconnect your iOS device and wipe it clean. This is why it’s recommended you back up everything on your device, so you don’t risk losing any personal files.
You can then repair or reinstall the iOS 15/14 update to clear any bugs or glitches that may have prevented your audio files and playlists from showing up. You can do this OTA or by using iTunes.
Step 5 – Once iOS 15/14 has been installed and it’s working on your device, you’ll then be able to restore all your files using Dr.Fone - Phone Backup software. Simply open the software again, connect your device, but this time use the Restore option after clicking the Phone Backup option on the main menu.

Step 6 – Go through the list that appears and select the backup you just made with all your audio files inside. When you’ve found the file you want, select the Next button.
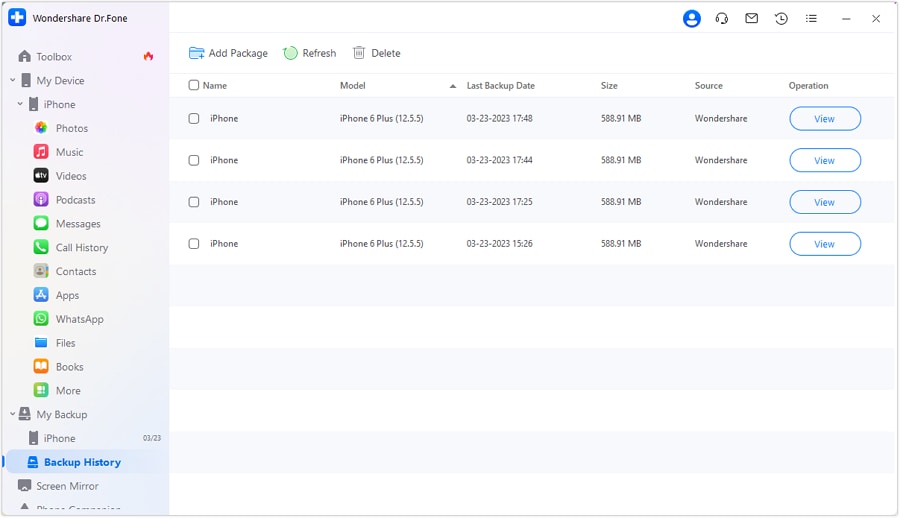
Step 7 – Once selected, you’ll be able to see all the files that are in the backup folder. Here, you’ll be able to use the left-hand menu to select which files you want back onto your device. In this case, make sure you select your audio files! When you’re ready, click the Restore to Device option.

Step 8 – The software will now automatically restore your music files to your PC. You can monitor the progress onscreen. Make sure your computer stays on, and your device stays connected until the process is complete.
Once it’s finished and you see a screen saying you can disconnect, disconnect your iOS device, and you should be able to use it as normal!
iPhone Music
- Download Music to iOS
- 1. Download Music to iPhone
- 2. Download Songs on iPhone/iPad/iPod
- 3. Download Free Music on iPhone
- 4. Download on iPhone without iTunes
- Make iPhone Ringtones
- 1. Set Voice Memo a Ringtone on iPhone
- 2. Ringtone Apps to Download Ringtones
- 3. Add Custom Ringtones to iPhone
- 4. iPhone Ringtone Apps
- 5. Ringtone Maker Apps for iPhone
- 6. Change iPhone Alarm Volume
- 7. Set A Ringtone on iPhone
- 8. Set MP3 As Ringtone iPhone
- 9. Set Ringtone iPhone
- 10. Make Custom Text Tones for iPhone
- 11. Websites for Free iPhone Ringtones
- 12. Move Ringtone from iPhone to Android
- 13. Popular iPhone Ringtone Remix
- Transfer Audio Media to iPhone
- 1. Send Ringtone from iPhone to iPhone
- 2. Transfer MP3 to iPhone
- 3. Transfer Audiobook from PC to iPhone
- 4. Transfer Songs from CD to iPhone
- 5. Put Ringtones on iPhone
- Transfer Music from iPhone
- 1. Transfer Music from iPhone to computer
- 2. Transfer Music from iPhone to iCloud
- 3. Transfer Music from iPhone to Android
- 4. Transfer Music from iPhone to iPod
- 5. Put Music on iPhone from Computer
- 6. Add Music to iPhone from Computer
- 7. Sync Apple Music Library
- Transfer Music from iTunes
- 1. Transfer Music from iTunes to iPhone
- 2. Transfer Music from Mac to iPhone
- 3. Transfer Music from Laptop to iPhone
- Transfer Music to iPhone
- 1. Transfer Music from Computer to iPhone
- 2. Transfer Music from Mac to iPhone
- 3. Transfer Music from Mac to iPhone
- 4. Music from PC to iPhone
- 5. Music from PC to iPhone without iTunes
- 6. Transfer Music from Android to iPhone
- 7. Transfer Music from iPad to iPhone
- 8. Transfer Music from iPod/iPhone
- 9. Transfer Music from iPhone to iPhone
- 10. Transfer Music from External Hard Drive
- 11. Transfer to iPhone without iTunes
- 12. Transfer Music to Jailbroken iPhone
- 13. Transfer Music to iPhone
- Transfer Music to iTunes/PC
- 1. Transfer Music from iPhone to iTunes
- 2. Transfer Music from iPhone to PC
- 3. Transfer Music from iPhone to Mac
- 4. Transfer Music between PC and iPhone
- 5. Transfer Music from to PC without iTunes
- 6. Sync Apple Music from iPhone to Mac
- iPhone Music Problems
- 1. Song Missing After iOS Update
- 2. Music Won't Play on iPhone
- 3. iPhone Plays Music by Itself
- 4. Apple Music Song Is Not Available
- 5.Fix Apple Music Library Not Syncing
- iPhone Music Tips
- ● Manage/transfer/recover data
- ● Unlock screen/activate/FRP lock
- ● Fix most iOS and Android issues
- Transfer Now Transfer Now Transfer Now


Daisy Raines
staff Editor
Generally rated4.5(105participated)