Ultimate Guide 2024: How to Transfer Music From iPhone to iPhone

Jul 12, 2024 • Filed to: Data Transfer Solutions • Proven solutions
The evolution of technology continually transforms how we consume and enjoy music. The iPhone stands among the most dominant brands in the smartphone world. Thus, the need for effortless ways to transfer music from iDevices has never been more paramount. In this comprehensive article, we will go through various methods and tools. This guide aims to simplify the process and empower you with the knowledge to transfer your music hassle-free.
It will explore native functionalities provided by Apple and third-party apps. Moreover, it will take you through music transfer employing cloud services. The goal is to equip you with the most effective, efficient, and reliable methods to transfer music from iPhone to iPhone.
- Part 1: How To Transfer Selective and All Music From iPhone to iPhone in One-Click

- Part 2: How To Transfer Music From iPhone to iPhone Using iTunes
- Part 3: How To Transfer Music From iPhone to iPhone via AirDrop
- Part 4: How To Transfer Music From iPhone to iPhone by Syncing Apple Music Library
- Part 5: How To Transfer Music From iPhone to iPhone Using Google Drive
- Part 6: How To Transfer Music Streaming Services Playlists From iPhone to iPhone
Part 1: How To Transfer Selective and All Music From iPhone to iPhone in One-Click
When it comes to transferring music between iPhones, Wondershare Dr.Fone emerges as a versatile solution. It allows you to move the entire music library or selective tracks with a single click. With its one-click transfer functionality, managing your music collection becomes a smooth experience.
This ensures that your favorite tunes are available on your new iPhone. The following are the detailed methods on how to transfer music from iPhone to iPhone using Wondershare Dr.Fone:
Method 1: Transfer Music Using Wondershare Dr.Fone – Phone Manager
Wondershare Dr.Fone offers a comprehensive solution for managing your iPhone. It allows you to handle your iPhone data efficiently. You can perform tasks like importing, exporting, and deleting files. With its intuitive drag-and-drop feature, you can move files into any desired app on your device. You can transfer a variety of data between your iOS device and computer. Here is how to transfer music from iPhone to iPhone using the phone manager feature:
- Step 1: Access the Source iPhone in Wondershare Dr.Fone
The first thing you need to do is install and launch Wondershare Dr.Fone. Then, connect both iPhones to the computer and wait for their detection by Dr.Fone. Once detected, click the source iPhone from the left panel.

- Step 2: Transfer the Selected Music Track
From the expanded options for the source iPhone, choose "Music." Now, go to the track you want to share and select it. Now, tap "To Device" from the top toolbar and select the other iPhone as the destination. As soon as you select the other iPhone, the music file will be transferred.

Method 2: Transfer Music Using Wondershare Dr.Fone – Phone Transfer
Wondershare Dr.Fone - Phone Transfer simplifies transferring different data types between 8000+ devices. It ensures ease of use with a simple click-through process. Moreover, it is compatible with Apple, Samsung, HUAWEI, OPPO, Sony, Google, and more.
You also get full support for the latest iOS and Android versions. It supports the transfer of over 15 types of data between different OS. Here is how to transfer music from iPod to iPhone using the Phone Transfer tool of Wondershare Dr.Fone:
- Step 1: Click Phone Transfer in Wondershare Dr.Fone
To begin, you need to connect both devices to the computer with Wondershare Dr.Fone. Within Dr.Fone, click "Toolbox" from the left panel and choose "Phone Transfer" as the option. It will lead to a new screen where you need to assign the positions to the iPhones.

- Step 2: Select Music and Tap Start Transfer
The iPhone from which you want to transfer the music should be in the "Source" position. Now, give the "Destination" position to the iPhone where you want to transfer music. Then select "Music" from the available data type and click "Start Transfer." Wait for the transfer process to complete, which will take time, depending on the library size.

Part 2: How To Transfer Music From iPhone to iPhone Using iTunes
iTunes remains a reliable and widely used application for managing iOS devices. Many iPhone users prefer this method for transferring music between iOS devices, which is limited to purchased songs. Follow these steps to transfer music from iPhone to iPad using iTunes:
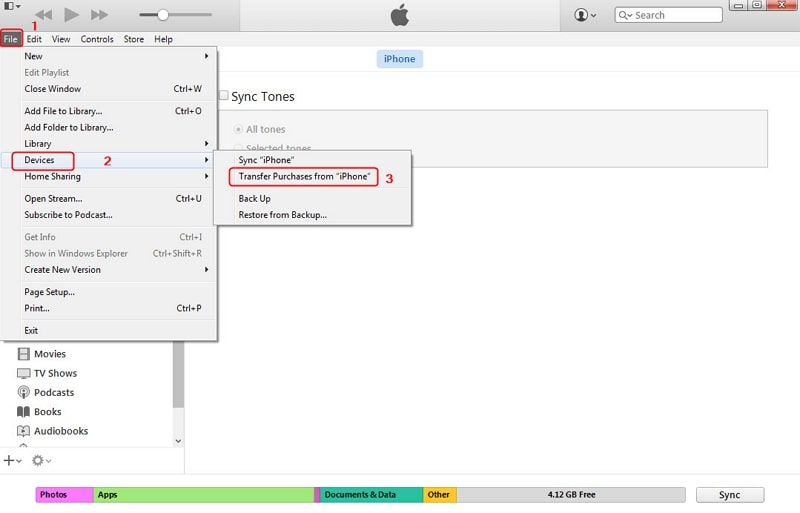
- Step 1. Run the latest version of iTunes on your computer and connect the source iPhone. After accessing iTunes, click on “File," located in the top left corner, and choose “Devices.” Next, select “Transfer Purchases from iPhone” and let the process finish.
- Step 2. Once all the purchased songs are transferred, disconnect the source iPhone. Now, connect the targeted iPhone and wait for iTunes to recognize it. Then tap the “Device" icon to access the iPhone window.
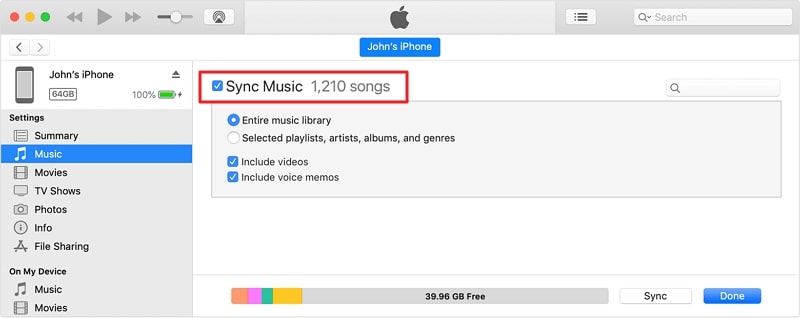
- Step 3. Here, click the "Music" tab from the left side panel. Now check the "Sync Music" box and select "Entire Library" or another option depending on your choice. Finally, press "Sync" to commence the music transfer process.
Part 3: How To Transfer Music From iPhone to iPhone via AirDrop
AirDrop provides a convenient and wireless way to transfer music between iPhones. It allows you to share songs, albums, or playlists effortlessly. You don't need any cable or extra software to use this method. This wireless approach simplifies the process, making it an excellent choice for transferring a few tracks or albums. Follow these steps to transfer music from iPhone to iPhone without iTunes:
- Step 1. Start by ensuring that AirDrop is enabled on both devices and its visibility is set to "Everyone." Moreover, you also need to ensure that both Wi-Fi and Bluetooth are also enabled, as they are essential.
- Step 2. Now open the Music app and find the track you want to transfer to the other iPhone. Tap the three-dots icon and select "Share Song." From the available options, choose "AirDrop."
- Step 3. Among the available devices to AirDrop, select the targeted iPhone. Now, you will receive a prompt on the targeted iPhone, which you need to accept to complete the data transfer.

Part 4: How To Transfer Music From iPhone to iPhone by Syncing Apple Music Library
Syncing your Apple Music Library across iPhones offers a smooth way to transfer music. It ensures all your favorite tracks, playlists, and albums are available on your new device. This method ensures a consistent music experience. It allows you to enjoy your favorite tunes without the need for manual transfers. Follow these steps to transfer music from iPad to iPhone Apple Music:
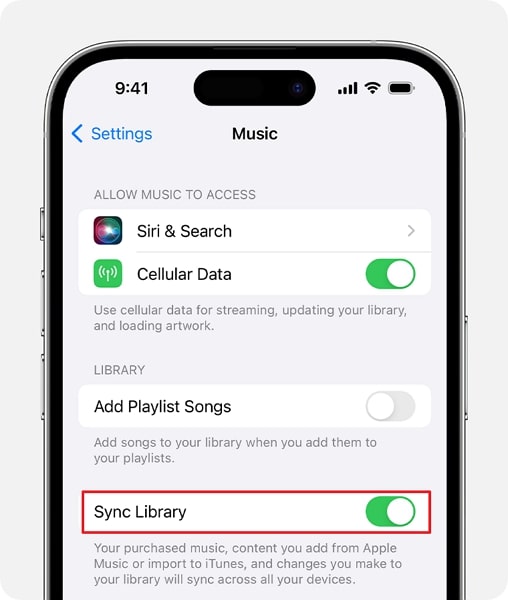
- Step 1. On both of your iPhone devices, log in using the same Apple ID. Then, move to the source iPhone and access the device's Settings. Here, scroll down to find and tap the "Music" option.
- Step 2. Now, move to toggle on the "Sync Library" option on the following screen. Afterward, repeat the same process on the new iPhone. Give the syncing process some time, and you will be able to access all songs on the new device.
Part 5: How To Transfer Music From iPhone to iPhone Using Google Drive
Transferring music via Google Drive offers a convenient way to move your music collection. This allows a music exchange between iPhones without the need for cables. It's a particularly useful method for transferring a few select songs or albums. With it, you can transfer songs that you have downloaded from the internet. The following are the steps you need to follow to transfer music from iDevices via Google Drive:
- Step 1. Once you've installed the Google Drive app on your iPhone, launch the app, sign in, and tap the "+" icon located at the lower right. Select "Upload" to proceed. Now, tap "Browse" and then go on to locate and select the targeted songs.
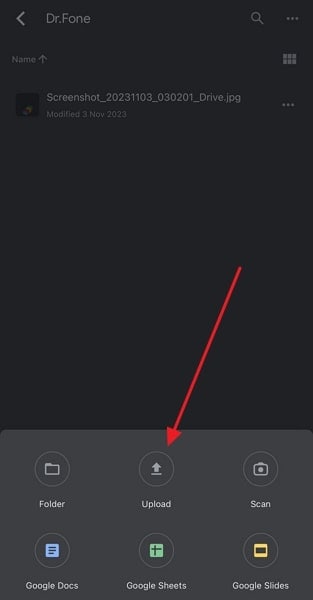
- Step 2. Once they are uploaded, move to the new iPhone and install the Google Drive app there. Here, log in using the same Google ID and access the songs you uploaded from the source device. Then tap the “Three dots” icon and select "Make available offline" to complete the process.

Part 6: How To Transfer Music Streaming Services Playlists From iPhone to iPhone
Transitioning between music streaming platforms can be challenging. However, with Wondershare MobileTrans, you can effortlessly transfer your beloved playlists. You can move your Spotify playlists to Apple Music, YouTube Music, or between various services hassle-free. Whether you're tech-savvy or not, its user-friendly interface ensures easy operation. Additionally, it supports more platforms and is completely free to use. Here are the steps you need to follow for playlist transfer:
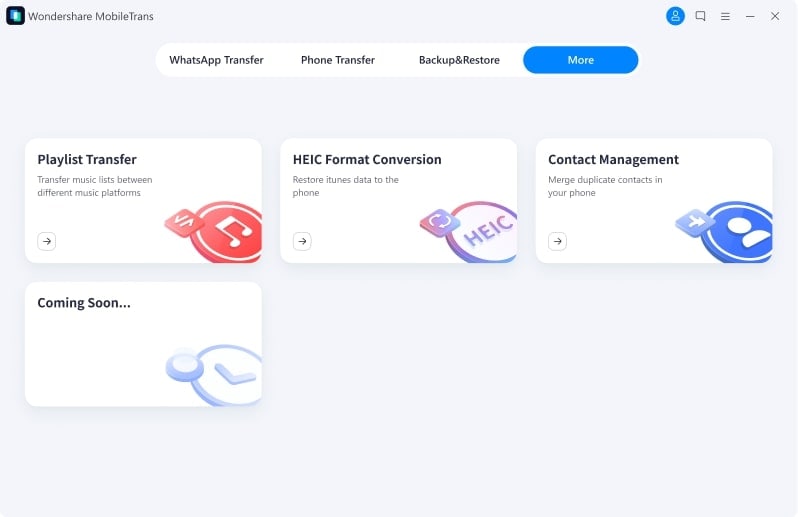
- Step 1. You start the process by installing Wondershare MobileTrans on your computer. Now, launch it and move to the "More" tab. Here, click the first option, "Playlist Transfer" to proceed.
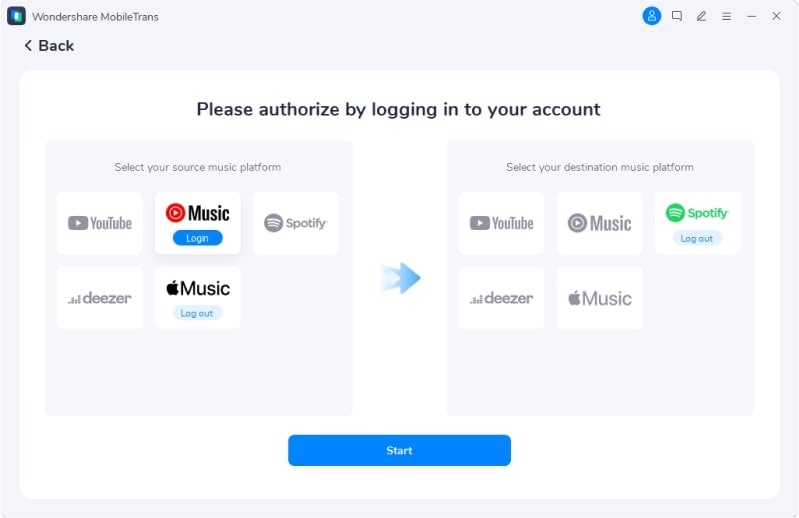
- Step 2. On the following screen, log into both music streaming services. Once you are logged in, tap "Start" to commence the playlist transfer procedure. The time it will take depends upon the number of playlists and songs.
Conclusion
In conclusion, transferring music between iPhones is essential for preserving our musical experiences. Whether using iTunes, AirDrop, cloud services, or specialized tools, the process can be simplified. For a comprehensive and user-friendly solution, consider Wondershare Dr.Fone. Its intuitive interface and versatile functionalities streamline the music transfer process. This makes Dr.Fone an ideal choice for how to transfer music from iPhone to iPhone.


Other Popular Articles From Wondershare
iPhone Music
- Download Music to iOS
- 1. Download Music to iPhone
- 2. Download Songs on iPhone/iPad/iPod
- 3. Download Free Music on iPhone
- 4. Download on iPhone without iTunes
- Make iPhone Ringtones
- 1. Set Voice Memo a Ringtone on iPhone
- 2. Ringtone Apps to Download Ringtones
- 3. Add Custom Ringtones to iPhone
- 4. iPhone Ringtone Apps
- 5. Ringtone Maker Apps for iPhone
- 6. Change iPhone Alarm Volume
- 7. Set A Ringtone on iPhone
- 8. Set MP3 As Ringtone iPhone
- 9. Set Ringtone iPhone
- 10. Make Custom Text Tones for iPhone
- 11. Websites for Free iPhone Ringtones
- 12. Move Ringtone from iPhone to Android
- 13. Popular iPhone Ringtone Remix
- Transfer Audio Media to iPhone
- 1. Send Ringtone from iPhone to iPhone
- 2. Transfer MP3 to iPhone
- 3. Transfer Audiobook from PC to iPhone
- 4. Transfer Songs from CD to iPhone
- 5. Put Ringtones on iPhone
- Transfer Music from iPhone
- 1. Transfer Music from iPhone to computer
- 2. Transfer Music from iPhone to iCloud
- 3. Transfer Music from iPhone to Android
- 4. Transfer Music from iPhone to iPod
- 5. Put Music on iPhone from Computer
- 6. Add Music to iPhone from Computer
- 7. Sync Apple Music Library
- Transfer Music from iTunes
- 1. Transfer Music from iTunes to iPhone
- 2. Transfer Music from Mac to iPhone
- 3. Transfer Music from Laptop to iPhone
- Transfer Music to iPhone
- 1. Transfer Music from Computer to iPhone
- 2. Transfer Music from Mac to iPhone
- 3. Transfer Music from Mac to iPhone
- 4. Music from PC to iPhone
- 5. Music from PC to iPhone without iTunes
- 6. Transfer Music from Android to iPhone
- 7. Transfer Music from iPad to iPhone
- 8. Transfer Music from iPod/iPhone
- 9. Transfer Music from iPhone to iPhone
- 10. Transfer Music from External Hard Drive
- 11. Transfer to iPhone without iTunes
- 12. Transfer Music to Jailbroken iPhone
- 13. Transfer Music to iPhone
- Transfer Music to iTunes/PC
- 1. Transfer Music from iPhone to iTunes
- 2. Transfer Music from iPhone to PC
- 3. Transfer Music from iPhone to Mac
- 4. Transfer Music between PC and iPhone
- 5. Transfer Music from to PC without iTunes
- 6. Sync Apple Music from iPhone to Mac
- iPhone Music Problems
- 1. Song Missing After iOS Update
- 2. Music Won't Play on iPhone
- 3. iPhone Plays Music by Itself
- 4. Apple Music Song Is Not Available
- 5.Fix Apple Music Library Not Syncing
- iPhone Music Tips
- ● Manage/transfer/recover data
- ● Unlock screen/activate/FRP lock
- ● Fix most iOS and Android issues
- Transfer Now Transfer Now Transfer Now
Selena Lee
chief Editor