2026 Guide: How to Screenshot on Motorola (All Methods: Buttons, Gesture & Third-Party)

Jun 30, 2026 • Filed to: Device Data Management • Proven solutions
 TL;DR:
You can take a screenshot on a Motorola phone by simultaneously pressing the Power and Volume Down buttons, utilizing a three-finger swipe gesture, tapping the Accessibility Menu floating icon, or using Google Assistant voice commands.
● The alternative native methods require manual setup beforehand, specifically by toggling the Three-finger screenshot in Display settings, enabling the Accessibility Menu, or turning on the Use Screen Context option in Google Assistant.
● Native screenshot storage is strictly restricted to the Internal Storage > Pictures > Screenshots directory, as Android lacks any built-in configuration to change this default save location.
● For scrolling screen grabs, you can tap the Capture more button on the native post-capture toolbar, or install third-party apps like ScreenMaster and Screenshot Easy to unlock alternative capture triggers like shaking the device.
Ask AI for a summary
 ChatGPT
 Perplexity
 Gemini
 Claude
 Grok
Grok
Dr.Fone Basic:
Better Control for Your Phone
Manage, transfer, back up, restore, and mirror your device
Motorola is known for its reliable and user-friendly smartphones, holding about 3% of the global smartphone market. Despite its relatively small market share, Motorola devices are popular for their practical features and ease of use. One such feature is a screenshot, which is essential for saving important information or capturing memorable moments.
For this, Motorola offers multiple convenient ways to take screenshots. The best methods include button combinations, gestures, voice commands, and accessibility features. Other than that, several screenshot-taking apps are available. This guide will give you a detailed overview of how to screenshot on a Motorola, along with its step-by-step guides.
- Part 1. How Do You Take a Screenshot on a Motorola?
- Method 1. Screenshot Using Power and Volume Down Buttons
- Method 2. Screenshot Using Three-Finger Gesture
- Method 3. Screenshot Using Accessibility Shortcut
- Method 4. Screenshot Using Google Assistant
- Method 5. Screenshot Using Third-Party Apps
- Part 2. Where to Find Screenshots in Motorola?

- Part 3. How to Manage a Motorola Phone Using Dr.Fone?
Part 1. How Do You Take a Screenshot on a Motorola?
Several screenshot methods are available for Motorola phones. Let's now explore each method on how to take a screenshot with a Moto phone. We will start from the most common button combination to advanced gesture and voice-assisted options.
Method 1. Screenshot Using Power and Volume Down Buttons
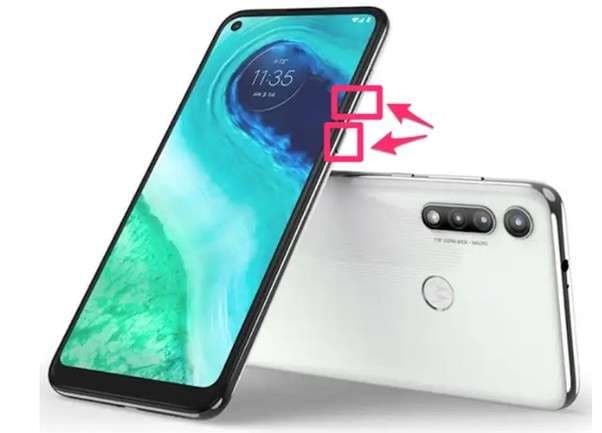
This is the most common way to take a screenshot on any Motorola phone. It works on almost all models and does not need any special settings or apps. You can instantly capture whatever is displayed on your screen by pressing the correct buttons at the same time. Follow the given instructions to learn how to take a screenshot on a Moto phone using the power and volume down buttons.
Instructions. Open up the screen you wish to screenshot on your Motorola smartphone. Then, press and hold the Power button and Volume Down button at the same time. After that, the screenshot will be taken.
Method 2. Screenshot Using Three-Finger Gesture
The easiest method to capture a screenshot on Motorola phones is the three-finger gesture. You just need to enable this feature from the settings, and then you capture your screen by simply swiping down with three fingers. Take help from the following guide to find your answer on how do I screenshot on a Motorola phone by enabling the three-finger screenshot feature.
How to Use the Three-Finger Screenshot Feature:
Step 1. Go to the Settings on your phone and tap on Display.
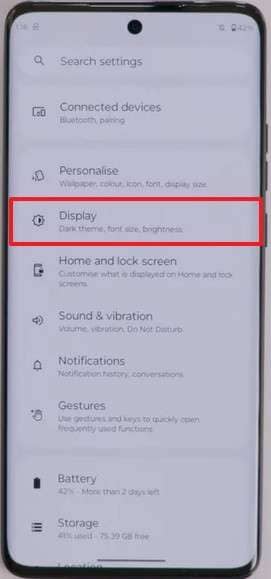
Step 2. In the Display screen, choose the Three-finger screenshot option.
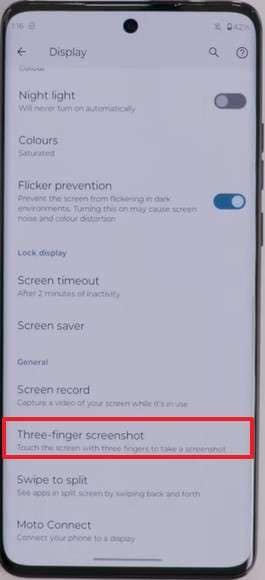
Step 3. Now, toggle the switch ON to enable the feature.
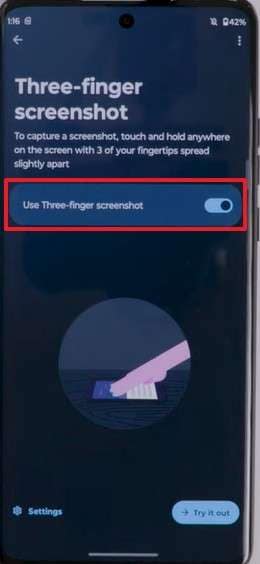
Step 4. Once you enable the feature, open the screen you want to capture and swipe down with three fingers to take a screenshot.
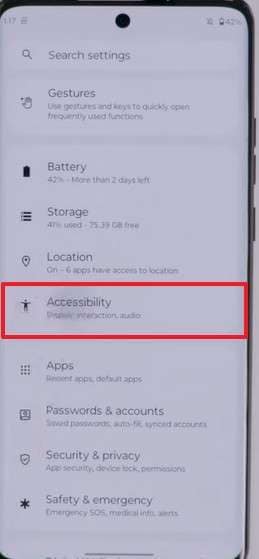
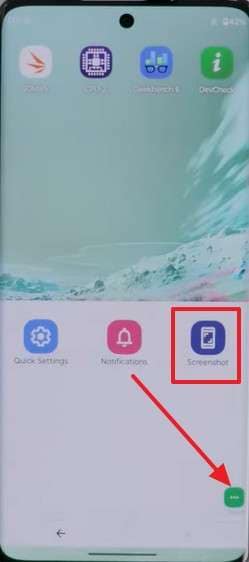
Method 3. Screenshot Using Accessibility Shortcut
Accessibility shortcut is a good option for users who want to take screenshots without using physical buttons. With this method, a floating icon appears on your screen that allows you to capture a screenshot with just a single click. Next is a guide on how to screenshot on a Motorola using the accessibility shortcut.
Step 1. Open the Settings app and select Accessibility.
Step 2. Now, tap on the Accessibility Menu and toggle the switch ON to enable the floating menu. Afterward, tap Allow to give the necessary permissions.
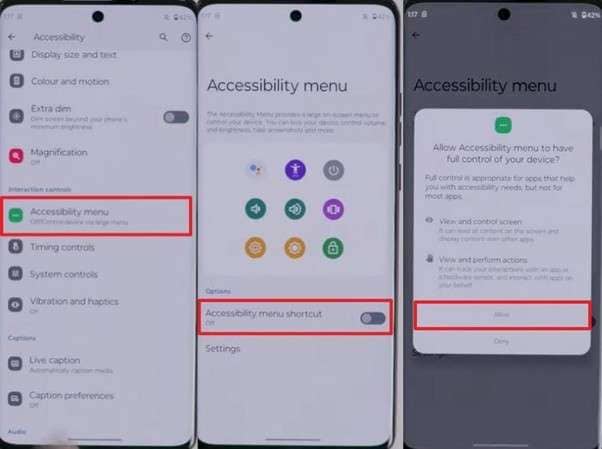
Step 3. When you see the accessibility icon, tap on it and choose Screenshot from the menu to capture your screen.
Method 4. Screenshot Using Google Assistant
Google Assistant enables you to capture screenshots with simple voice commands. This approach works well in case you don't like to use buttons and want a quick way to capture your screen. You can follow the provided step guide below to understand how to take a screenshot on a Moto phone after setting up Google Assistant.
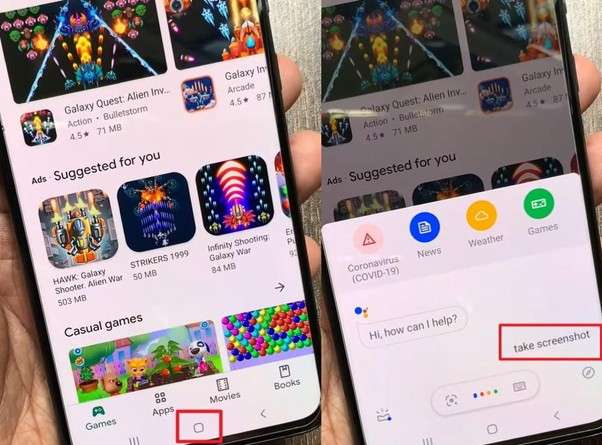
Step 1. After opening the Google app on your phone, tap More. After that, select Settings and pick the Google Assistant option.
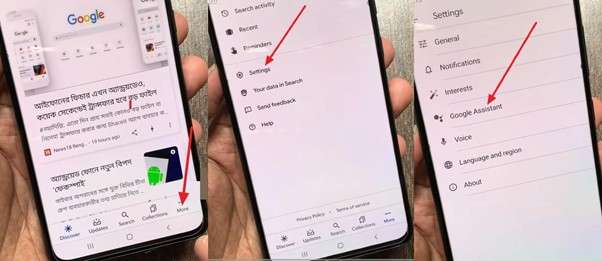
Step 2. Next, tap on Assistant and scroll down to choose the Phone option. Once you do that, toggle the Use Screen Context ON to let Google Assistant capture screenshots.
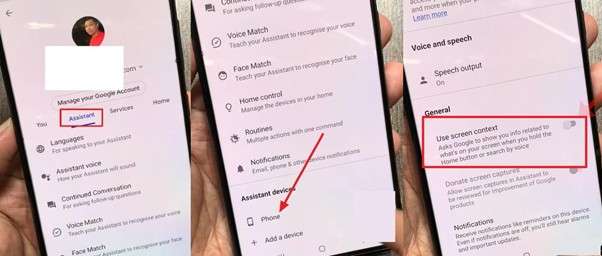
Step 3. Lastly, long-press the home button to activate Google Assistant and say Take a Screenshot. The screenshot will be captured with your voice prompt.
Method 5. Screenshot Using Third-Party Apps
Other than the above built-in screenshot-taking methods, there are various apps on the Google Store that can be used for that purpose. This section explores some of the best apps for learning how to screenshot on a Motorola.
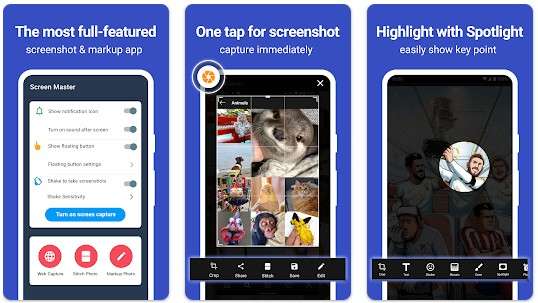
1. ScreenMaster
ScreenMaster is a free screenshot-taking and photo markup tool. This app lets you take screenshots by simply using the floating button or shaking the device. You can take high-quality screenshots with this app and even save them in PNG format.
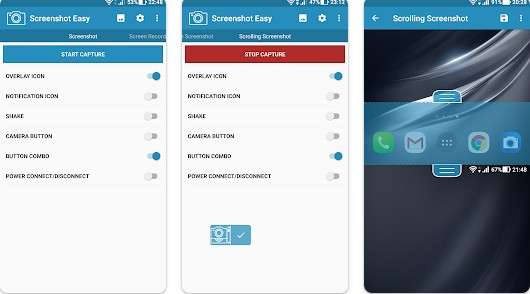
2. Screenshot Easy
Screenshot Easy is another popular Android app that allows users to capture screenshots. Users can take multiple types of screenshots, including scrolling ones, and even do screen recording with sound. The app also includes features for editing and sharing the captured screenshots.
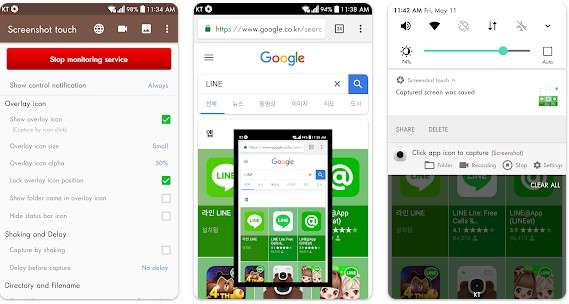
3. Screenshot Touch
Screenshot Touch app allows you to capture screenshots using a floating icon, notification bar, or device shake. It also supports scrolling webpage capture, screen recording, and image-to-PDF conversion. Beyond that, this app has an image cropper and editor.
Part 2. Where to Find Screenshots in Motorola?
After you take screenshots on a Motorola device, it’s important to know where they are stored. There are two methods. You can either access them through your Gallery or find them in the Files folder. This section explores the step guides for both methods.
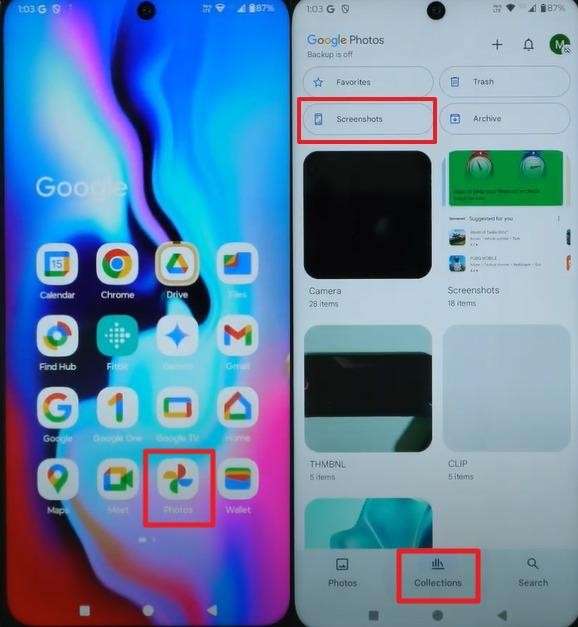
Access Screenshots via Gallery
Instructions: Open the Gallery app and tap on Collections. After reaching the collections, tap on the Screenshots folder to see your captured images.
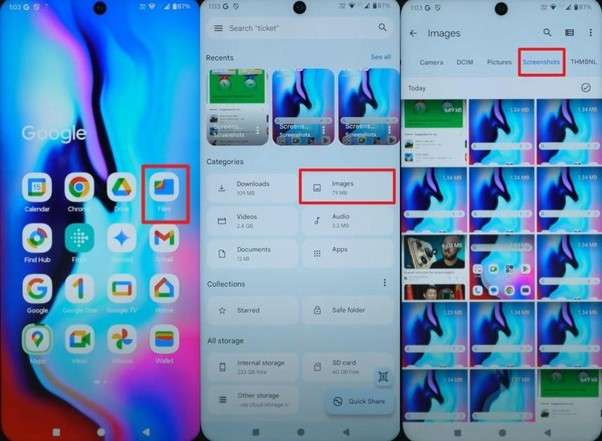
Access Screenshots via Files Folder
Instructions: Open the Files folder and navigate to the Images folder. Inside, you will find the Screenshots subfolder where all your captured images are stored.
Part 3. How to Manage a Motorola Phone Using Dr.Fone?
After learning how to take a screenshot on a Moto phone, it's helpful to have a tool that can organize, back up, and transfer your files. Wondershare Dr.Fone is one such reliable tool that lets you manage your Motorola phone from a computer without any hassle. With Dr.Fone, you can easily access photos, videos, messages, call logs, apps, and more. In addition to that, you can perform backups, restore data, and transfer files between devices.
Wondershare Dr.Fone
One-Stop Solution to Manage and Transfer Data on Motorola Phone
- Transfer files between Android and computer, including contacts, photos, music, SMS, and more.
- Manage, export/import your music, photos, videos, contacts, SMS, Apps, etc.
- Transfer iTunes to Android (vice versa).
- Manage your Android device on the computer.
- Fully compatible with the newest Android OS.


Key Features
- Music Management & Deduplication: Manage music, ringtones, recordings, and voicemails, and remove duplicate files automatically.
- Contacts Management & Deduplication: Add, export, and merge duplicate contacts from your phone, CSV, vCard, or Outlook.
- Apps Management: Install, uninstall, and export apps along with their settings on your Android device.
- WhatsApp Management: Backup, preview, export, and manage WhatsApp messages, photos, videos, audio, and other files safely.
Manage Photos on Your Android with Dr.Fone
Once you’ve captured the images on your Motorola device, you can follow the given steps to manage them with the help of Dr.Fone.
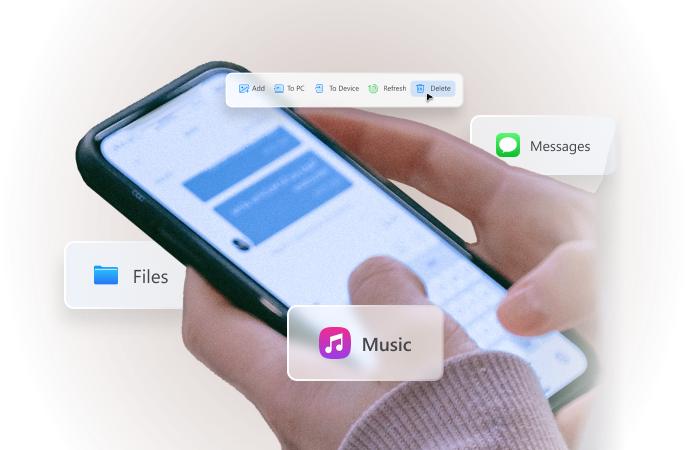
Step 1. After connecting your Android, head into the Android Device > Photos from the left-hand panel. Tap Add to import more images into the device. Use the To PC option to export selected images to the PC. Moreover, you can use the Delete option to delete specific images for managing your gallery.
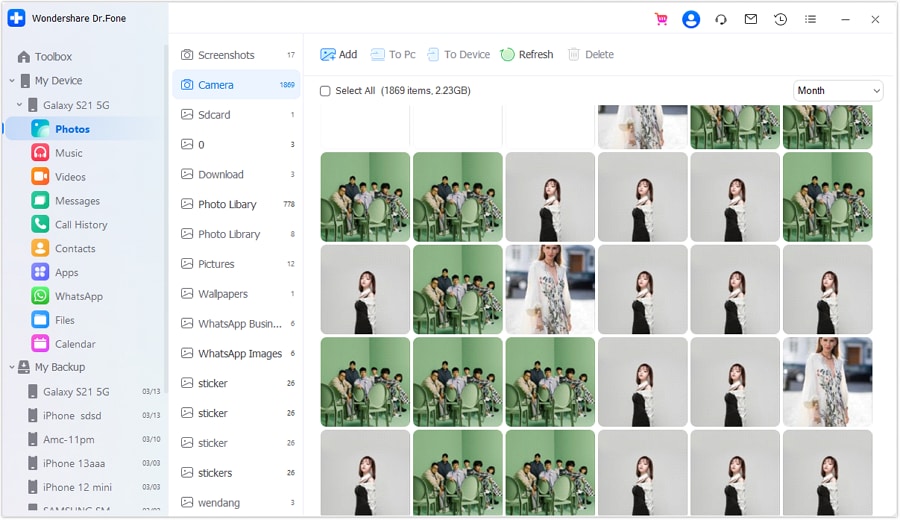
Step 2. Choose a specific photo and open it to preview. It opens up a new window where you can rotate and zoom the image as per your needs.

Conclusion
All in all, taking screenshots on a Motorola phone is an easy task. With the help of the built-in buttons, accessibility features, and Google Assistant, you can easily capture your screen. However, after taking screenshots, you might need to capture your images. For this task, Dr.Fone is a great tool. This tool allows you to organize, backup, and transfer photos to a PC and other mobile devices with just a single tap.
4,624,541 people have downloaded it
FAQs
Dr.Fone Basic:
Better Control for Your Phone
Manage, transfer, back up, restore, and mirror your device


Motorola Manage
- Motorola Transfer
- 1. Download Pictures to PC
- 2. Transfer Motorola to Mac
- 3. Transfer Whatsapp from Moto to iOS
- 4. Transfer Music from Mac to Moto
- 5. Transfer WhatsApp from iOS to Moto
- Motorola Unlock
- 1. Unlock Motorola Without Factory Reset
- 2. Network Unlock Motorola One 5G Ace
- 3. Sim Unlock Moto G Phone
- 4. Unlock Moto Without Factory Reset
- 5. Unlock Motorola Bootloader
- 6. Bypass FRP Lock on Motorola
- 7. Reset Motorola Phone When Locked
- Motorola Repair
- 1. Motorola Won't Power On
- 2. Android App Not Installed Error
- 3. Black Screen of Death Error
- 4. Unbrick Android Phone
- 5. Encryption Unsuccessful Error
- 6. Stuck at Android System Recovery
- 7. Android Won't Turn On
- 8. Android Stuck on Boot Screen
- Motorola Tips
- 1. Turn Off a Motorola Phone
- 2. Mirror Motorola Screen to PC
- 3. Back up Motorola to PC
- 4. Control Motorola from PC
- 5. Format Motorola Phone in 2026
- 6. Reboot Any Motorola Phone
- 7. How to Screenshot on Motorola
- 8. Restart Any Motorola Phone
- 9. Motorola Phone Restore Guide
- 10. Set Up Voicemail on Motorola
- ● Manage/transfer/recover data
- ● Unlock screen/activate/FRP lock
- ● Fix most iOS and Android issues
- Free Download Free Download Free Download


James Davis
staff Editor