100% Security Verified | No Subscription Required | No Malware

 :
: 
 ChatGPT
 Perplexity
 Gemini
 Claude
 Grok
Grok
You want to save a picture on your screen, but it looks poor because the screenshot is blurry. Maybe the text is hard to read, or the image becomes unclear after posting. This feels frustrating, especially when you need a clean image for work, study, or social media. The good news is that you can capture sharp and clear screenshots by following the correct steps.
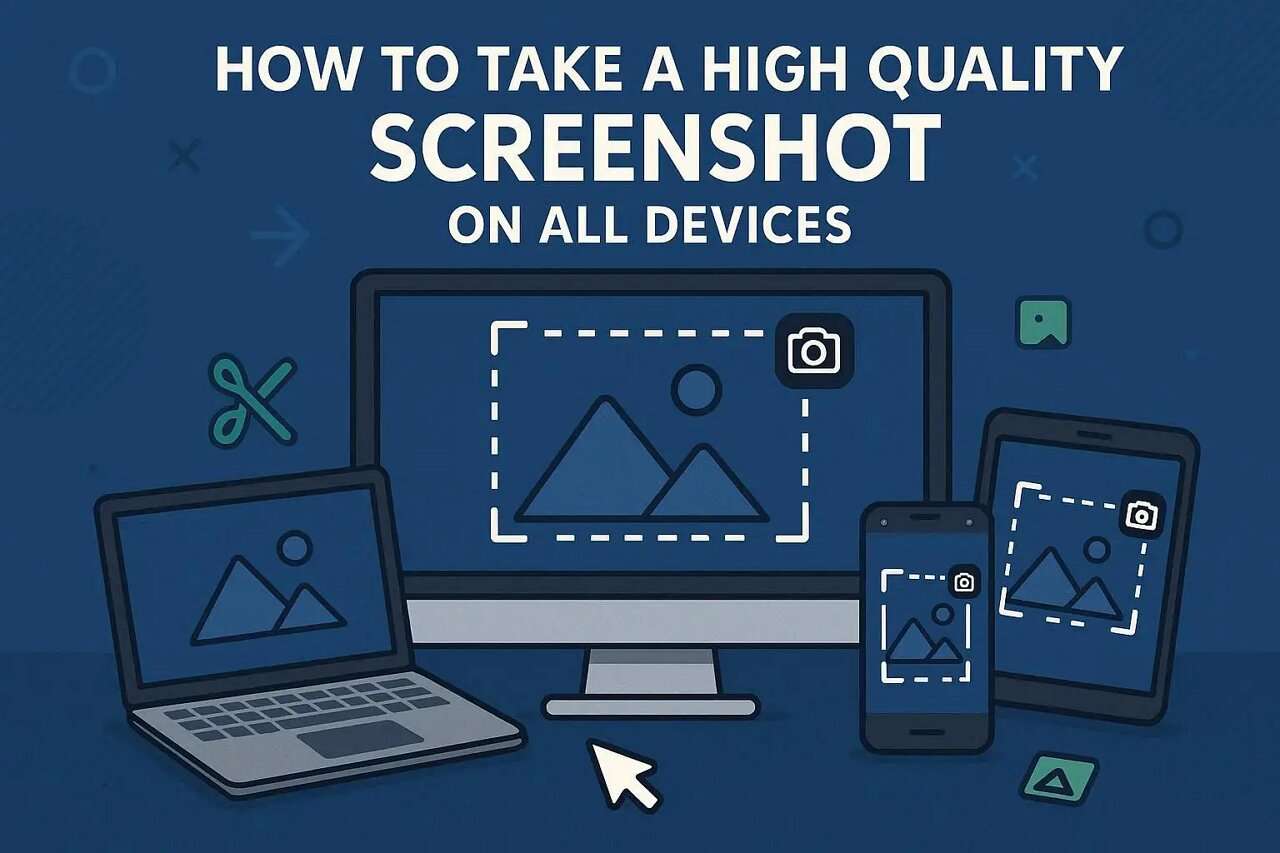
Thus, this guide will teach you how to capture a high-quality screenshot on Android, iOS, Windows, and MacBooks. You will be instructed on step-by-step instructions and easy tricks to take clean screenshots without inconvenience. After you have taken screenshots, understand how you can use Dr.Fone to manage them between gadgets.
In this article
- Part 1. What Is a High-Quality Screenshot?
- Part 2. How to Take a High-Resolution Screenshot on Android & iPhone - Quick Guide
- Part 3. Take High Resolution Screenshot Windows: Best Native Methods
- Part 4. Screen Capture High Resolution on Mac - Detailed Insights
- Bonus Tip. Use Wondershare Dr.Fone to Manage & Organize Screenshots
- Frequently Asked Questions
Part 1. What Is a High-Quality Screenshot?
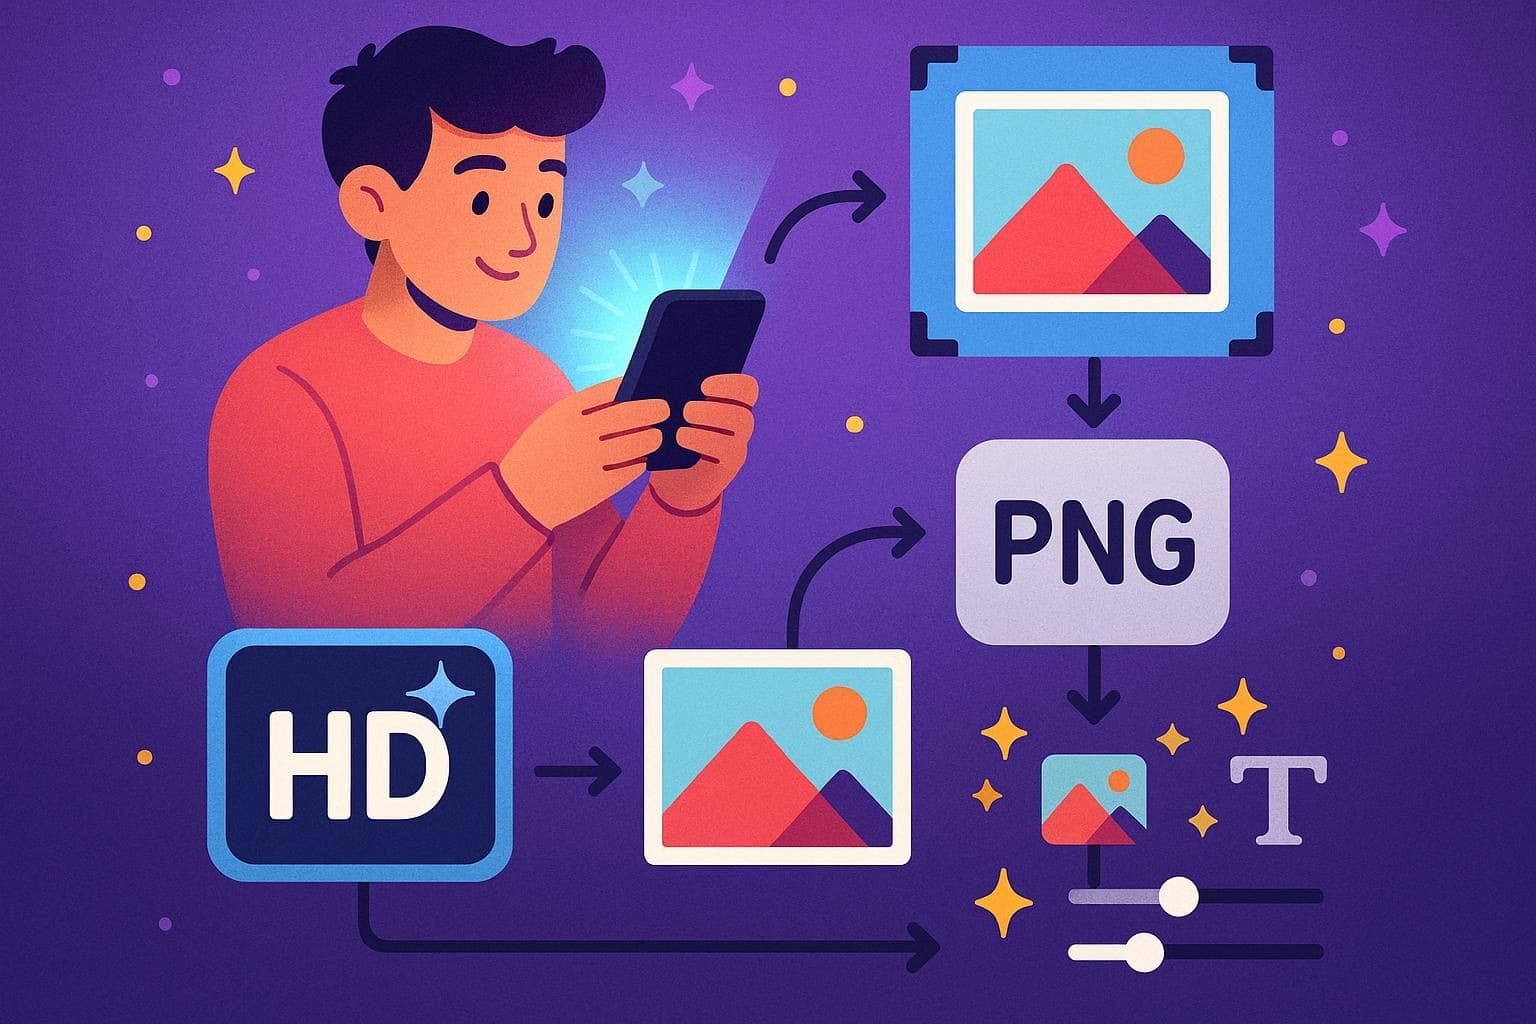
A high-resolution screenshot is a clear, sharp image of your screen that makes text and details easy to read. It should have high resolution, like full HD or 4K, so everything stays crisp. Not just that, the image must match or exceed the display size to avoid blur from stretching. Thus, this works best in formats like PNG that keep details without heavy compression.
Helpful Tips & Tricks to Take a High Quality Screenshot
So, if you want to screen capture a high-resolution screenshot, here are some tips you can follow:
- Max Resolution and Scaling: Set your device to the highest supported resolution so text and icons stay sharp and clear. In addition, avoid display zoom or heavy scaling, as they reduce detail and make screenshots look soft.
- Focus on Key Content: Select only the important part of the screen, not the entire display, to keep the image clean. Furthermore, remove extra alerts or clutter so attention stays on the main content.
- Choose the Right Tools and Format: Use proper screenshot tools that allow region selection and save files in high quality. While doing so, choose the PNG format to keep text and edges sharp, rather than a low‑quality JPEG.
- Light Editing Only: Crop around the key area and add simple arrows or labels if needed for clarity. It is also recommended to avoid heavy filters or excessive sharpness, as this can reduce image quality.
- Prepare Before Capture: Finally, check brightness, contrast, and font size so everything looks clear and easy to read. Not just that, keep only the necessary windows open and make sure the screen uses the native resolution.
Part 2. How to Take a High-Resolution Screenshot on Android & iPhone - Quick Guide
While adhering to the above-mentioned tips, follow these simple methods to capture high-resolution screenshots on Android and iOS:
Option 1: Built-in
For quick screenshot capture, here are some built-in options for Android and iPhone:
On Android
-
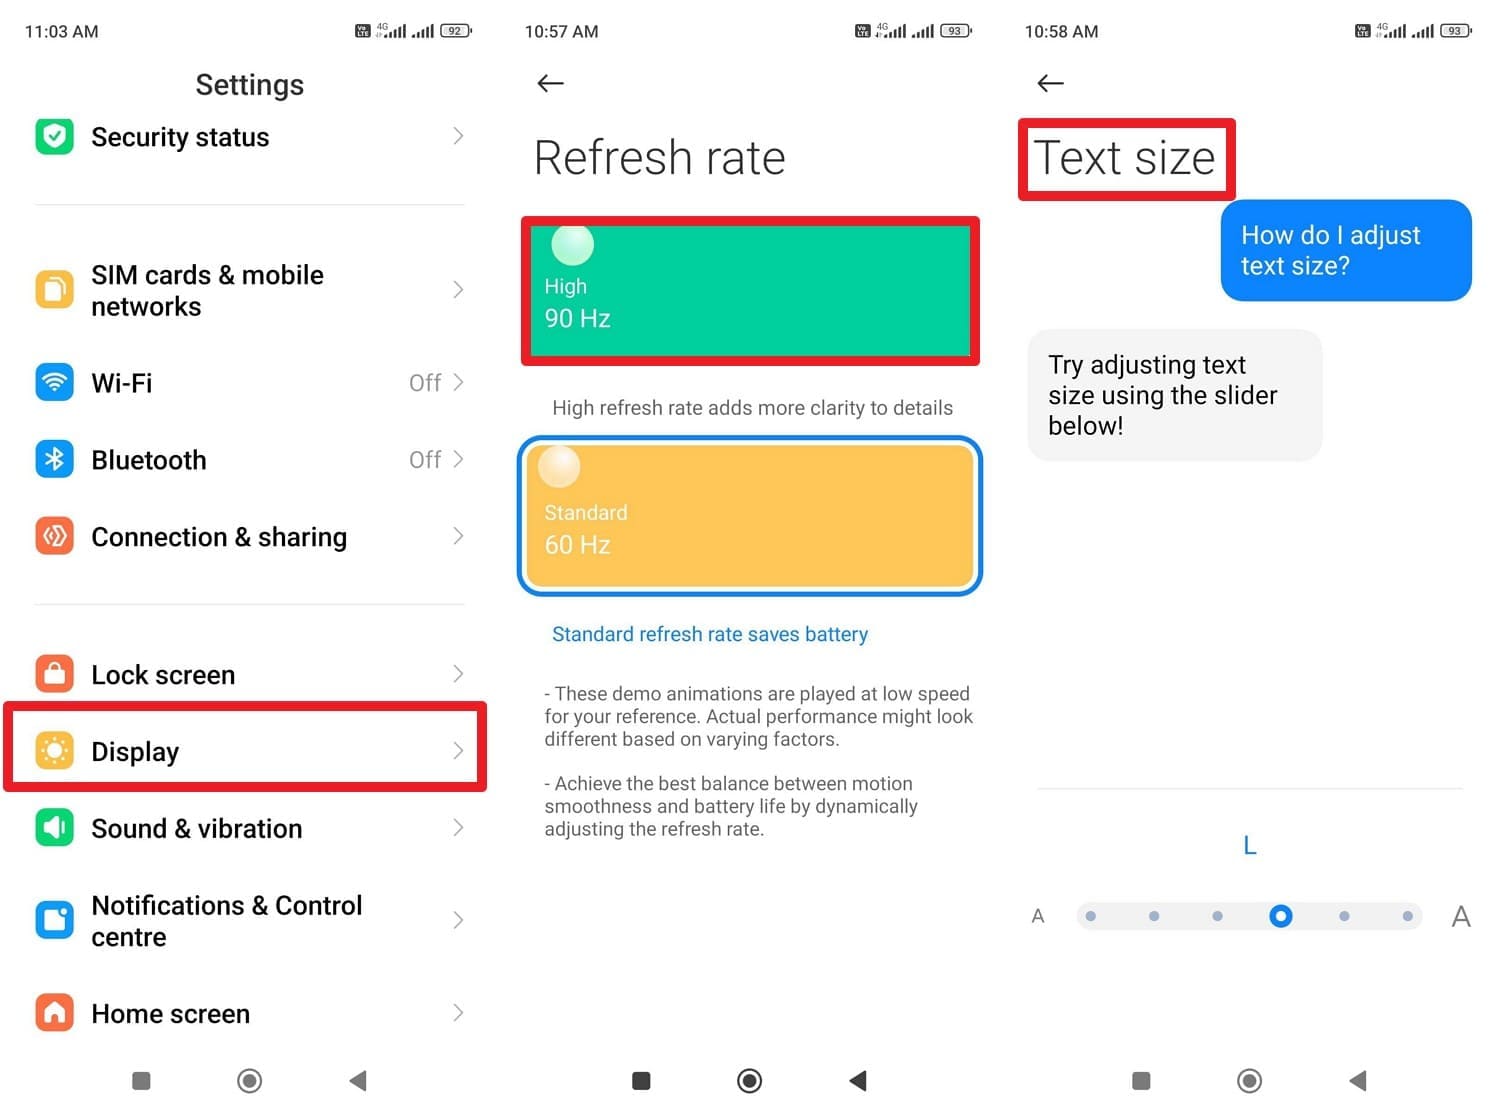
Step 1 Set Display Settings for Clarity
In settings, go to "Display" settings, go to "Refresh Rate" and set it to "High." Then, choose the "Text Size" settings and adjust them accordingly to get clear screenshots.
-
Step 2 Capture the Screenshot
Now go to the screen you want to capture and press the “Power and Volume Down” buttons to capture it.
On iPhone
Method 1: Button Combinations
-
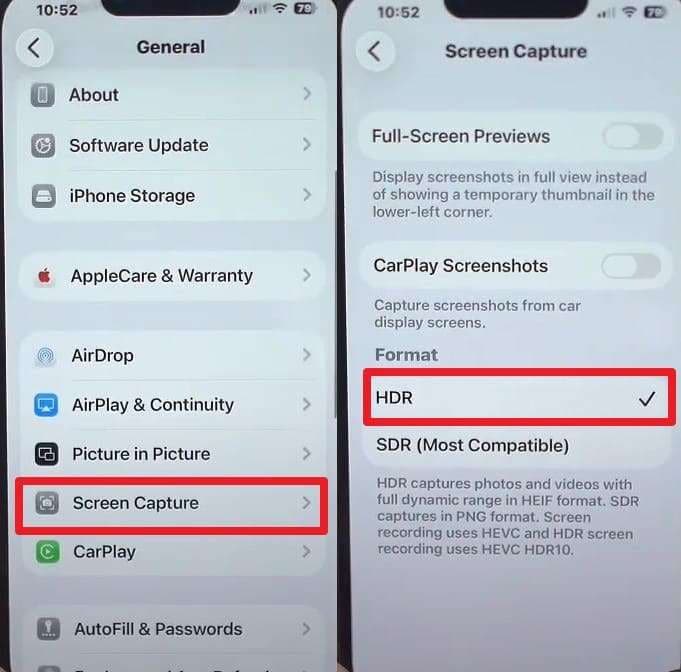
Step 1 Configure Screenshot Settings
Go to Settings > General > Screen Capture to set the format, and choose the highest-quality option (HDR) for better-looking screenshots.
-
Step 2 Use Device-Specific Button Combo
Try the listed button combinations according to the models and take an HD screenshot:
- Face ID on iPhones: Press Side + Volume Up quickly to take a screenshot.
- Touch ID with Side button: Press Home + Side button to take a screenshot.
- Touch ID with the Top button: Press Home + Top button to capture the screen.
Method 2: Use AssistiveTouch, Back Tap, or Siri
For AssistiveTouch
-
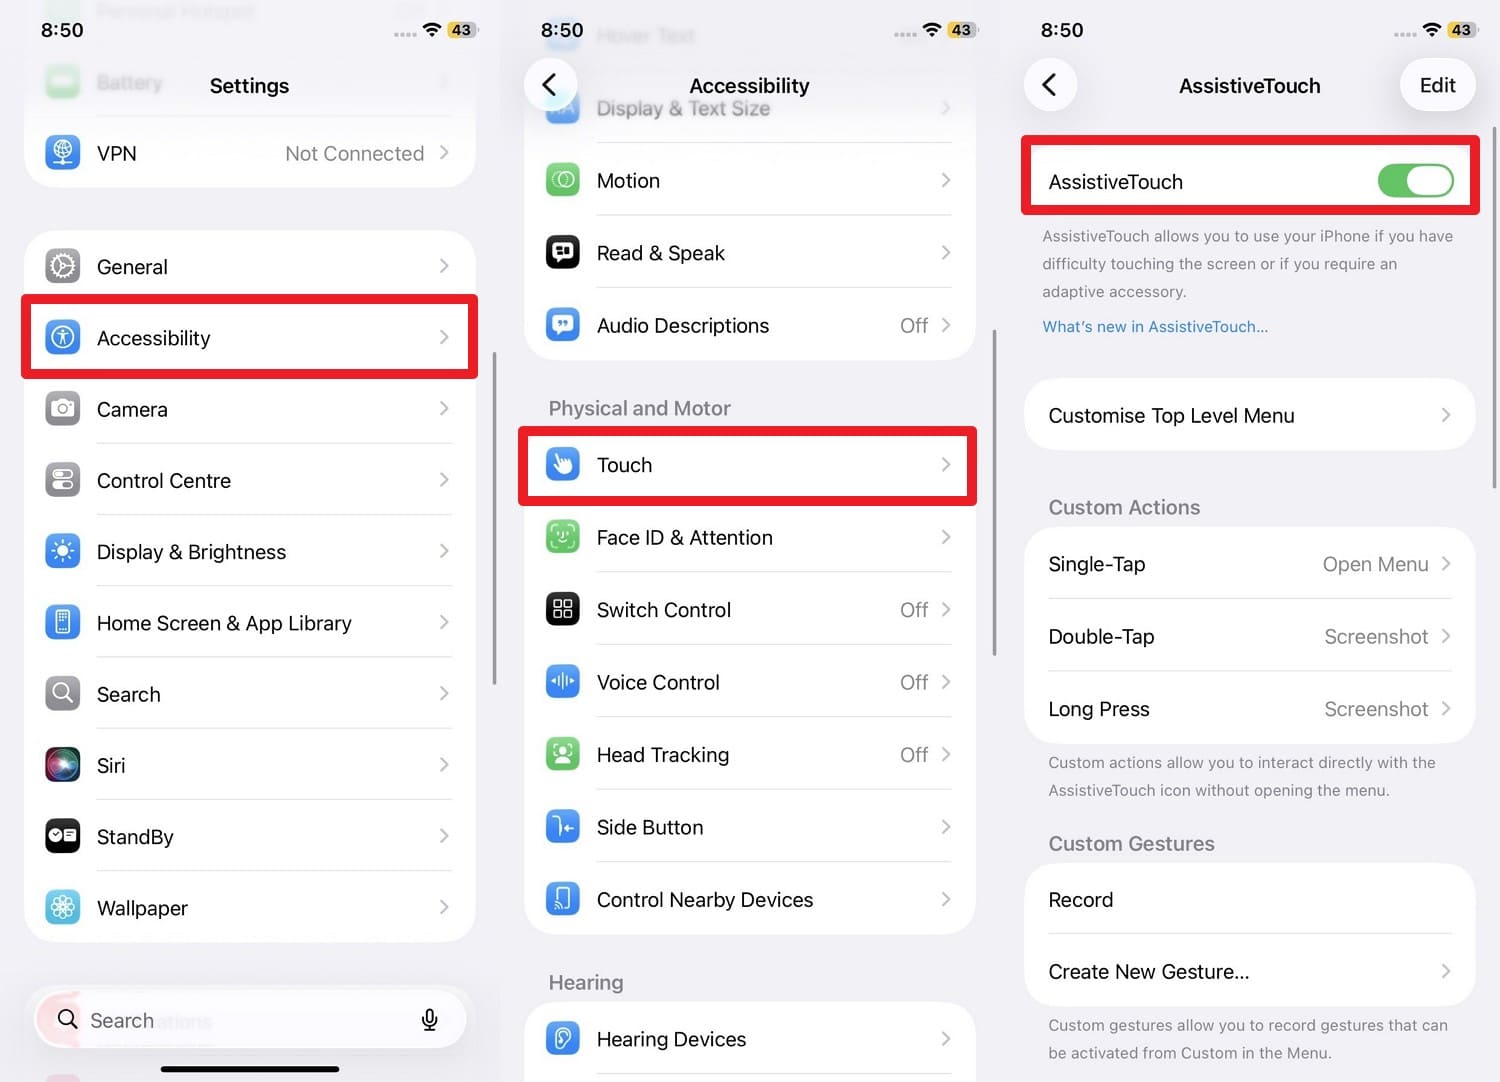
Step 1 Enable AssistiveTouch
Go to Settings > Accessibility > Touch, select the “AssistiveTouch” and turn the toggle “On.”
-
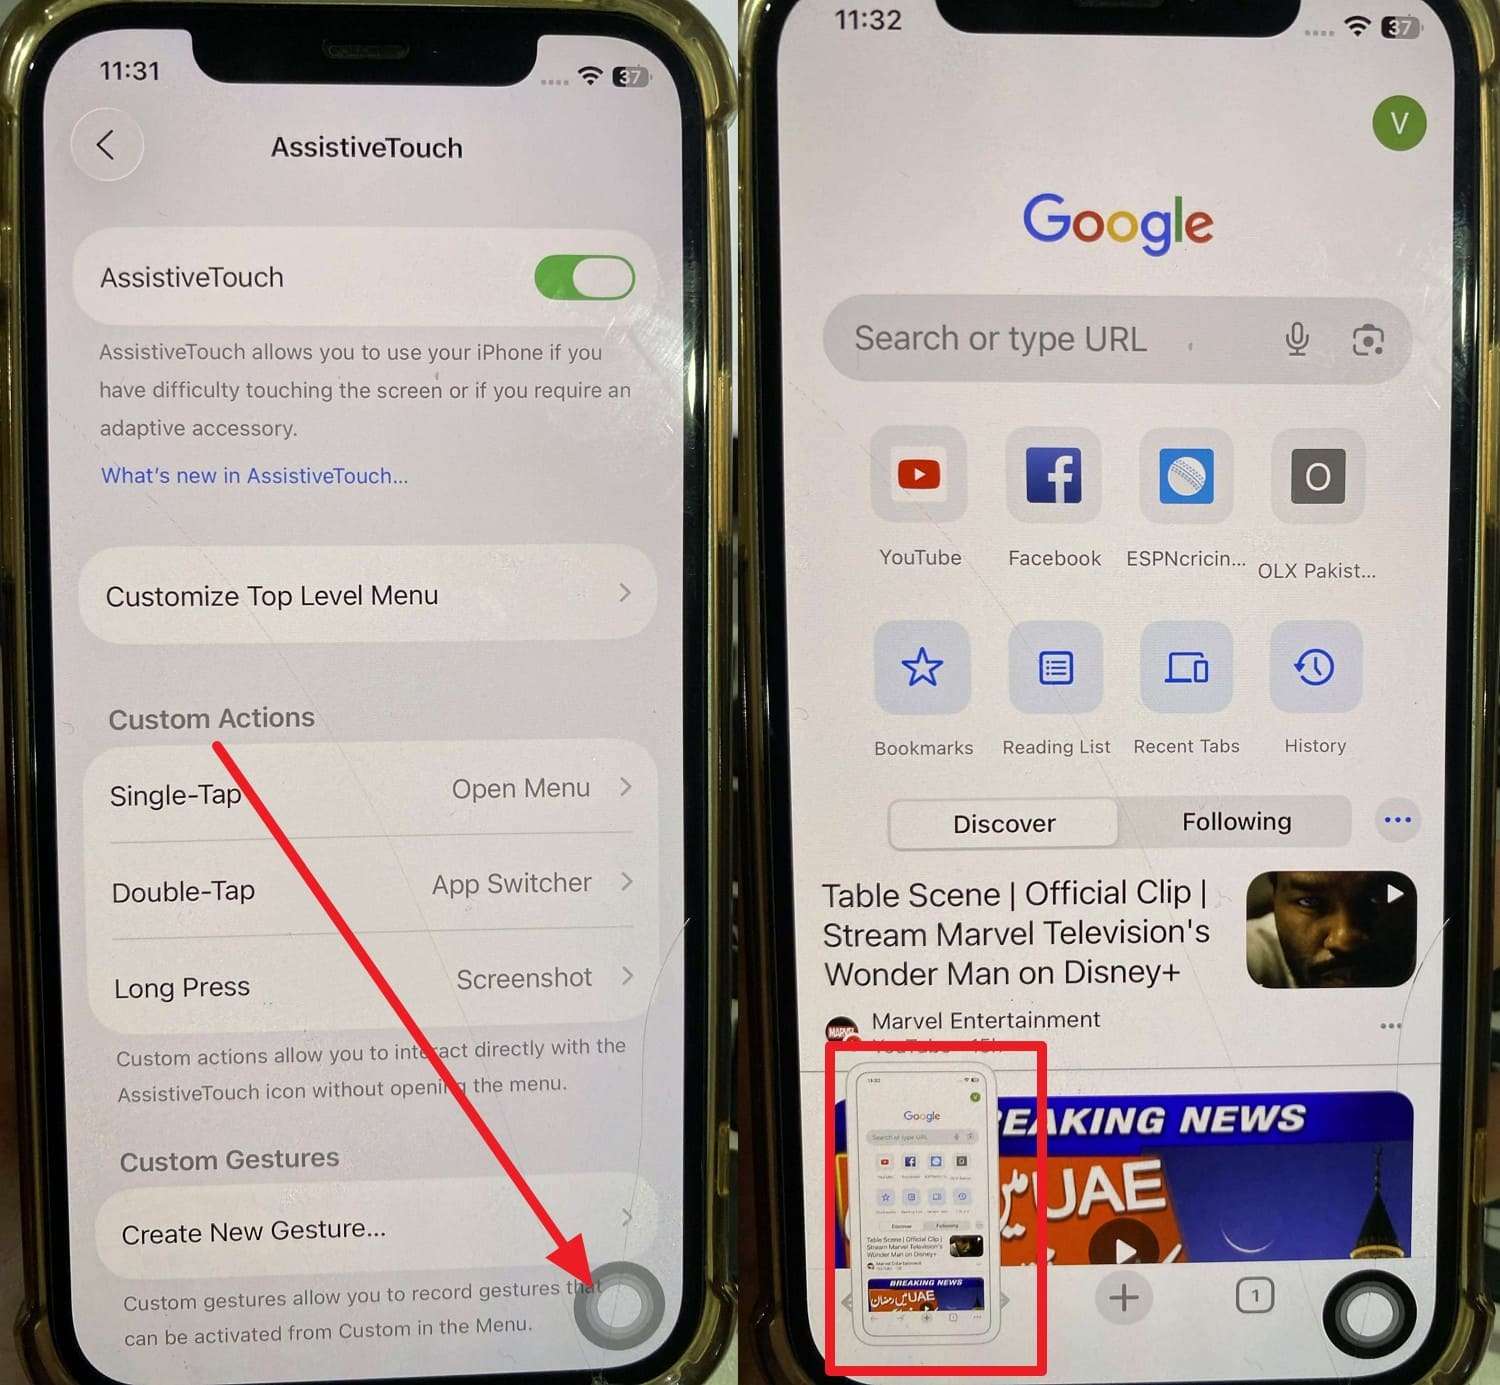
Step 2 Take Screenshot via Floating Button
This will let the grey, circular, floating button appear on your screen, then long-press it to take an HD screenshot.
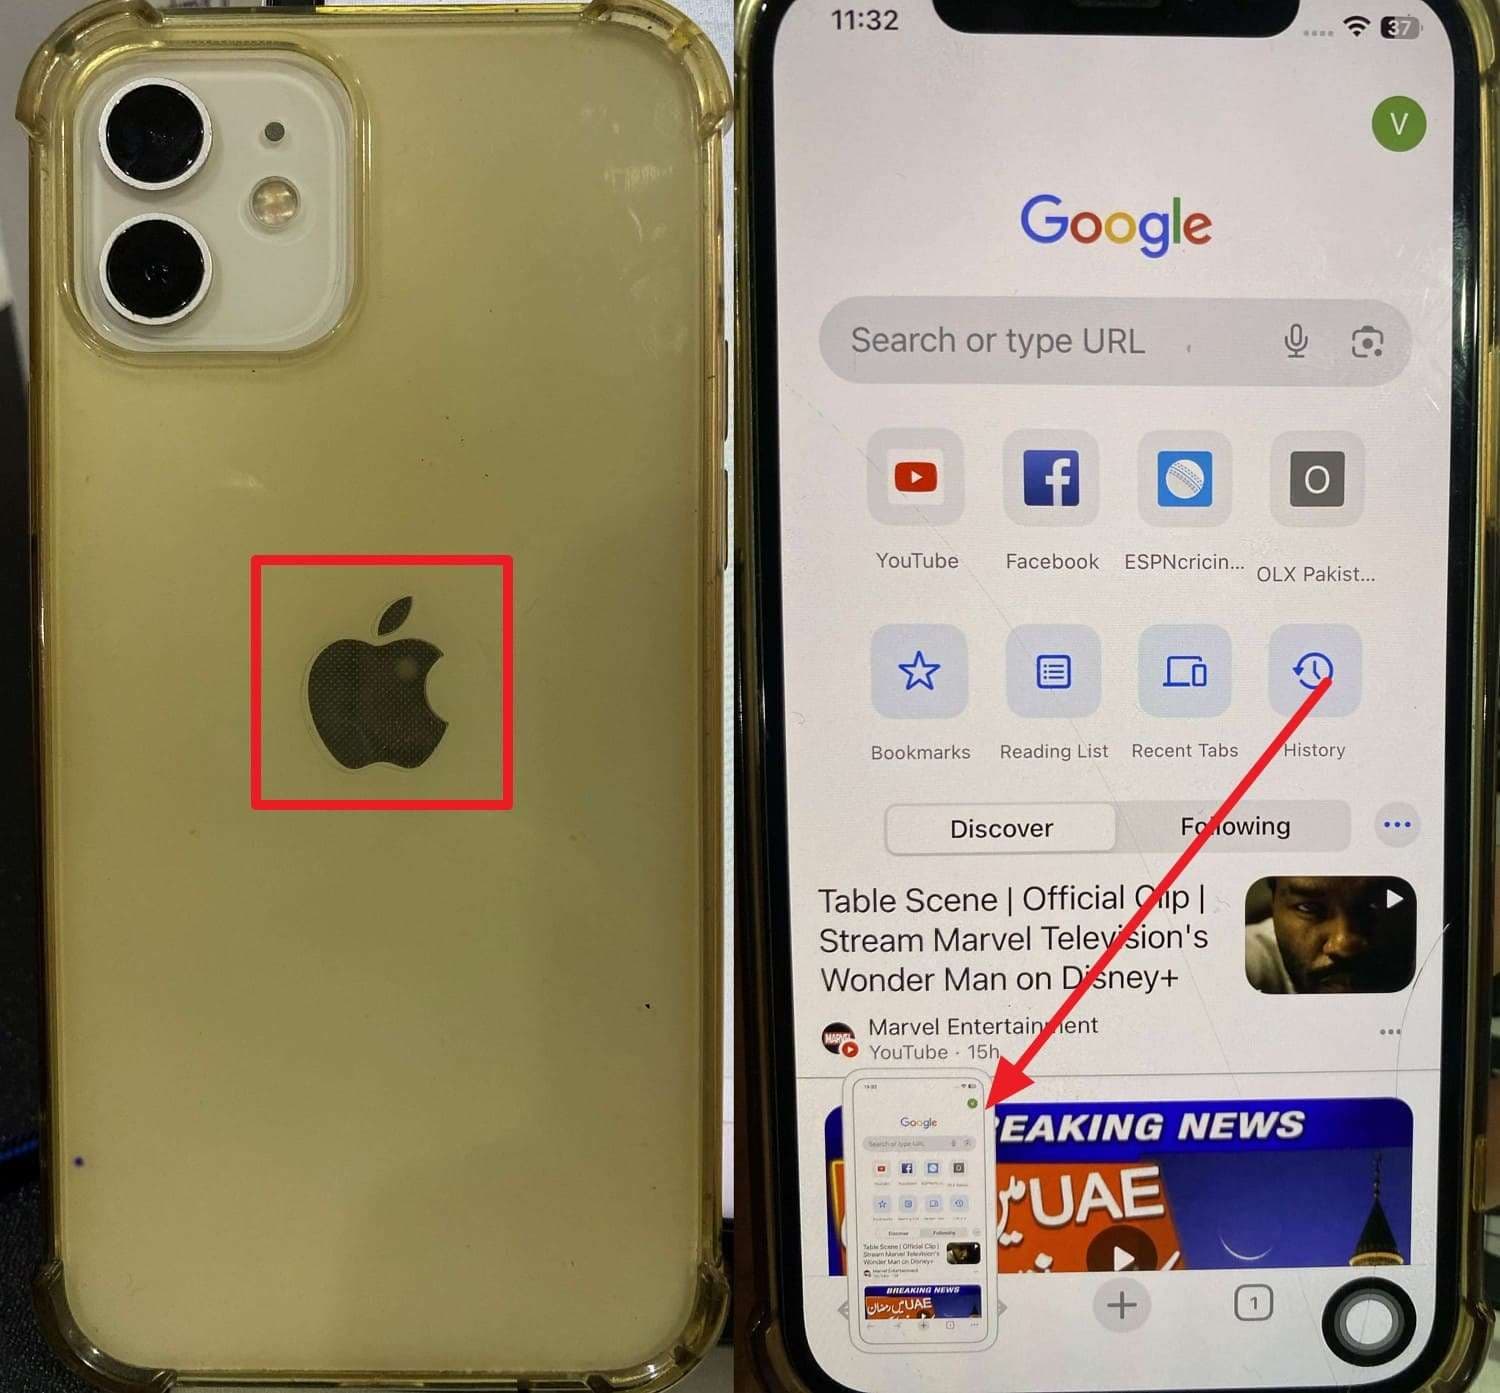
For Back Tap
-
Step 1 Set Up Back Tap Gesture
In Settings > Accessibility > Touch, scroll down to choose the "Back Tap" option. Then, pick the “Double Tap” menu and select “Screenshot” from the action list.

-
Step 2 Perform the Back Tap
Now, Double/Triple-Tap the Apple logo or the center of the back of your iPhone firmly. A flash will occur, and a thumbnail will appear in the corner.
For Siri
-
Step 1 Enable Siri Voice Command
Pick "Siri" in the settings, choose the "Talk to Siri" option, and choose the given talk options.
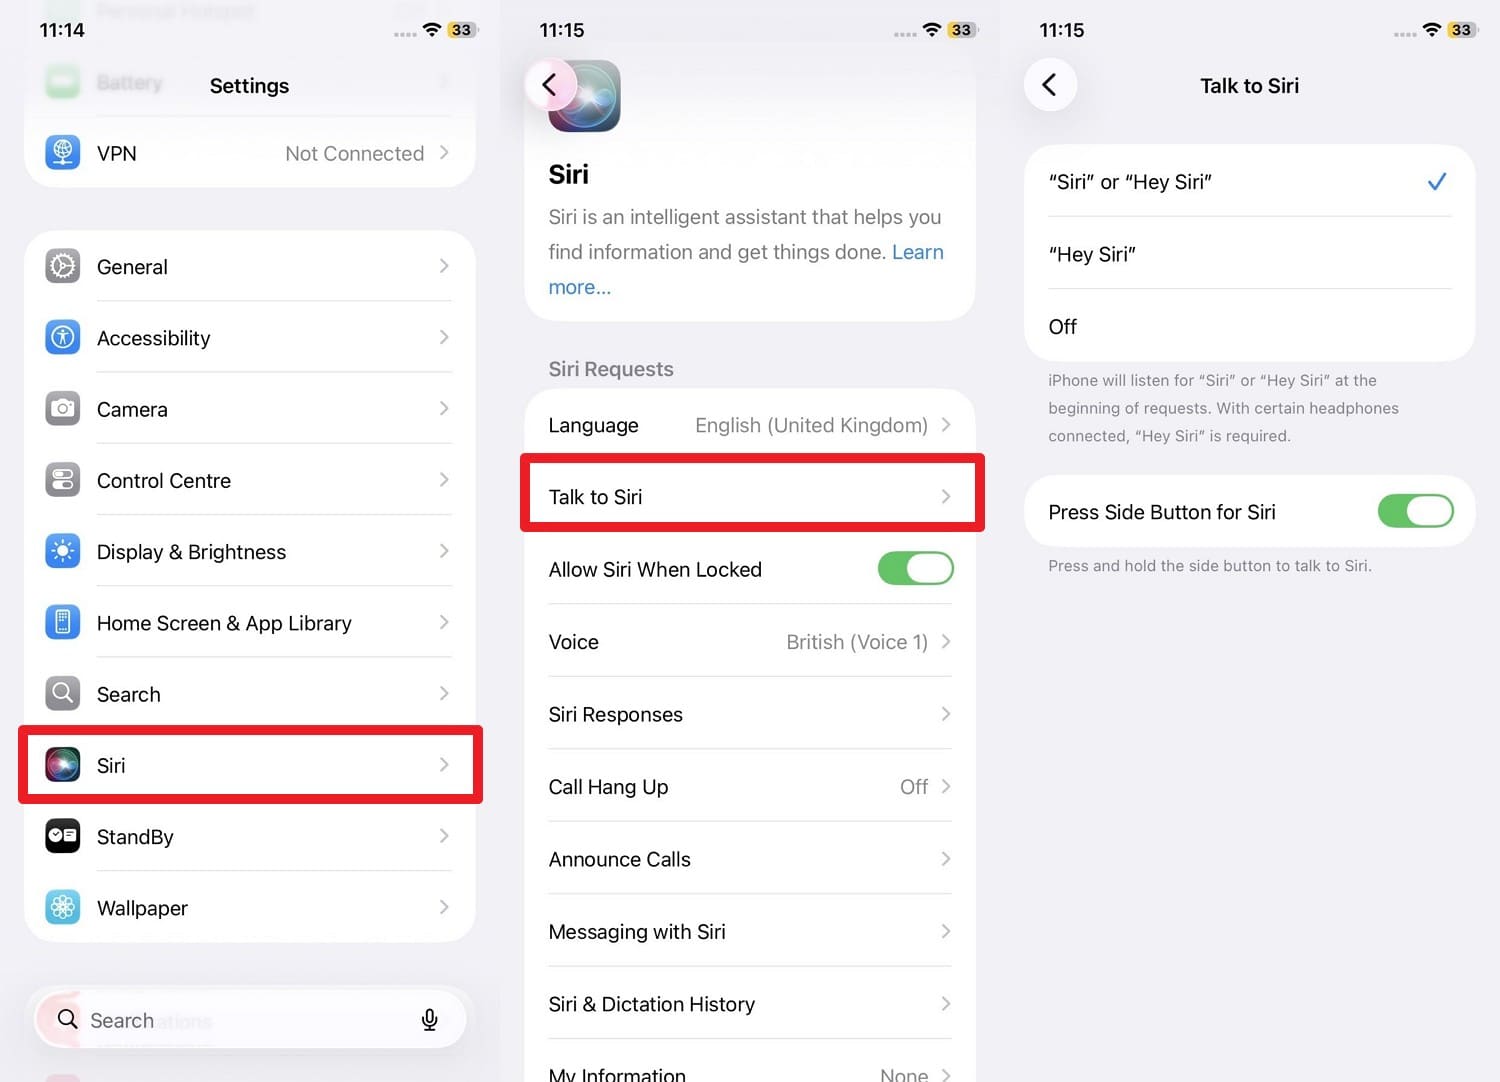
-
Step 2 Use Voice to Capture
Now, say “Hey Siri, take a screenshot,” and wait until it completes the command.
Option 2: Third-Party Application
Since you may face compression on phones, various Android and iOS apps can save the day, and some are explained in this section.
On Android
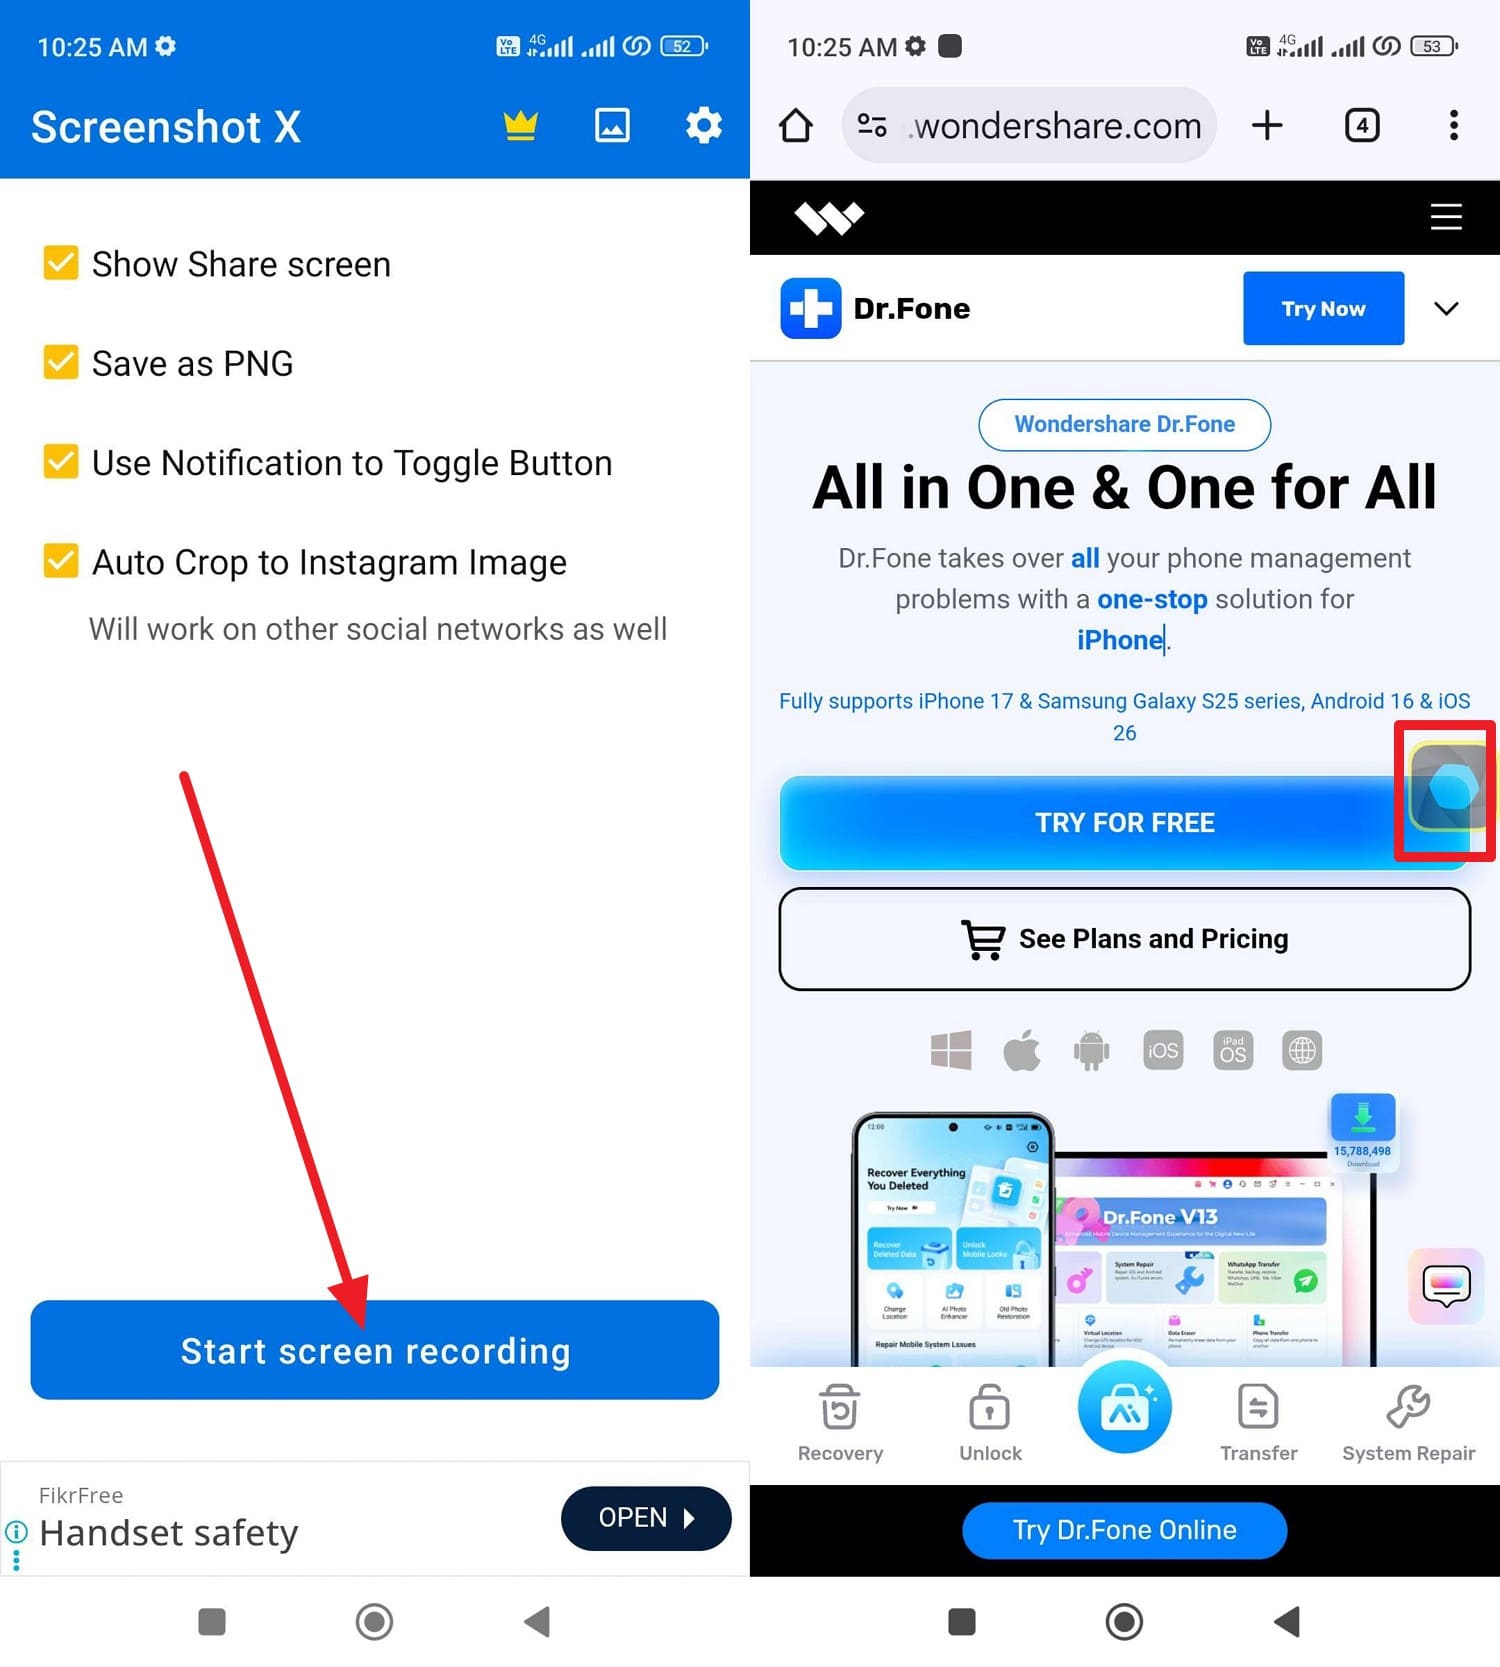
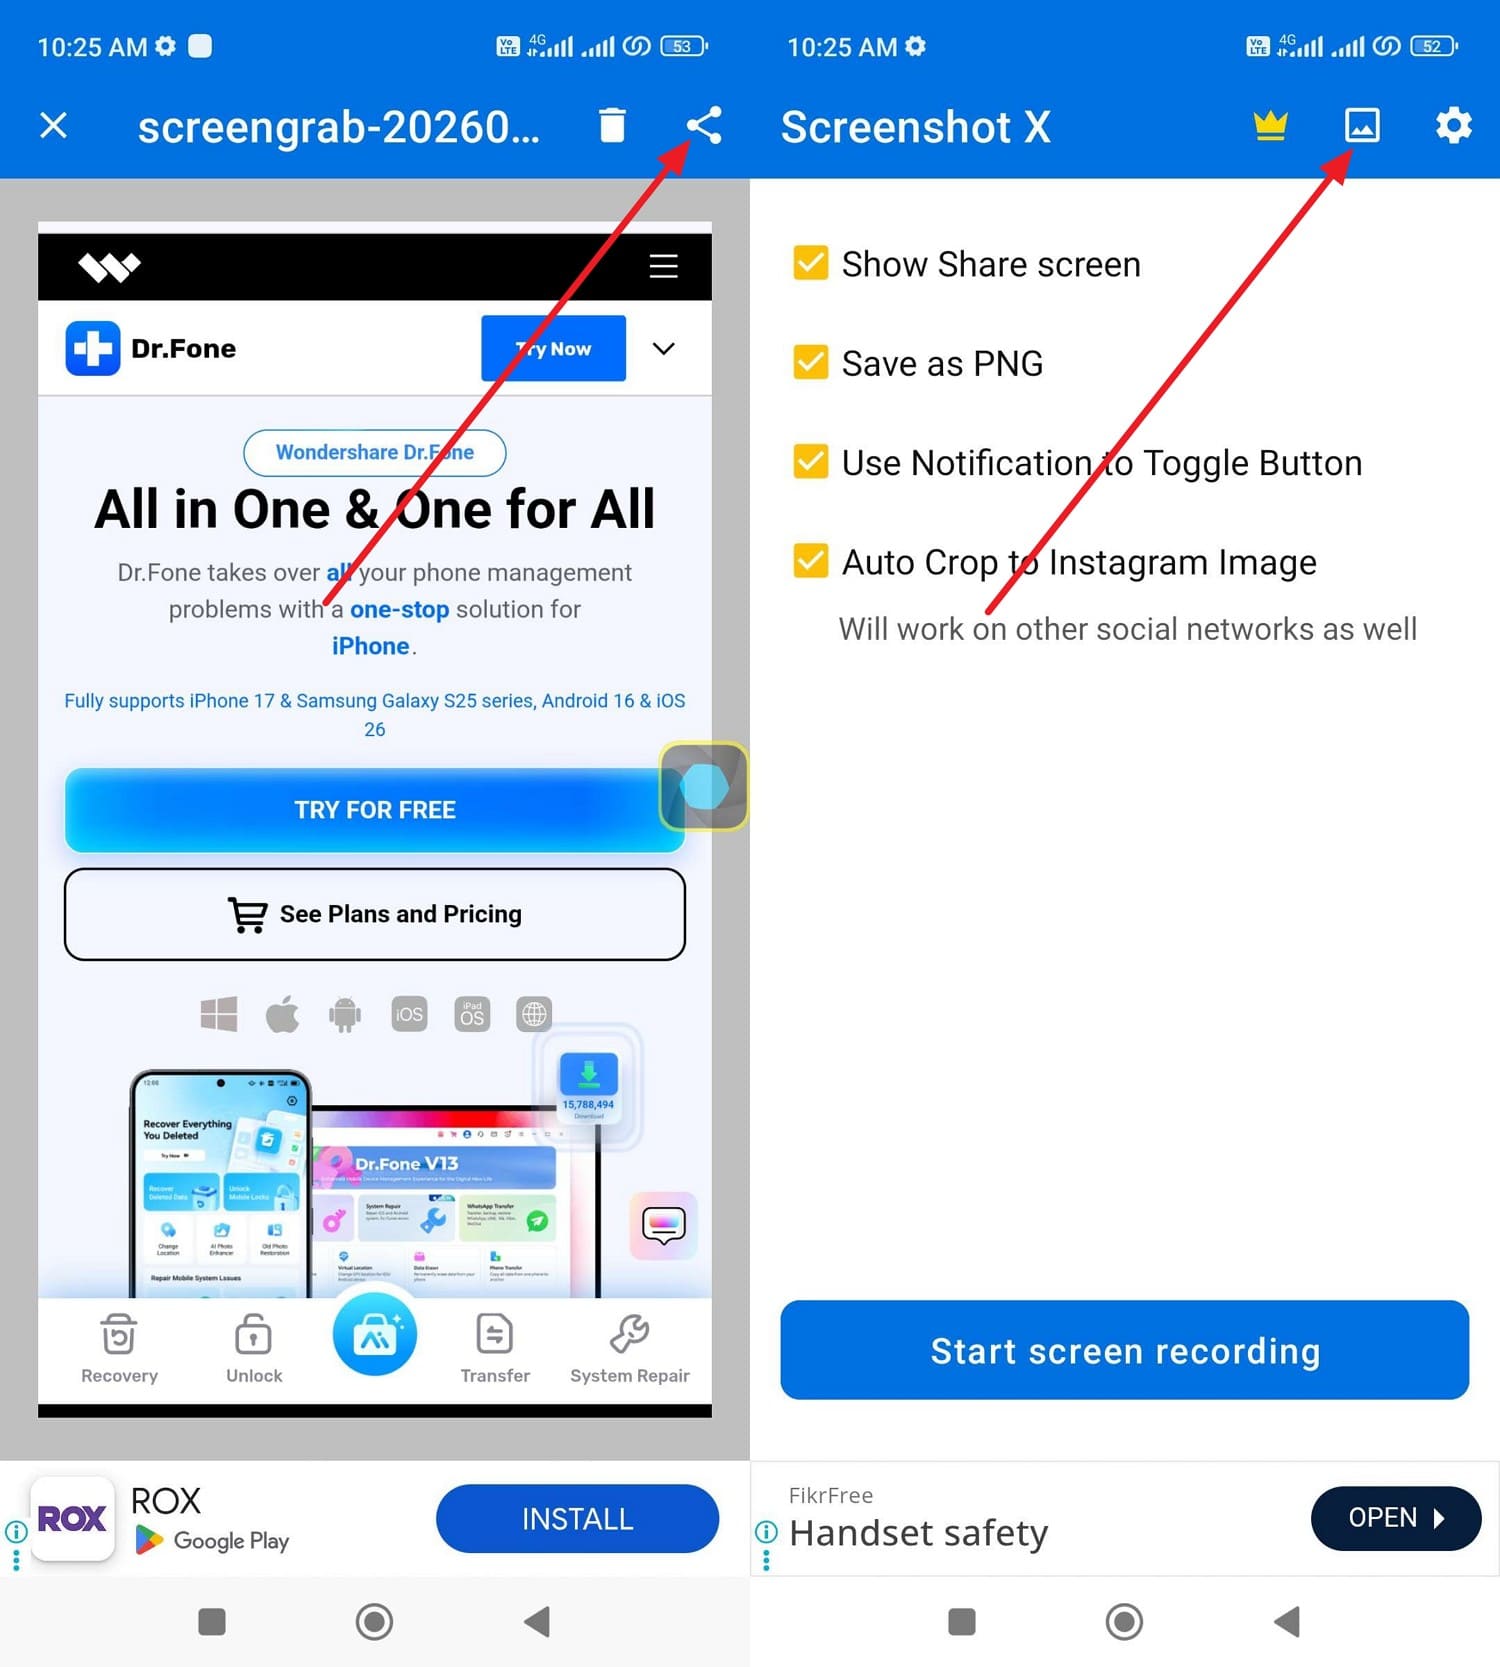
If the device compresses screenshots to save space, use a dedicated app, Screenshot X. This app lets you take high-quality screenshots easily and save them in PNG format. In this regard, the app offers a small shortcut icon that allows you to get a crisp screenshot, as guided below:
-
Step 1 Start the App and Activate Shortcut
After installing the app, grant the required permissions and tap the “Start Screen Recording” button. When the small “Shortcut” icon appears, head to the target screen and long-press it.
-
Step 2 Save or Share the Screenshot
Once the screenshot is captured, press the “Share” button or the “Image Folder” icon to save it as a PNG.
On iPhone
To learn how to take a high-resolution screenshot as an iOS user, use the StitchShot application. This app allows you to take a full-screen screenshot via the scroll option or capture a one-click web page screenshot of a specific page. Users can access them from the Screenshot Gallery, once captured through the mentioned steps:
-
Step 1 Enter Webpage URL
Choose the type of screenshot you want to capture, like “Webpage Screenshot,” and paste the link in the given textbox.

-
Step 2 Capture and Export
After pressing the “Go” button, as you get the preview interface, press the “Capture” icon. Once taken, choose to “Share” or save it in “PDF.”

Part 3. Take High Resolution Screenshot Windows: Best Native Methods
After knowing how to take high-quality screenshots on Android, follow the simple steps for Windows:
1. Print Screen (PrtScn)
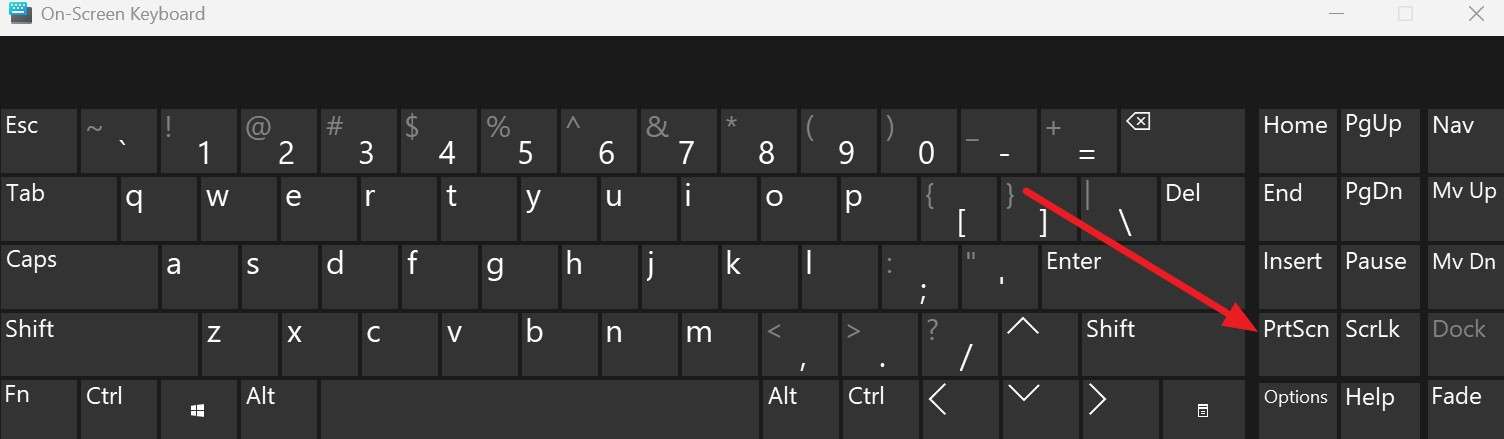
Print Screen captures your Windows screen at full resolution and saves it as a PNG, making it a quick solution for PC users. Additionally, it grabs the screen exactly as shown, and the PNG format preserves quality without loss. Since it works well on HDR or 4K displays, here is how it works:
-
Step 1 Press the PrtScn Button
In settings, enhance the Display and HDR settings and press the “PrtScn” button.
-
Step 2 Access the Screenshot
After that, the image will be saved in File Explorer’s “Gallery” or OneDrive as a PNG.

2. Win + PrtScn (PickPick Tool)
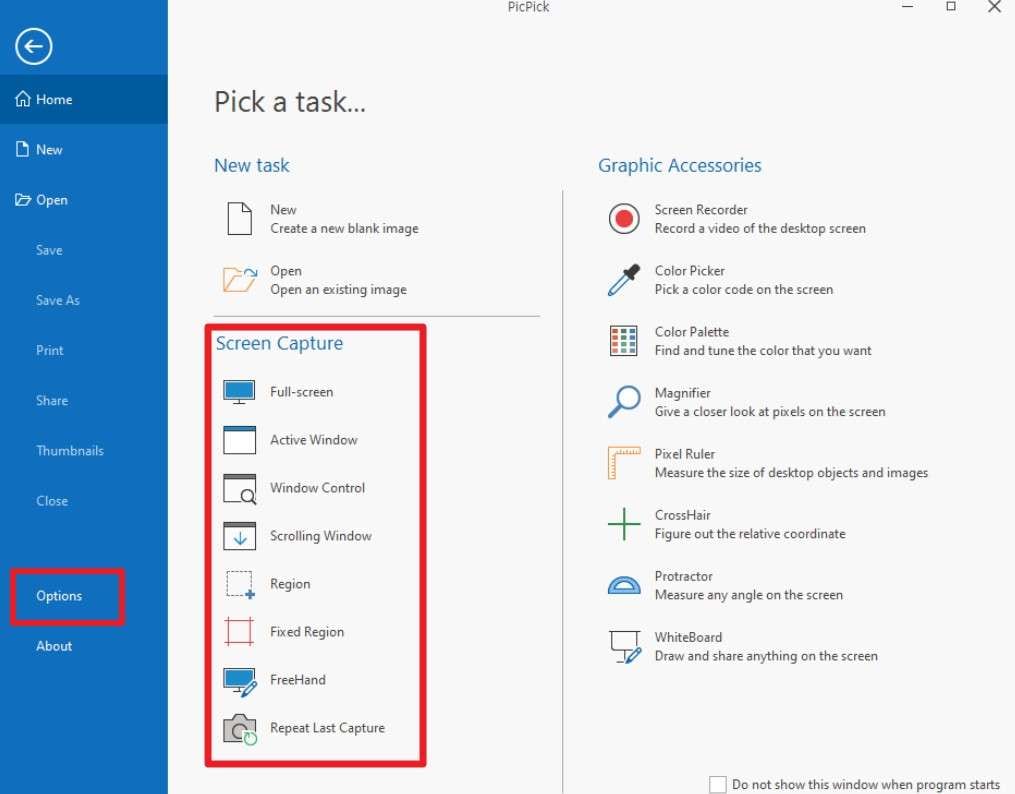
For screen capture with high resolution, you can use a combination of Win + PrtScn and the PickPick Tool. It can copy the image to the clipboard so you can paste it immediately, or users can take Scroll or Targeted screenshots. Unlike built-in ways, PickPick adds control and flexibility, and keeps file format, naming, and folders consistent, as illustrated:
-
Step 1 Configure Hotkeys in PickPick
With the tool installed, choose the HotKeys under the “File > Options > Hotkeys” section. After that, press the “Win+ PrtScn” key and choose whether to capture a specific region or take a scroll screenshot, then click the screen.
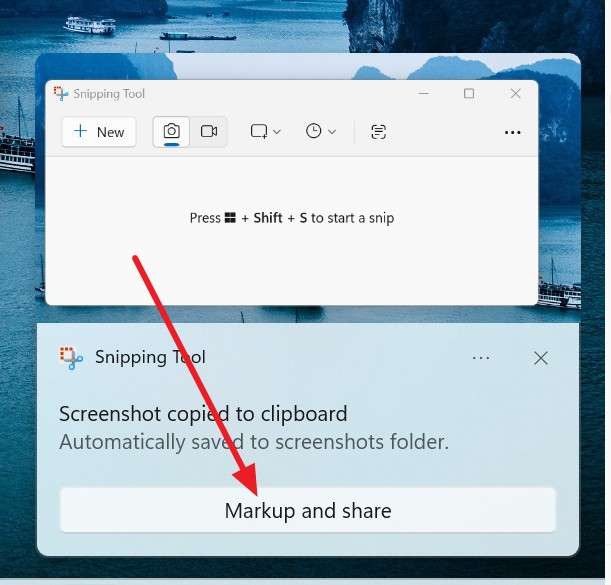
3. Snipping Tool & Snip & Sketch
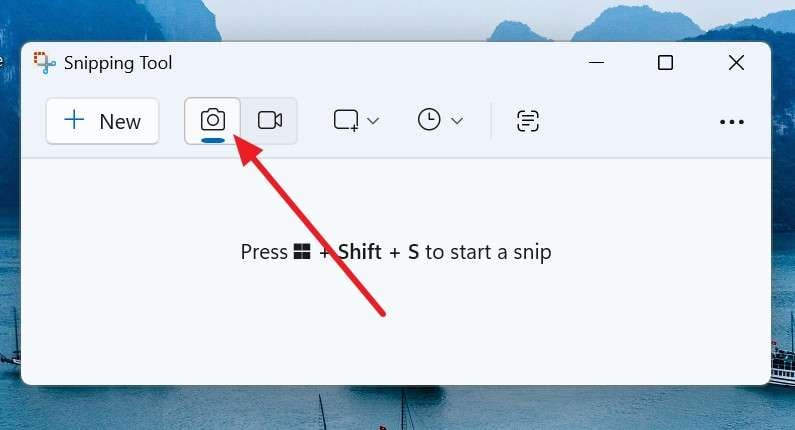
With a seamless command “Win + Shift +S,” as you open the Snipping Tool, use it to take a high-resolution screenshot. There, you can make shapes like a rectangle, a free-form shape, a window, or a full-screen shape. Hence, once taken, it copies the screenshot to the clipboard instantly, so you can paste it in an email, chat, or share as demonstrated:
-
Step 1 Open and Use Snipping Tool
Press “Win + Shift +S” then when the tool opens, choose the “Camera” icon, tap the “Got It” button, and draw a shape to capture the screenshot.
-
Step 2 Edit and Share
Once done, choose the “Markup and Share” option to edit or share it further.
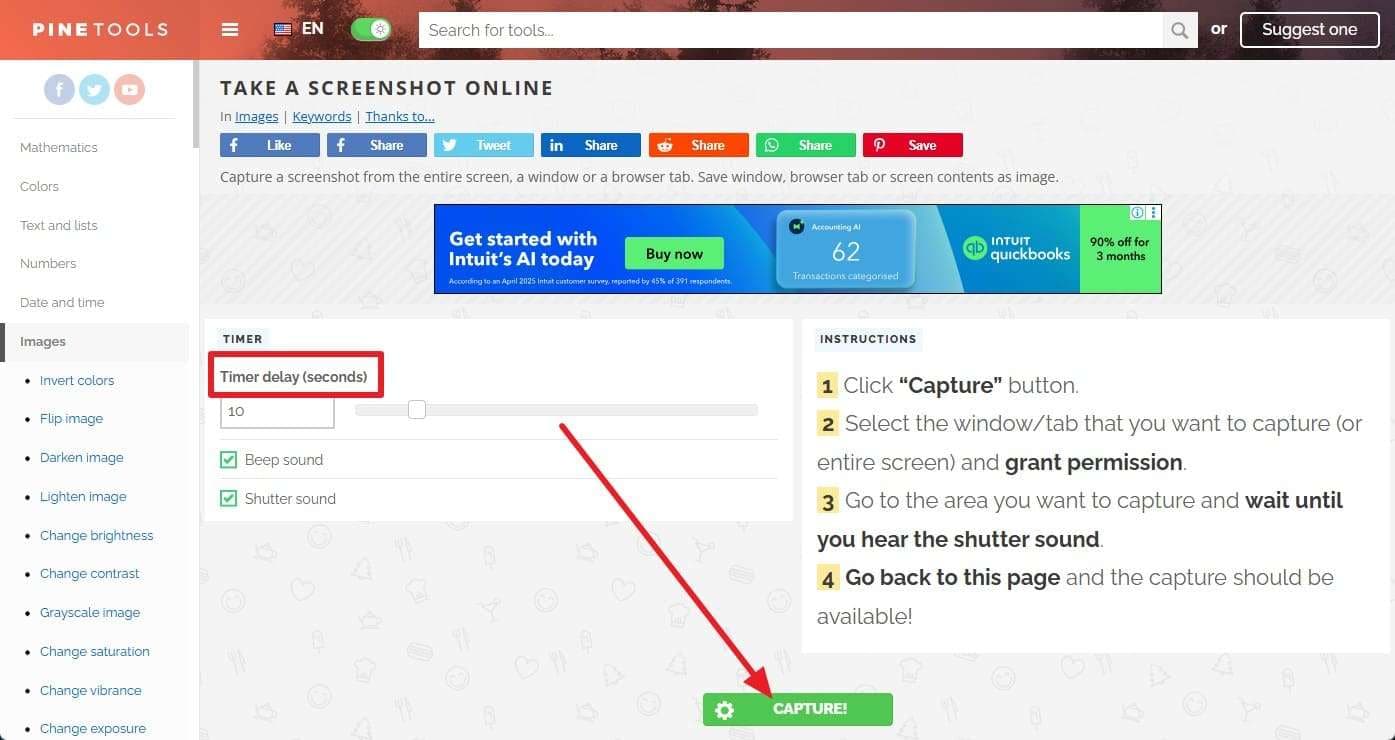
4. Online Tool (Pine Tools)
Online tools like Pine Tools also aid in high-resolution screen capture on Windows, and offer options like Timer Delay or Beep Sound. You can capture a tab, window, or the entire screen and set a delay to capture menus or tooltips. Moreover, screenshots can be copied to the clipboard or downloaded as PNG, JPG, or WebP, as guided:
-
Step 1 Set Delay and Click Capture
Set the “Timer Delay” settings and press the “Capture” button on the main interface.
-
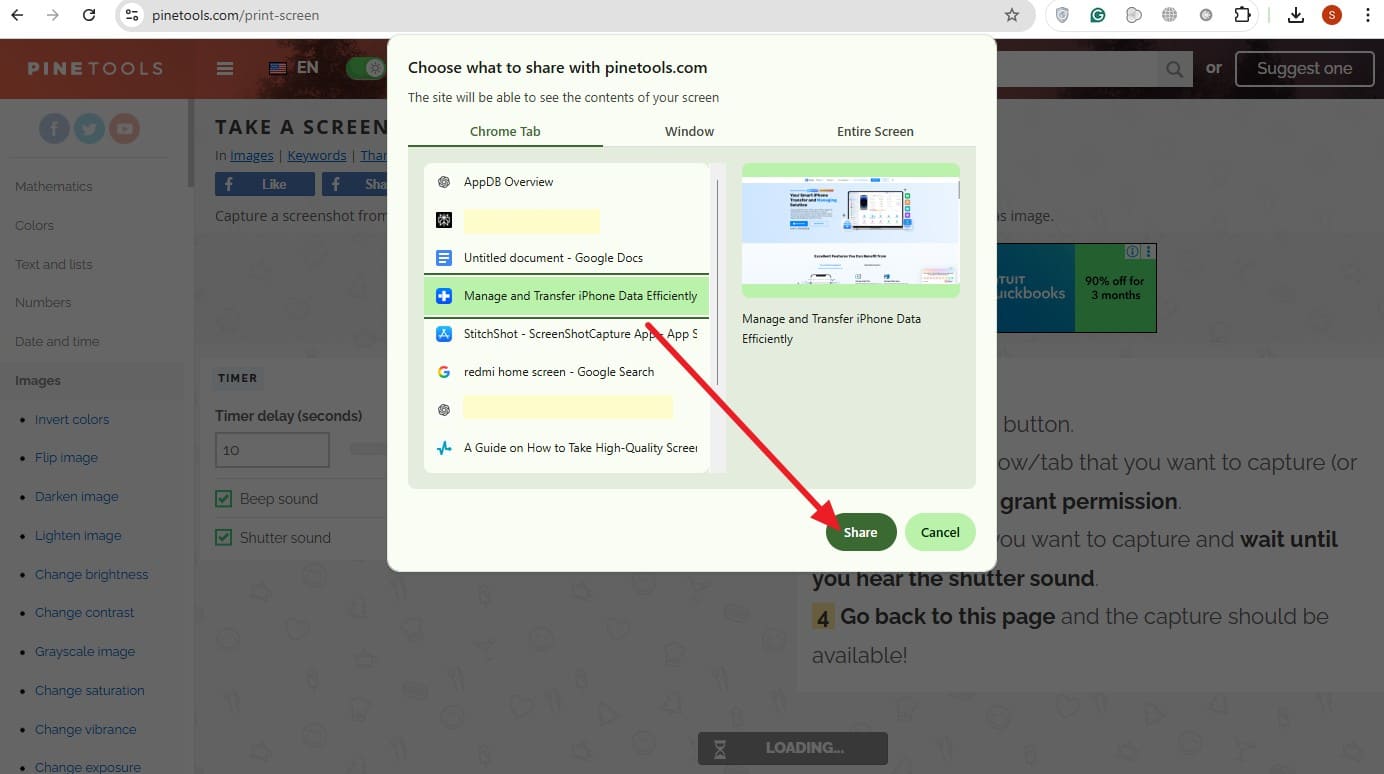
Step 2 Select Screen Area
After that, choose the screen you seek to capture and pick the “Share” button.
-
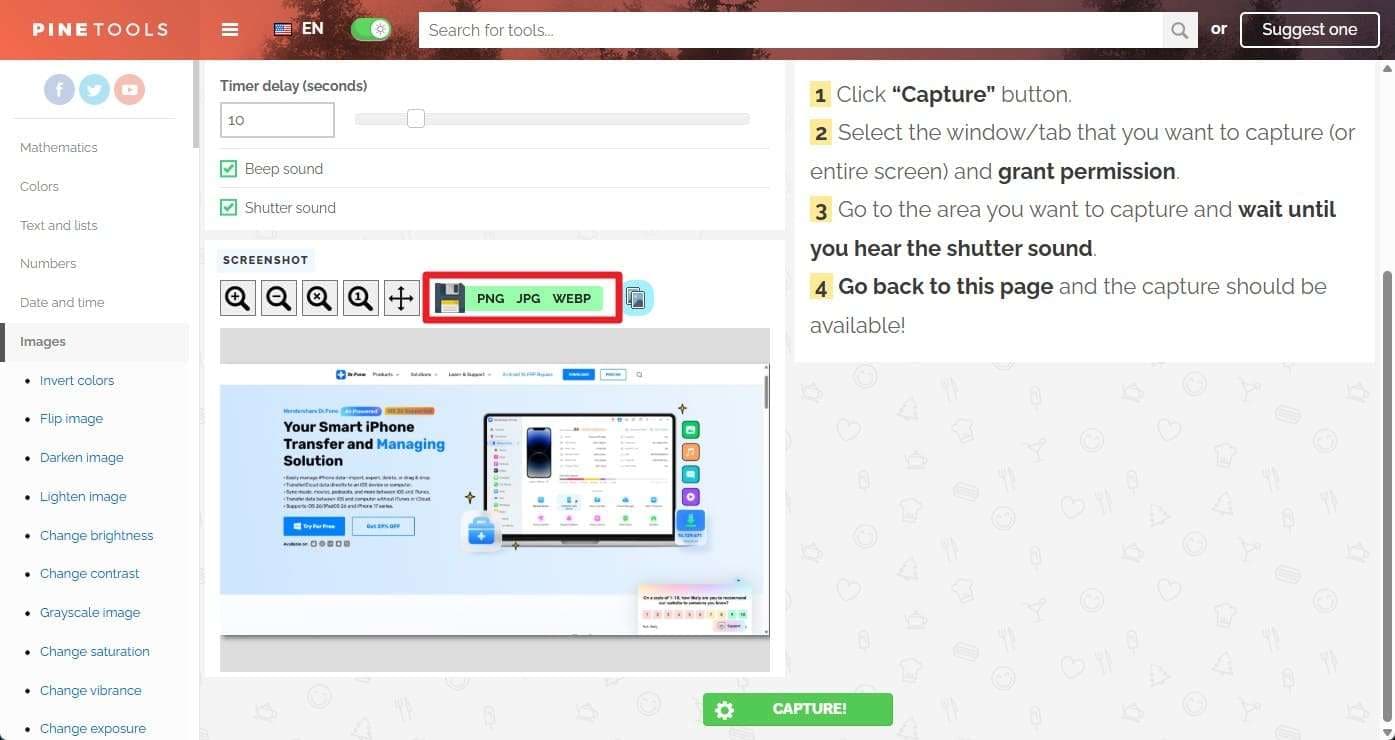
Step 3 Save in High-Quality Format
Wait for the delay time and beep to end, and the tool will automatically take the screenshot. Once done and displayed on the tool, choose between “PNG, JPG, or WebP” format to save it.
Part 4. Screen Capture High Resolution on Mac - Detailed Insights
Those who seek to know how to capture high-resolution screenshots on a Mac, here are some ways for you:
Option 1: Use Native Shortcuts (Full Resolution)
- Command + Shift + 3: Capture the whole screen at the current resolution.
- Command + Shift + 4: Capture area or window by pressing Space after 4.
- Command + Shift + 5: Open toolbar for full, window, area, timer, and save. Later, use the given Edit option to alter it and save it in HD quality.
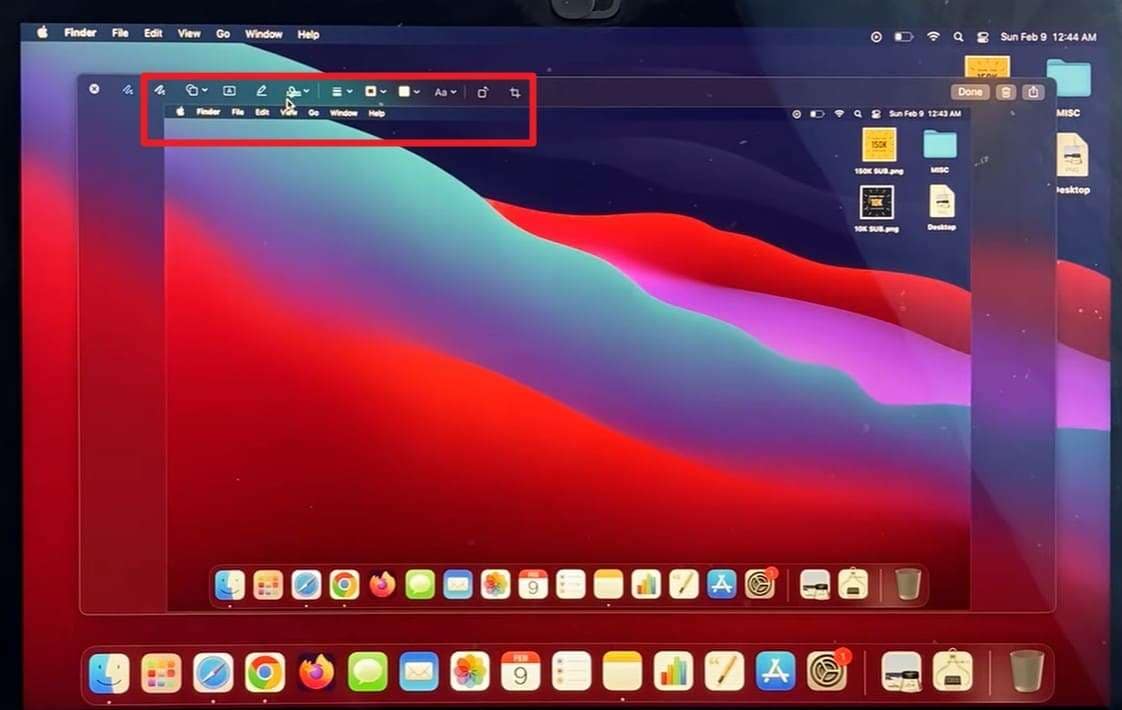
Option 2: Use The Screenshot App’s
To take a high-quality screenshot with precise zoom, use CleanShot X. It is a paid screen capture and recording app for macOS that's a better replacement for the built-in screenshot tool. CleanShot X even comes with more than 50 features to help users capture, edit, and share content easily. Additionally, it lets you quickly edit screenshots with tools to crop, annotate, highlight, or blur private details, as guided below:
-
Step 1 Activate CleanShot X
As you install the tool, press “Command + Shift + 4” or any custom keys until the stretcher with Zoom box appears.
-
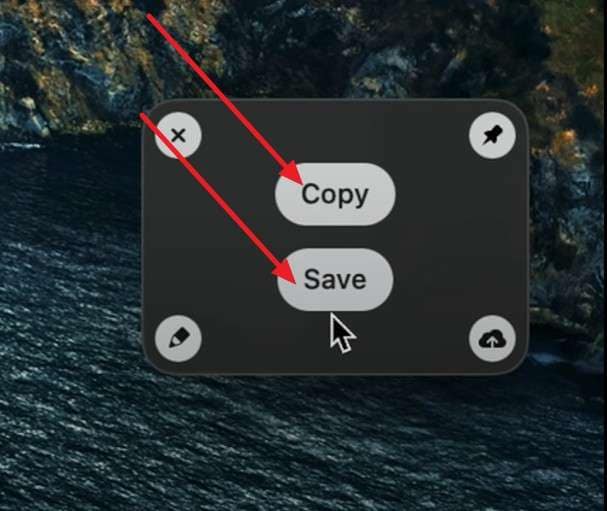
Step 2 Save or Copy the Screenshot
Stretch it to specific areas, windows, or full-screen, and use the floating “Quick Access Overlay” to “Copy” or “Save” a screenshot.
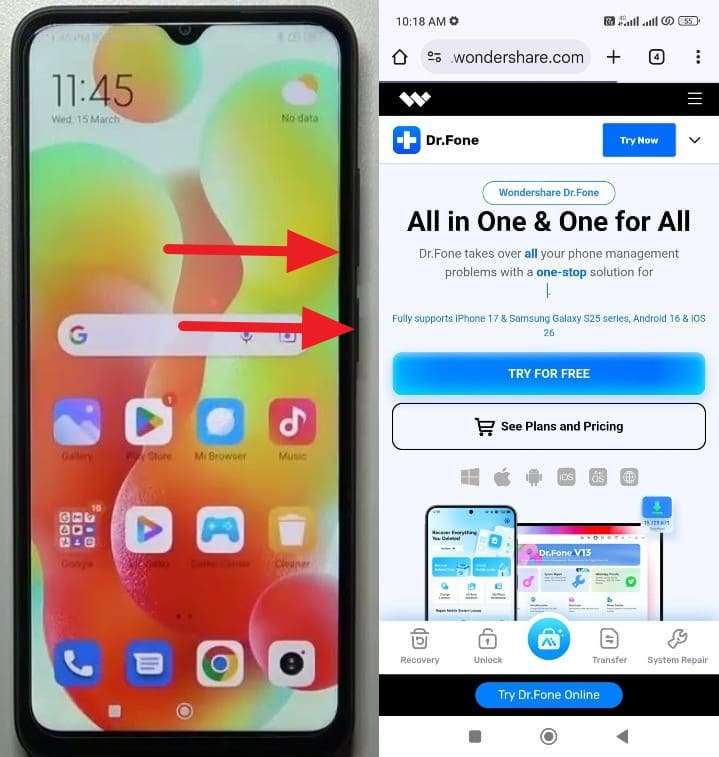
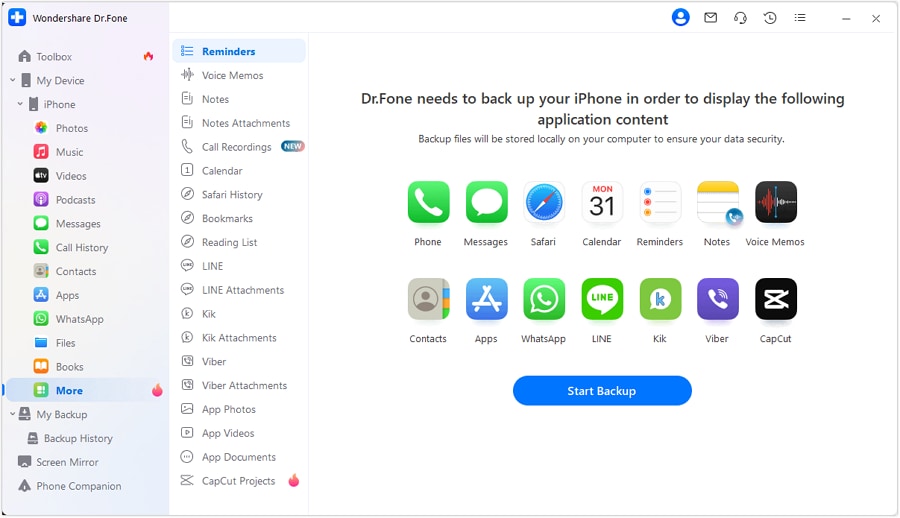
Bonus Tip. Use Wondershare Dr.Fone to Manage & Organize Screenshots
Now that you know a seamless way to capture high-resolution screenshots, you might need to manage them when storage space runs out. Here, Wondershare Dr.Fone is the ideal choice. With the support for iOS 26/iPadOS 26 and iPhone 17 series and Android phones/tablets, you can move iCloud data to iOS or any computer. Users can move data selectively in batches, without iTunes or iCloud.
With simple buttons, it makes import and export effortless in 3 simple steps. All in all, the tool is ideal for all types of users and needs no learning curve. Unlike other tools, it displays multiple subcategories of Photos, organized according to date and time, to manage data hassle-free. Other than import and export, you can also choose to delete the media file, but doing so takes hours in the Photos app.
 Effortlessly manage data through preview, delete, export, etc.
- Transfer all data between devices.
- Robust backup solutions for reliable data protection.
- Mirror screens to PC for meetings, teaching, and control.

Detailed Guide to Manage iOS Data with Dr.Fone - Data Manager
Here is how you can manage the high-res screen-captured image from iOS to any computer in 3 steps:
-
Step 1 Access the iOS Data Manager and Connect iDevice
Locate the name of your iPhone under the “My Device” section as you connect it with the official Apple-certified cable.
-
Step 2 Choose the Photos Category to Import/Export
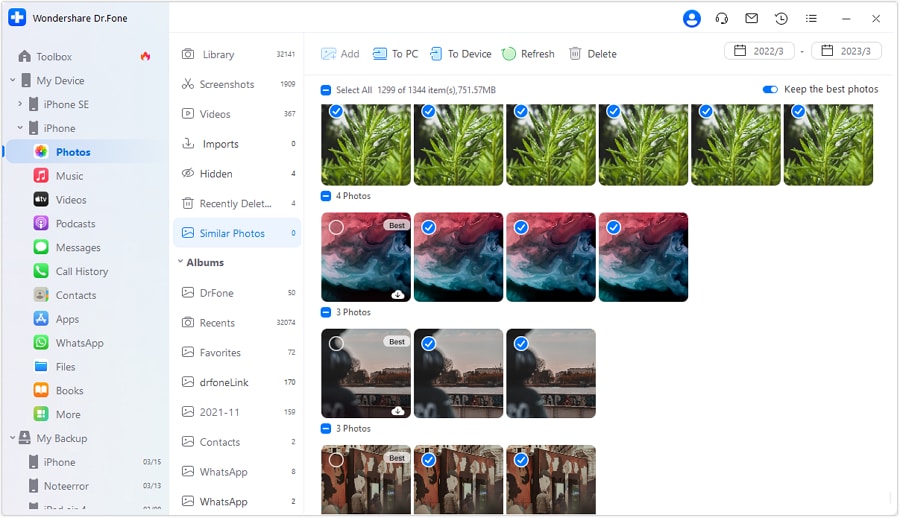
Head to the “Photos” section now and select the subcategories to choose the HD captured screenshots. There, pick the “To PC” button to export, “To Device” to import, or press “Delete” to make space.

Conclusion
To wrap up, this guide has explained what a high-quality screenshot is and how to take one. Some expert tips and detailed steps for Android, iOS, Windows, and Mac are also shared to guide users. So, if you have taken multiple photos on your phone and want to manage or organize them, the usage of Wondershare Dr.Fone is suggested to import, export, or delete data.


FAQ
-
1. Does file format affect screenshot quality?
Yes, PNG keeps edges and text sharp without compression, while JPEG noticeably reduces quality. Therefore, choosing PNG ensures clear screenshots, especially for tutorials, documents, or UI captures on computers. -
2. Can screenshots keep HDR or color accuracy?
If the display supports HDR and captures matches settings, colors remain accurate and bright. Thus, proper display setup preserves original brightness, contrast, and colors in screenshots for all uses. -
3. Why do screenshots sometimes shrink on social media?
Many platforms automatically compress or resize images, which reduces sharpness and text clarity noticeably. Consequently, sharing PNG or high-resolution images helps retain detail for viewers when posting online.
 Add Wondershare Dr.Fone as a preferred source on Google