Download All Google Photos to Your Phone at Once [iPhone 17 Supported]

Jun 30, 2026 • Filed to: Device Data Management • Proven solutions
 TL;DR:
To download thousands of Google Photos to your phone at once, you must bypass the mobile app's limitations by either downloading your entire library to a computer first or generating a bulk export archive via Google Takeout.
● The Google Photos mobile app restricts iOS users to downloading images individually, whereas Android users can select and download multiple photos simultaneously using the app's 'Copy to Files' feature.
● Exporting your library directly to your phone via Google Takeout delivers the images in a compressed ZIP file, requiring you to have a dedicated RAR or ZIP extraction app installed on your device to open and view the photos.
● For bulk transfers to iOS devices, including the iPhone 17, you must download your web library to a Mac or Windows PC first, and then use the Wondershare Dr.Fone software to import the files directly into your iOS Photos application.
Ask AI for a summary
 ChatGPT
 Perplexity
 Gemini
 Claude
 Grok
Grok
Dr.Fone Basic:
Better Control for Your Phone
Manage, transfer, back up, restore, and mirror your device

Google Photos is one of the most convenient ways to store and organize your memories in the cloud. However, when you search for how to download Google Photos to your phone, most results only explain how to save pictures one by one. But what if you want to move your entire library—thousands of photos and videos—directly to your device? Whether you’re using Android or the latest iPhone 17, learning how to quickly download all Google Photos to your phone in bulk can save you time and ensure your memories are always accessible offline.
If you want to access these photos on your phone without an internet connection or simply prefer to transfer your Google Photos to your phone, this guide is what you are looking for. We'll explore four effective methods on how to download Google Photos to your phone.
- Part 1. What You Need to Do Before Downloading Google Photos
- Part 2. How to Download Individual Google Photos to Your Phone (iOS & Android)
- Part 3. How to Download Multiple Photos from Google Photos (Android)
- Part 4. How to Download from Google Photos (Web) to Computer

- Part 5. How to Transfer from Google Photos to iPhone With Easy Software
- Part 6. Transfer From Google Photos to iPhone Using Google Takeout
Part 1. What You Need to Do Before Downloading Google Photos
Before we get into the process of downloading your Google Photos to your phone, there are several crucial points to consider. Understanding these aspects helps make sure a smooth and successful transfer process.
1. Check Storage Space
Check the available storage space on your phone before downloading from Google Photos to your phone. Ensure that you have enough space to accommodate the photos you intend to download. If necessary, clear up space by deleting unnecessary files or apps.
2. Ensure A Good Internet Connection
Since downloading photos directly from the Google Photos app requires an internet connection, transferring a large number of photos at once might be more efficient using a Wi-Fi connection to avoid excessive data charges and have faster download speeds.
3. Set the Quality Settings
Google Photos stores your images in their original format and quality unless you've opted for compression to save space. You can set the quality settings before downloading your Google Photos. Higher-quality images and videos may take up more storage space on your phone. Choose the appropriate quality settings based on your preferences and available storage.
4. Have Adequate Battery Life
Downloading a large number of photos can take time and consume significant battery power. It's advisable to have your phone fully charged or connected to a power source during the photo transfer process to prevent interruptions due to low battery.
You May Also Like ![]()
Part 2. How to Download Individual Google Photos to Your Phone (iOS & Android)
The first method to download from Google Photos to your phone is by using the built-in download feature within the app itself. Google Photos offers the flexibility to download individual or multiple photos at once.
Whether you are an iOS or Android user, you can simply follow these steps on how to get photos from Google Photos to your phone:
Step 1: Open Google Photos on your phone.
Step 2: Locate the photo you wish to download. Tap the photo to open it
Step 3: Once opened, tap the three-dot menu icon in the top-right corner.
Step 4: From the options provided, select "Download" or "Save to device." The selected photo will be downloaded and saved to your phone's local storage.

Note: This option is only available if the photo from Google Photos is not available on your device.
Part 3. How to Download Multiple Photos from Google Photos (Android)
To download multiple photos from Google Photos on Android, you can efficiently use the 'Copy to Files' feature. Although this method doesn’t cater to iPhone users, you can refer to the next section for alternative options.
Follow these steps on how to download photos from Google Photos to your phone:
Step 1: Open Google Photos on your Android device and sign in with your account.
Step 2: Tap and hold on one photo to start selecting multiple photos. You can tap on each photo you want to download to select them.
Step 3: Once you've selected the photos, tap on the three-dot menu icon and choose 'Copy to Files'

Step 4: You'll be prompted to choose where you want to copy the photos. Select the folder where you want to save the photos within the Files app. Tap 'Paste' or 'Save' to save the selected photos to your device.

Part 4. How to Download from Google Photos (Web) to Computer
Another efficient method how to download all photos from Google Photos to your phone is by using your PC or computer. This approach offers a quicker and easier way to transfer a large number of photos in one go compared to downloading directly to your phone. Furthermore, iPhone users can also employ this method.
In order to download all Google Photos to your phone, you need to download these photos from Google Photos on the web to your computer first. Follow these steps:
Step 1: Go to the Google Photos website on your computer browser. If you're not already signed in, you'll need to sign in to your Google account associated with Google Photos.
Step 2: Once signed in, you'll see all your photos and albums. You can browse through your photos and albums on Google Photos to locate the ones you want to save to your iPhone.
Step 3: Click on the photo(s) you want to save. You can select multiple photos or all photos from a specific date by clicking on the respective date.
Step 4: After selecting the desired photos, click on the three dots (more options). From the dropdown menu, select "Download." Your selected photos will begin downloading to your computer.

Part 5. How to Transfer from Google Photos to iPhone With Easy Software
Once you have all of your photos from Google Photos on your computer, the next step is to transfer them to your iPhone. This method will be easy if you are using Wondershare Dr.Fone. This software stands out as an all-in-one solution for managing and transferring data across different devices and platforms.
One of Dr.Fone’s Phone Manager features offers Quick Transfer which allows you to transfer your photos to your phone in no time. Moreover, Dr.Fone is also compatible with Mac, Windows, iOS, and Android platforms, making it versatile regardless of your devices.
Dr.Fone - Phone Manager (iOS)
Transfer from Google Photos to iPhone at Once
- Transfer, manage, export/import your music, photos, videos, contacts, SMS, Apps, etc.
- Back up your music, photos, videos, contacts, SMS, Apps, etc., to the computer and restore them easily.
- Transfer music, photos, videos, contacts, messages, etc., from one smartphone to another.
- Transfer media files between iOS devices and iTunes.
- Fully compatible with the newest iOS system.


How to transfer Google Photo to iPhone with Wondershare Dr.Fone:
Step 1: Launch Dr.Fone after making an iOS connection
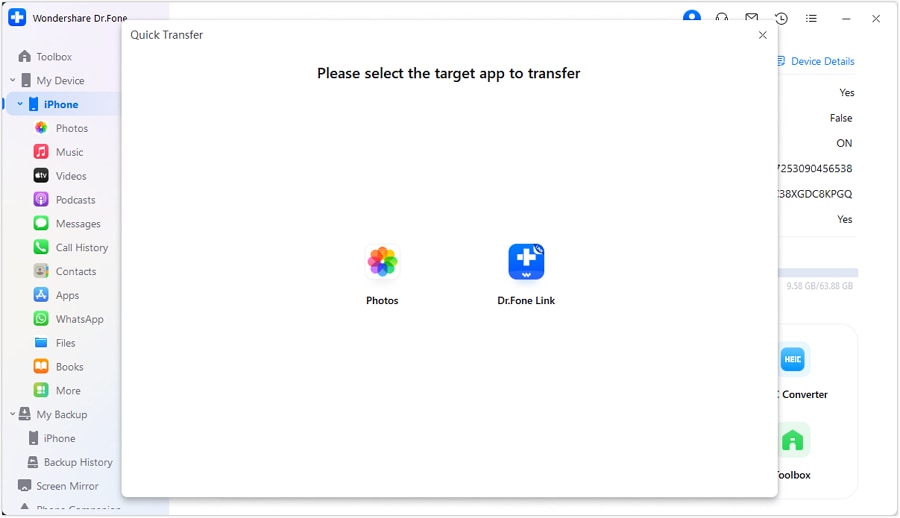
Open Wondershare Dr.Fone and make an iPhone connection to your computer. Once the software detects your device, click Quick Transfer on the home screen.

Step 2: Import files for transfer
Once a new window appears, you can add the files you wish to transfer to your phone by clicking "Select Files." You can also drag and drop the files for a quicker process.

Step 3: Save to Photos
Following file selection, Dr.Fone may present you with the option to choose the destination application where you want to store the specific data type. Opt for Photos to proceed with the transfer process.
Step 4: Finalize the photo transfer
Once it finishes, the software will provide a notification indicating the successful transfer. To locate the transferred data, click on the "i" icon to reveal a pop-up displaying the storage location.

Part 6. Transfer From Google Photos to iPhone Using Google Takeout
Another solution on how to transfer photos from Google Photos to the phone is Google Takeout. Google Takeout is a web-based tool by Google that you can use to export your Google data, including Google Photos. You can also use this tool to export and transfer Google Drive content, email, documents, and more.
However, it's important to note that this method requires you to have a RAR app or the ability to extract ZIP files in order to view your photos after the transfer. If you are ready, here’s how to download all photos from Google Photos at once using Google Takeout:
Step 1: Go to the Google Takeout website using your computer browser.
Step 2: Once on the site, opt for the data you wish to include in your export. In this instance, select Google Photos and proceed by clicking "Next Step". Google Takeout offers the flexibility to export approximately 55 types of data.

Step 3: After selecting Google Photos, designate the file destination. You have the option to either send the download Image name via email or choose a direct download. Then, specify the file type, size (which will impact your photo quality), and frequency. Once done, click "Create Export".

Step 4: Watch the progress of your export. Once complete, the exported data containing your Google Photos will be dispatched to your email.
Step 5: Check your email inbox for the notification regarding your exported data. Upon receiving the email, simply click on the download Image name provided.
Step 6: Finally, extract the downloaded ZIP file on your iPhone.
FAQs
Conclusion
While numerous resources discuss how to download Google Photos to a phone, only a few address downloading all of these photos at once. But is there a more efficient method than manually selecting each photo in Google Photos? Absolutely. This article has covered those methods for you.
Equipped with this knowledge, you can now streamline the photo downloading process by using Wondershare Dr.Fone. This powerful tool offers a convenient solution to download all your Google Photos to your phone in one go, saving you time and effort. Otherwise, you can also use Google Takeout for this purpose.
Dr.Fone Basic:
Better Control for Your Phone
Manage, transfer, back up, restore, and mirror your device


Android Transfer
- Android to Android
- 1. Transfer Files to Android
- 3. Transfer Contacts to Android
- 4. Data Transfer Apps to Switch Phone
- 5. Transfer Data to Android
- 6. Transfer Text Messages to Android
- 7. Transfer Music to Android
- 8. Transfer Contacts Using Bluetooth
- 9. Transfer Apps to Another Android
- 10. Migrate Data to New Android
- 11. Best Clone Apps for Android
- Android to iPad/iPod
- Android to iPhone
- 1. Transfer Files to iPhone 13
- 2. Transfer Contacts to iPhone 13
- 3. Transfer Music to iPhone
- 4. Transfer Contacts to iPhone
- 5. Android to iPhone Transfer Apps
- 6. Transfer Text Messages to iPhone
- 7. Transfer Photos to iPhone
- 8. Transfer Messages to iPhone 13
- 9. Transfer Contacts to iPhone XS/11
- 10. Transfer Messages to iPhone 12
- 11. FaceTime for Android and iPhone
- 12. Move Data From Android to iPhone After Setup
- 13. Transfer Data from OnePlus to iPhone
- 14. Move Contacts From Android to iPhone
- 15. Transfer Data From Android To iPhone
- 16. Top Apps To Transfer Data From Android To iPhone
- Contacts Transfer
- 1. Sync Contacts to Gmail
- 2. Transfer Contacts from Outlook
- 3. Transfer Contacts to Outlook
- 4. Import Contacts from Excel
- 5. Import Contacts to Android
- 6. Export Contacts to Android Phones
- 7. Merge Contacts in Phones
- 8. Export CSV Contacts for Android
- iOS to Android
- 1. Transfer Files from iPad
- 2. Move Custom Ringtones from iPhone
- 3. Transfer Data from iPhone
- 4. Transfer Music from iPhone
- 5. Transfer Contacts from iPhone
- WhatsApp Transfer
- 1. Transfer WhatsApp from Android
- 2. Transfer WhatsApp Messages
- 3. Transfer WhatsApp Messages to PC
- 4. Transfer Messages to Android
- 5. Transfer WhatsApp Data to Android
- Transfer Tips
- 1. Android USB File Transfer Software
- 2. Android Apps to Transfer Files
- 3. Android Sync Managers
- 4. Android File Transfer Apps
- 5. Fix Transfer Files Not Working
- 6. Simplify Android File Transfer
- 7. Transfer Photos to USB
- 8. Transfer Data to BlackBerry
- 9. Transfer Data From ZTE
- 10. Transfer Data From Windows phone
- 11. Clone Phone and Copy Data
- 11. 12 Best Phone Clone Apps
- 12. Transfer Torrents from PC to Phone
- 13. Send Large Files Through Outlook
- ● Manage/transfer/recover data
- ● Unlock screen/activate/FRP lock
- ● Fix most iOS and Android issues
- Free Download Free Download


Daisy Raines
staff Editor