
How to Back Up Your Old iPhone to New iPhone 16: Step-by-Step Guide Using Dr.Fone
iPhone Backup
- iPhone Data Backup
- 1. Back up iPhone in Recovery Mode
- 2. Back Up iPhone With/Without iTunes
- 3. Back up iPhone to Mac
- 4. Back up iPhone/iPad to Computer
- 5. Back up iPhone to Mac Catalina
- 6. Back up Jailbreak Apps And Restore
- 7. iPhone Backup Software
- 8. Back up iPhone/iPad Easily
- 9. Back up iPhone/iPad in DFU Mode
- 10. Back up iPhone Apps and App Data
- 11. Back up Notes on iPhone and iPad
- 12. Back up iOS to External Hard Drive
- 13. Export Notes from iPhone to PC/Mac
- 14.Back up iPhone Photos to Google Photos
- 15. Back Up Your iPhone Voicemails
- 16. Back Up to External Drive
- 17.How to Back Up to NAS
- 18.Back Up iPhone With Broken Screen
- 19.Back Up iPhone to Google Drive
- 20.Buy Used iPhones
- 21.Sell Used Phone for Cash
- 22.Sell Used iPhone for Dollar
- 23.How Much is My iPhone Worth
- iPhone Data Recovery
- 1. Recover iPhone Data Without Backup
- 2. Restore Calendar on iPhone
- 3. Recover Call History on iPhone
- 4. Recover iPhone Lost Data
- 5. Restore iPhone in Recovery Mode
- 6. Undelete iPhone Backup Files
- 7. Recover Deleted iPhone Messages
- iPhone Data Restore
- 1. Restore iPhone from iTunes Backup
- 2. Restore iPhone after Downgrade
- 3. Restore iPhone from Backup
- 4. Restore iPhone from iPad Backup
- 5. Restore iPhone from DFU Mode
- 6. Restore iPhone Deleted Text Message
- iPhone Backup Problems
- 1. Find iPhone Backup Location on Mac
- 2. iPhone Backup Password Never Set
- 3. iPhone Backup Password Forget
- 4. iCloud Backup Taking Forever
- 5. iPhone Won't Backup to iCloud
- 6. iTunes Won't Backup iPhone
- iPhone Restore Problems
- 1. iTunes Stuck on Verifying iPhone
- 2. Not Space to Restore iPhone Backup
- 3. iTunes Backup Not Restoring
- 4. iPhone Won't Restore
- WhatsApp Backup & Restore
- 1. WhatsApp from Google Drive to iOS
- 2. Restore Old WhatsApp Backup
- 3. Restore WhatsApp Chat on iPhone
- 4. Retrieve WhatsApp Chat History
- 5. See Deleted Messages on WhatsApp
- 6. Restore WhatsApp Stuck on iPhone
- 7. iPhone WhatsApp to Google Drive
- 8. Back Up WhatsApp on iPhone
- 9. Backup WhatsApp Data before Changing Number
- iPhone Backup Tips
- 1. Extract Data From iPhone
- 2. Encrypt iPhone Backup
- 3. Reset iPhone Backup Password
- 4. Extract iPhone Backup in Win 10
- 5. How Long take iPhone to Backup
- 6. Find iPhone Backup Location
- 7. iPhone Backup Password
- 8. View iPhone Backup on Computer
- 9. iPhone Backup with iTunes/iCloud
- 10.Check Last Backup on iPhone
- 11. How To Backup Foldable iPhone
- 12. Best Backup Chargers for iPhone
- 13. Speed Up Your iPhone Backups
- 14. Save Data When iPhone Disabled
- ● Manage/transfer/recover data
- ● Unlock screen/activate/FRP lock
- ● Fix most iOS and Android issues
- Free Download Free Download Free Download

Jun 30, 2026 • Filed to: Backup & Restore Solutions • Proven solutions
 TL;DR:
Dr.Fone provides a specialized backup and migration tool to transfer data from an old iPhone to the iPhone 16, allowing Windows and Mac users to selectively back up, restore, or export specific file types.
● Enabling the automatic backup schedule strictly requires both the source iPhone and the host computer to be actively connected to the same Wi-Fi network.
● Users can preview and selectively restore distinct data categories, such as contacts or messages, ensuring no existing data is overwritten or lost on the target device during the transfer.
● The software permits cross-platform data transfers between iOS and Android operating systems and includes a fail-safe that automatically resumes interrupted backups from the exact point of disconnection.
Ask AI for a summary
 ChatGPT
 Perplexity
 Gemini
 Claude
 Grok
Grok
Dr.Fone Basic:
Better Control for Your Phone
Manage, transfer, back up, restore, and mirror your device
Upgrading to the iPhone 16 is undeniably thrilling. Its sleek design and top features make it a top choice for anyone wanting to improve their mobile experience. Yet, amid the excitement of new tech, there's a bittersweet moment. It's time to say goodbye to your old iPhone.
To ensure a smooth transition, back up your data. It is vital to avoid losing any valuable information. A backup ensures your photos, contacts, messages, and files are safe on your new device.

Dr.Fone—a trusted solution designed to simplify the backup and transfer process. With Dr.Fone, you can easily know how to backup iPhone to another iPhone. It will save all your data. Then, you can enjoy the new device's upgraded features.
Part 1: Why iPhone Backup is Crucial?
Backing up your data before upgrading to a new device, such as the iPhone 16, is essential. Without a backup, you risk losing valuable data, from cherished photos to vital documents.
Consider a real-life scenario: When you upgraded to a new iPhone but forgot to back up your old one. When your old device fails, you will lose years of irreplaceable data. Family photos, important work documents, and personal notes will be gone forever.

Backup Methods
There are several ways to back up your iPhone data. Each has its own benefits.
- iCloud: It automatically backs up your data and updates it regularly. So, your data is always protected without manual work. You can access your backup from any device with your Apple ID. This makes it a good option for those needing cloud storage.
- iTunes: Using iTunes allows you to create a local backup of your iPhone on your computer. This method is best if you want a physical copy of your data, not cloud storage.
- Dr.Fone: This third-party tool improves backups and transfers. It combines the best features of iCloud and iTunes. Dr.Fone has a user-friendly interface. It simplifies backups. You can quickly and efficiently transfer your data. It offers cloud and local backups. This gives you control over your data.
Dr.Fone Unlock Online - Free IMEI Check
iPhone 17 Is Here. Is Your Old Phone Ready to Sell?
Quickly check your iPhone or Android device status for free: Verify Blacklist, iCloud, Carrier Lock, and Warranty Status in Seconds. Ad-free, and globally.
Part 2: Preparing to Backup Your old iPhone to iPhone 16
When switching from your old iPhone to the new iPhone 16, use Dr.Fone. It's a simple tool that makes data migration easy. With Dr.Fone, you can easily back up, restore, and export your data to a computer. This will preserve your digital life during the upgrade.
Dr.Fone's Capabilities:
- Backup: Dr.Fone simplifies the process of creating a backup of your old iPhone, capturing all your essential data, from photos and messages to app data and settings.
- Restore: When setting up your new iPhone 16, Dr.Fone makes it easy to restore your backup, seamlessly transferring all your data to the new device without any hassle.
- Export to Computer: For additional security or offline access, Dr.Fone allows you to export your data to a computer, providing an extra layer of backup and flexibility.
By using Dr.Fone, you ensure that all your vital information is securely transferred to your new iPhone 16. This approach eliminates the risk of losing important data. It makes your move to the new device smooth and easy.
Dr.Fone - Phone Backup (iOS)
Selectively backup your iPhone contacts in 3 minutes!
- One-click to backup the whole iOS device to your computer.
- Allow previewing and selectively export contacts from iPhone to your computer.
- No data loss on devices during the restoration.
- Works for all iOS devices. Compatible with the latest iOS version.


Solution 1: Manual Backup of iPhone Data Using Dr.Fone
Dr.Fone can back up a wide range of data types, including contacts, messages, photos, videos, apps, and more. This ensures that all your important information is safely transferred to your new iPhone. Here is the step-by-step guide for manually backing up iphone data using Dr.Fone:
Step 1: Start the Backup Process
Launch Dr.Fone, connect your iPhone to your computer, and click “Back Up Now” to initiate the backup process. Dr.Fone will begin backing up your selected data types.

Step 2: Wait for the Backup Process to Complete
Allow Dr.Fone to automatically detect and back up all chosen data types. This process may take some time depending on the amount of data.
Step 3: Complete and Review Backup
Once the backup is complete, review the backup details to ensure all data has been accurately backed up. Use the “View Backups” option to check the backup contents.
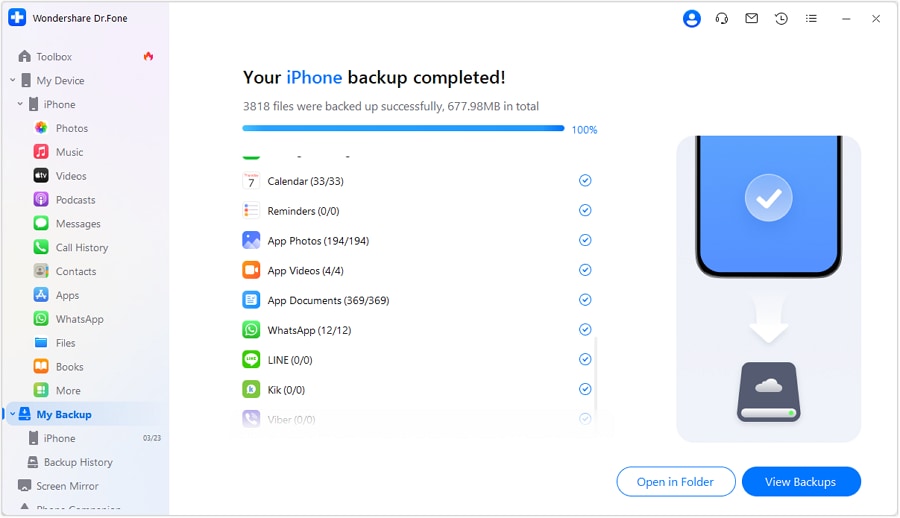
Step 4: Secure Your Backup
Verify that your backup files are securely stored. This will help prevent data loss and ensure that you can restore your data whenever needed.
Solution 2: Automatic Data Backup Using Dr.Fone
Automatic backups provide continuous protection for your data without the need for manual intervention. Dr.Fone’s automatic backup feature ensures that your data is regularly updated and available for transfer to your new iPhone. Here is the step-by-step guide for automatically backing up iphone data using Dr.Fone:
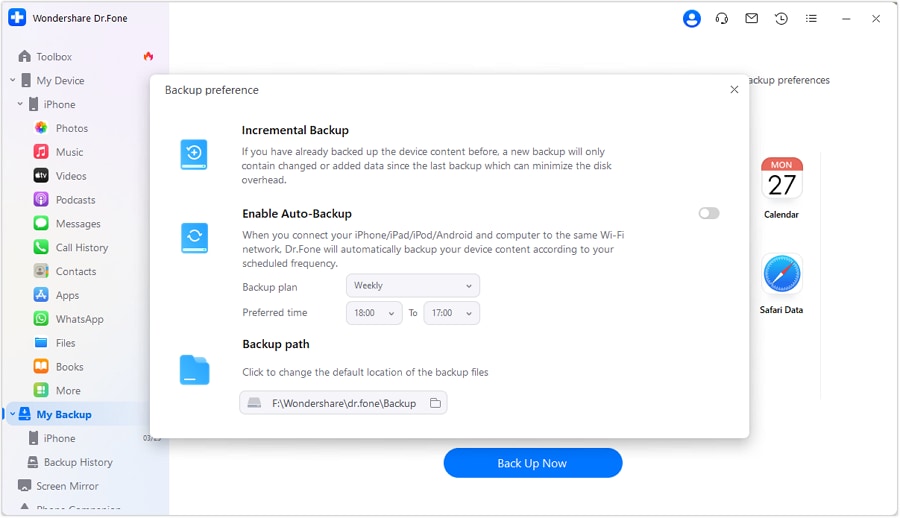
Step 1: Start Automatic Backup Setup
Open Dr.Fone, go to “Backup Preferences,” and enable the automatic backup option. This will set up Dr.Fone to regularly back up your data without manual input.
Step 2: Connect iPhone and PC to the Same Wi-Fi Network
Ensure that both your iPhone and computer are connected to the same Wi-Fi network. This allows Dr.Fone to perform seamless automatic backups.
Step 3: Configure Backup Plan and Schedule
Within Dr.Fone settings, configure your preferred backup plan and schedule. This will determine how frequently your data is backed up automatically.
Step 4: View and Manage Backups

Access “Backup History” to review and manage your automatically created backups. This allows you to monitor your backup status and make any necessary adjustments.
Part 3: Restoring and Exporting Data Using Dr.Fone
Dr.Fone simplifies the process of restoring data to your new iPhone 16 from a backup file. Its intuitive interface lets you select a backup file. You can also specify the data types to restore, like contacts, photos, and messages. The confirmation step checks your selections before the transfer. It helps prevent accidental data loss.
In addition to restoring data, Dr.Fone offers the option to export your iPhone data to a PC. This feature is particularly useful for those seeking extra security and backup options. You can choose which files to export and select a destination on your PC. Rest assured, Dr.Fone will keep your data intact. This keeps your files intact and organized. It protects your important info.
For detailed instructions and further assistance, check this guide about how to back up iphone, which provides comprehensive support for using the tool effectively.
Conclusion
In summary, upgrading to the iPhone 16 is exciting. But, a smooth transition requires a proper data backup. Dr.Fone is a reliable solution for this task. It has an easy-to-use platform for backing up, restoring, and exporting your iPhone data. Its comprehensive features make it a top choice for anyone looking to secure their information during a device upgrade.
With Dr.Fone, you can confidently back up your old iPhone. You can also restore data to your new iPhone 16 and export files to your PC for extra security. Explore how to backup iphone to iphone using Wondershare Dr.Fone.
FAQs
Dr.Fone Basic:
Better Control for Your Phone
Manage, transfer, back up, restore, and mirror your device


Julia Becker
chief Editor