Download the latest version | Secure & verified

How to Hard/Factory Reset Samsung Galaxy Devices [Newest]

Jun 30, 2026 • Filed to: Phone Repair Solutions • Proven solutions
 TL;DR:
You can reset a Samsung Galaxy by navigating to the Settings menu for a standard factory wipe on functional devices, or by using physical hardware buttons to force a hard reset in Recovery Mode if the phone is locked or unresponsive.
● To initiate a hardware hard reset, power off the phone and simultaneously hold Volume Up and Power (along with the Home button on Galaxy S7 and older models) until the Android Recovery Mode menu appears, then select "Wipe data / Factory reset."
● Remove all linked Google and Samsung accounts prior to a software-based factory reset to prevent the device from locking behind Factory Reset Protection (FRP), and verify the battery is at least 70% charged to avoid system corruption from an interrupted wipe.
● Standard resets leave invisible data fragments that can be extracted with recovery tools, meaning devices being sold or traded require a secure storage overwrite using a utility like Dr.Fone - Data Eraser to make personal files and authentication tokens permanently unrecoverable.
Ask AI for a summary
 ChatGPT
 Perplexity
 Gemini
 Claude
 Grok
Grok
Dr.Fone Basic:
Better Control for Your Phone
Manage, transfer, back up, restore, and mirror your device
If your Samsung Galaxy is freezing, crashing, stuck in a boot loop, or simply running slower than it should, a hard reset Samsung can resolve most of these issues instantly. Whether you're troubleshooting a software problem, removing a virus, or preparing your device for sale, knowing how to properly perform a factory reset Samsung Galaxy is one of the most essential skills for any Galaxy user. This guide covers every method — from using built-in settings and recovery mode to using dedicated samsung reset software — so you can choose the right approach for your situation.
A factory reset Samsung wipes user data and returns the device to its original out-of-the-box configuration. It's the go-to fix for persistent software crashes, unremovable apps, virus infections, and sluggish performance. Many users also look for a reliable samsung hard reset tool or samsung factory reset software to simplify the process or handle advanced scenarios like a locked device. This guide covers all available methods with clear, step-by-step instructions.
- Part 1: Understanding the Difference Between Hard Reset and Factory Reset
- Part 2: Backup Your Data Before Resetting Your Samsung
- Part 3: How to Perform a Hard Reset on Samsung Galaxy Devices?
- Part 4: How to Perform a Factory Reset on Samsung Galaxy Devices?
- 1. How to Factory Reset Samsung from Settings?
- 2. How to Factory Reset Samsung When It's Locked Out?

- Part 5: Troubleshooting Common Issues After Reset
- Part 6: How to Wipe Samsung Completely Before Selling?
Part 1: Hard Reset vs. Factory Reset Samsung — What's the Difference?
Before choosing a reset method, it's important to understand exactly what each option does to your Samsung Galaxy device. While the terms are often used interchangeably, hard reset Samsung and factory reset Samsung Galaxy are technically distinct processes with different triggers, behaviors, and use cases.
What Is a Hard Reset on Samsung?
A hard reset Samsung — also called a master reset or hardware reset — is performed using physical hardware buttons (Volume Up, Power, and on older models, the Home button) without accessing the Android operating system. It forces the device to boot into recovery mode and wipe all data and system settings from the storage partition. This method is typically used when the device is unresponsive, stuck in a boot loop, or the screen is frozen and the software menu is inaccessible. A hard reset completely erases all installed apps, personal files, accounts, and settings, restoring the device to the exact state it was in when it left the factory.
What Is a Factory Reset on Samsung?
A factory reset Samsung Galaxy is a software-based reset initiated through the Settings menu. It removes user-installed apps, accounts, contacts, and personal data, returning the operating system to its default configuration. Unlike a hard reset, a factory reset can only be performed when the device is functional and you have access to the settings interface. Some residual system-level cache and app data may remain after a standard factory reset, which is why it's not always considered a complete data wipe for security-sensitive situations.
Hard Reset vs. Factory Reset: Key Differences at a Glance
- Trigger method: Hard reset uses hardware buttons via recovery mode; factory reset uses the Settings menu.
- Accessibility: Hard reset works even when the phone is unresponsive or locked; factory reset requires the device to be operational.
- Data erasure depth: Hard reset erases all data including system cache; factory reset removes user data but may leave some residual data.
- Use case: Hard reset is ideal for unresponsive or severely corrupted devices; factory reset is better for routine maintenance or pre-sale preparation.
- Software requirement: Factory reset can also be initiated via samsung factory reset software like Dr.Fone for greater control and safety.
Both methods are effective for resolving software problems, fixing performance degradation, and clearing personal data. The right choice depends on your device's current state and how complete a reset you need.
Part 2: Always Backup Your Data Before Resetting Your Samsung
Whether you're performing a hard reset or a factory reset, all personal data on your Samsung device will be permanently deleted. This includes photos, videos, contacts, messages, app data, and downloaded files stored in internal storage. Before you proceed with any reset, you must back up your data using one of the following trusted methods.
1. Back up Samsung to Samsung Cloud
Samsung Cloud is the built-in cloud storage solution for Galaxy devices. It automatically syncs and stores key data including contacts, calendar entries, photos, videos, notes, and app settings. To back up your data using Samsung Cloud, go to Settings > Accounts and backup > Samsung Cloud > Back up this phone. Make sure your device is connected to Wi-Fi before starting, as cloud backups can consume significant data. After your reset is complete, you can restore everything by signing back in to your Samsung account during the setup wizard.
2. Back up Samsung to Google Account
Your Google Account provides a seamless backup solution for Android devices, storing contacts, Chrome data, app data, call history, and Google Photos in Google Drive. To back up your data using Google Account, navigate to Settings > Accounts and backup > Backup and restore > Google Account and ensure "Back up to Google Drive" is turned on. After the reset, simply sign in with your Google account during setup to restore your data automatically.
3. Back up Samsung Using Smart Switch PC
Smart Switch is Samsung's official desktop application for Windows and Mac, designed to transfer and back up your entire device to your computer. Smart Switch backs up contacts, messages, photos, music, videos, apps, and settings. It provides a more comprehensive backup than cloud solutions, especially for users with large amounts of media. Download Smart Switch from the official Samsung website, connect your phone via USB or Wi-Fi, and follow the on-screen instructions to create a full backup. This is the recommended method before a hard reset.
4. Back up Samsung Using Third-Party Apps
Several trusted Samsung Backup Software and Apps offer comprehensive backup capabilities beyond what Samsung Cloud or Google Account provide. Tools like Titanium Backup, Helium, MyBackup, and Dr.Fone offer granular control over which data to back up and restore. These tools are especially useful if you want to selectively restore specific files after your reset, rather than restoring everything at once.
Tips: Wondershare Dr.Fone is a tool that helps you keep your important data safe. It securely backs up essential data on your Samsung device—photos, music, videos, contacts, and more—and works with over 8,000 Android devices. The backup process is simple and quick, requiring just a few clicks. You can easily restore your backup to any device and select specific data to recover, ensuring your important information is always safe.
Wondershare Dr.Fone
Backup & Restore Data Turns Flexible.
- One-click to back up the whole iOS and Android device to your computer.
- Export what you want from the backup to your computer.
- Your device's data remains intact during the restore process.
- Fully compatible with the latest iOS and Android version.


Part 3: How to Perform a Hard Reset on Samsung Galaxy Devices?
A hard reset Samsung Galaxy is performed entirely through hardware buttons and the device's built-in recovery mode — no software, no screen interaction required. This is the recommended method when your Samsung is unresponsive, stuck on the boot screen, or cannot access the Settings menu due to a system crash. Since this is a hardware-level operation, it works even without a functioning display or operating system.
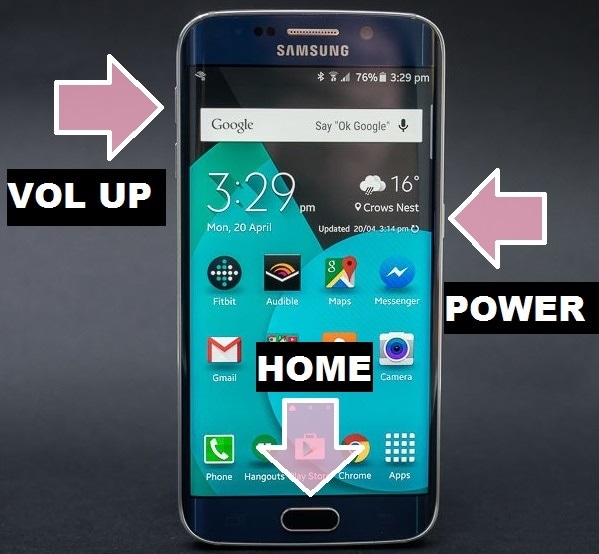
Important note on button combos: The key combination varies by model. On older Samsung Galaxy devices with a physical Home button (Galaxy S7 and earlier), use Volume Up + Home + Power. On newer models without a Home button (Galaxy S8, S9, S10, S20, S21, S22, S23, S24 series, and most A-series), use Volume Up + Power (Bixby on some models). If the first combination doesn't work, try the alternative.
- Step 1. Power off your Samsung Galaxy device completely by holding the Power button and selecting "Power off."
- Step 2. Press and hold the appropriate button combination for your model (Volume Up + Home + Power, or Volume Up + Power) simultaneously for 10–15 seconds.
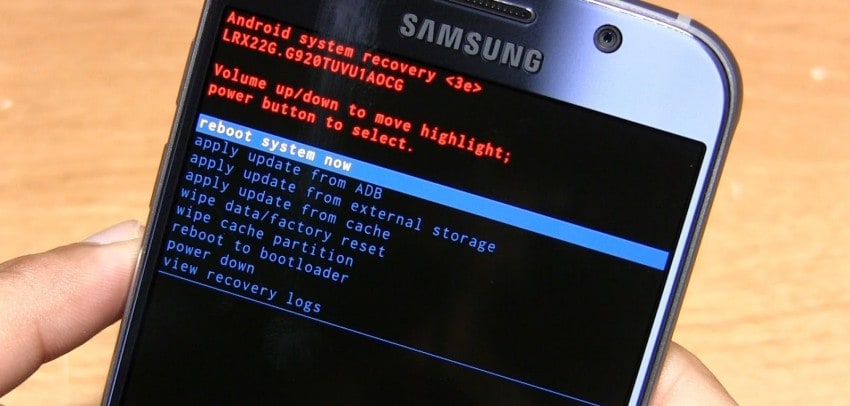
- Step 3. Release all buttons when the Samsung logo appears on screen. The device will boot into Android Recovery Mode.
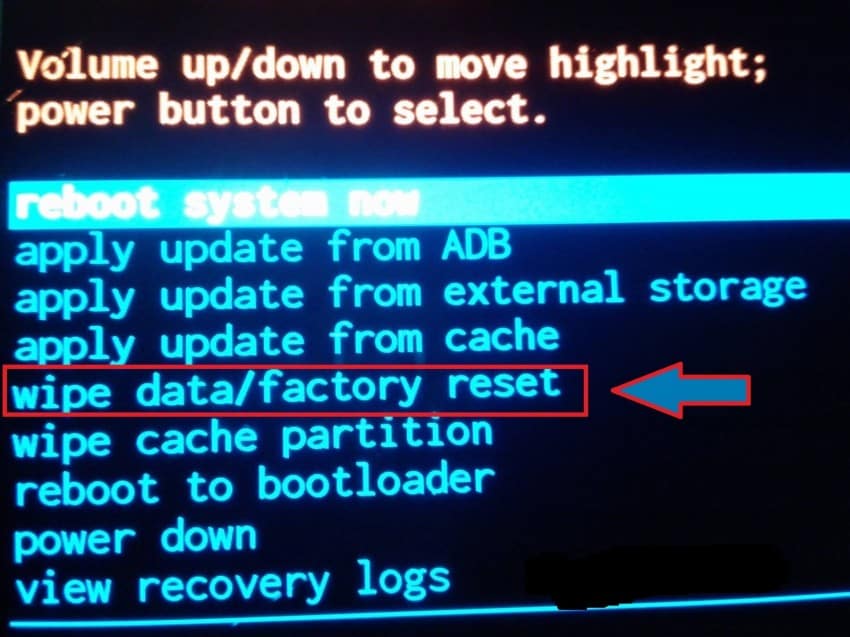
- Step 4. In the recovery menu, use the Volume Down button to scroll to "Wipe data / Factory reset" and press the Power button to select it.
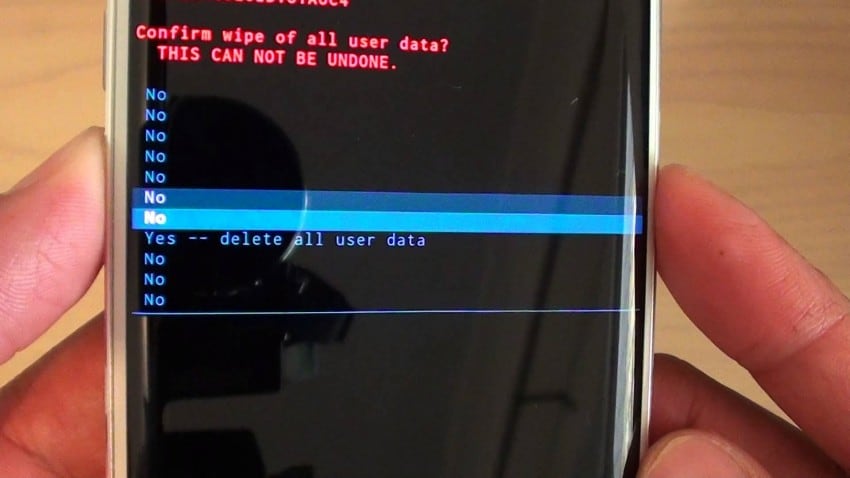
- Step 5. Scroll to "Factory reset" or "Yes – delete all user data" (wording varies by Android version) and press Power to confirm.
- Step 6. Wait for the wipe process to complete (typically 1–3 minutes). When finished, select "Reboot system now" and press Power.
Your Samsung Galaxy will restart and launch the initial setup wizard, just as it did when it was brand new. Keep in mind that this process permanently deletes all apps, photos, contacts, messages, and settings stored in internal storage. If your device still fails to boot or shows system errors after the hard reset, consider using a dedicated Android system repair tool to address deeper firmware-level issues.
Part 4: How to Perform a Factory Reset on Samsung Galaxy Devices?
A factory reset Samsung Galaxy through the Settings menu is the safest, most user-friendly option when your device is still functional. This method is ideal for resolving recurring app crashes, sluggish performance, persistent software bugs, or when you plan to sell or give away your phone. Unlike a hard reset, the samsung software reset via Settings allows you to review what will be erased before confirming the action. Below are the two primary methods, covering both accessible and locked devices.
Samsung Galaxy devices can be reset in two processes.
Factory reset Samsung device with a few clicks!
1. How to Factory Reset Samsung from Settings?
The Settings-based factory reset is the standard samsung software reset method and is recommended for users whose devices are fully functional. Before initiating, follow these essential preparatory steps to avoid data loss and hardware complications:
- Step 1. Use a reliable Android backup software to back up all internal data to an external storage device or cloud service. Alternatively, use Dr.Fone - Phone Backup (Android) for a one-click complete backup solution.
- Step 2. Ensure your device has at least 70% battery charge remaining before starting. A reset interrupted by a dead battery can cause system corruption.
- Step 3. Remove or note down any accounts (Google, Samsung) linked to the device to avoid Factory Reset Protection (FRP) lock after the reset. This process cannot be undone, so confirm your decision before proceeding with the factory reset Samsung Galaxy.
Once you have completed the above preparation, follow these steps to perform the factory reset via Settings:
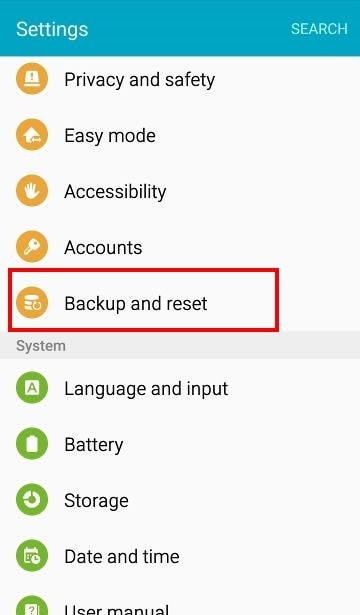
- Step 1. Open the Settings app on your Samsung Galaxy and scroll down to find "General Management" (on newer One UI versions) or "Backup and Reset" (on older devices).
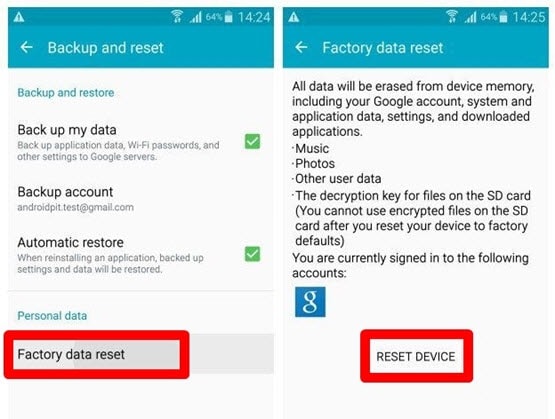
- Step 2. Tap on "Reset", then select "Factory data reset".
- Step 3. Review the list of data that will be deleted, then tap "Reset device" to continue.
- Step 4. If prompted, enter your device PIN, password, or pattern to authenticate the reset. Then tap "Erase everything" or "Delete all" to begin the factory reset Samsung Galaxy process.
The reset process typically takes 3–10 minutes depending on your device model and the amount of data stored. Do not force-restart or remove the battery during this process, as doing so may corrupt the system partition and render the device unbootable. Once complete, your Samsung Galaxy will automatically restart and display the initial setup screen. Remember to take a full backup of the Samsung device before proceeding with any reset.
2. How to Factory Reset Samsung When It's Locked Out?
If your Samsung Galaxy device is locked due to a forgotten PIN, password, or pattern — or if a software crash has made the Settings menu inaccessible — you can still perform a complete factory reset Samsung Galaxy using Android recovery mode. This hardware-based approach bypasses the lock screen entirely and resets the device without requiring any software access.
Go through the below-mentioned step-by-step guide to factory reset Samsung Galaxy device.
- Step 1. Power off your device completely by holding the Power button. If the screen is unresponsive, hold Power + Volume Down simultaneously for 10 seconds to force a shutdown.
- Step 2. Press and hold the Volume Up, Power, and Home button (or Volume Up + Power on Home-button-free models) together until the device vibrates and the Samsung logo appears.
- Step 3. The device will boot into Android Recovery Mode. Use the Volume Up and Down keys to navigate to "Wipe data / Factory reset" and press the Power button to select it.
Tips: Do remember at this stage, your mobile touch screen will not work. All navigation must be done using the physical Volume and Power buttons.
- Step 4. Scroll to and select "Factory reset" or "Delete all user data", then confirm by selecting "Yes" and pressing Power to start the reset Samsung process.
- Step 5. Once the wipe is complete, use the Volume keys to highlight "Reboot system now" and press Power to restart your device into its fresh factory-restored state.
Your Samsung Galaxy will restart with all data erased and the system restored to its default factory configuration. Note that if your device has Factory Reset Protection (FRP) enabled, you will be required to sign in with the previously linked Google account during setup. Make sure you have your Google credentials ready before proceeding.
Part 5: Troubleshooting Common Issues After Resetting Samsung Galaxy
Even after a successful hard reset Samsung or factory reset, some users encounter unexpected issues during or after the device setup process. Below are the most common post-reset problems and their practical solutions, so you can get your Samsung Galaxy running smoothly again.
- Issue: Device is still slow or laggy after reset
If your Samsung Galaxy feels sluggish even after a factory reset, do not immediately restore all apps and data. Instead, first test the device in its clean state. If performance is still poor, the issue may be hardware-related (aging battery or storage). Consider avoiding the restoration of heavy background apps, or check for a pending One UI system update via Settings > Software update. - Issue: Data loss — files not found after reset
A factory or hard reset permanently deletes all locally stored data. If you did not back up before resetting, restore your backups from Samsung Cloud, Google Drive, or Smart Switch if available. For data that was not backed up, a professional Android data recovery tool may help recover recently deleted files from internal storage before they are overwritten. - Issue: Factory Reset Protection (FRP) lock — "Verify your Google account"
FRP is a built-in security feature that activates after a factory reset on devices where a Google account was previously signed in. To bypass the FRP lock legitimately, simply sign in with the Google account that was registered on the device before the reset. If you do not remember the credentials, use Google's account recovery page from a browser before attempting another reset. - Issue: Apps crashing or not working after restore
After restoring data from a backup, some apps may malfunction due to version conflicts or corrupted cache files. Go to Settings > Apps, select the affected app, and tap "Clear cache" and "Clear data". Then update all apps via the Google Play Store. Reconfigure app permissions under Settings > Privacy > Permission manager if needed. - Issue: Wi-Fi, Bluetooth, or SIM not connecting
After a reset, network-related settings are cleared entirely. Reconfigure your Wi-Fi connections, Bluetooth pairings, and mobile network APN settings from scratch. If you experience persistent connectivity problems, go to Settings > General Management > Reset > Reset network settings to restore default network configurations without affecting other data. - Issue: Samsung device stuck in boot loop after reset
If your Galaxy fails to boot or gets stuck on the Samsung logo after a hard reset, the system partition may be corrupted. Try entering recovery mode again (Volume Up + Power) and performing a second wipe. If the problem persists, the device may require a firmware flash using Samsung's official Odin tool or a third-party Android system repair solution to reinstall the operating system correctly. - Issue: "Samsung account verification" prompt after reset
On some Samsung Galaxy models, Samsung's Find My Mobile feature triggers an additional verification step after a factory reset, separate from Google FRP. You will need to sign in with your Samsung account credentials. If you have forgotten your Samsung account password, reset it via the Samsung account website before completing the device setup.
In most cases, these issues can be resolved with the steps above. If problems persist after trying all troubleshooting methods, contact Samsung's official support team or visit a certified Samsung service center for hardware diagnostics.
Part 6: How to Wipe Samsung Completely and Securely Before Selling?
If you're planning to sell, trade in, or give away your Samsung Galaxy, performing a standard factory reset Samsung to erase all settings and personal data is the obvious first step — but it may not be enough. Research by cybersecurity experts has shown that even after a factory reset, residual authentication tokens, account data fragments, and cached media files can remain in the device's storage. These remnants are often invisible to the naked eye but can be extracted by a technically skilled buyer using freely available data recovery tools.
This means your personal emails, photos, contacts, payment data, and cloud account access tokens could potentially be recovered by whoever receives your old device after a standard factory reset. For privacy-conscious users or anyone selling a device with sensitive account data, a standard reset is not sufficient.
To overcome this situation, we recommend you try Dr.Fone - Data Eraser.
Dr.Fone - Data Eraser is a professional-grade samsung reset software designed for complete and permanent data destruction. Unlike a standard factory reset, it overwrites your device's storage with random data multiple times, making recovery impossible even with forensic-level tools. It supports all Samsung Galaxy models and virtually all Android devices on the market. The entire process is simple, fast, and requires no technical expertise.
Dr.Fone - Data Eraser
Fully Erase Everything on Android and Protect Your Privacy
- Simple, click-through process.
- Wipe your Android completely and permanently.
- Erase photos, contacts, messages, call logs, and all private data.
- Supports all Android devices available in the market.
Here is how to securely erase all data from your Samsung Galaxy before selling it:
- Step 1. Download and install Dr.Fone on your Windows PC or Mac, then launch the program and select the Data Eraser module.

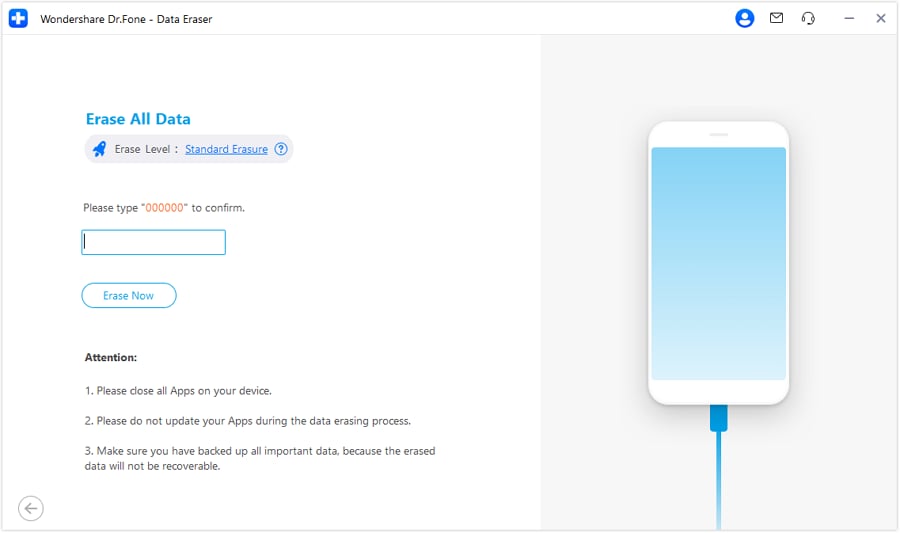
- Step 2. Connect your Samsung Galaxy to the computer using a USB cable. Enable USB Debugging in Developer Options if prompted (Settings > About phone > tap "Build number" 7 times, then enable USB Debugging in Developer Options). The tool will automatically detect your device and prompt you to confirm by tapping "Erase All Data".
- Step 3. Type "000000" in the confirmation field and click Erase to begin the permanent data destruction process. This step serves as a final safety confirmation to prevent accidental erasure.
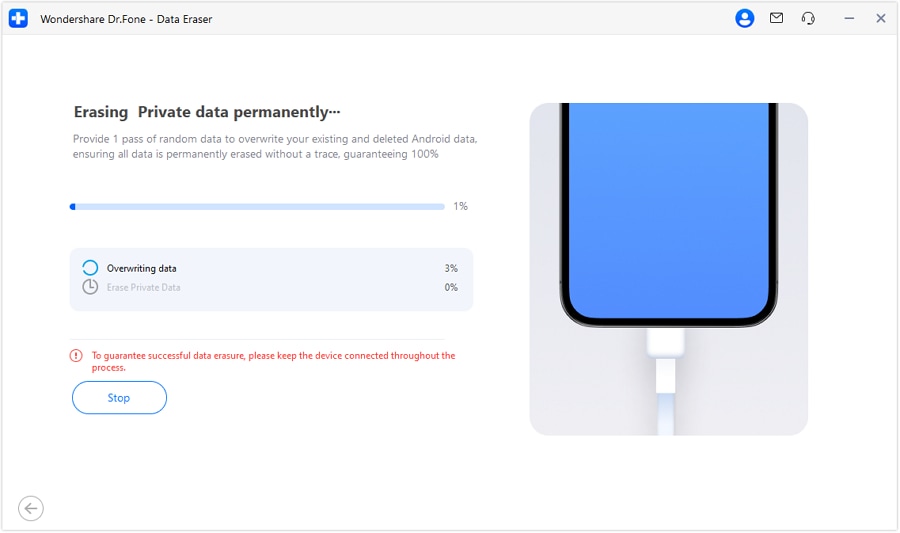
- Step 4. Dr.Fone will securely overwrite all data on your Samsung Galaxy. Once the erasure is complete, the toolkit will automatically prompt you to also perform a "Factory Reset" to finalize the device wipe. Tap "Factory Reset" and allow the device to restart.
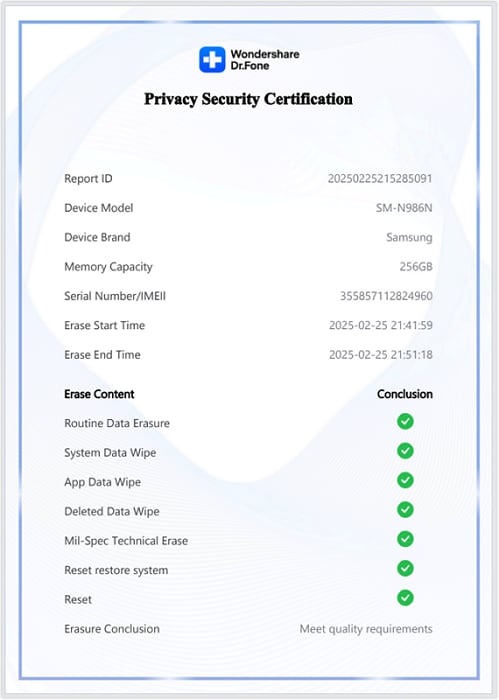
After the process, Dr.Fone generates a detailed erasure report confirming that all data has been permanently destroyed and cannot be recovered. Your Samsung Galaxy is now completely safe to sell, trade, or donate.
Conclusion
Resetting your Samsung Galaxy — whether through a hard reset Samsung via recovery mode or a samsung software reset through the Settings menu — is one of the most effective ways to fix software problems, improve device performance, and protect your personal data. The key is choosing the right method for your situation: use a hard reset when the device is unresponsive or locked; use a Settings-based factory reset for routine maintenance or pre-sale preparation; and always back up your data first.
For users who want complete, irreversible data destruction before selling their Samsung Galaxy, a standard factory reset is not enough. Tools like Dr.Fone - Data Eraser provide the highest level of data security by permanently overwriting storage, ensuring that no personal information — including photos, contacts, tokens, or account data — can ever be recovered. Combined with the right samsung factory reset software, you can approach any reset scenario with confidence, whether you're troubleshooting, selling, or simply starting fresh.
Quick summary of recommended steps:
- Always back up data before any reset (Samsung Cloud, Smart Switch, or Dr.Fone Backup).
- For a malfunctioning or locked device: use the hardware hard reset via recovery mode.
- For a working device: use the factory reset option in Settings > General Management > Reset.
- Before selling: use Dr.Fone - Data Eraser for permanent, forensic-proof data destruction.
FAQs
Dr.Fone Basic:
Better Control for Your Phone
Manage, transfer, back up, restore, and mirror your device


Samsung Issue
- Samsung Phone Issues
- 1. Fix Samsung Camera Failed
- 2. Fix Samsung Phone Hang
- 3. Samsung Phone Not Displaying Incoming Calls
- 4.Fix a Bricked Samsung
- 5. Downloading Do Not Turn Off Target
- 6. Fix Samsung Stuck in Download Mode
- 7. Fix Samsung S5 Won't Turn On
- 8. Fix Samsung Pay Not Working
- 9. Samsung ROM Download & Install
- 10. Samsung Firmware Download
- 11. Fix Samsung Sudden Death
- 12. Fix Samsung Stuck on Boot Screen
- 13. Fix Samsung Frozen on Startup
- 14. Full Guide to Fix 'Samsung Galaxy Phone Keeps Restarting'
- 15. Fix Samsung S3 Won't Turn On
- 16. Fix Samsung J7 Problems
- 17. Fix Samsung S10 Gone Dead
- 18. Fix Samsung S10 Won't Turn On
- 19. Fix Samsung Galaxy S7
- Samsung Screen Issues
- 1. Fix Unresponsive Touchscreen
- 2. Fix Black Screen After Dropping
- 3. Resolve Screen Stuck on Boot Issue
- 4. Fix Samsung Fold Screen Issues
- 5. Fix Samsung Black Screen
- 6. Fix Samsung Screen Not Working
- 7. Fix Half of Screen Not Working
- 8. Fix Samsung Stuck on Bootloop
- 9. Fix Samsung Screen Blacked Out
- 10. Fix Screen Blacked During a Call
- 11. Fix Samsung Stuck on the Screen
- 12. Solve Samsung Yellow Screen
- 13. Fix Samsung Flip Screen Not Working
- 14. Fix Screen Won't Respond
- Samsung Tablet Issues
- 1. Fix Samsung Tablet Problems
- 2. Fix Samsung Stuck on Logo
- 3. Fix Samsung Tablet Won't Turn On
- 4. Fix Touch Screen Not Working
- Samsung Update
- 1. Flash a Samsung phone
- 2. Samsung Mobile Software Update
- 3. Update Samsung Kies for Mac
- 4. Update Samsung to Android Oreo
- 5. Update Samsung Kies on PC
- 6. Update Android 6.0 for Samsung
- Samsung Useful Tricks
- 1. Remove Google Account Bypass
- 2. Hard/Factory Reset Samsung
- 3. Samsung Root Software
- 4. Transfer Files from Samsung to PC
- 5. Top 5 Samsung Kies Alternatives
- 6. Bypass Samsung Lock Screen Pin
- 7. SIM Network Unlock PIN
- 8. Transfer Whatsapp to iPhone
- 9. Samsung Auto Backup
- 10. Recover File on Samsung
- ● Manage/transfer/recover data
- ● Unlock screen/activate/FRP lock
- ● Fix most iOS and Android issues
- Free Download Free Download Free Download


James Davis
staff Editor