3 Essential Ways to Backup iPhone/iPad Easily
iPhone Backup
- iPhone Data Backup
- 1. Back up iPhone in Recovery Mode
- 2. Back Up iPhone With/Without iTunes
- 3. Back up iPhone to Mac
- 4. Back up iPhone/iPad to Computer
- 5. Back up iPhone to Mac Catalina
- 6. Back up Jailbreak Apps And Restore
- 7. iPhone Backup Software
- 8. Back up iPhone/iPad Easily
- 9. Back up iPhone/iPad in DFU Mode
- 10. Back up iPhone Apps and App Data
- 11. Back up Notes on iPhone and iPad
- 12. Back up iOS to External Hard Drive
- 13. Export Notes from iPhone to PC/Mac
- 14.Back up iPhone Photos to Google Photos
- 15. Back Up Your iPhone Voicemails
- 16. Back Up to External Drive
- 17.How to Back Up to NAS
- 18.Back Up iPhone With Broken Screen
- 19.Back Up iPhone to Google Drive
- 20.Buy Used iPhones
- 21.Sell Used Phone for Cash
- 22.Sell Used iPhone for Dollar
- 23.How Much is My iPhone Worth
- iPhone Data Recovery
- 1. Recover iPhone Data Without Backup
- 2. Restore Calendar on iPhone
- 3. Recover Call History on iPhone
- 4. Recover iPhone Lost Data
- 5. Restore iPhone in Recovery Mode
- 6. Undelete iPhone Backup Files
- 7. Recover Deleted iPhone Messages
- iPhone Data Restore
- 1. Restore iPhone from iTunes Backup
- 2. Restore iPhone after Downgrade
- 3. Restore iPhone from Backup
- 4. Restore iPhone from iPad Backup
- 5. Restore iPhone from DFU Mode
- 6. Restore iPhone Deleted Text Message
- iPhone Backup Problems
- 1. Find iPhone Backup Location on Mac
- 2. iPhone Backup Password Never Set
- 3. iPhone Backup Password Forget
- 4. iCloud Backup Taking Forever
- 5. iPhone Won't Backup to iCloud
- 6. iTunes Won't Backup iPhone
- iPhone Restore Problems
- 1. iTunes Stuck on Verifying iPhone
- 2. Not Space to Restore iPhone Backup
- 3. iTunes Backup Not Restoring
- 4. iPhone Won't Restore
- WhatsApp Backup & Restore
- 1. WhatsApp from Google Drive to iOS
- 2. Restore Old WhatsApp Backup
- 3. Restore WhatsApp Chat on iPhone
- 4. Retrieve WhatsApp Chat History
- 5. See Deleted Messages on WhatsApp
- 6. Restore WhatsApp Stuck on iPhone
- 7. iPhone WhatsApp to Google Drive
- 8. Back Up WhatsApp on iPhone
- 9. Backup WhatsApp Data before Changing Number
- iPhone Backup Tips
- 1. Extract Data From iPhone
- 2. Encrypt iPhone Backup
- 3. Reset iPhone Backup Password
- 4. Extract iPhone Backup in Win 10
- 5. How Long take iPhone to Backup
- 6. Find iPhone Backup Location
- 7. iPhone Backup Password
- 8. View iPhone Backup on Computer
- 9. iPhone Backup with iTunes/iCloud
- 10. iPhone Backup Unlockers
- 11.How To Encrypt iPhone Backup
- 12. Best Backup Chargers for iPhone
- 13. Speed Up Your iPhone Backups
- 14. Save Data When iPhone Disabled
- 15.Check Last Backup on iPhone
- ● Manage/transfer/recover data
- ● Unlock screen/activate/FRP lock
- ● Fix most iOS and Android issues
- Back up Now Back up Now Back up Now

Jul 12, 2024 • Filed to: Backup & Restore Data • Proven solutions
“How do I backup my iPhone? Is there any fast and reliable way to selectively backup my iPhone data?”
If you also wish to learn how to back up iPhone, then you have landed at the right place. Sometimes, our data can have more worth than our device and it is of utmost importance to have its backup. Luckily, there are plenty of ways to backup and restore your iPhone or iPad. In this guide, we will teach you how to backup iPhone 11/X, iPad, and other iOS devices in three different ways. Let’s get it started with!
Part 1: How to backup iPhone/iPad to iCloud?
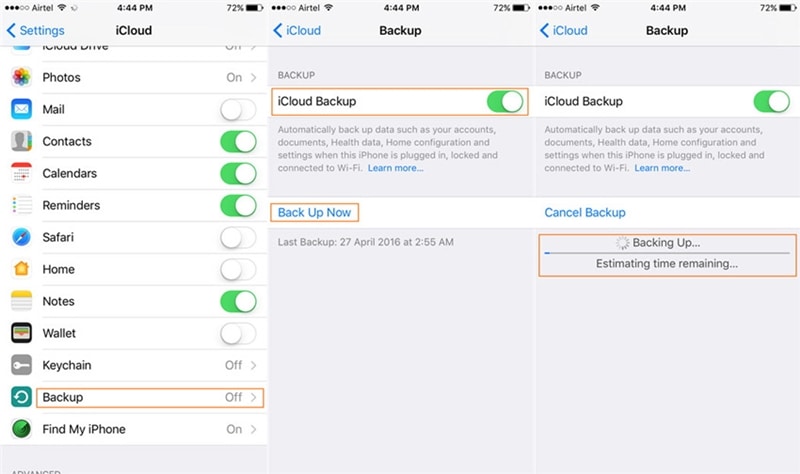
One of the easiest ways to learn how to do I backup my iPhone is by taking the assistance of iCloud. In this method, you can backup your data on the cloud without connecting your phone to the system. By default, Apple provides a free space of 5 GB to every user. After utilizing the free storage, you might have to purchase more space. To learn how to back up the iPhone on iCloud, follow these steps.
- 1. Make sure your Apple ID is linked to your phone. If not, go to Settings > iCloud and log-in using your Apple ID and password.
- 2. You can also create a new account or reset your password from here.
- 3. Now, go to Settings > iCloud > Backup and turn on the option of “iCloud Backup”.
- 4. You can also designate the time for automatic backup.
- 5. Furthermore, you can tap on the “Back Up Now” to take an immediate backup of your device.
- 6. You can also select the kind of data you wish to backup (photos, emails, contacts, calendar, etc.) by turning their respective options on/off.
Part 2: How to backup iPhone/iPad to iTunes?
Besides iCloud, you can also learn how to back up iPhone using iTunes. It is a freely available tool developed by Apple that can be used to manage your device. You can either take a backup of your device by connecting it to the system or wirelessly. We have discussed both the options here.
How to backup iPhone to iTunes using a cable?
This is a fast and easy way to take a backup of your iOS device by connecting it to your system using a USB/lightning cable.
- 1. To start with, launch an updated version of iTunes on your system.
- 2. Connect your phone to the system and wait for a while as iTunes will detect it automatically.
- 3. Go to the Devices tab and select the iPhone you have connected.
- 4. Click on the “Summary” tab from the left panel.
- 5. Under the “Backup” section, choose to take a backup on the local storage and click on the “Backup now” button.
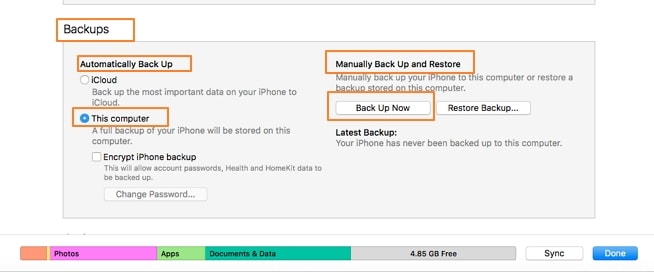
This will initiate the backup process and your data would be saved on the local storage via iTunes.
How to backup iPhone to iTunes wirelessly?
By taking the assistance of WiFi sync, you can easily learn how to backup iPhone 11/X, iPad, and other iOS devices via iTunes. To make it work, your device should be running on iOS 5 and later version and you should have iTunes 10.5 or a newer version installed. Afterward, all you need to do is follow these steps:
- 1. Launch the updated version of iTunes on your system.
- 2. Connect your iOS device to the system and go to its Summary tab.
- 3. From the list of various options, enable “Sync with this iPhone over WiFi”. Save your changes and disconnect your phone.
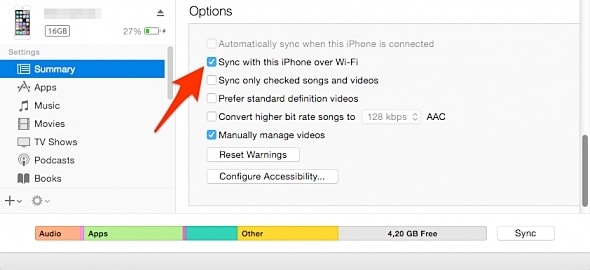
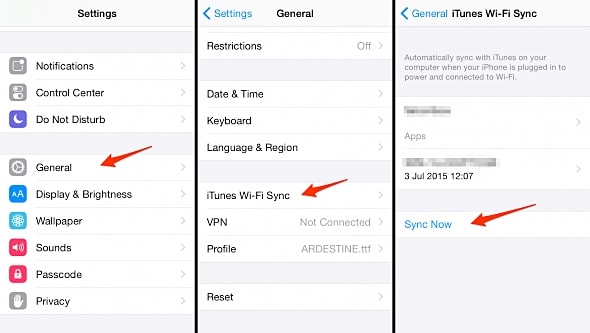
- 4. Now, you can sync it with iTunes without connecting it to your system.
- 5. Go to your phone’s Settings > General > iTunes WiFi Sync option and tap on the “Sync now” button manually to connect your device.
Part 3: How do I backup my iPhone using Dr.Fone - Phone Backup (iOS)?
Wondershare Dr.Fone - Phone Backup (iOS) provides a secure and easy way to backup your iOS device and restore it afterward. It can be used to take a complete or selective backup of your files like photos, contacts, videos, messages, audios, and more. A part of Dr.Fone toolkit, it is compatible with every major iOS version with a dedicated desktop application for Windows and Mac. To learn how to do I backup my iPhone using Dr.Fone, follow these instructions.
Dr.Fone - Phone Backup (iOS)
Backup & Restore iOS Data Turns Flexible.
- Backup all the data on your iOS devices to your computer in one click.
- Preview to selectively restore any item from the backup to a device.
- Export what you want from the backup to your computer.
- 100% of original data remained during the restoration.
- Selectively backup and restore any data you want.
- Support the latest iPhone models and iOS 17.

- Windows 10/8/7 or Mac 14 and former all can work with it smoothly


1. Click the Download button to install the program on your computer. Connect your iOS device and launch the application. Click on the “Phone Backup” option to commence.

2. You can either select items from your devices or choose all to backup. This will let you perform a selective backup of data. Click on the “Backup” button to initiate the process.

3. Make sure that your device stays connected to the system as the application will take a while to back up your data.

4. Once the process is completed, you will be notified. Afterward, you can simply preview your data and restore it to any iOS device of your choice.

Part 4: Comparison of the 3 iPhone backup solutions
If you can’t seem to choose how to back up iPhone out of all the provided solutions, simply go through this quick comparison.
| iCloud | iTunes | Dr.Fone toolkit |
| Backup data on the cloud | Can back up data on the cloud as well as the local storage | Backup data on the local storage |
| Users can turn on/off data they wish to backup | Can’t selectively backup data | Can selectively backup your data |
| Can’t preview files | No way to preview files | Users can preview their files before restoring |
| Backup data wirelessly | Can backup data by the connecting device as well as wirelessly | No wireless backup provision provided |
| No installation required | Apple’s official tool | Third-party tool installation |
| It is pretty easy to use | Can be pretty complicated to use | Easy to use with one-click solution |
| Can consume lots of data usage | Depends on the usage | No data is consumed |
| Only works with iOS devices | Only works with iOS devices | Available for iOS and Android devices |
| Only 5 GB of free space is available | Free solution | Free trial available (paid after completing the trial) |
Now when you know how to backup iPhone 11 and other iOS devices, you can easily keep your data safe. Go ahead and implement these solutions and always maintain a second copy of your data. If someone asks you, how do I backup my iPhone, feel free to share this guide with them as well!


Alice MJ
staff Editor