Unlocking the Power of NAS: A Comprehensive Guide to iPhone Backup
iPhone Backup
- iPhone Data Backup
- 1. Back up iPhone in Recovery Mode
- 2. Back Up iPhone With/Without iTunes
- 3. Back up iPhone to Mac
- 4. Back up iPhone/iPad to Computer
- 5. Back up iPhone to Mac Catalina
- 6. Back up Jailbreak Apps And Restore
- 7. iPhone Backup Software
- 8. Back up iPhone/iPad Easily
- 9. Back up iPhone/iPad in DFU Mode
- 10. Back up iPhone Apps and App Data
- 11. Back up Notes on iPhone and iPad
- 12. Back up iOS to External Hard Drive
- 13. Export Notes from iPhone to PC/Mac
- 14.Back up iPhone Photos to Google Photos
- 15. Back Up Your iPhone Voicemails
- 16. Back Up to External Drive
- 17.How to Back Up to NAS
- 18.Back Up iPhone With Broken Screen
- 19.Back Up iPhone to Google Drive
- 20.Buy Used iPhones
- 21.Sell Used Phone for Cash
- 22.Sell Used iPhone for Dollar
- 23.How Much is My iPhone Worth
- iPhone Data Recovery
- 1. Recover iPhone Data Without Backup
- 2. Restore Calendar on iPhone
- 3. Recover Call History on iPhone
- 4. Recover iPhone Lost Data
- 5. Restore iPhone in Recovery Mode
- 6. Undelete iPhone Backup Files
- 7. Recover Deleted iPhone Messages
- iPhone Data Restore
- 1. Restore iPhone from iTunes Backup
- 2. Restore iPhone after Downgrade
- 3. Restore iPhone from Backup
- 4. Restore iPhone from iPad Backup
- 5. Restore iPhone from DFU Mode
- 6. Restore iPhone Deleted Text Message
- iPhone Backup Problems
- 1. Find iPhone Backup Location on Mac
- 2. iPhone Backup Password Never Set
- 3. iPhone Backup Password Forget
- 4. iCloud Backup Taking Forever
- 5. iPhone Won't Backup to iCloud
- 6. iTunes Won't Backup iPhone
- iPhone Restore Problems
- 1. iTunes Stuck on Verifying iPhone
- 2. Not Space to Restore iPhone Backup
- 3. iTunes Backup Not Restoring
- 4. iPhone Won't Restore
- WhatsApp Backup & Restore
- 1. WhatsApp from Google Drive to iOS
- 2. Restore Old WhatsApp Backup
- 3. Restore WhatsApp Chat on iPhone
- 4. Retrieve WhatsApp Chat History
- 5. See Deleted Messages on WhatsApp
- 6. Restore WhatsApp Stuck on iPhone
- 7. iPhone WhatsApp to Google Drive
- 8. Back Up WhatsApp on iPhone
- 9. Backup WhatsApp Data before Changing Number
- iPhone Backup Tips
- 1. Extract Data From iPhone
- 2. Encrypt iPhone Backup
- 3. Reset iPhone Backup Password
- 4. Extract iPhone Backup in Win 10
- 5. How Long take iPhone to Backup
- 6. Find iPhone Backup Location
- 7. iPhone Backup Password
- 8. View iPhone Backup on Computer
- 9. iPhone Backup with iTunes/iCloud
- 10. iPhone Backup Unlockers
- 11.How To Encrypt iPhone Backup
- 12. Best Backup Chargers for iPhone
- 13. Speed Up Your iPhone Backups
- 14. Save Data When iPhone Disabled
- 15.Check Last Backup on iPhone
- ● Manage/transfer/recover data
- ● Unlock screen/activate/FRP lock
- ● Fix most iOS and Android issues
- Back up Now Back up Now Back up Now

Jul 12, 2024 • Filed to: Backup & Restore Data • Proven solutions
iPhones have become indispensable devices that store cherished memories, vital documents, and sensitive information. However, the potential risks of data loss or device malfunctions loom ever-present. That's why data backup has become an essential practice for iPhone users. It ensures the protection and accessibility of their valuable data.
Enter NAS (Network Attached Storage), a game-changer in the realm of data storage and backup. NAS provides a secure and efficient solution for safeguarding your iPhone data. It offers enhanced security and expanded storage capacity. This comprehensive guide will explore the world of iPhone NAS backup and help you unleash its true potential.
Part I. What Is iPhone NAS Backup?
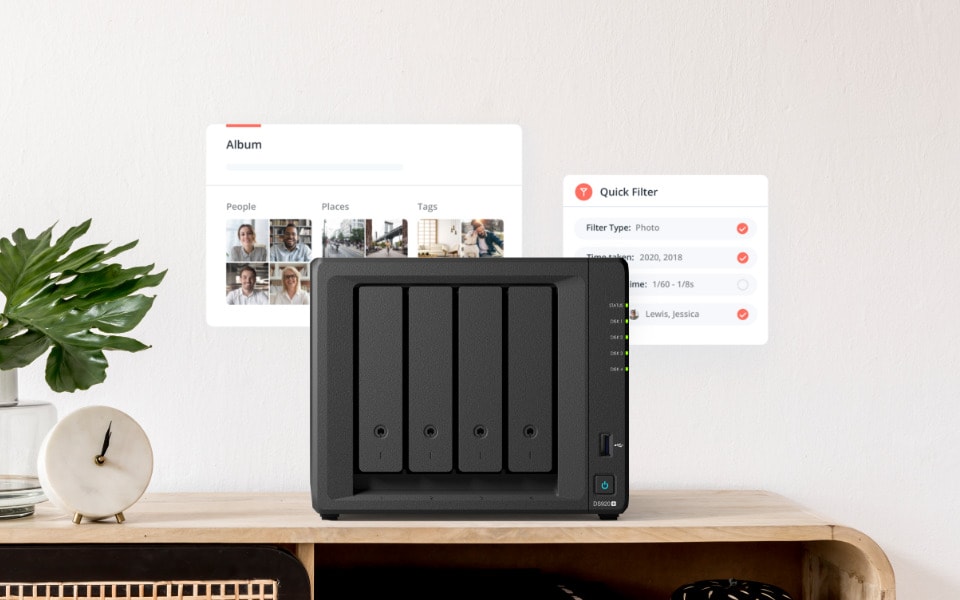
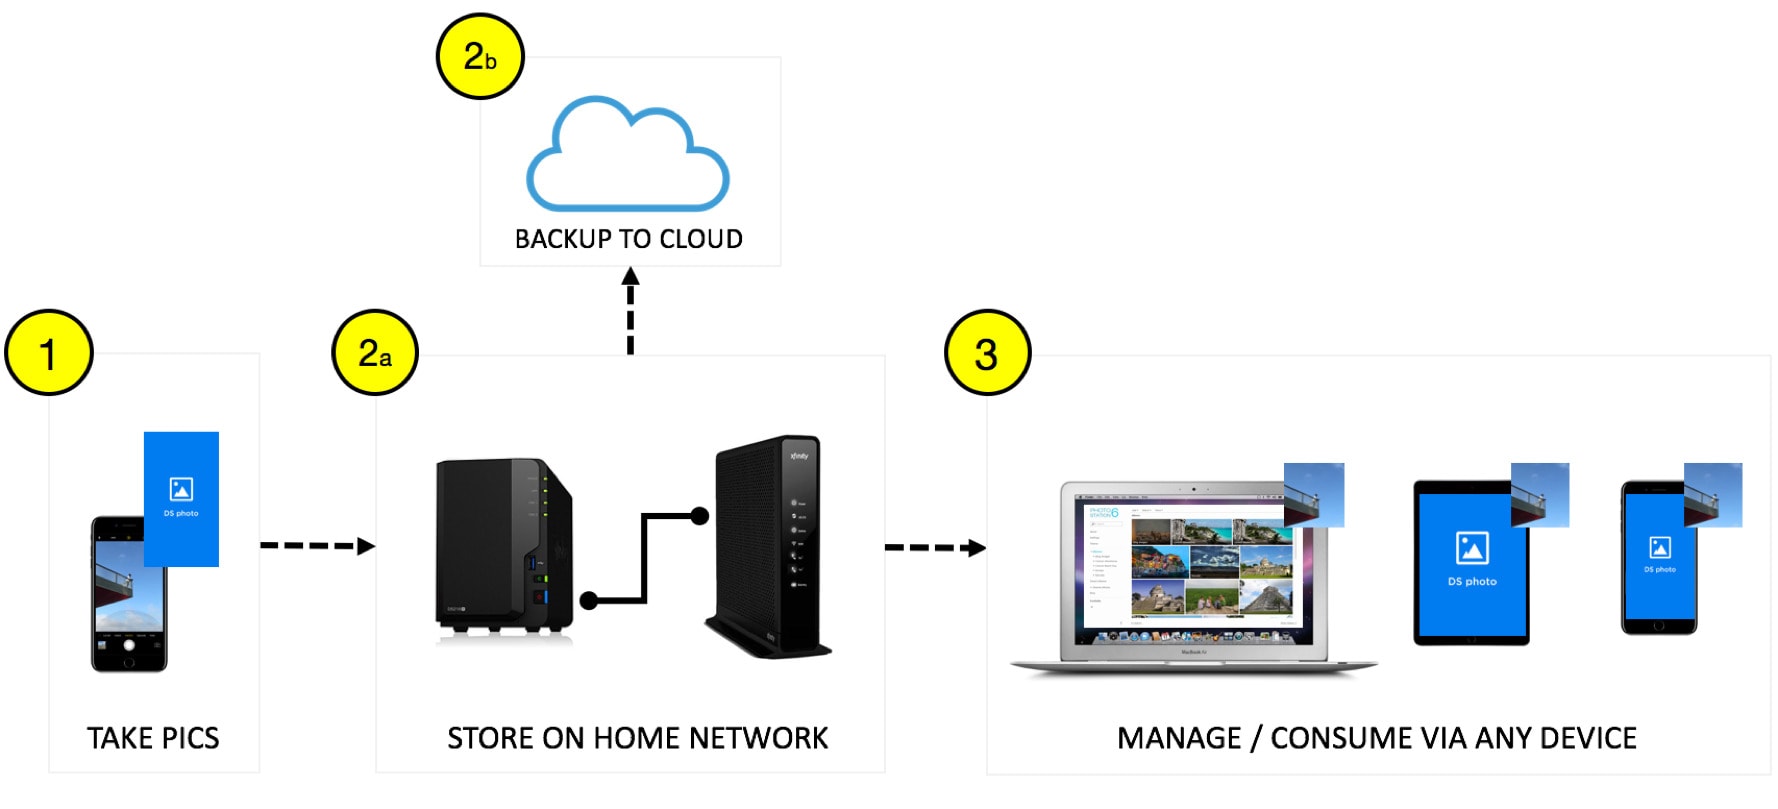
The iPhone NAS backup refers to backing up data from an iPhone to a NAS device. NAS devices are specialized storage units that connect to a network. They allow multiple devices to store and access data on them. By utilizing NAS iOS backup, users can ensure the safety and accessibility of their data.
Benefits of Using NAS for iPhone Backup
Users can enjoy enhanced data security and increased storage capacity when they back up iPhones to NAS. It also offers convenient accessibility to backed-up data. Learn more about these benefits below:
Enhanced Data Security and Redundancy
One of the primary benefits of iPhone NAS backup is its heightened data security and redundancy. NAS devices often offer advanced security features such as encryption, user access controls, and RAID configurations. These measures help protect data from unauthorized access and provide an extra layer of redundancy, ensuring that data remains intact even if one drive fails.
Increased Storage Capacity
iPhones typically have limited storage capacity, which can become a hindrance when it comes to backing up large amounts of data. On the other hand, NAS devices offer ample storage space, often spanning multiple terabytes. They allow users to back up all their iPhone data, including photos, videos, applications, and documents, without worrying about running out of storage.
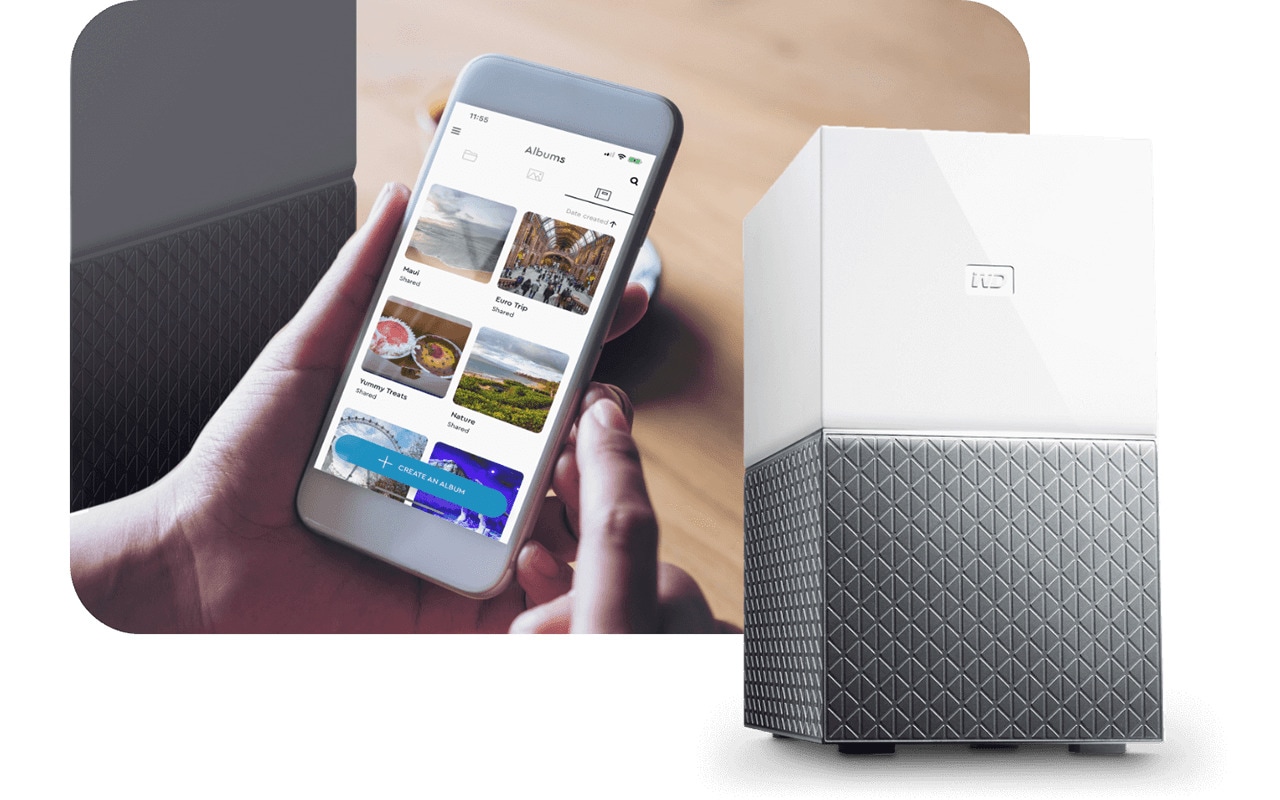
Convenient Access to Backed-Up Data from Multiple Devices
One of the key advantages of using NAS for iPhone backup is the ability to access backed-up data from multiple devices. Since the NAS device connects to the network, users can access data from other devices like laptops, tablets, or smartphones. This convenience ensures that backed-up data is readily accessible whenever and wherever needed.
Part II. Setting Up NAS for iOS Backup
Setting up a NAS device for iOS backup is a crucial step in ensuring the safety and accessibility of your iPhone data. Let's explore the key points involved in this process:
Choosing the Right NAS Device for iPhone Backup
When selecting a NAS device for iPhone backup, it's essential to consider the storage capacity, connectivity options, and compatibility.
- Storage Capacity:Assess your data storage needs, including the size of your iPhone backups and future growth. Choose a NAS device with sufficient storage capacity to accommodate your backups and potential expansion.
- Connectivity Options:Ensure the NAS device supports the necessary connectivity options for seamless integration with your iPhone and network. Common connectivity options include Ethernet, Wi-Fi, and USB.
- Compatibility:Verify that the NAS device is compatible with iOS and supports the necessary protocols for iPhone backup. This ensures smooth communication between your iPhone and the NAS device.
Step-by-Step Guide on Setting Up NAS for iPhone Backup
The first step is configuring your PC's NAS device for iPhone backup. It is a quick process that involves logging into the NAS device with your credentials. That's why it's critical to configure your NAS device before using it to back up your iPhone. This is what you will do on your Mac or Windows PC:
Note: This guide shows the steps for setting up a Synology NAS for iPhone backup.
- Step 1: Install the Synology Assistant program, then launch and wait for it to recognize your NAS device.
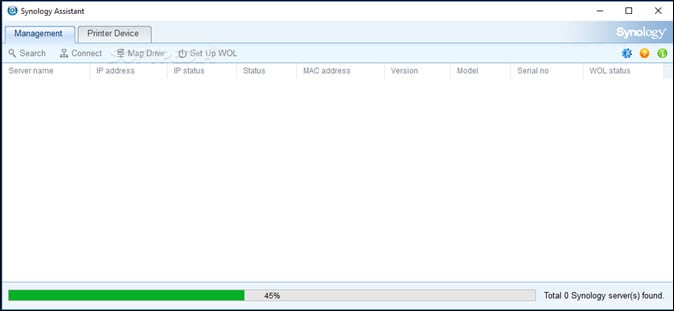
- Step 2: Choose one of the NAS devices or the only option if you only have one.
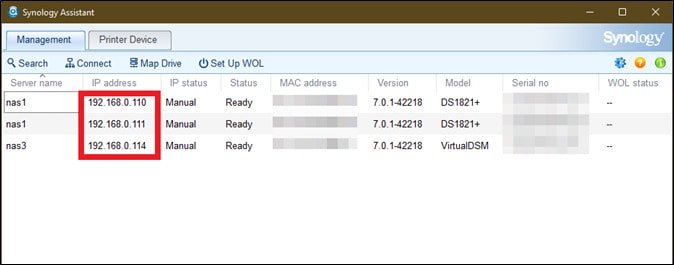
- Step 3: Enter your IP address into a browser tab and your NAS credentials.
Tip: You may change your NAS device's password by right-clicking on the NAS option in the Synology Assistant app. Navigate to the credentials options to change the NAS device's password and IP address.
- Step 4: Next is backing up your iPhone to Synology NAS manually. To do this, use any browser to sign in to your Synology NAS device.
- Step 5: Launch the File Station app on the NAS desktop, then open the folder or location where your iPhone data are saved.
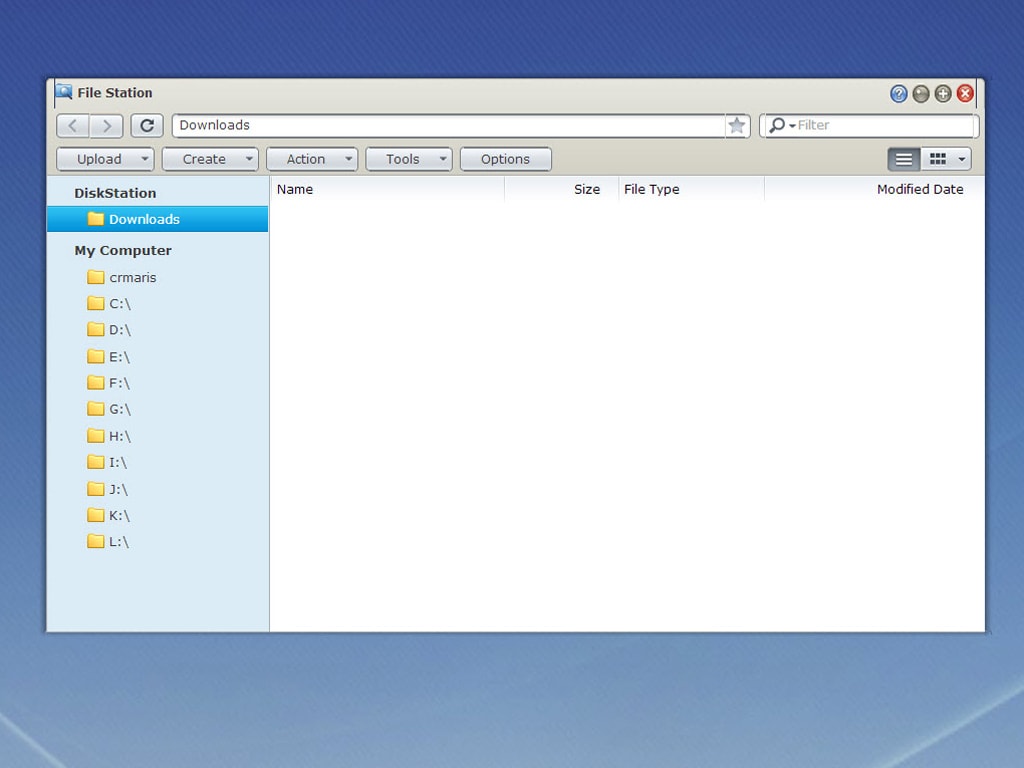
- Step 6: Drop the files into the Synology NAS, then wait for the upload to your Synology NAS to complete.
Various Backup Options and Settings
NAS devices offer various backup options and customized settings based on your preferences. These include options for full backups, incremental backups, scheduling backups at specific times, and specifying particular folders or files to contain or exclude from the backup. Additionally, some NAS devices may offer features like versioning, allowing you to retain multiple versions of backed-up files.
The next part of this article will explore a different method for performing iPhone backups. It leads to a popular third-party application that simplifies the backup process and offers additional features.
Part III. A Powerful Alternative Tool for iPhone Backup: Wondershare Dr.Fone
Dr.Fone - Phone Backup (iOS)
Selectively backup your iPhone contacts in 3 minutes!
- One-click to backup the whole iOS device to your computer.
- Allow previewing and selectively export contacts from iPhone to your computer.
- No data loss on devices during the restoration.
- Works for all iOS devices. Compatible with the latest iOS version.


While iPhone NAS backup offers an excellent solution, there are alternative tools that provide comprehensive backup options and additional features. One such tool is Wondershare Dr.Fone. Let's explore everything about this powerful iPhone backup tool.
Wondershare Dr.Fone is a versatile software designed to simplify backing up and restoring iOS devices, including iPhones. It offers a user-friendly interface and a wide range of features to ensure a comprehensive backup experience.
Key Features
Learn more about what makes Dr.Fone so special by reading below:
- One-click Backup and Restore.Fone allows you to back up your iPhone data with a single click and restore it whenever needed.
- Encrypted Backup.Fone offers the option to encrypt your backups with a password, enhancing data security.
- Preview and Export.You can preview and selectively export data from backups, such as photos, messages, contacts, etc.
Pros
Find out more about the benefits it offers below:
- Fone's intuitive interface makes it easy for users, even those with limited technical knowledge, to navigate and perform backups effortlessly.
- The software offers multiple backup options, including full backups, selective backups, and encrypted backups, catering to different user needs.
- You can choose specific data to restore from a backup, allowing for a targeted restoration process.
- Fone supports a wide range of iOS devices and iOS versions and provides reliable customer support.
Cons
Below is the drawback of using Dr.Fone:
- While Dr.Fone offers a free trial version, the full version requires a purchase. However, the cost is reasonable for the software's comprehensive features and functionality.
Step-by-Step Guide on How To Backup iOS Data Using Dr.Fone
Follow this tutorial to learn how to use Dr.Fone for iPhone backup:
Step 1: Download and open Dr.Fone, then click the My Backup tab on the left sidebar. Click the Back Up Now button to start backing up your iOS device immediately.

Step 2: Dr.Fone will analyze your device to determine which file types you want to back up. Only proceed once everything has been successfully backed up to the cloud. To abort the current action, select Cancel.

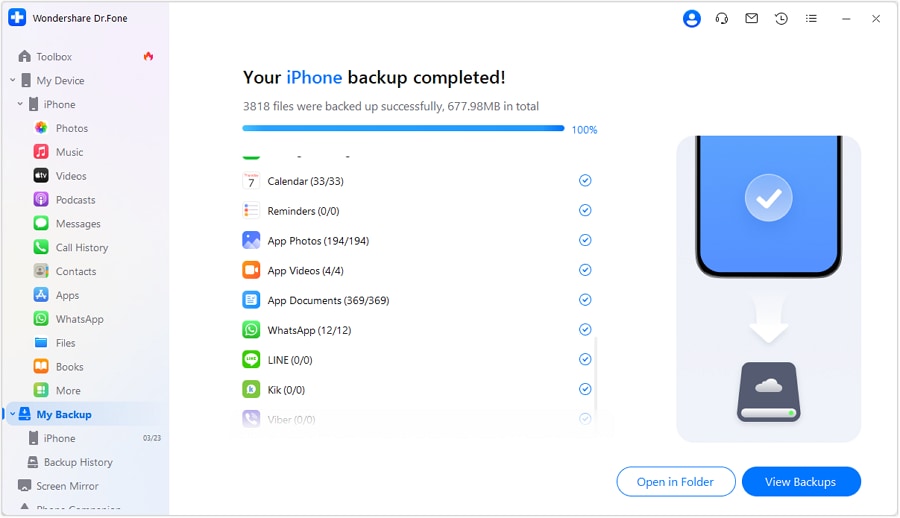
Step 3: Once the backup is complete, the prompt window will show all the information backed up. Click the View Backups button to proceed and view the backups Dr.Fone has made.
Tip: As an alternative, you can use Open in Folder to get to the archive directory.
Conclusion
iPhone NAS backup offers numerous benefits that ensure the safety and accessibility of your valuable data. However, while NAS devices provide an excellent solution, a better alternative tool for iPhone backup has been unearthed. Wondershare Dr.Fone offers a user-friendly interface, versatile backup options, and selective restoration capabilities. It simplifies the backup process and ensures the protection of your iPhone data.
Don't risk losing your important files, memories, and documents. Embrace the power of iPhone NAS backup and consider using Dr.Fone to back up your iPhone. Protect your data and enjoy the peace of mind that comes with knowing your information is secure and easily accessible whenever needed.


James Davis
staff Editor