How To Automatically Backup iPhone Photos to Google Photos
iPhone Backup
- iPhone Data Backup
- 1. Back up iPhone in Recovery Mode
- 2. Back Up iPhone With/Without iTunes
- 3. Back up iPhone to Mac
- 4. Back up iPhone/iPad to Computer
- 5. Back up iPhone to Mac Catalina
- 6. Back up Jailbreak Apps And Restore
- 7. iPhone Backup Software
- 8. Back up iPhone/iPad Easily
- 9. Back up iPhone/iPad in DFU Mode
- 10. Back up iPhone Apps and App Data
- 11. Back up Notes on iPhone and iPad
- 12. Back up iOS to External Hard Drive
- 13. Export Notes from iPhone to PC/Mac
- 14.Back up iPhone Photos to Google Photos
- 15. Back Up Your iPhone Voicemails
- 16. Back Up to External Drive
- 17.How to Back Up to NAS
- 18.Back Up iPhone With Broken Screen
- 19.Back Up iPhone to Google Drive
- 20.Buy Used iPhones
- 21.Sell Used Phone for Cash
- 22.Sell Used iPhone for Dollar
- 23.How Much is My iPhone Worth
- iPhone Data Recovery
- 1. Recover iPhone Data Without Backup
- 2. Restore Calendar on iPhone
- 3. Recover Call History on iPhone
- 4. Recover iPhone Lost Data
- 5. Restore iPhone in Recovery Mode
- 6. Undelete iPhone Backup Files
- 7. Recover Deleted iPhone Messages
- iPhone Data Restore
- 1. Restore iPhone from iTunes Backup
- 2. Restore iPhone after Downgrade
- 3. Restore iPhone from Backup
- 4. Restore iPhone from iPad Backup
- 5. Restore iPhone from DFU Mode
- 6. Restore iPhone Deleted Text Message
- iPhone Backup Problems
- 1. Find iPhone Backup Location on Mac
- 2. iPhone Backup Password Never Set
- 3. iPhone Backup Password Forget
- 4. iCloud Backup Taking Forever
- 5. iPhone Won't Backup to iCloud
- 6. iTunes Won't Backup iPhone
- iPhone Restore Problems
- 1. iTunes Stuck on Verifying iPhone
- 2. Not Space to Restore iPhone Backup
- 3. iTunes Backup Not Restoring
- 4. iPhone Won't Restore
- WhatsApp Backup & Restore
- 1. WhatsApp from Google Drive to iOS
- 2. Restore Old WhatsApp Backup
- 3. Restore WhatsApp Chat on iPhone
- 4. Retrieve WhatsApp Chat History
- 5. See Deleted Messages on WhatsApp
- 6. Restore WhatsApp Stuck on iPhone
- 7. iPhone WhatsApp to Google Drive
- 8. Back Up WhatsApp on iPhone
- 9. Backup WhatsApp Data before Changing Number
- iPhone Backup Tips
- 1. Extract Data From iPhone
- 2. Encrypt iPhone Backup
- 3. Reset iPhone Backup Password
- 4. Extract iPhone Backup in Win 10
- 5. How Long take iPhone to Backup
- 6. Find iPhone Backup Location
- 7. iPhone Backup Password
- 8. View iPhone Backup on Computer
- 9. iPhone Backup with iTunes/iCloud
- 10. iPhone Backup Unlockers
- 11.How To Encrypt iPhone Backup
- 12. Best Backup Chargers for iPhone
- 13. Speed Up Your iPhone Backups
- 14. Save Data When iPhone Disabled
- 15.Check Last Backup on iPhone
- ● Manage/transfer/recover data
- ● Unlock screen/activate/FRP lock
- ● Fix most iOS and Android issues
- Back up Now Back up Now Back up Now

Jul 12, 2024 • Filed to: Backup & Restore Data • Proven solutions
If you use an iPhone and want to access your photos and videos across multiple devices, consider using Google Photos as your backup service. Google Photos offers 15GB of free storage, face and pet recognition, AI search, editing options, and more. Furthermore, ensuring the safety and longevity of our cherished photos is crucial, as unforeseen accidents or device malfunctions can lead to irreversible data loss.
This detailed guide will explore a convenient and automated solution to back up iPhone photos to Google Photos. There are a few complex facts that you must know before you try it out yourself. Now, discover more in detail below!

Part 1: How To Set Up Google Photos on Your iPhone
Offered by Google, Google Photos is a photo and video storage service that enables cross-device access to your media. You must enable the app and configure backup options to use Google Photos on your iPhone.
Steps of Downloading and Activating Google Photos
Here are the steps to install and enable Google Photos on your iPhone:
- Step 1: Launch the App Store on your iPhone to install the Google Photos application.
- Step 2: Launch the application and sign in with your Google account after installing it.
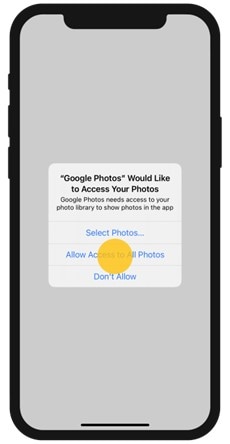
- Step 3: When prompted by your iPhone, tap Allow Access to All Photos.
- Step 4: Choose whether to back up your photos at the bottom of the screen.
- Step 5: Select Storage Saver to conserve storage space on your Google Account. Videos will be preserved at 1080p, and photos at 16 megapixels.
- Step 6: Tap Original Quality to maintain the original dimensions of your photos and videos.
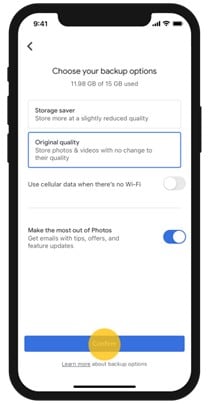
- Step 7: After selecting, tap Confirm.
Move iPhone Photos From iCloud to Google Photos
Here's how to move iPhone photos from iCloud to Google Photos once you've installed and enabled it:
- Step 1: Sign in to privacy.apple.com using your Apple ID.
- Step 2: Click the Request a copy of your data link.
- Step 3: Mark photos and videos as the source and select Google Photos as the backup location. Click Continue below to proceed.
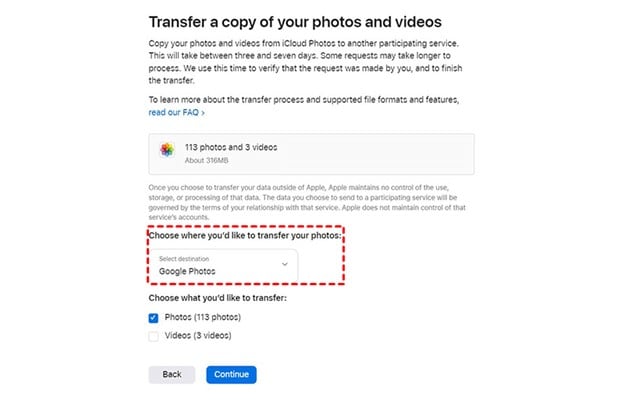
- Step 4: On the subsequent page, select Continue again, then click Add to your Google Photos library to sign in with your Google Photos account.
- Step 5: Click Confirm Transfer to back up the selected data from iCloud Photos to Google Photos.

Note: Apple estimates that the transfer to Google Photos will take between 3 and 7 days, with some time required to verify the user's identity
Disable Backup to iCloud Photos
After learning how to back up iPhone photos to Google Photos, you may wonder how to stop syncing pictures to iCloud. Here's the way to stop the backup process for future usage:
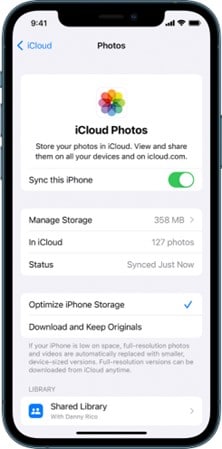
- Step 1: Tap your name within the Settings application.
- Step 2: Tap iCloud>Photos.
- Step 3: Toggle off Sync this iPhone in the iCloud tab.
Part 2: How To Automatically Upload Photos & Videos From iPhone to Google Photos
To automatically upload photos and videos from your iPhone to Google Photos, you must enable the backup and sync option in the app. This operation will allow Google Photos to automatically back up your media whenever you have an internet connection.
Here is the procedure:
- Step 1: Launch the Google Photos iPhone app. In the upper-right corner, tap your profile picture and select Google Photos Settings.
- Step 2: Tap Backup and Sync and turn on the toggle to start the backup.
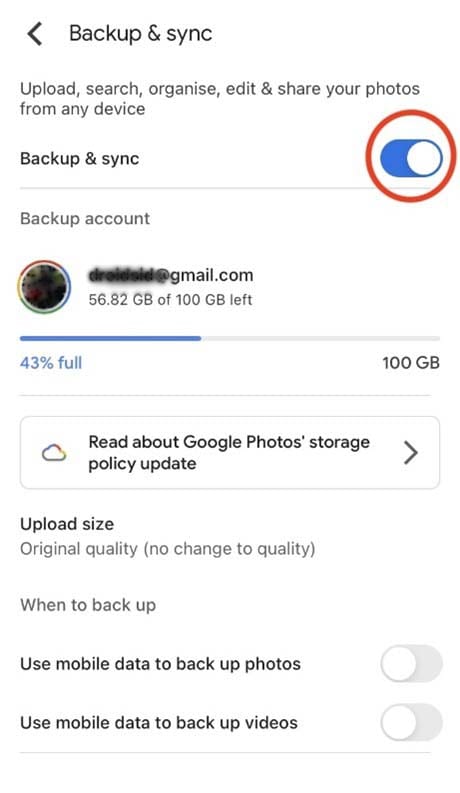
Your iPhone photos and videos will now be backed up automatically to Google Photos. Once everything has been backed up, you can delete photos and videos from the Photos app on your device if you're running out of space.
Part 3: Backup the Photos With Wondershare Dr.Fone
If you're experiencing difficulties backing up your iPhone photos to Google Photos, you can consider other, more reliable options. You can back up your iPhone images to your PC and then upload them straight to Google Photos. This way helps conserve iCloud storage space, minimize network difficulties, and get greater control over your backup process.
But how can you quickly upload and back up your iPhone photos to your PC? Wondershare Dr.Fone is the solution to this!

Wondershare Dr.Fone is a sophisticated program that will assist you in seamlessly transferring and backing up your iPhone images. It lets you see and pick the photographs you wish to back up before saving them to your PC in a readable format. You can also restore the backup to your iPhone or another iOS device.
Dr.Fone can backup and restore all images, including live photos, burst photos, screenshots, and more. Other supported data formats include contacts, messages, notes, videos, music, etc.
Key Features of Dr.Fone
Here are some of the key highlights that you must know:
- Backup and restore iPhone data selectively and flexibly.
- Preview and export iPhone data in a readable format.
- Support various data types, including photos, videos, messages, contacts, etc.
- Compatible with all iDevices.
- Safe and easy to use, with no data loss or overwrite.
Pros
A few benefits of Dr.Fone are:
- Extremely reliable on data safety
- Efficient and quick transfer
- Allows for large data to back up without losing data
Cons
Despite a few pros, here's a con you should be aware of:
- You'll need a subscription once you run out of free GBs. However, the charging plans are reasonable for resolving various problems for iPhone and Android Phones.
Steps of Backing Up iPhone Photos With Dr.Fone
Here are the two ways that can help you back up iPhone Photos using Dr.Fone to your PC/Mac:
Method 1: Manual Backup
The first method is to start manual backing up of data. Here's how to do it:
- Step 1: Launch Dr.Fone and navigate to the My Backup section on the left drop-down menu. Click the Back Up Now icon to begin manually saving up your iDevice.
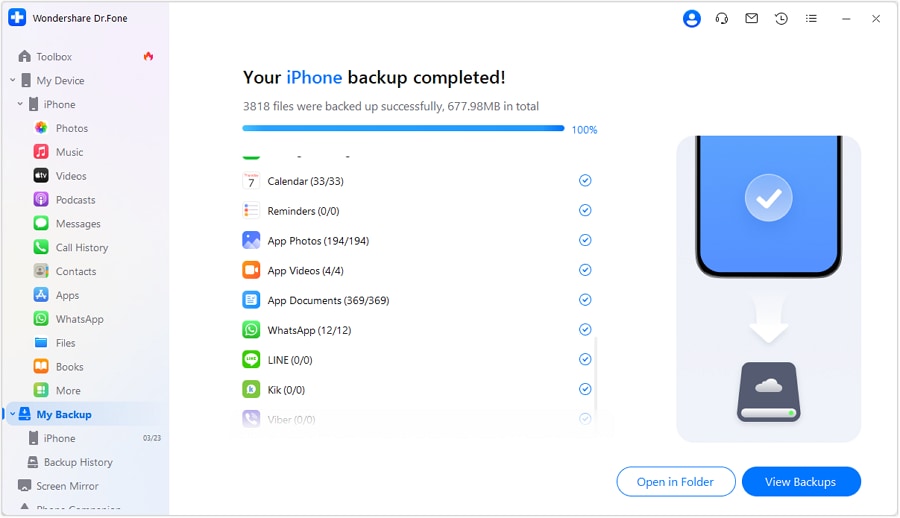
- Step 2: Dr.Fone will automatically detect and back up the file types on your device. Wait until all data has been stored on the platform. Click Cancel to terminate the procedure.

- Step 3: The prompt window displays all backup information once the restore is complete. Click the View Backups so that you can see the Dr. Fone-created backups.
Method 2: Automatic Backup
The second method is to begin with automatic backing up of data. Here's how you can do it:
- Step 1: Launch the application and navigate to My Devices > Backup preferences to open a new window with backup options.
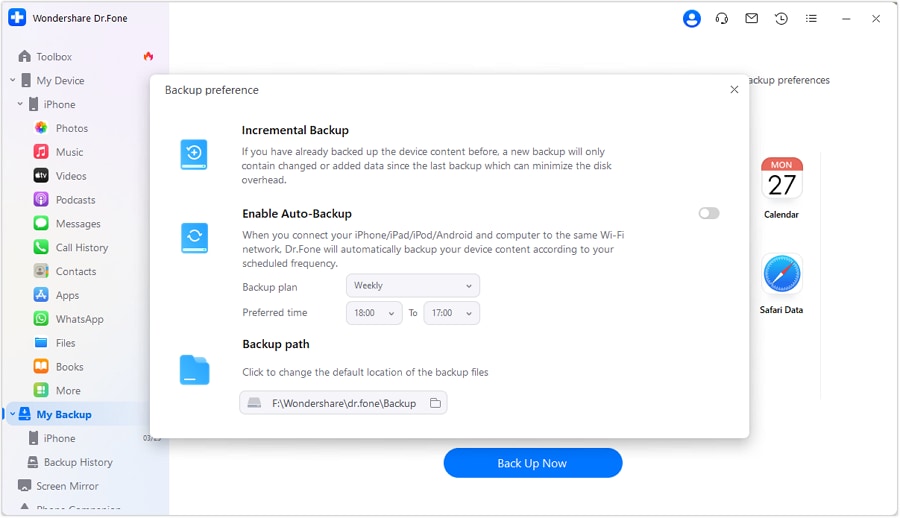
- Step 2: Ensure the iDevice and computer are connected to the same network before activating the switch next to the Enable Auto-Backup option.

Note: If the devices are connected to the same Wi-Fi network, the device will back up automatically according to the defined Backup Plan and Preferred Time.
- Step 3: You can select Backup History to view the backup history of your iOS device. Click the View icon to examine the categories of the backup file's contents.
Conclusion
It's not always easy or convenient to back up your iPhone images to Google Photos or iCloud. Try Wondershare Dr.Fone if you want a more streamlined backup procedure.
It's a fast and straightforward way to back up your iPhone images on your computer. You can restore the backup to your iPhone or any iOS device anytime. Dr.Fone is your best bet regarding backing up your iPhone images.
FAQs
Some of the commonly asked questions about how to backup iPhone photos to Google photos are listed below:


James Davis
staff Editor