A Comprehensive Guide for Locating Your iPhone Backup on a Mac
iPhone Backup
- iPhone Data Backup
- 1. Back up iPhone in Recovery Mode
- 2. Back Up iPhone With/Without iTunes
- 3. Back up iPhone to Mac
- 4. Back up iPhone/iPad to Computer
- 5. Back up iPhone to Mac Catalina
- 6. Back up Jailbreak Apps And Restore
- 7. iPhone Backup Software
- 8. Back up iPhone/iPad Easily
- 9. Back up iPhone/iPad in DFU Mode
- 10. Back up iPhone Apps and App Data
- 11. Back up Notes on iPhone and iPad
- 12. Back up iOS to External Hard Drive
- 13. Export Notes from iPhone to PC/Mac
- 14.Back up iPhone Photos to Google Photos
- 15. Back Up Your iPhone Voicemails
- 16. Back Up to External Drive
- 17.How to Back Up to NAS
- 18.Back Up iPhone With Broken Screen
- 19.Back Up iPhone to Google Drive
- 20.Buy Used iPhones
- 21.Sell Used Phone for Cash
- 22.Sell Used iPhone for Dollar
- 23.How Much is My iPhone Worth
- iPhone Data Recovery
- 1. Recover iPhone Data Without Backup
- 2. Restore Calendar on iPhone
- 3. Recover Call History on iPhone
- 4. Recover iPhone Lost Data
- 5. Restore iPhone in Recovery Mode
- 6. Undelete iPhone Backup Files
- 7. Recover Deleted iPhone Messages
- iPhone Data Restore
- 1. Restore iPhone from iTunes Backup
- 2. Restore iPhone after Downgrade
- 3. Restore iPhone from Backup
- 4. Restore iPhone from iPad Backup
- 5. Restore iPhone from DFU Mode
- 6. Restore iPhone Deleted Text Message
- iPhone Backup Problems
- 1. Find iPhone Backup Location on Mac
- 2. iPhone Backup Password Never Set
- 3. iPhone Backup Password Forget
- 4. iCloud Backup Taking Forever
- 5. iPhone Won't Backup to iCloud
- 6. iTunes Won't Backup iPhone
- iPhone Restore Problems
- 1. iTunes Stuck on Verifying iPhone
- 2. Not Space to Restore iPhone Backup
- 3. iTunes Backup Not Restoring
- 4. iPhone Won't Restore
- WhatsApp Backup & Restore
- 1. WhatsApp from Google Drive to iOS
- 2. Restore Old WhatsApp Backup
- 3. Restore WhatsApp Chat on iPhone
- 4. Retrieve WhatsApp Chat History
- 5. See Deleted Messages on WhatsApp
- 6. Restore WhatsApp Stuck on iPhone
- 7. iPhone WhatsApp to Google Drive
- 8. Back Up WhatsApp on iPhone
- 9. Backup WhatsApp Data before Changing Number
- iPhone Backup Tips
- 1. Extract Data From iPhone
- 2. Encrypt iPhone Backup
- 3. Reset iPhone Backup Password
- 4. Extract iPhone Backup in Win 10
- 5. How Long take iPhone to Backup
- 6. Find iPhone Backup Location
- 7. iPhone Backup Password
- 8. View iPhone Backup on Computer
- 9. iPhone Backup with iTunes/iCloud
- 10. iPhone Backup Unlockers
- 11.How To Encrypt iPhone Backup
- 12. Best Backup Chargers for iPhone
- 13. Speed Up Your iPhone Backups
- 14. Save Data When iPhone Disabled
- 15.Check Last Backup on iPhone
- ● Manage/transfer/recover data
- ● Unlock screen/activate/FRP lock
- ● Fix most iOS and Android issues
- Back up Now Back up Now Back up Now

Jul 12, 2024 • Filed to: Backup & Restore Data • Proven solutions
Losing precious data from your iPhone can be a nightmare. That's why knowing the location of your iPhone backup on Mac is crucial, whether you need to restore your device or want to ensure the safety of your data.
This article will walk you through finding your iPhone backup file location on a Mac. It will also explore different methods for backing up your iPhone data on a Mac, including using iCloud, iTunes, and an excellent third-party app. By the end of this article, you'll have all the knowledge you need to safeguard your iPhone data effectively.
Part 1. Where Is the iPhone Backup Location on Mac?
Finding your iTunes backup location on Mac is relatively straightforward. You can quickly locate your iPhone backup location on MacOS by simply following the steps given below:
- Step 1: On your Macbook, launch iTunes and select Preferences.
- Step 2: Select the specific iPhone by clicking Devices at this point.
- Step 3: To inspect a backup, right-click it and choose Show in Finder from the context menu.
- Step 4: Afterward, you will be directed to the folder keeping the chosen backup.

Note: Once in the backup folder, you will find various subfolders with unique identifiers representing your iPhone backups. Each subfolder contains the backup data for a specific device. Knowing this location allows you to access and manage your iPhone backups on your Mac efficiently.
Part 2: Changing iTunes Backup Location on Mac
Changing iTunes backup location on Mac allows you to customize where your backups are stored. By following the simple steps below, you can easily change the iPhone backup location on your Mac to a place that suits your preferences.
- Step 1: Quit iTunes if it's open, then open a Finder window on your Mac.
- Step 2: Navigate to where you want to save your backups, then create a new folder at the desired location and give it a name.
- Step 3: Navigate to the Go menu, then select the Go to Folder option.
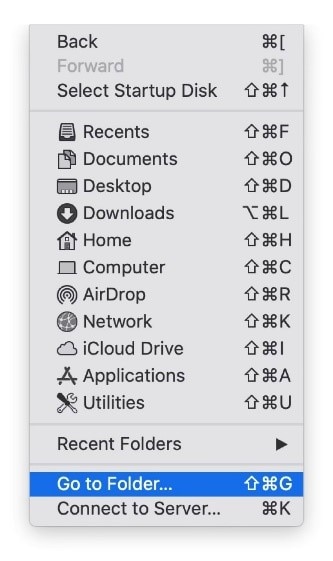
- Step 4: Select Library from the dropdown menu to open the folder. Within the Library folder, locate and open the Application Support folder.
- Step 5: Find the MobileSync folder and open it, then look for the Backup folder and move it to the newly created folder in the desired location.

- Step 6: Launch iTunes, and it will now save your iPhone backups in the newly specified location.
Part 3: How To Backup iPhone Data on Mac
There are four easy ways to back up iPhone data on Mac, and this section will dig into those methods. Learn about them below.
Method 1. Using a Third-Party App: Wondershare Dr.Fone
Regarding third-party apps for iPhone backup, Dr.Fone - Phone Backup feature is a reliable and feature-rich option. It's a specialist iOS backup program designed particularly for backing up your iPhone to a PC. It also offers a user-friendly interface and a wide range of functionalities.
Unlike typical backup solutions, Dr.Fone allows you to select which files you want to include in the backup. This means you won't have to spend hours backing up your data when you can choose the file types you wish to keep. On Mac, you may also choose a dedicated iPhone backup file location to save all backups in a specified folder.
Key Features
Some key features of Dr.Fone - Phone Backup include:
- Secure and efficient backup of various types of data, including contacts, messages, photos, videos, and more
- Previewing and exporting specific data from backups
- Compatibility with most iPhone models and iOS versions,including the latest ones
Pros
Here are some of the advantages of using Dr.Fone over iCloud/iTunes backup:
- Restore the backups to another iPhone without losing the existing data
- One-click backup of iPhone data
- The straightforward and intuitive interface allow users to navigate and operate the software easily
Cons
Here is the drawback to utilizing Dr.Fone:
- Fone is a premium software requiring a license to use the advanced functions.
A Step-by-Step Guide on Using Dr.Fone
Check out the steps on how to use Dr.Fone to backup iPhone data on a Mac:
Solution 1: Back Up Data Manually
- Step 1: To begin with a manual backup, launch Dr.Fone and navigate to the My Backup section on the left side, then click Back Up Now to start backing up your iDevice.

- Step 2: Dr.Fone will automatically detect and back up the file kinds on your device. Wait until all data has been backed up to the platform. Click Cancel if you want to cancel the process.

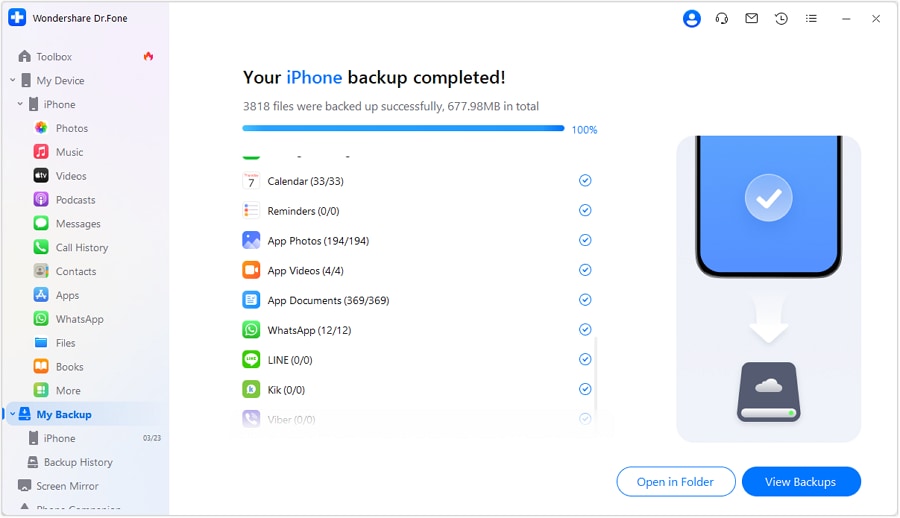
- Step 3: The prompt window displays the complete backup details when the backup is finished. Continue by clicking the View Backups button to see the backups created by Dr.Fone.
Note: You can also try Open in Folder to navigate to the backup folder.
Solution 2: Back Up Data Automatically
- Step 1: Those looking to back up their iDevices automatically can also use Dr.Fone – Phone Backup feature. Launch the tool and navigate to My Devices > Backup preference to open a new window with data backup choices.
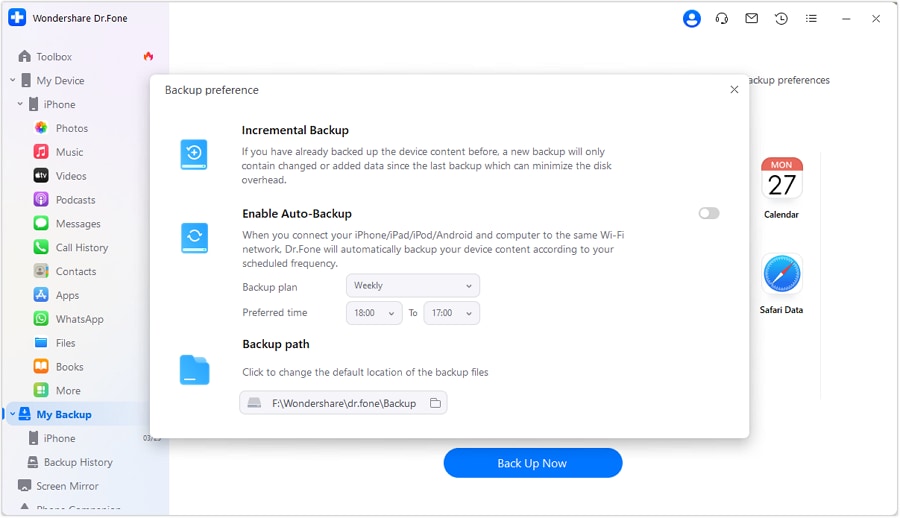
- Step 2: While you turn on the toggle next to the Enable Auto-Backup option, ensure your iDevice and computer are connected to the same network. If they are, the device will automatically back up using the Backup Plan and Preferred Time settings.
- Step 3: You may check all iOS device backup history by clicking Backup History. To view the backup file's contents in the categories, click the View option.

Method 2. Using iCloud Backup
While we're at it, let's review how to back up your iPhone data using your iCloud account. The backup will be saved on the cloud in this scenario. This also implies that if you have a large amount of data to back up, you may need to purchase additional iCloud storage.
Let's review how to back up your iPhone using your iCloud account.
- Step 1: Connect your iPhone to your MacBook using a USB cord.
- Step 2: Launch the Finder app, choose iPhone from the side menu bar, then select the General tab.

- Step 3: Select Back up your most important data on your iPhone to iCloud and press the Back Up Now button.
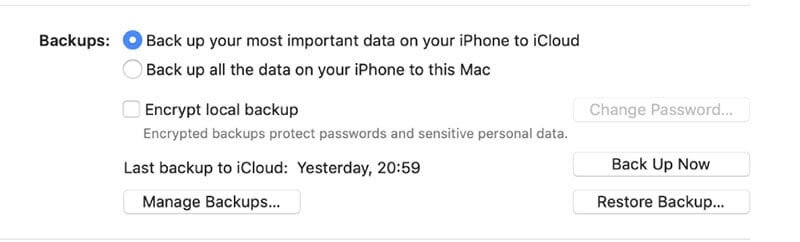
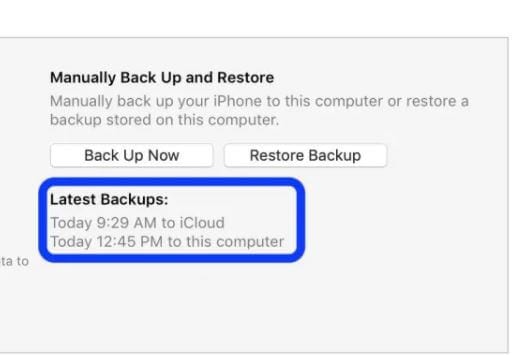
- Step 4: Wait for the backup process to finish before checking the status under Latest Backups.

Is There a Downside to iCloud/iTunes Backup?
Despite being Apple's approved method for backing up data on an iPhone, both iTunes and iCloud have one significant disadvantage. Neither of these ways will back up the complete data set. The user does not have the option of selecting which files to include in the backup.
So, if you only want to back up a subset of your iPhone's data, utilizing iTunes/iCloud may not be the ideal solution. In this case, it is preferable to use a third-party backup solution like Dr.Fone - Phone Backup to produce a selective backup.
Method 3. Using iTunes Backup
Your iPhone's Mac backups can be synced with your iTunes account. With an iTunes account, you can effortlessly back up all your data. Finding the iTunes iPhone backup location on a Mac will also become less hassle after creating the backup.
Here's how to use iTunes to create an iPhone backup on a Macbook.
- Step 1: You'll want to get your iPhone plugged into your Macbook and iTunes.
- Step 2: Select the "iPhone" icon in the top-left corner.
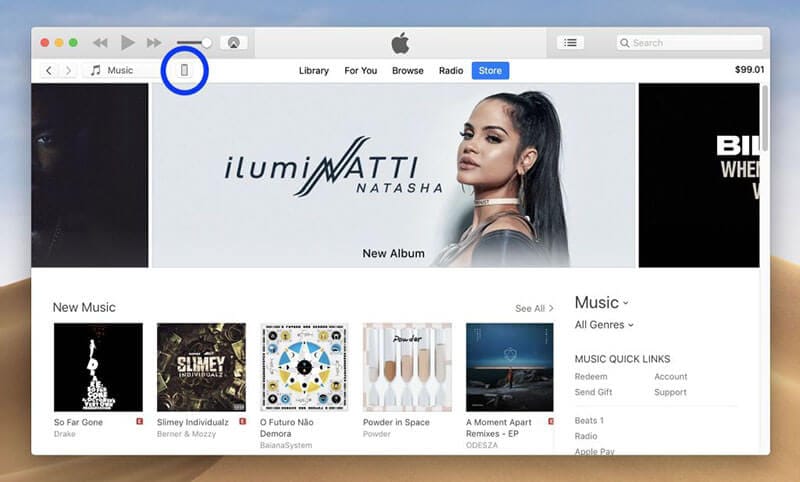
- Step 3: To begin the backup process, click the Backup Up Now button.
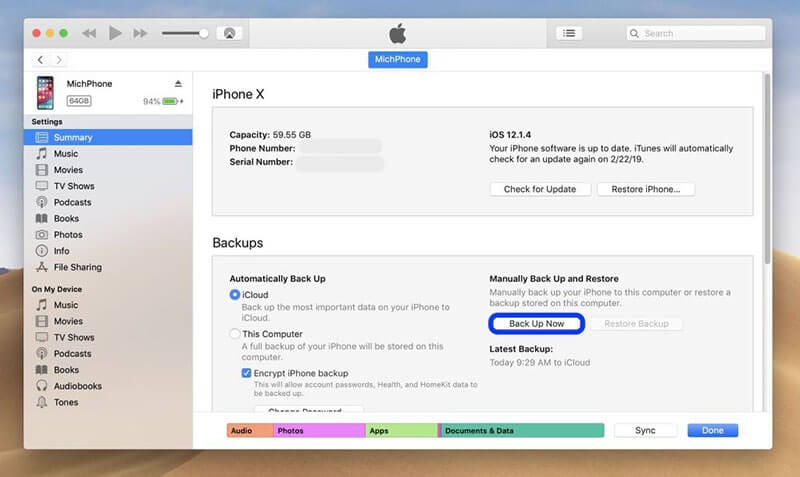
- Step 4: Check the Latest Backups section to verify the backup was created successfully. After the iPhone's data has been successfully backed up, eject it.
Method 4. Copying Data From iPhone to Mac
The usual and easiest method of creating a backup for your files is to connect the iPhone to a Mac and transfer data. You may easily link the two devices through USB and copy files from your iPhone to your PC. You can select a unique iPhone backup location on Mac in this situation.
This method is ideal if you need to back up a small amount of data (a few photographs or movies). Here's how to use a USB transfer to move files from an iPhone to a Mac.
- Step 1: Connect your iPhone to the Mac using a USB lightning cord. You may need an adaptor to connect the iPhone if you have a new MacBook with a USB-C connection.
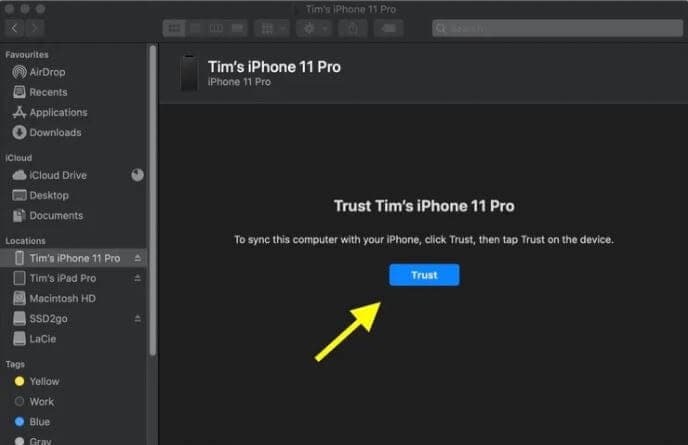
- Step 2: After successfully connecting the two devices, input the screen code on your iPhone and tap Trust to establish a connection for file transfer between the two devices.
- Step 3: On your Macbook, click the Finder app and select the "iPhone's" icon from the left menu bar.
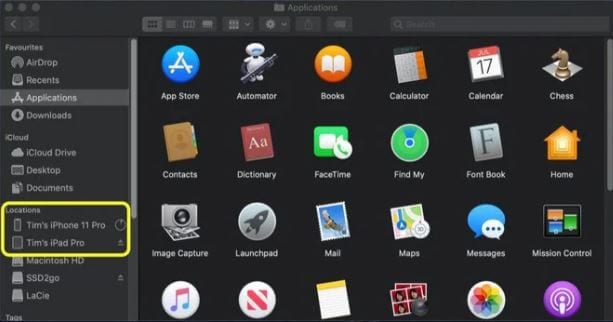
- Step 4: If this is your first time connecting the iPhone, you'll also need to check Trust on the Macbook.
- Step 5: On your iPhone, you'll need a File Sharing app explicitly created for transferring files from an iPhone to macOS. You can find such programs in Apple's App Store.
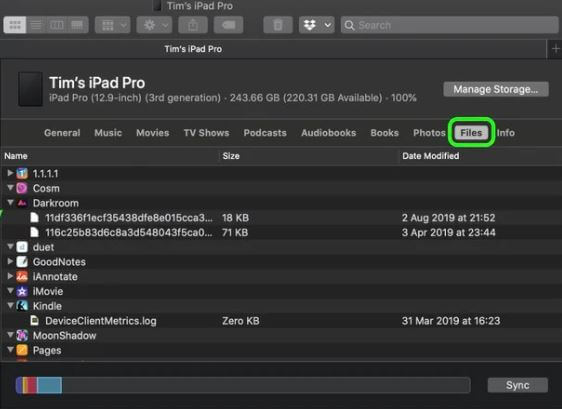
- Step 6: On your Macbook, click the Files button and select the file transfer software you want to use.
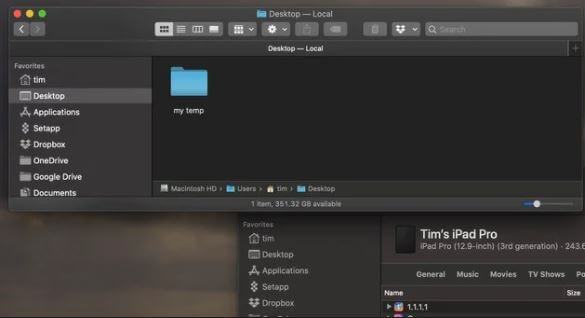
- Step 7: Now, on your Macbook, open another Finder window and navigate to where you wish to paste the files. Drag the files from your iPhone to the desired folder.
Notes:
- While USB file transfer is a simple way to establish a backup, it is not the greatest solution for backing up all files. Furthermore, USB file transfer for Mac is not as simple as expected.
- You cannot just copy and paste files onto the MacBook's desktop. So, if you intend to back up a significant amount of data, other options like Dr.Fone – Phone Backup is preferable.
Conclusion
Following the steps outlined in this comprehensive guide, you can easily find the iOS backup location on your Mac and take control of your data's safety. Whether you use the default iTunes backup, third-party apps like Dr.Fone - Phone Backup, or iCloud, regularly backing up your iPhone data is crucial to prevent data loss.
We highly recommend using Dr.Fone - Phone Backup to restore your iPhone from an iTunes backup. Dr. Fone simplifies the backup and restores process with its user-friendly interface, comprehensive features, and compatibility with most iPhone models and iOS versions. Ensure the protection of your precious iPhone data by considering Dr.Fone - Phone Backup as your go-to solution for restoring iTunes backups.


Alice MJ
staff Editor