Tip & Trick for How to Backup iPhone to Mac
iPhone Backup
- iPhone Data Backup
- 1. Back up iPhone in Recovery Mode
- 2. Back Up iPhone With/Without iTunes
- 3. Back up iPhone to Mac
- 4. Back up iPhone/iPad to Computer
- 5. Back up iPhone to Mac Catalina
- 6. Back up Jailbreak Apps And Restore
- 7. iPhone Backup Software
- 8. Back up iPhone/iPad Easily
- 9. Back up iPhone/iPad in DFU Mode
- 10. Back up iPhone Apps and App Data
- 11. Back up Notes on iPhone and iPad
- 12. Back up iOS to External Hard Drive
- 13. Export Notes from iPhone to PC/Mac
- 14.Back up iPhone Photos to Google Photos
- 15. Back Up Your iPhone Voicemails
- 16. Back Up to External Drive
- 17.How to Back Up to NAS
- 18.Back Up iPhone With Broken Screen
- 19.Back Up iPhone to Google Drive
- 20.Buy Used iPhones
- 21.Sell Used Phone for Cash
- 22.Sell Used iPhone for Dollar
- 23.How Much is My iPhone Worth
- iPhone Data Recovery
- 1. Recover iPhone Data Without Backup
- 2. Restore Calendar on iPhone
- 3. Recover Call History on iPhone
- 4. Recover iPhone Lost Data
- 5. Restore iPhone in Recovery Mode
- 6. Undelete iPhone Backup Files
- 7. Recover Deleted iPhone Messages
- iPhone Data Restore
- 1. Restore iPhone from iTunes Backup
- 2. Restore iPhone after Downgrade
- 3. Restore iPhone from Backup
- 4. Restore iPhone from iPad Backup
- 5. Restore iPhone from DFU Mode
- 6. Restore iPhone Deleted Text Message
- iPhone Backup Problems
- 1. Find iPhone Backup Location on Mac
- 2. iPhone Backup Password Never Set
- 3. iPhone Backup Password Forget
- 4. iCloud Backup Taking Forever
- 5. iPhone Won't Backup to iCloud
- 6. iTunes Won't Backup iPhone
- iPhone Restore Problems
- 1. iTunes Stuck on Verifying iPhone
- 2. Not Space to Restore iPhone Backup
- 3. iTunes Backup Not Restoring
- 4. iPhone Won't Restore
- WhatsApp Backup & Restore
- 1. WhatsApp from Google Drive to iOS
- 2. Restore Old WhatsApp Backup
- 3. Restore WhatsApp Chat on iPhone
- 4. Retrieve WhatsApp Chat History
- 5. See Deleted Messages on WhatsApp
- 6. Restore WhatsApp Stuck on iPhone
- 7. iPhone WhatsApp to Google Drive
- 8. Back Up WhatsApp on iPhone
- 9. Backup WhatsApp Data before Changing Number
- iPhone Backup Tips
- 1. Extract Data From iPhone
- 2. Encrypt iPhone Backup
- 3. Reset iPhone Backup Password
- 4. Extract iPhone Backup in Win 10
- 5. How Long take iPhone to Backup
- 6. Find iPhone Backup Location
- 7. iPhone Backup Password
- 8. View iPhone Backup on Computer
- 9. iPhone Backup with iTunes/iCloud
- 10. iPhone Backup Unlockers
- 11.How To Encrypt iPhone Backup
- 12. Best Backup Chargers for iPhone
- 13. Speed Up Your iPhone Backups
- 14. Save Data When iPhone Disabled
- 15.Check Last Backup on iPhone
- ● Manage/transfer/recover data
- ● Unlock screen/activate/FRP lock
- ● Fix most iOS and Android issues
- Back up Now Back up Now Back up Now

Jul 12, 2024 • Filed to: Backup & Restore Data • Proven solutions
iPhone backup refers to creating a secure copy of data on your iPhone and storing it on a separate device, such as a Mac. Regularly backing up your iPhone ensures the protection and recovery of your data in case of loss, damage, or accidental deletion. Moreover, it grants you the benefits of local storage and control over your backups, enabling easy device migration and seamless upgrades for the future.
Backing up your iPhone to a Mac offers a range of advantages that cannot be ignored. This article will introduce the techniques for backing up an iPhone to a Mac. It will show you different ways of backing up your important files. Without further ado, let's dive right into it!
Part 1: 3 Basic Ways To Back Up Your iPhone
There are three basic ways to back up your iPhone on Mac. Each method includes the implementation of a few steps that you can perform on your own. Let's look at them in detail:
With Finder – for MacOS Catalina or Newer
If you have a Mac running MacOS Catalina or later, you can back up your iPhone to your Mac using Finder. The Finder software on your Mac lets you view and manage your files and folders. It can also sync and back up your iOS devices. Let's find out how to back up iPhone on a Mac computer.
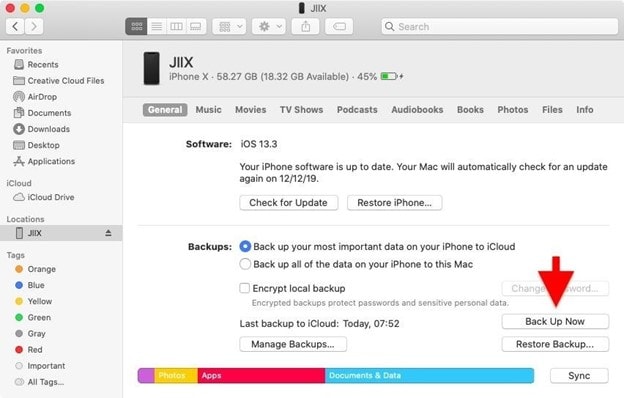
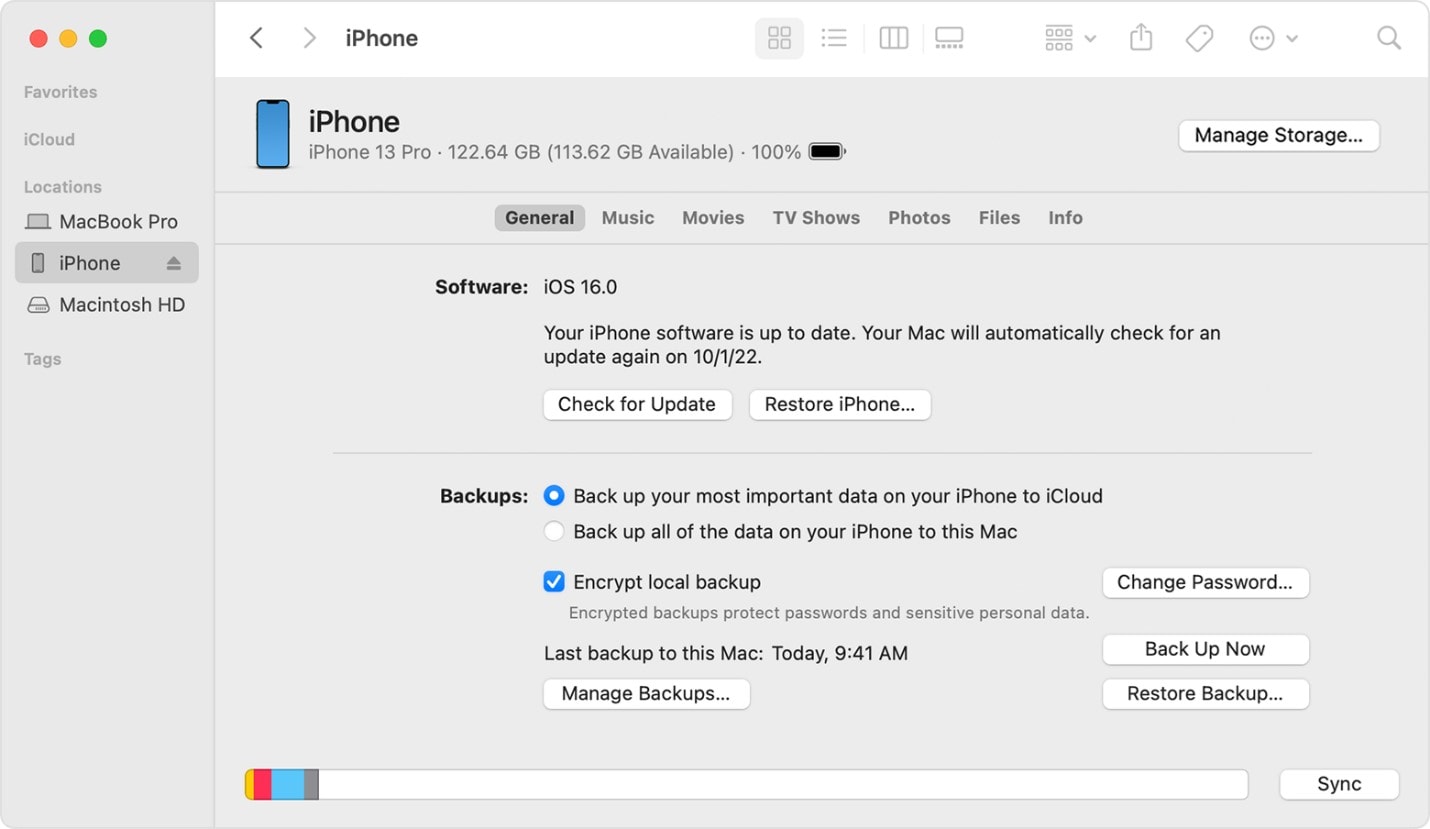
Here are the steps for backing up your iPhone to your Mac using Finder:
- Step 1: Connect your iPhone to your Mac using a USB cord. Unlock your iPhone and trust your Mac if requested.
- Step 2: Open Finder on your Mac and choose your iPhone from the Locations sidebar.
- Step 3: Check the box next to back up all data on your iPhone to this Mac on the General page.
- Step 4: To begin the backup process, choose Back Up Now.
With iTunes -– for MacOS Mojave or earlier
If you have a Mac running MacOS Mojave or earlier, you can back up your iPhone to your Mac using iTunes. iTunes is the program on your Mac that allows you to play and manage your music and media. It can also sync and back up your iOS devices. Let's find out how to back up iPhone on a Mac with iTunes.
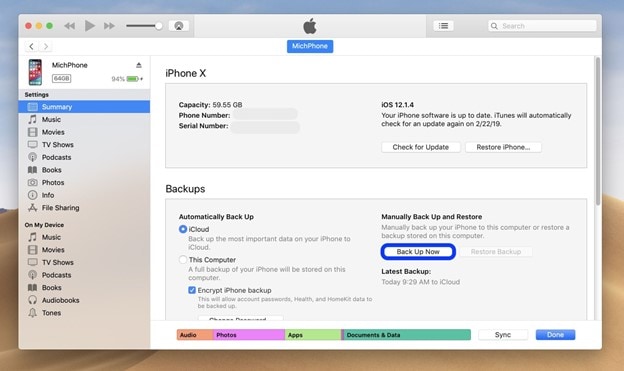
Here are the procedures for backing up your iPhone to your Mac using iTunes:
- Step 1: Connect your iPhone to your Mac using a USB cord. Unlock your iPhone and trust your Mac if requested.
- Step 2: Launch iTunes on your Mac and choose the iPhone icon in the upper left corner of the window.
- Step 3: In the sidebar, select Summary, and then click Back Up Now under Manually Back Up and Restore.
With iCloud
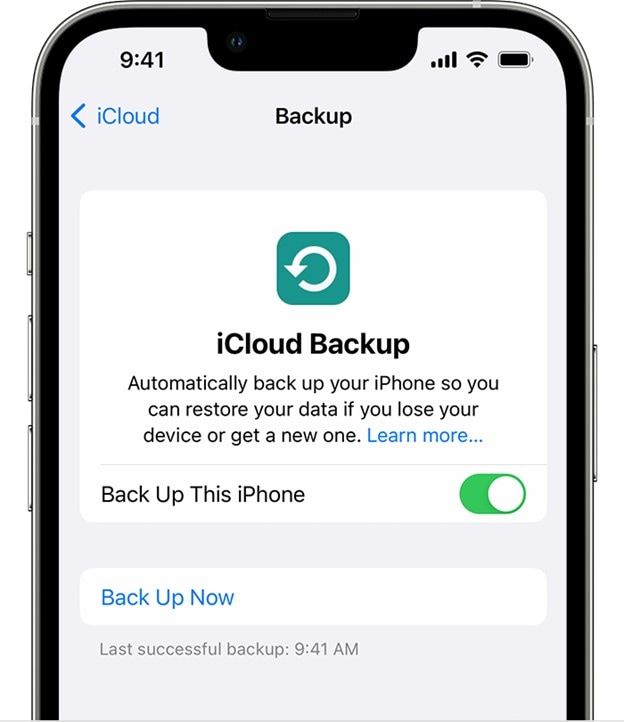
You can back up your iPhone to iCloud without a cable or a computer. Apple's cloud service, iCloud, allows you to store and access your data across all your devices. You can back up your iPhone wirelessly using iCloud. The following are the steps for backing up your iPhone to iCloud:
- Step 1: On your iPhone, go to Settings > [your name] > iCloud > iCloud Backup and enable iCloud Backup.
- Step 2: To begin the backup process, choose Back Up Now. You can also check when your most recent backup was finished.
Part 2: How To Backup iPhone to Mac Using a Reliable Third-Party Tool
Using a reliable third-party tool to back up your iPhone data to a Mac can add a layer of convenience and security.Wondershare Dr.Fone is an excellent option for ensuring the safety of your data during the backup procedure. This powerful software provides an intuitive interface and a comprehensive set of features for backing up your iPhone easily.
Dr.Fone enables you to create a backup of your iPhone's data, including contacts, messages, photographs, and videos. With its user-friendly interface, you can quickly select the data you wish to back up and select the backup location on your Mac.
Key Features of Dr.Fone
Here are the most prominent highlights of Dr.Fone – Phone Backup feature:
- Preview and export the desired backup items to your Mac
- Can back up iPhone contacts, messages, photos, videos, and more
- Compatible with almost all iOS devices
- No data lost during the restoration process
Pros
- Users can directly view backup files
- Offers a user-friendly experience
- Protects transferred files
Cons
- Users can't skip downloading the tool on iOS devices
Steps To Back Up Using Dr.Fone – Phone Backup
Follow the below steps to back up your important files on iPhone to Mac using Dr.Fone – Phone Backup.
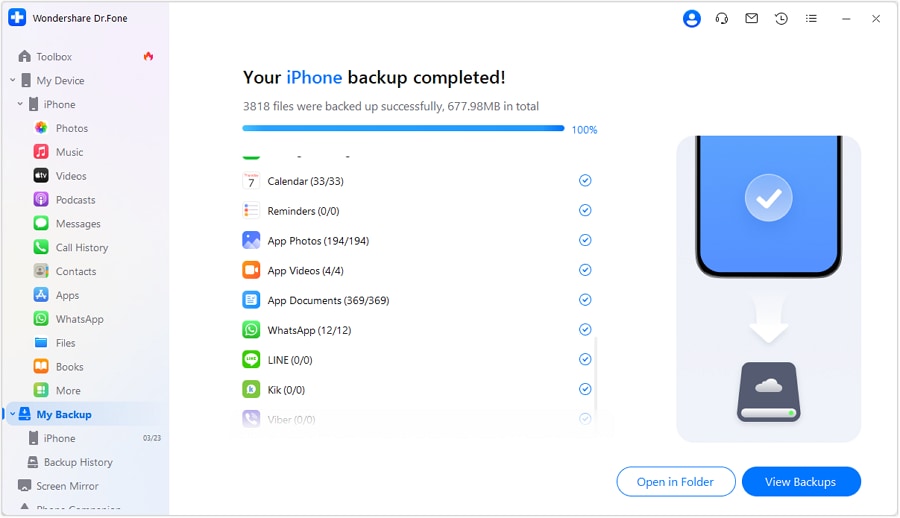
- Step 1: Download and launch Dr.Fone. Navigate to the My Backup section on the left interface. Click the Back Up Now icon to begin manually saving up your iDevice.

- Step 2: Dr.Fone will automatically detect and back up the file types on your device. Wait until all data has been stored on the platform. Click Cancel if you wish to cancel the process.

Note: Please do not disconnect your device while Dr.Fone backs up your iPhone data. The process will take several minutes.
- Step 3: The prompt window displays all backup information once the restore process is complete. Continue clicking the View Backups icon to view the Dr. Fone-created backups. Open in Folder button can also navigate to the folder containing the backup.
- Step 4: After transferring iPhone backup files to a Mac, you can immediately access them on your computer.
Part 3: Restore the Backup to Your iPhone
Sometimes, you might need to restore your iPhone from a Mac backup. This can occur if you misplace your iPhone, get a new one, or need to repair your current device. Restoring your iPhone from a backup allows you to recover all your data and settings without losing anything crucial.
How To Restore an iPhone Backup From Mac
You must first have an iPhone backup to restore your iPhone from a backup on your Mac. As previously explained, you can create a backup using Finder, iTunes, or iCloud.
Once you have a backup, you can restore your iPhone using the following steps:
- Step 1a: If you have a Mac running MacOS Catalina or later, launch Finder and select your iPhone under Locations in the sidebar.
- Step 1b: If you have a Mac running MacOS Mojave or an earlier version, launch iTunes and select the iPhone icon in the window's upper-left corner.
- Step 2: Select the Finder > General or the Summary tab in iTunes, then select Restore Backup under Manually Backup and Restore.
- Step 3: Select the backup you want to restore from the drop-down menu. If the backup is encrypted, input the specified password when creating it.
- Step 4: Click the Restore button and wait for the procedure to finish. The iPhone will restart and synchronize with the Mac.
Transfer Data From iPhone to iPhone
Apple's ecosystem facilitates the transmission of data between iPhones. You can transfer data using iCloud, iTunes, or a USB cable. You can use iCloud to back up your iPhone and restore it to a different iPhone.
Follow these steps to transfer data from one iPhone to another using iCloud:
Note: Ensure that both iPhones are enrolled into the same iCloud account.
- Step 1: Launch the iCloud Backup on your old iPhone by navigating to Settings > [your name] > iCloud > iCloud Backup.
- Step 2: Tap Backup Now and wait for the backup to finish.
- Step 3: Turn on your new iPhone and follow the instructions on-screen until you reach the Apps & Data interface. Select Restore from iCloud Backup and enter your Apple ID and password.
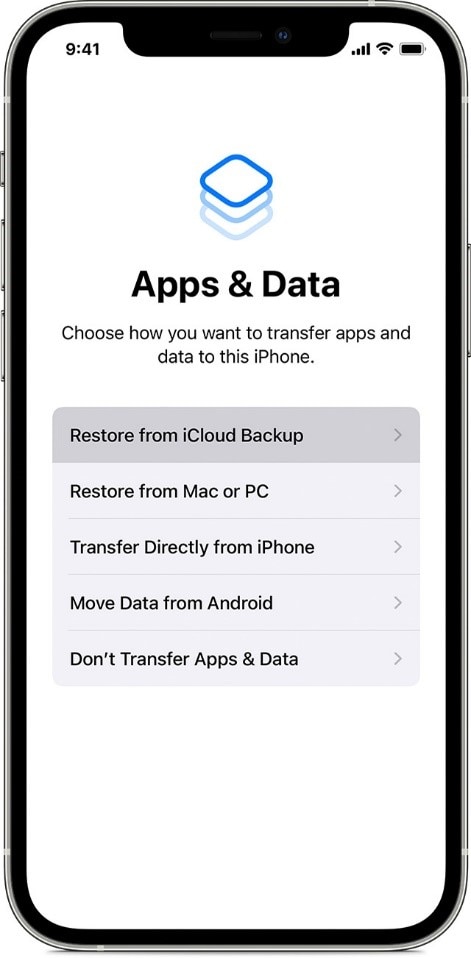
- Step 4: Select the backup created from your previous iPhone and tap Restore. Wait for the data to restore and download.
Part 4: Troubleshoot Common Issues With Backup and Restore Using iTunes or iCloud
Troubleshooting common issues with iTunes or iCloud backup and restore processes can help ensure a successful data transfer.
Connection problem between iPhone and Mac
iPhone and Mac connection problems are a common occurrence. If this occurs, ensure you use an original Apple USB cable and attempt connecting your devices to separate USB terminals. Restarting your iPhone and Mac can also assist in resolving connectivity issues.
Storage problem – Insufficient storage space for backups
Another common issue is insufficient backup storage space. If you receive a message that there is insufficient capacity to complete a backup, you can either free up space on your Mac or iPhone.
Remove unnecessary files, applications, and media to free up space. Consider using external storage devices or cloud services as an alternative method for storing your backups.
Incomplete or corrupted backup file
Additionally, incomplete or corrupted archival files can occasionally occur. If you encounter this issue, verify that you are using the most recent version of iTunes or iCloud. If the issue persists, create a new backup, and delete the previous one.
Conclusion
Backing up your iPhone to a Mac is essential for protecting your data and assuring its availability in an emergency. Whether you choose to utilize Finder, iTunes, iCloud, or a dependable third-party utility, it is impossible to exaggerate the importance of regular backups.
Wondershare Dr.Fone is an excellent choice for those searching for a dependable, user-friendly solution for backing up your iPhone to a Mac. Its specific features, such as selective backup, encryption, and flexible restoration options, make it an ideal tool for Mac users who want to securely back up their iPhone data.
FAQs
FAQs about WhatsApp transferring to new phone
- Step 1: To access iCloud Backup, navigate to Settings > [Your Name] > iCloud > iCloud Backup.
- Step 2: Ensure that iCloud Backup is activated.
- Step 3: When enabled, iCloud Backup backs up your iPhone to iCloud.


Alice MJ
staff Editor