Everything You Need to Know About iPhone Backup Encryption

Jul 12, 2024 • Filed to: Remove Screen Lock • Proven solutions
The most secure platform you can imagine is an iPhone, or for that matter, any device running iOS. With iPhone, data can be easily backed up using iTunes contributes to the ecosystem's excellence. Additionally, iOS asks you to encrypt your backup with a password.
Let's look at how you may encrypt your iTunes backup and decrypt it. In actuality, the solutions involve using both standard and specialized software. Below, we'll go over both categories of techniques. The comprehensive article will walk you through every method to encrypt iPhone backup.
Part 1: What is iPhone Backup Encryption?
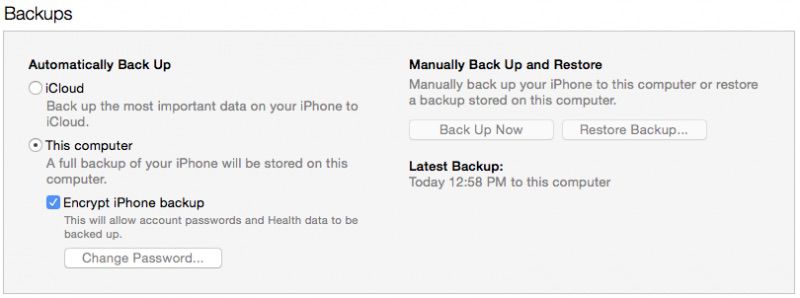
You can use encryption to safeguard your computer's backups of your iOS devices. Your information is locked and encrypted using the "Encrypt local backup" option in the Finder or iTunes.
Data related to Face ID, Touch ID, or device passcodes are not included in encrypted backups. By default, your backup is not encrypted. For the first time, enable the password-protected "Encrypt local backup" option in the Finder or iTunes. Your device's backups will be encrypted automatically. You can also create a backup in iCloud, which always encrypts your data.
Features:
The features of iPhone backup encryption assist in protecting your data. Some of the most notable are listed below:
- Automatically encrypts all data kept on computer backups or in the cloud.
- It gives you the option of selecting a solid password for your backups.
- For added protection, it can be used with optional two-factor authentication.
Pros
- Backup data that has been encrypted is only accessible by you and cannot be used or accessed by anyone else. No thief can access your files, even if the backup is stolen.
- Thanks to backup data encryption, your backup files will always be secure and shielded from any data breach.
- Data security in cloud services is a constant concern while backing up your data there. Your worries about unwanted access will be put to rest by encrypting backup data.
- Your backup will be within the provider's control if you use cloud services. Therefore, it is wiser to encrypt backup data to stop anyone from viewing and accessing your files.
Cons
- Although encryption may benefit you while harming others, bad luck can strike anytime if you forget the password. What happens if you need to remember your password or save it somewhere? You will no longer be able to access the files.
- Backup data can become damaged or lost, just as all storage devices are susceptible to certain malfunctions that result in data loss. Therefore, encryption will make it more challenging to recover backup data when it becomes corrupted.
Types of Data:
Backups that have been encrypted may contain data that hasn't been encrypted in the past:
- Your saved passwords
- Wi-Fi settings
- Website history
- Health data
- Call history
Part 2: How to Encrypt iTunes Backup?
Some of your most private information is backed up only if you link your iOS device to your computer rather than utilizing iCloud. By default, an iTunes backup excludes saved passwords, Wi-Fi settings, website history, and health information due to security concerns.
If you want to encrypt your iTunes backup, an option provided by Apple, you can preserve data such as passwords and internet history. Although encrypted backups are not the default option, we've produced a tutorial that will lead you through encrypting and decrypting iTunes backups for those who wish to make more complete backups to your computer.
- As usual, use an iOS smartphone to connect to your computer.
- If iTunes doesn't launch when you connect your device, open it manually, then let your device sync normally.
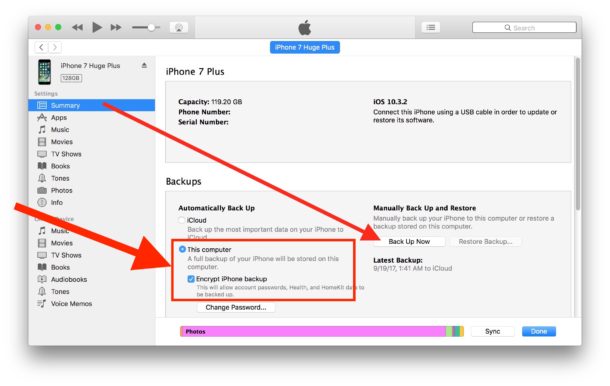
- In iTunes, choose your device. Next, select "Summary."
- Check the "Encrypt iPhone Backup" box in the Backups section.
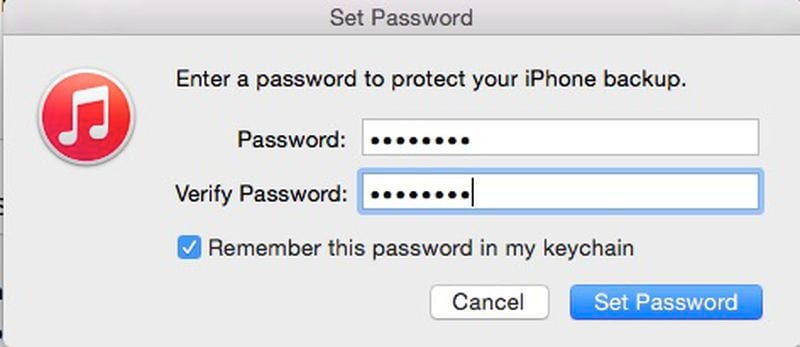
- A password must be created, as required. Please do your best to make it something you won't forget. The password is stored in your keychain for easy recall.
- The data on your device will be completely backed up by iTunes, which will replace any previous backups and encrypt them.
- Attend until the backup's conclusion. After that, make sure the encryption is successful. From the iTunes toolbar, select Preferences. Select Devices next. The backup would have a lock next to it if it were encrypted.
It's great if you had a password to enable and modify your encrypted backups. You can use iCloud to sync your iOS device if you need help remembering the password for your encrypted backup. Because there is no method to recover data or disable encryption if you forget the password, it is advised to use a password manager to save your encryption password.
Part 3: How Can I Decrypt iTunes Backup?
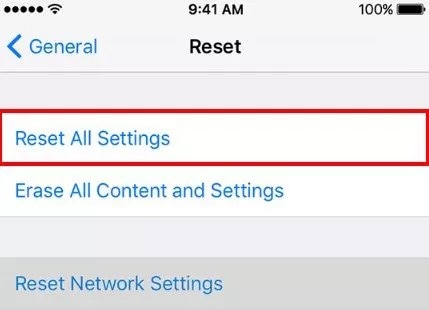
1. Reset All Settings (passcode required)
Remove all settings and contents, then reset the device to its default settings. The technique efficiently resolves the error and any additional potential bugs. Resetting the encrypted iPhone backup password in a few easy steps:
- Create a backup on iTunes first.
- Reset all content and settings under Settings> General> Reset. If asked, enter the password.
- When a warning pop-up appears, select the Erase option and request confirmation from the phone screen.
- As seen in the image below, connect your iPhone to your computer, launch iTunes, and choose Restore Backup.
2. Uncheck Encrypt iPhone backup (encryption password required)
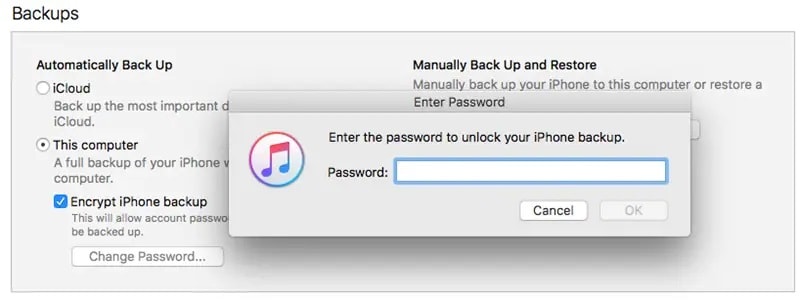
To decrypt an iTunes or iCloud backup, adhere to the methods listed below:
- Start iTunes and attach your iOS device to a computer with a USB cord. Next, select the device-shaped icon at the top of the iTunes window.
- Navigate to the Backups section by clicking Summary and additionally selecting Encrypt backup. It would help if you unchecked the box to get it back.
- Your password will be requested in a window that appears. Your iPhone or iPad backup will be unlocked when you enter it and hit OK.
3. Dr.Fone-Screen Unlock
In the article above, we learned how to encrypt iPhone backup. But what if you lose the password for your iTunes backup? You won't be able to retrieve your backup data or restore it from your settings without the encryption password.
Your best bet for locating your iPhone's encryption password is Wondershare Dr.Fone-Screen Unlock. You can change the encryption settings or find your iPhone backup password using the methods it offers.
Steps:
- Please run Dr.Fone after installation, then look for the red "Screen Unlock" button.

- To continue, you can press the "Remove iTunes BackUp Encryption" option in the Screen Unlock interface's bottom right corner.

- Before accessing this page, please use a USB cable to connect your iOS device to the PC. If Dr.Fone recognizes this relationship, you will see the image below.

- Please read the following three notes carefully before selecting "Remove Now":
Ensure "Find My iPhone" is not turned on.
Don't start "iTunes" while doing this.
While being removed, your device will reboot.

- Your iTunes backup can be checked and deleted automatically with Dr.Fone. This encryption will be removed after the bar at 100% has been reached. This procedure will take a little time.

- Encryption on iTunes backups has been successfully removed! You can easily back up, restore, move, or wipe your device.
Part 4: What to do if Encrypt iPhone Backup is Greyed out?
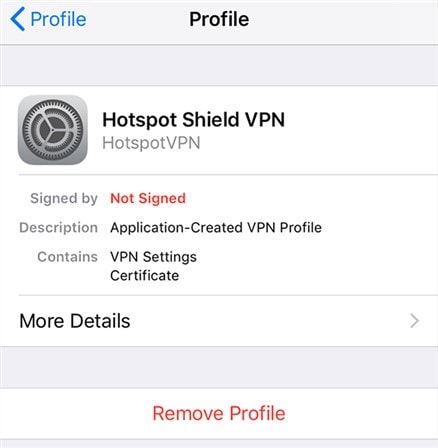
As you are aware, the fact that some profiles are already loaded on your iPhone is one of the reasons you cannot stop the encrypted backup of your iPhone. You can only create encrypted backups for your iOS-based device because these profiles interfere with the backup procedure.
Thankfully, the iPhone allows you to delete profiles from your device. It will enable you to remove any problematic profiles and solve your issue. One of the iPhone's built-in apps lets you do it.
However, there are a few things to remember only the profiles that you believe to be problematic must be deleted. A frequently used program will stop working if you accidentally delete something from it.
- Start your iPhone's Settings app. To access the general settings menu on your iPhone, discover General by scrolling down on the following screen and tapping on it.
- On the next screen, scroll down to find the option labeled "Profile." Your iPhone profiles are saved there. To see the installed profiles, tap on them.
- All the profiles installed on your iPhone are listed on the screen that follows. To open the suspicious profile's screen, tap on it.
- Now look for the option labeled "Remove Profile." The selected profile will be removed from your iPhone when you tap this option.
- Once the profile has been deleted from your device, you can connect it to your computer and use the iTunes program to create non-encrypted backups.
Conclusion
You should be able to encrypt backup of your iPhone using those straightforward techniques. Or, if you've lost your password, bypass the encryption with Wondershare Dr.Fone-Screen Unlock.
In any event, for increased security, we advise you to encrypt your iPhone backup. It would help if you didn't ever have to worry about losing your backups or forgetting your passwords again, thanks to technologies like Wondershare Dr.Fone-Screen Unlock.


iPhone Backup
- iPhone Data Backup
- 1. Back up iPhone in Recovery Mode
- 2. Back Up iPhone With/Without iTunes
- 3. Back up iPhone to Mac
- 4. Back up iPhone/iPad to Computer
- 5. Back up iPhone to Mac Catalina
- 6. Back up Jailbreak Apps And Restore
- 7. iPhone Backup Software
- 8. Back up iPhone/iPad Easily
- 9. Back up iPhone/iPad in DFU Mode
- 10. Back up iPhone Apps and App Data
- 11. Back up Notes on iPhone and iPad
- 12. Back up iOS to External Hard Drive
- 13. Export Notes from iPhone to PC/Mac
- 14.Back up iPhone Photos to Google Photos
- 15. Back Up Your iPhone Voicemails
- 16. Back Up to External Drive
- 17.How to Back Up to NAS
- 18.Back Up iPhone With Broken Screen
- 19.Back Up iPhone to Google Drive
- 20.Buy Used iPhones
- 21.Sell Used Phone for Cash
- 22.Sell Used iPhone for Dollar
- 23.How Much is My iPhone Worth
- iPhone Data Recovery
- 1. Recover iPhone Data Without Backup
- 2. Restore Calendar on iPhone
- 3. Recover Call History on iPhone
- 4. Recover iPhone Lost Data
- 5. Restore iPhone in Recovery Mode
- 6. Undelete iPhone Backup Files
- 7. Recover Deleted iPhone Messages
- iPhone Data Restore
- 1. Restore iPhone from iTunes Backup
- 2. Restore iPhone after Downgrade
- 3. Restore iPhone from Backup
- 4. Restore iPhone from iPad Backup
- 5. Restore iPhone from DFU Mode
- 6. Restore iPhone Deleted Text Message
- iPhone Backup Problems
- 1. Find iPhone Backup Location on Mac
- 2. iPhone Backup Password Never Set
- 3. iPhone Backup Password Forget
- 4. iCloud Backup Taking Forever
- 5. iPhone Won't Backup to iCloud
- 6. iTunes Won't Backup iPhone
- iPhone Restore Problems
- 1. iTunes Stuck on Verifying iPhone
- 2. Not Space to Restore iPhone Backup
- 3. iTunes Backup Not Restoring
- 4. iPhone Won't Restore
- WhatsApp Backup & Restore
- 1. WhatsApp from Google Drive to iOS
- 2. Restore Old WhatsApp Backup
- 3. Restore WhatsApp Chat on iPhone
- 4. Retrieve WhatsApp Chat History
- 5. See Deleted Messages on WhatsApp
- 6. Restore WhatsApp Stuck on iPhone
- 7. iPhone WhatsApp to Google Drive
- 8. Back Up WhatsApp on iPhone
- 9. Backup WhatsApp Data before Changing Number
- iPhone Backup Tips
- 1. Extract Data From iPhone
- 2. Encrypt iPhone Backup
- 3. Reset iPhone Backup Password
- 4. Extract iPhone Backup in Win 10
- 5. How Long take iPhone to Backup
- 6. Find iPhone Backup Location
- 7. iPhone Backup Password
- 8. View iPhone Backup on Computer
- 9. iPhone Backup with iTunes/iCloud
- 10. iPhone Backup Unlockers
- 11.How To Encrypt iPhone Backup
- 12. Best Backup Chargers for iPhone
- 13. Speed Up Your iPhone Backups
- 14. Save Data When iPhone Disabled
- 15.Check Last Backup on iPhone
- ● Manage/transfer/recover data
- ● Unlock screen/activate/FRP lock
- ● Fix most iOS and Android issues
- Back up Now Back up Now Back up Now
Daisy Raines
staff Editor