3 Ways to Backup Your iPhone to Mac Catalina
iPhone Backup
- iPhone Data Backup
- 1. Back up iPhone in Recovery Mode
- 2. Back Up iPhone With/Without iTunes
- 3. Back up iPhone to Mac
- 4. Back up iPhone/iPad to Computer
- 5. Back up iPhone to Mac Catalina
- 6. Back up Jailbreak Apps And Restore
- 7. iPhone Backup Software
- 8. Back up iPhone/iPad Easily
- 9. Back up iPhone/iPad in DFU Mode
- 10. Back up iPhone Apps and App Data
- 11. Back up Notes on iPhone and iPad
- 12. Back up iOS to External Hard Drive
- 13. Export Notes from iPhone to PC/Mac
- 14.Back up iPhone Photos to Google Photos
- 15. Back Up Your iPhone Voicemails
- 16. Back Up to External Drive
- 17.How to Back Up to NAS
- 18.Back Up iPhone With Broken Screen
- 19.Back Up iPhone to Google Drive
- 20.Buy Used iPhones
- 21.Sell Used Phone for Cash
- 22.Sell Used iPhone for Dollar
- 23.How Much is My iPhone Worth
- iPhone Data Recovery
- 1. Recover iPhone Data Without Backup
- 2. Restore Calendar on iPhone
- 3. Recover Call History on iPhone
- 4. Recover iPhone Lost Data
- 5. Restore iPhone in Recovery Mode
- 6. Undelete iPhone Backup Files
- 7. Recover Deleted iPhone Messages
- iPhone Data Restore
- 1. Restore iPhone from iTunes Backup
- 2. Restore iPhone after Downgrade
- 3. Restore iPhone from Backup
- 4. Restore iPhone from iPad Backup
- 5. Restore iPhone from DFU Mode
- 6. Restore iPhone Deleted Text Message
- iPhone Backup Problems
- 1. Find iPhone Backup Location on Mac
- 2. iPhone Backup Password Never Set
- 3. iPhone Backup Password Forget
- 4. iCloud Backup Taking Forever
- 5. iPhone Won't Backup to iCloud
- 6. iTunes Won't Backup iPhone
- iPhone Restore Problems
- 1. iTunes Stuck on Verifying iPhone
- 2. Not Space to Restore iPhone Backup
- 3. iTunes Backup Not Restoring
- 4. iPhone Won't Restore
- WhatsApp Backup & Restore
- 1. WhatsApp from Google Drive to iOS
- 2. Restore Old WhatsApp Backup
- 3. Restore WhatsApp Chat on iPhone
- 4. Retrieve WhatsApp Chat History
- 5. See Deleted Messages on WhatsApp
- 6. Restore WhatsApp Stuck on iPhone
- 7. iPhone WhatsApp to Google Drive
- 8. Back Up WhatsApp on iPhone
- 9. Backup WhatsApp Data before Changing Number
- iPhone Backup Tips
- 1. Extract Data From iPhone
- 2. Encrypt iPhone Backup
- 3. Reset iPhone Backup Password
- 4. Extract iPhone Backup in Win 10
- 5. How Long take iPhone to Backup
- 6. Find iPhone Backup Location
- 7. iPhone Backup Password
- 8. View iPhone Backup on Computer
- 9. iPhone Backup with iTunes/iCloud
- 10. iPhone Backup Unlockers
- 11.How To Encrypt iPhone Backup
- 12. Best Backup Chargers for iPhone
- 13. Speed Up Your iPhone Backups
- 14. Save Data When iPhone Disabled
- 15.Check Last Backup on iPhone
- ● Manage/transfer/recover data
- ● Unlock screen/activate/FRP lock
- ● Fix most iOS and Android issues
- Back up Now Back up Now Back up Now

Jul 12, 2024 • Filed to: Backup & Restore Data • Proven solutions
Taking a backup of your data is essential to keep important files safe and secure while freeing phone space. You will need to take backup on iCloud, but macOS Catalina is a great option if you do not want to pay for iCloud space.
If you are not willing to pay for the storage space of iCloud, backing up your iPhone with a Mac Catalina is a good option. Apple has replaced the iTunes app with new apps, including Music, Apple Podcasts, and Apple TV in macOS Catalina. The best part is that you can take back up all the iPhone data on Mac Catalina with ease. Further, it will keep your data safe in the long run and allow you to restore your data anytime.
Suppose you have no knowledge about how to backup iPhone Catalina; this guide is for you. In this article, we will teach how to backup the iPhone to Mac Catalina.
Take a look!
Method 1: Sync Data to Backup iPhone on Catalina
Synchronizing data allows you to back up your device data safely to your Mac. You can sync all files or only selected files for backup. Here are the steps that you will need to follow to sync data backup.
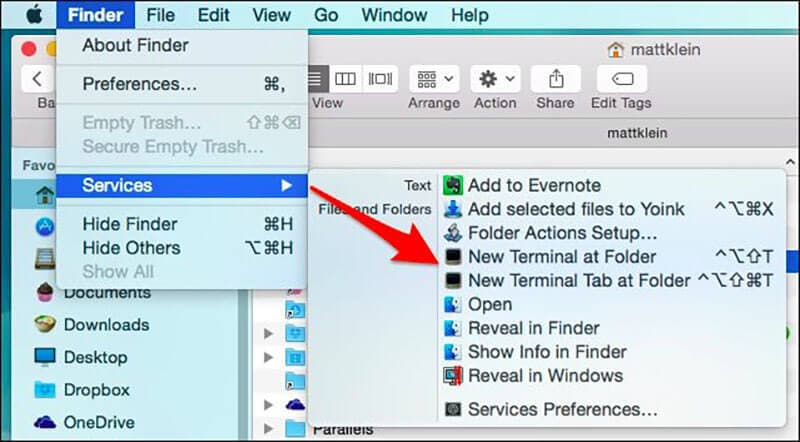
- Connect your iPhone to your MAC or system. On your Mac with macOS Catalina, open Finder.
- You may receive a message of device passcode or to Trust This Computer.
- Follow the steps of the process and if you forget the passcode, get help.
- Now, look for your iPhone on your system. If your device doesn't appear on the list, then try to reconnect it.
- When you found your device, you can select the files you want to back up your iPhone on Catalina.
Here are the examples of data files to backup on Catalina. This will helps you to save your files on Catalina. Have a look!
Example 1.1 How to sync music, podcast, videos, and audios to your Mac Catalina
- Open Finder in Mac
- From the left side of the screen, select your device
- On the right-hand side, you will see options of files, and there click on the music, audios, videos, and podcast tab one by one

- Check the box Sync Music, audio, videos, and podcast onto your device
- Under Sync, you can select Entire files or choose selected albums, artists, topics, etc.
- Click Apply. This will sync all needed files between your MAC and iPhone
Example 1.2 How to sync photos to your iPhone on macOS Catalina
- Click on the Finder
- Select your device from the left side of the screen
- Click on the photo tab from the right-hand side
- Tick the files to sync and click apply
Note: To Sync the data, you will need your passcode. If you forget it, you will not be able to recover or restore your data from backup. We have discussed third-party apps in the below section for people who do not want to use Catalina for backup data.
Method 2: Third-Party Apps to Backup
If you are not running macOS Catalina and do not want to use iTunes for backup, you can use a third-party app. There are many third-party apps available to backup the iPhone, but only a few of them are safe to use. Following are the two apps that you may consider to backup your iOS device. Please choose the best among them.
App 1: Dr.Fone-Phone Backup
There are many third-party apps to backup or restore iPhone data, but the best one is Dr.Fone - Phone Backup (iOS).
It is a very easy-to-use app that can backup all your device's data in a single click. Plus, you can preview and restore any file from the backup to your iOS/Android devices. The best part is that, it not only restores backup, but also helps restore iTunes as well as iCloud backup files.
Why Choose Dr.Fone - Phone Backup (iOS)
- It offers flexible backup
As compared to backup iPhone data with iTunes or iCloud, Dr.Fone offers a flexible solution to restore and backup data. It can backup selective data without overwriting the existing data on your device.
- Backup iPhone is easy
The whole backup process will only take a one-click after you connected your device to the system successfully. Plus, the new backup file will not overwrite the old one.
- Easy to restore backup data
With Dr.Fone, you can review your data and can backup or restore what is necessary. The whole process is straightforward and time-saving, as well. With just one single click, you can restore the data that you need.
How to Backup iPhone with Dr.Fone?
Making a backup of an iPhone or iOS device with Dr.Fone is very easy and simple. Here is the step by step guide for you that will help you to backup iPhone data. Take a look!
- First, connect the iOS device to the system
Download, install and launch the Dr.Fone on your system. After this, choose the Phone Backup option from its tool list.

When installed, connect your iPhone or iPad to your system with a lightning cable. Now, select Device Data Backup & Restore option.

- Choose file types you want to take backup
After selecting the Device Data Backup & Restore, you will see file types on the screen, and you can choose any file type to backup. Then tap on "Backup."
Further, you can also opt for the folder below the file types to customize the saving path.
You only need to wait for few minutes for the backup process to complete. Once the backup is completed, Dr.Fone will display all the supported data.
- View the data you backed up
When the backup is completed, you can View the Backup History anytime, anywhere. Also, you can import these files into your system. You can either select one by one or can select all to export on the system.

All in all, backup iPhone data with Dr.Fone is straightforward and safe as well.
App 2: CopyTrans Software for iPhone Backup
CopyTrans is another software that you can use to take the backup of your iPhone. It is easy to use tool that offers easy options to delete and edit files. Also, it keeps your data safe while managing your files sensibly.
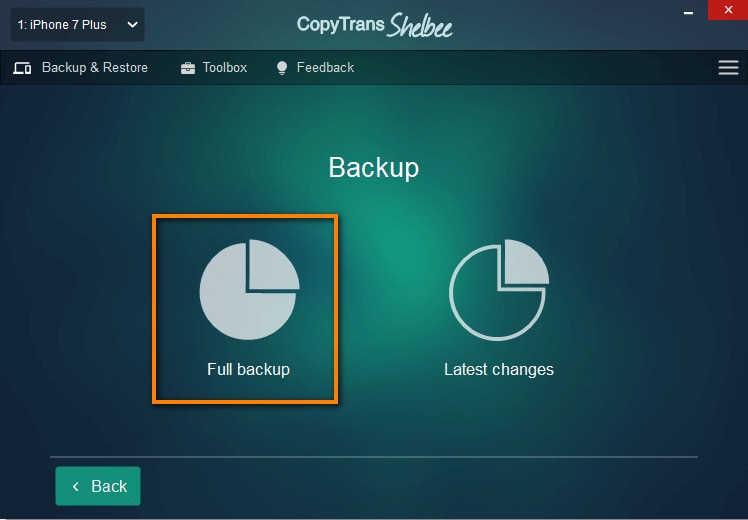
The best part is that you can choose which data you want to backup or not with this tool. After backup, you can easily restore images, messages, calendars, notes, app data, SMS, WhatsApp, Viber, and much more. To keep data safe, it is important to make regular backups of your iOS device. CopyTrans allows you to back up and restore your iOS data without the need for iTunes or iCloud.
The drawback of this software is that it can only transfer 50 contacts for a single purchase. If you need to backup more content, then you need to make another purchase.
Method 3: Wi-Fi Sync to Backup
- First, you will need to connect your iOS device to your computer with a USB cable. Also, make sure that your device is unlocked. A message may appear on your device about whether to trust the computer or to confirm things. Agree on that and confirm.
- Now that your iPhone gets successfully connected with iTunes. You will see a small device icon below the menu bar; click on that device icon.
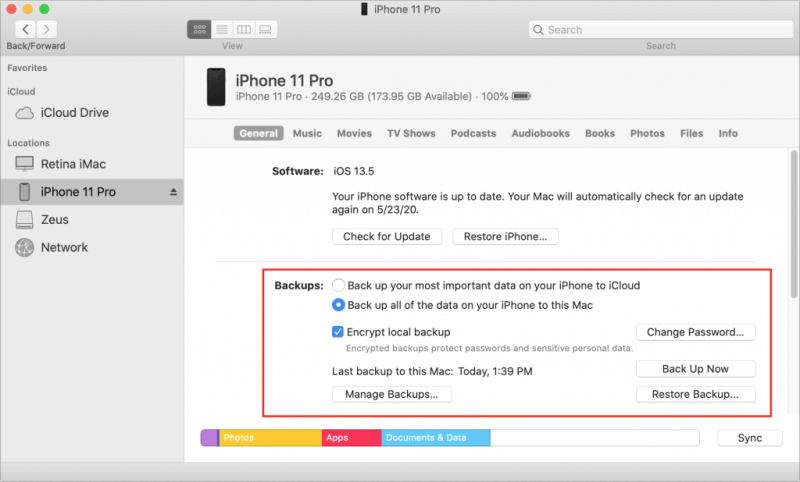
- After this, look at the sidebar and select a summary from the list of the sidebar.
- Now, you will need to choose "this computer" as your destination device. Rest it is up to you; if you do not want to make the system your destination, you can encrypt it, but remember the password.
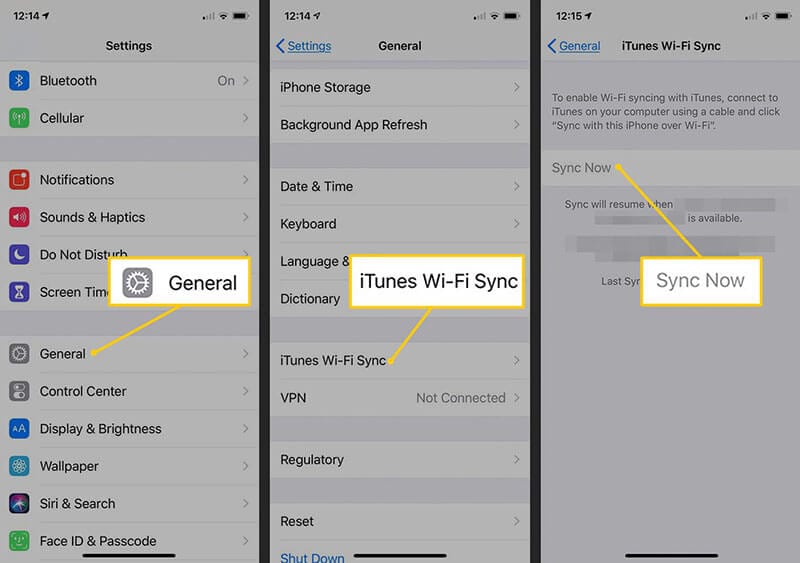
- Now, under the "Options," choose Sync with this iPhone or iOS over Wi-Fi. This ensures your backups get Sync correctly over Wi-Fi.
- Do not forget to click Done to save the changes.
Note to make Wi-Fi backup work
With the above steps, you will learn about how to backup iPhone or iOS over Wi-Fi. But there are certain conditions that you will need to keep in mind while syncing data over Wi-Fi
- Both devices that are your iPhone and system must be on the same Wi-Fi network
- iTunes needs to be open on the system.
- Your iPhone or any other iOS device should be charged fully.
Conclusion
Backups are critical to secure the data in the long run. If your iPhone memory gets full or planning to free memory space, then make a backup of Catalina's iPhone. In the above article, you will learn about how to backup your iPhone on Catalina and save your data in a safe place.
If you want an easy and simple way to backup or restore your iOS data, Dr.Fone is a great tool. It is safe to install and easy to use. With just one click, you can make a backup of your whole data. Try it now!


Alice MJ
staff Editor