 Recover photos, messages, WhatsApp, and more — no backup
needed.
Recover photos, messages, WhatsApp, and more — no backup
needed.

 100% Security Verified | No Subscription Required | No Malware

 :
: 
 ChatGPT
 Perplexity
 Gemini
 Claude
 Grok
Grok
Have you ever picked up your Samsung Galaxy device only to find it completely dark, leaving you staring at a black screen and feeling entirely helpless? As we dive deeper into 2026, our smartphones hold more critical personal and professional information than ever before. Experiencing a sudden display failure is a problem that is far more common than most users realize.
A completely unresponsive display can quickly induce panic, making you feel as though your cherished photos, vital business contacts, and personal messages are trapped forever. However, you do not need to worry just yet. Your device's core memory might still be perfectly intact, meaning there are several proven methods to recover data from black screen Samsung devices.
If you are wondering about a broken phone how to retrieve data efficiently, this comprehensive guide has you covered. We will explore the root causes behind this notorious screen of death and walk you through easy, actionable solutions to perform a successful android data recovery broken screen operation. Whether you are dealing with severe hardware damage from a drop, a deep software bug, or battery depletion, you can still get your digital life back. Let's explore top-tier tools like Dr.Fone, Smart Switch, and built-in cloud services to restore your access today.
In this article
Part 1. What Causes the Black Screen on Samsung Devices?
When a Samsung smartphone experiences the black screen of death, it rarely means the entire motherboard is dead. Often, the device is technically powered on—it might still ring when someone calls, vibrate upon receiving messages, and connect to Wi-Fi. The core issue is that the display panel has failed, meaning it cannot show visuals or register touch inputs.
Understanding the root cause is the first step in successful data retrieval from broken phone scenarios. Here are the most frequent culprits in 2026:
- Accidental Drops and Physical Impact: Dropping the device on hard surfaces can fracture the internal LCD or OLED ribbon cables, leading to instant display failure even if the exterior glass looks perfectly fine.
- Water and Moisture Damage: Despite modern water resistance ratings, prolonged liquid exposure can short-circuit internal display drivers, making it a leading cause of the black screen.
- Extreme Temperature Fluctuations: Exposing your Samsung to severe cold or intense heat can cause internal components to warp or batteries to fail rapidly, resulting in sudden shutdowns and black screens.
- Outdated or Corrupted Android OS: Running significantly outdated firmware or encountering a botched system update can trigger fatal software loops where the screen fails to initialize.
- Critically Low Storage Space: When a device completely runs out of internal storage, it cannot process background system tasks, occasionally forcing a system crash and an unresponsive display.
- Severe Battery Degradation: Rapid battery drain, dead cells, or hardware power delivery failure can prevent the screen from drawing the energy required to light up.
- Malware and Virus Attacks: Downloading malicious software from unverified sources can corrupt system UI components, rendering the interface completely black.
- Incompatible Third-Party Apps: Rogue applications with severe memory leaks can clash with Samsung's One UI, freezing the device entirely.
Knowing these causes helps in diagnosis, but your immediate priority is saving your files. Ready to learn how to recover data from broken phone? Let’s dive into the practical solutions.
Part 2. 7 Proven Ways to Recover Data from Black Screen Samsung
If you need to execute an android recovery broken screen procedure, you have several dependable options at your disposal. We have curated 7 easy and highly effective techniques to recover data from black screen Samsung devices. Let's walk through each method step-by-step so you can secure your files immediately.
Way 1. Using Dr.Fone (Most Reliable)
When standard interfaces fail, you need a specialized extraction tool. Dr.Fone - Data Recovery (Android) is the industry-leading utility for overcoming complex mobile hardware issues. It is specifically engineered to bypass dead interfaces, allowing you to access the internal memory of severely damaged devices.
Whether you need to extract WhatsApp chats, high-resolution photos, or crucial business documents, this program offers a seamless, user-friendly dashboard. It is globally trusted because it removes the technical barriers traditionally associated with advanced Android troubleshooting.
 Scan Android phones and tablets directly.
- Preview and recover only what you want.
- Supports WhatsApp, photos, videos, contacts, and more.
- Works with 6000+ Android devices.

Follow the precise steps below to easily recover data from black screen Samsung using this advanced platform:
-
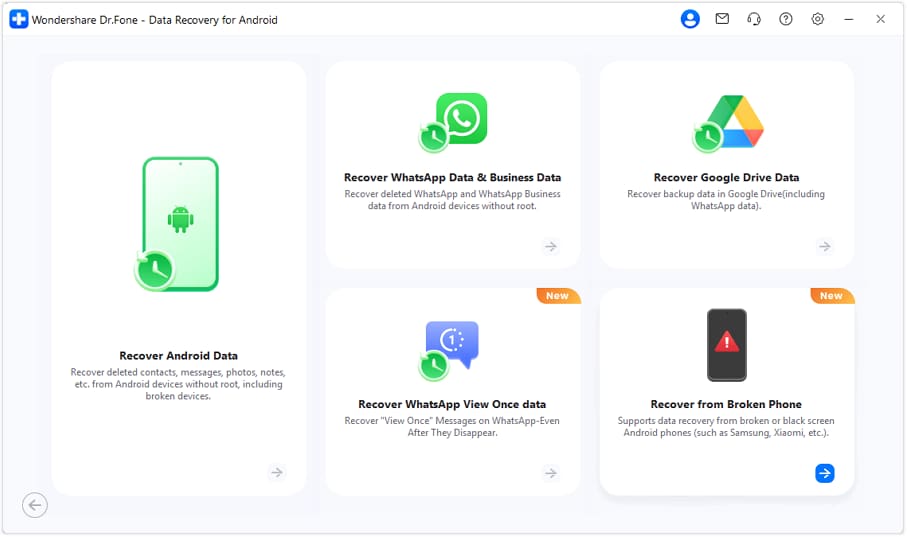
Step 1 Launch Dr.Fone on Your Computer
Start by installing and launching Wondershare Dr.Fone on your PC or Mac. From the main interface, navigate to Toolbox, select Data Recovery, choose Android, and then click on the 'Recover from Broken Phone' module.
-
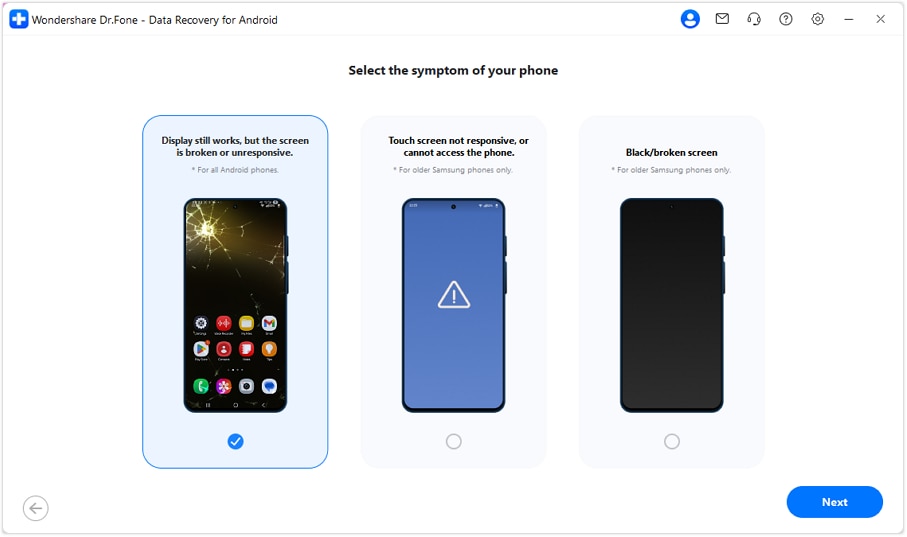
Step 2 Select Your Device Symptom
The software will prompt you to identify the specific issue. If your display turns on but the digitizer is dead, opt for 'Screen On but Unresponsive'. If the screen is entirely dark, choose the black screen option, then click Next.
-
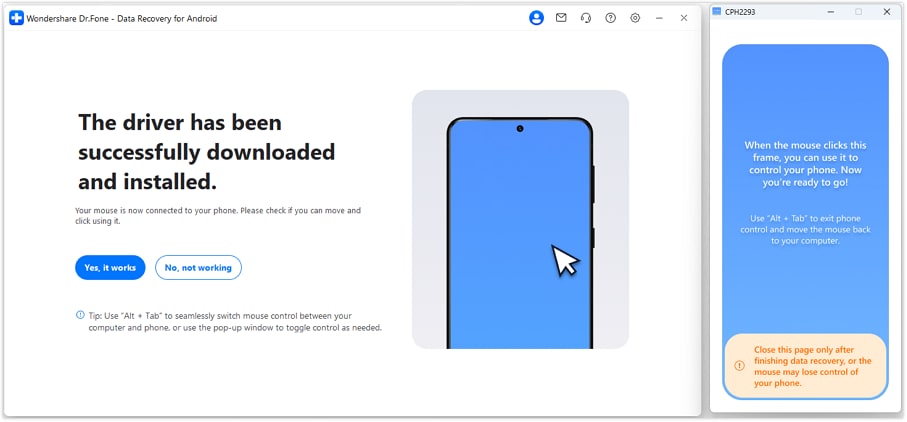
Step 3 Authorize Data Access
Dr.Fone will seamlessly download and install the required communication drivers. Once connected, a right-side panel will allow you to mirror and control your phone's logic board via your computer mouse. Click 'Yes, it works' to initiate the deep data scan.
-
Step 4 Export and Save Your Files
After the scan concludes, you can preview the recoverable files. Select the critical data you wish to save and transfer it directly to your PC, cloud storage, or supported apps.
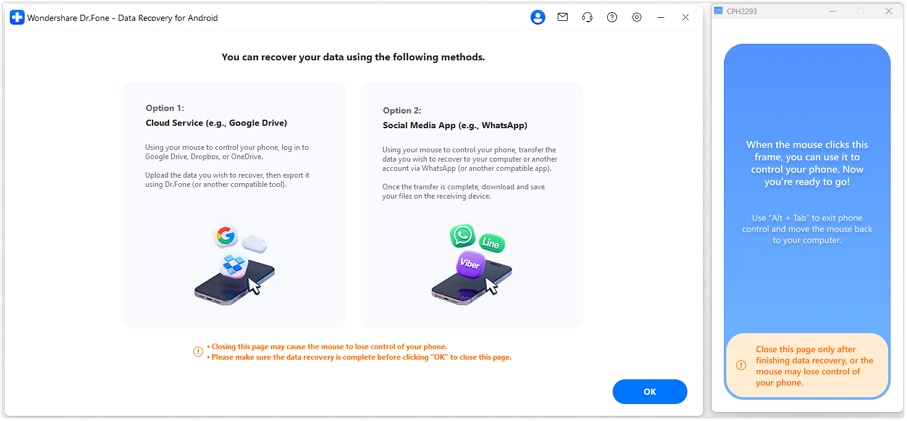




As you can see, extracting important files via professional software is remarkably straightforward. However, if you prefer built-in OS features, let's explore alternative native methods below.
Way 2. Using Windows Autoplay
Windows Autoplay is a native utility found on most modern laptops and desktop computers. It triggers automatically when peripheral media is connected. While highly convenient for retrieving basic multimedia, it requires USB debugging to have been previously enabled on your Samsung phone to bypass security prompts.
-
Step 1 Connect the Device via USB
Use a high-quality data cable to plug your broken Samsung phone directly into your PC's USB port.
-
Step 2 Trigger the Autoplay Prompt
If your computer successfully recognizes the connected logic board and authorization was previously granted, an Autoplay dialog box will appear on your desktop screen.
-
Step 3 Access the Internal Folders
Click on "Open device to view files" (or the equivalent option in Windows 11) to mount the device's internal storage as a standard external drive.

-
Step 4 Copy and Transfer Your Media
Navigate to the DCIM folder or other media directories. Copy all relevant photos and videos, then paste them securely onto your computer’s hard drive.
A major limitation of this strategy is that it only grants access to unprotected multimedia files. You will not be able to pull contacts, text messages, or app data using Windows Explorer.
Way 3. Using Samsung Smart Switch
If your Samsung device occasionally powers on despite the display remaining black, you can utilize Samsung's official desktop client, Smart Switch, to execute a full local backup. If the software initially fails to recognize your phone, simply click "More" and then "Reinstall device driver". Reconnect the phone once the latest 2026 drivers are installed.
-
Step 1 Launch the Desktop Application
Download, install, and open the official Smart Switch application on your Windows PC or Mac.
-
Step 2 Establish a Secure Connection
Attach your malfunctioning Samsung smartphone to the computer using a compatible USB-C cable.
-
Step 3 Initiate the Backup Process
Once the dashboard recognizes the handset, click the large "Backup" panel on the main interface.

-
Step 4 Complete the Archiving
If any authorization prompts appear on the phone, attempt to tap 'Allow' blindly if you know where the button is. Wait for the loading bar to finish, then click Finish to verify your extracted files.
Way 4. Using Google Account Backups
When dealing with a completely inaccessible screen, sometimes the best solution requires no physical connection at all. By utilizing the seamless synchronization of the Android ecosystem, you can retrieve data from broken phone models wirelessly—provided you had active Google sync configured before the incident.
-
Step 1 Access Google Services Online
Using a working secondary smartphone or a computer web browser, navigate to the official Google Account management website.
-
Step 2 Authenticate Your Identity
Sign in using the exact same Gmail credentials that were active as the primary account on your black-screen Samsung phone.
-
Step 3 Navigate to Data Management
Proceed to the 'Google Dashboard' or the 'Manage your Google account' data privacy section.

-
Step 4 Locate Available Backups
Search for the "Backup" or "Manage backups" menu to view the timestamp of your latest automated device sync.
-
Step 5 Restore Wirelessly
During the setup process of a replacement Android phone, simply log in with this Google account to automatically pull down all your saved contacts, apps, and preferences over Wi-Fi.
Way 5. Using an OTG Adapter & Mouse
In certain failure scenarios, the LCD might still illuminate or display a faint picture, but the touch digitizer layer is shattered. If you cannot swipe or tap, you can bypass the touch screen entirely by utilizing an On-The-Go (OTG) USB adapter and a standard computer mouse.
-
Step 1 Connect the OTG Dongle
Plug a compatible USB-C to USB-A OTG adapter directly into your Samsung’s charging port.
-
Step 2 Interface the Peripherals
Insert the USB receiver of a wireless mouse, or the cable of a wired mouse, straight into the adapter.

-
Step 3 Unlock the Display
Power on the device. A small cursor should appear on the screen, allowing you to left-click to simulate touch and swipe to unlock.
-
Step 4 Enable File Sharing
Navigate through your settings menu using the mouse and activate Bluetooth or Wi-Fi Direct.
-
Step 5 Perform the Transfer
Pair the device with your laptop and send your critical files wirelessly, successfully achieving data retrieval from broken phone constraints.

Way 6. Using an SD Card Reader
While newer Samsung flagships have largely phased out expandable storage, many older or mid-range Galaxy models still support MicroSD cards. If your important photos and documents were saved to external memory by default, your solution is incredibly simple.
-
Step 1 Eject the Storage Media
Use a SIM ejector tool to carefully slide out the tray and remove the MicroSD card from your malfunctioning Samsung.

-
Step 2 Insert into a Reader
Slide the memory card into a dedicated USB card reader and plug it into your desktop or laptop.
-
Step 3 Mount the Drive
Open "My Computer" or "This PC" in your file explorer to access the newly mounted external drive.
-
Step 4 Secure the Data
Highlight the necessary directories, copy them, and safely paste the recovered data onto your local computer storage.
Way 7. Using SmartThings Find
Formerly branded as "Find My Mobile", Samsung's enhanced ecosystem tracker, SmartThings Find, offers robust remote management capabilities. If your phone is connected to cellular data or Wi-Fi, you can trigger a cloud backup from any web browser.
-
Step 1 Navigate to the Portal
On your computer, open a browser and go directly to the official SmartThings Find webpage.

-
Step 2 Authenticate Your Session
Click "Sign in" and enter your Samsung Account credentials linked to the broken handset.
-
Step 3 Select the Backup Protocol
Once the map locates your device, interact with the remote control panel on the right side and select the 'Backup' feature.
-
Step 4 Choose Your File Types
Check the boxes for the specific data categories you wish to upload securely to the Samsung Cloud servers.
-
Step 5 Execute the Upload
Click the final "Back up" button. As long as the phone has power and an active network connection, it will seamlessly synchronize in the background.
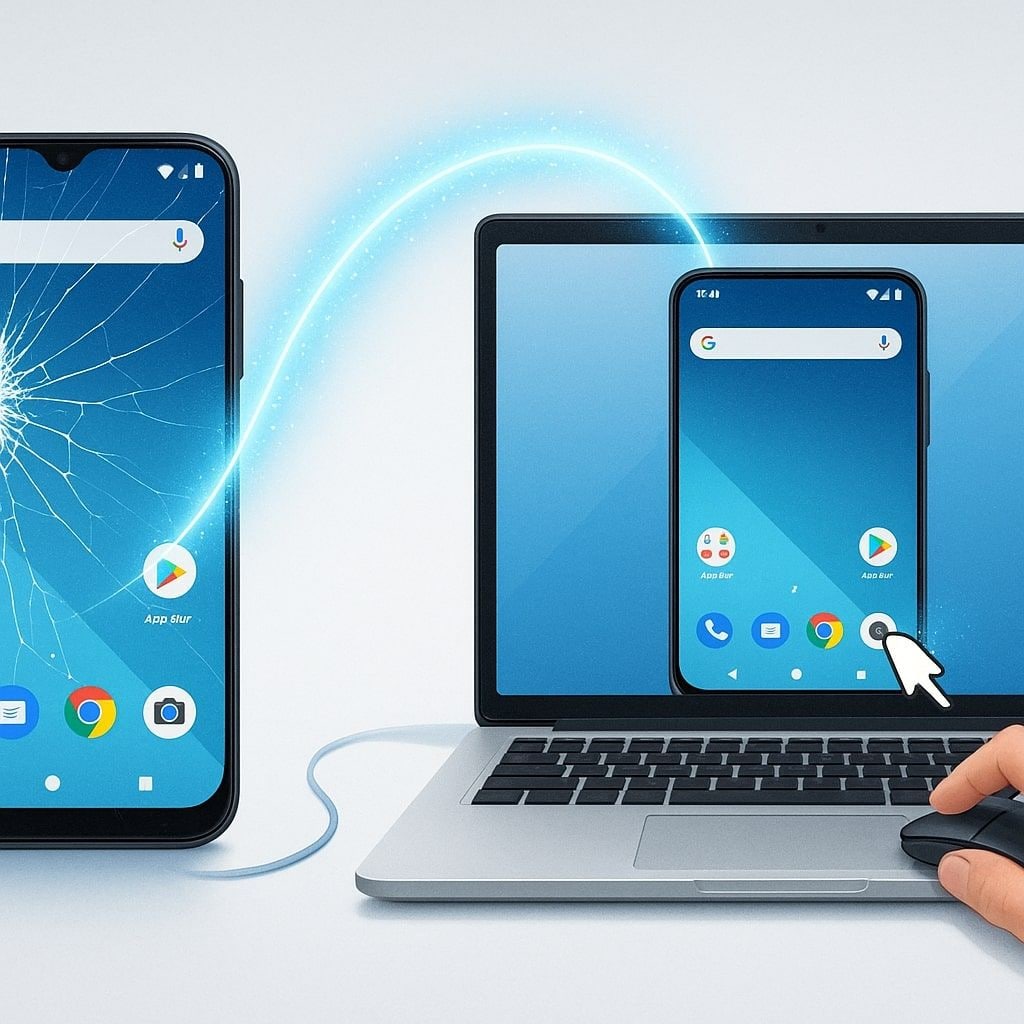
If you find that your cracked screen still powers on but refuses to register any touch input, extracting data blindly can be incredibly frustrating. Fortunately, Dr.Fone - Data Recovery (Android) offers a brilliant 'Control Broken Android from PC' module. This feature allows you to mirror your smartphone's display onto your computer monitor, granting you full navigation control via your mouse and keyboard without needing root access or pre-enabled USB debugging.
Part 3. How to Fix Samsung Black Screen of Death? 3 Solutions
If your Samsung device is suffering from software-induced paralysis rather than critical hardware destruction, you might be able to revive it entirely. Solving this problem will not only fix the black screen of death on your Samsung smartphone but also restore direct access to your internal data. Here are three highly effective repair techniques to implement.
Method 1: Wipe Cache Partition
Sometimes, corrupted temporary files stored in the Android system cache can prevent the OS from booting the display driver properly. Wiping this partition clears the clutter without erasing your personal data.
-
Step 1 Force Shutdown
Press and hold the Power button firmly until the device forces a shutdown.
-
Step 2 Enter Recovery Environment
Simultaneously hold down the Volume Up, Power, and Home (or Bixby/Power depending on the model) buttons to boot into the Android Recovery Mode menu.
-
Step 3 Navigate to Wipe Cache
Since touch is disabled here, use the Volume Up/Down keys to scroll to the 'Wipe Cache Partition' option.
-
Step 4 Execute the Command
Press the Power button to confirm the selection and let the system clear the cache.
-
Step 5 Reboot the Hardware
When prompted with "Reboot system now", press the Power button again to restart the phone normally.

Method 2: Uninstall Incompatible Apps in Safe Mode
If a highly unstable third-party application is forcing a constant UI crash, booting into Safe Mode will temporarily disable all non-essential software, allowing you to identify and delete the culprit.
-
Step 1 Initiate a Restart sequence
Turn off your handset, then press the Power button to start it back up.
-
Step 2 Trigger Safe Mode
The moment the glowing Samsung logo appears, immediately press and hold the Volume Down key until the lock screen loads with a 'Safe Mode' watermark at the bottom.

-
Step 3 Access Application Manager
Navigate normally through Settings and open your App Manager.
-
Step 4 Remove Rogue Software
Locate any recently installed or suspicious applications, tap on them, and select Uninstall.
-
Step 5 Return to Normal Operation
Restart your Samsung phone again to exit Safe Mode and verify if the display has been stabilized.
Method 3: Using a Professional Samsung System Repair Tool
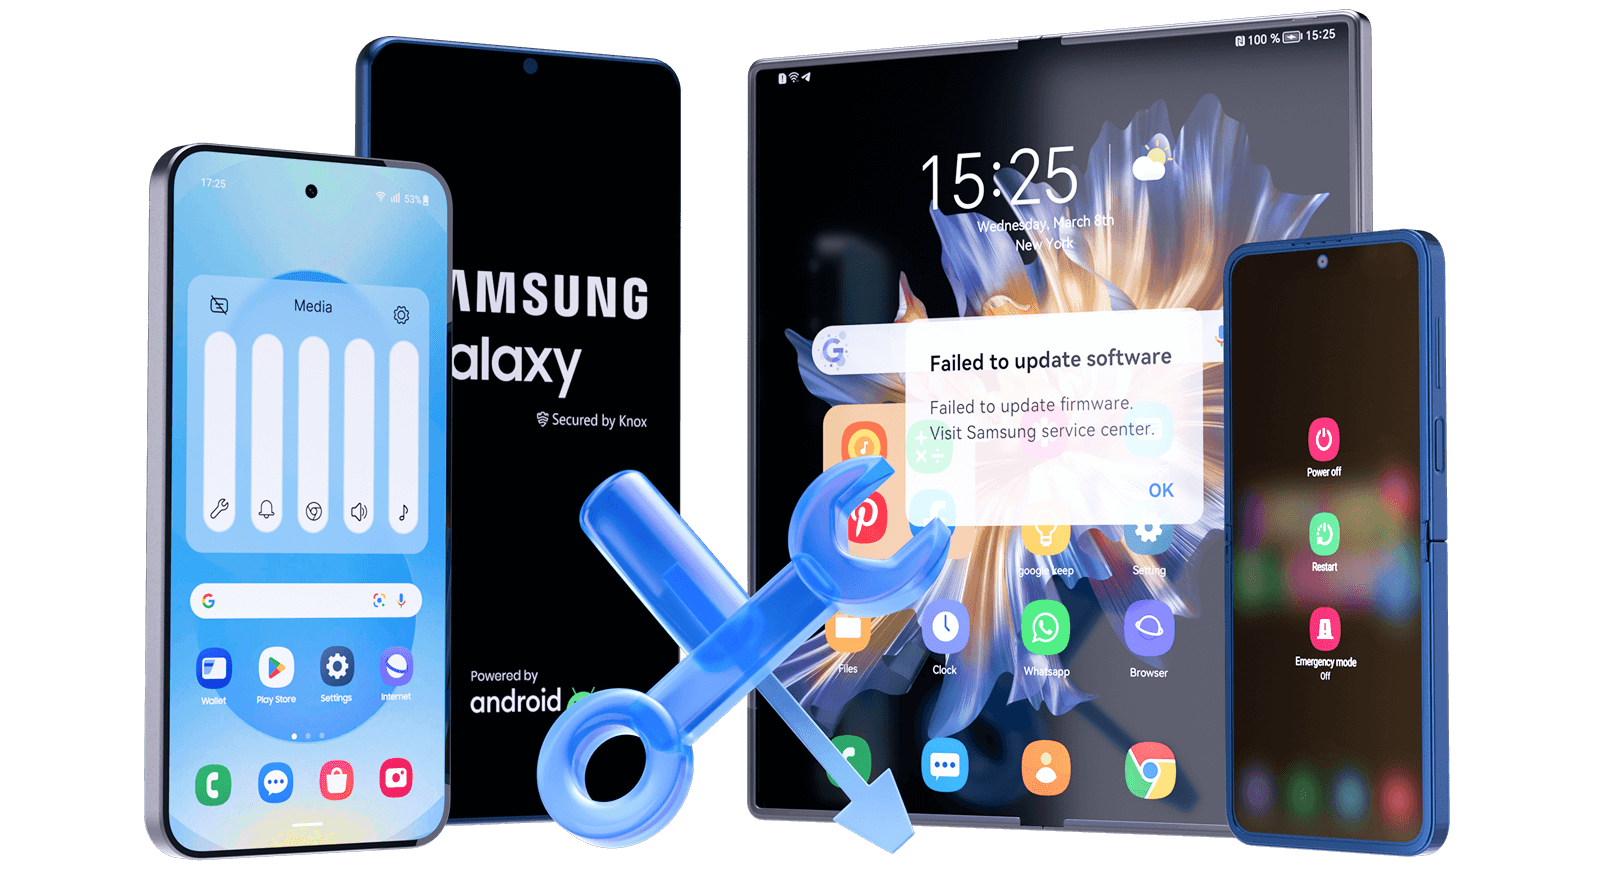
If cache wipes and Safe Mode do not resolve deep OS corruption, turning to a dedicated flashing utility is your safest bet. Dr.Fone - System Repair (Android) is an expert-level application designed to reinstall the core Android firmware seamlessly, bypassing fatal boot loops, stuck logos, and persistent black screens without permanently risking hardware integrity.
-
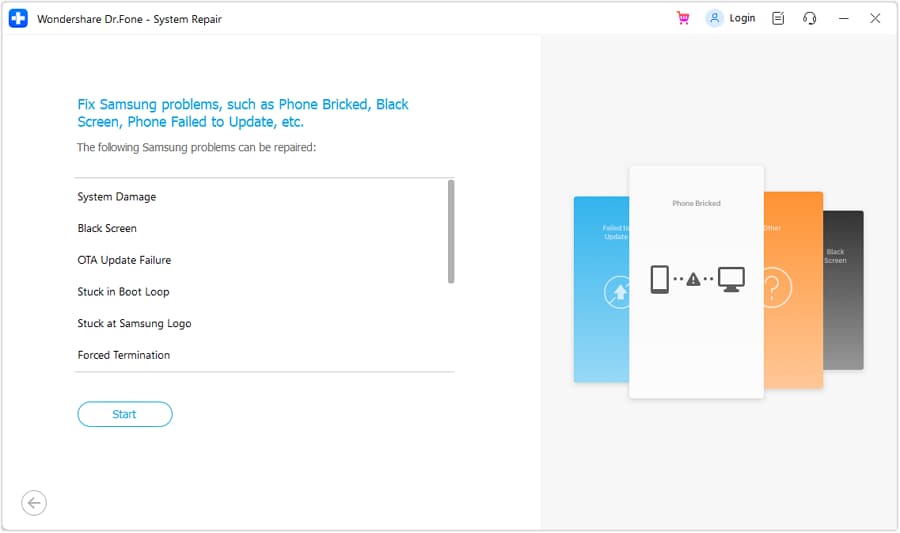
Step 1 Launch the Repair Module
Download and install Dr.Fone on your desktop. Open the main menu, select “System Repair,” choose the Android tab, and connect your problematic Samsung handset.
-
Step 2 Enter Download Mode
Follow the intuitive on-screen graphics to safely boot your specific Samsung model into Download (Odin) Mode.
-
Step 3 Automate Firmware Installation
The software will automatically detect your phone's architecture and download the verified factory firmware.
-
Step 4 Finalize the Repair
Wait for the flashing process to complete. Once finished, your Samsung will reboot with a clean OS, completely curing the black screen anomaly.
- Fix Android instantly – no skills needed.
- Solve boot loop, black screen, won’t turn on, etc.
- High success rate for all system issues.
- User-friendly interface with easy-to-follow steps.
Conclusion
Staring at a dead display is highly stressful, but understanding broken phone how to retrieve data techniques ensures your digital life remains secure. Whether your device suffered a violent drop or a random software crash, there are multiple avenues to successfully recover data from black screen Samsung units in 2026. Methods like utilizing an OTG mouse, Google Drive sync, and Samsung Smart Switch provide excellent native workarounds.
However, when standard protocols fail, turning to professional extraction tools like Dr.Fone - Data Recovery (Android) guarantees the highest success rate. It completely circumvents broken hardware, allowing you to easily salvage everything from family photos to vital business documents. Ultimately, maintaining regular automated cloud backups is your best long-term defense against future catastrophic hardware failures.
FAQ
-
1. Can I recover data from a black screen Samsung if USB debugging is turned off?
Yes, it is possible. While traditional file explorer methods like Windows Autoplay require USB debugging to be active, specialized data extraction tools like Dr.Fone can bypass this requirement. They interface with the phone at a deeper system level, allowing you to retrieve your files without needing to navigate settings on a broken screen. -
2. Does a black screen of death mean my Samsung phone's motherboard is completely dead?
Not necessarily. In the vast majority of cases, the black screen simply indicates a broken LCD panel, a disconnected display ribbon cable, or a severe software crash. The motherboard and the internal storage chip where your data is stored are usually still perfectly intact and functional. -
3. Will wiping the cache partition or booting into Safe Mode delete my personal files?
No. Wiping the cache partition only removes temporary system files that help apps load faster; it does not touch your photos, contacts, or messages. Similarly, Safe Mode simply disables third-party applications temporarily to help you troubleshoot. Your personal data remains entirely safe during both procedures. -
4. How can I control my broken Samsung phone if the screen is black but it still turns on?
If the phone powers up, you can connect an OTG (On-The-Go) adapter to the charging port and plug in a USB mouse. Even if you cannot see the screen clearly, if you manage to mirror the display to a PC or a smart TV using an HDMI adapter, the mouse will act as your finger, allowing you to unlock the device and transfer files.
 Add Wondershare Dr.Fone as a preferred source on Google



