 Recover photos, messages, WhatsApp, and more — no backup
needed.
Recover photos, messages, WhatsApp, and more — no backup
needed.

 100% Security Verified | No Subscription Required | No Malware

 :
: 
 ChatGPT
 Perplexity
 Gemini
 Claude
 Grok
Grok
Are you searching for highly reliable USB repair tools in 2026? Dealing with a corrupted, unrecognized, or malfunctioning flash drive can be incredibly frustrating, especially when it holds critical professional documents or precious personal memories. Fortunately, modern software solutions have evolved to address these exact hardware and software malfunctions.
Standout options like Disk Drill, DiskGenius, Recuva, Rizonesoft USB Repair, and JetFlash Recovery Tool serve the ultimate purpose of bringing dead drives back to life. In this comprehensive guide, we will explore exactly how these robust utilities assist in repairing corrupt drives, recovering permanently deleted files, and restoring your USB flash drives back to their absolute peak performance. Let's dive into the top choices and see which flash drive repair tool is the right fit for your situation.
In this article
Part 1. Top USB Repair Tools for Fixing Corrupted Drives
It can be severely anxiety-inducing when dealing with a USB flash drive that suddenly becomes corrupt, slow, or totally non-recognizable by your computer. However, advanced USB repair tools are specifically engineered to not only recover your seemingly lost files but also bring back the flash drive's optimal read and write speeds. Whether you are dealing with logical corruption or minor physical sector degradation, utilizing a proper USB drive repair tool can save the day.
If your primary and only goal is to extract crucial data before running any formatting commands, we highly recommend selecting a dedicated program from our curated list. Let's explore the top 5 pen drive repair tools of 2026, dissecting their unique features, distinct pros and cons, and providing clear operational steps on how to use them effectively.
1. Disk Drill - Best Overall USB Repair Tool
Disk Drill by CleverFiles stands out as a highly professional data recovery and USB drive repair tool designed for both Windows and Mac operating systems. It excels at recovering permanently lost files from severely corrupted USB drives. Its comprehensive suite of features includes advanced deep scanning algorithms targeting fragmented or completely lost data, a highly secure one-click backup mechanism known as "Byte-to-byte Backup," and a unique Recovery Vault that acts as an extended system recycle bin for effortless future restores.
Key Features
- Fix corrupted or completely inaccessible USB drives without forcing a factory format.
- Allows users to thoroughly preview files before execution, ensuring you recover only the needed documents.
- Extensive cross-compatibility supporting multiple file systems, including FAT32, NTFS, and exFAT architectures.
- Integrated S.M.A.R.T. disk health monitoring feature that preemptively alerts you about potential hardware failures early on.
- The graphical interface is exceptionally user-friendly, rendering it ideal for absolute beginners while retaining depth for advanced IT professionals.
- Virtually universal hardware support, compatible with nearly all USB flash drive brands and storage devices on the market.
- Available in both free and premium tiers, offering robust flexibility tailored to varying recovery scopes and budgets.
- Some long-term users have reported occasional incomplete recoveries, where files are technically located but not fully assembled upon restoration.
- Navigating license reactivation procedures can sometimes be cumbersome, and the scan filtering tools lack ultra-granular controls.
How to Use the Tool
-
Step 1 Install and Setup Backup
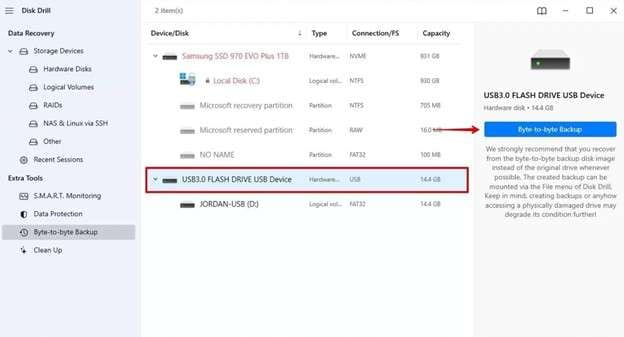
Install and launch the Disk Drill application, then securely plug your problematic USB device into your PC or laptop. In the left navigation panel, select "Byte-to-byte Backup" and highlight your USB device. Hit the "Byte-to-byte Backup" execution button, and allocate a secure storage location on your main hard drive to safeguard the image.
-
Step 2 Initiate Data Scan
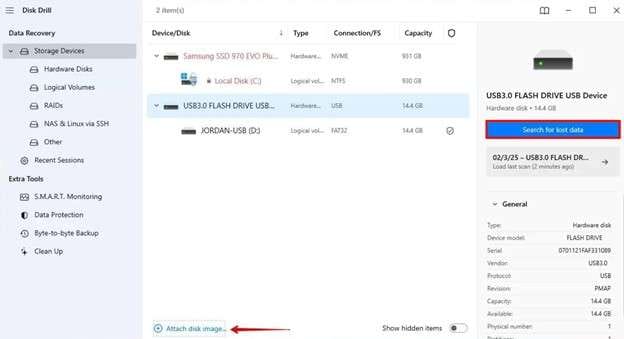
Navigate to the "Storage Devices" tab. Manually assign your USB drive an image map by clicking "Attach disk image." Once loaded, click the "Search for lost data" button on the right side to prompt the deep scanning engine to comb through the corrupted sectors.
-
Step 3 Filter and Recover Data
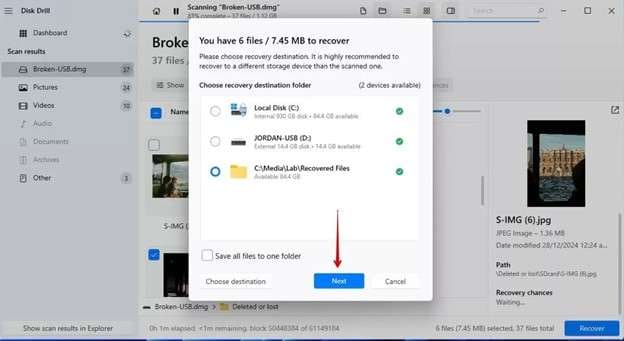
Utilize the built-in filtering categories to meticulously sift through deleted, previously lost, or partially reconstructed sections for your missing files. Select "Recover all," choose an entirely separate physical drive as your final recovery destination to prevent overwriting, and click "Next."
2. DiskGenius - Top Free USB Repair Tool
DiskGenius by Eassos acts as a robust, Windows-exclusive data recovery and USB flash drive repair tool that goes far beyond simple file retrieval. It is engineered to meticulously recover files from formatted, deleted, or thoroughly corrupted RAW USB flash drives, SD cards, HDDs, and even virtual disk environments. This utility possesses the unique ability to recover deleted and lost structural partitions, offering both quick and Deep Scan methodologies. With native support for diverse file systems—including NTFS, FAT/exFAT, and EXT—it also bundles highly technical utilities such as precise Disk Imaging, an integrated Hex editor, proactive bad sector scanning, full disk cloning, and the ability to author bootable USB recovery media for total system failures.
Key Features
- Advanced partition recovery technology that helps restore entirely lost or accidentally deleted USB partition tables.
- Dedicated bad sector scanning that accurately detects, isolates, and frequently repairs severely corrupted memory sectors.
- Reliable disk cloning capabilities, allowing you to safely duplicate fragile USB drives before attempting any heavy repair protocols.
- An integrated Hex editor that empowers advanced IT users to directly view and modify raw byte data for in-depth troubleshooting.
- Uniquely merges standard file recovery with deep disk utilities, such as proactive bad-sector masking and complex RAID virtual reconstruction.
- Fully capable of booting straight from WinPE environments to salvage data from unbootable system architectures.
- Highly effective when communicating directly with severely damaged RAW or unmountable USB drive partitions.
- Quality-of-life features like media file previews are notably limited, frequently lacking visual thumbnails for images or videos.
- The stringent free edition strictly caps file recovery limits to tiny files that are less than 64 KB in size.
How to Use the Tool
-
Step 1 Select and Scan Drive
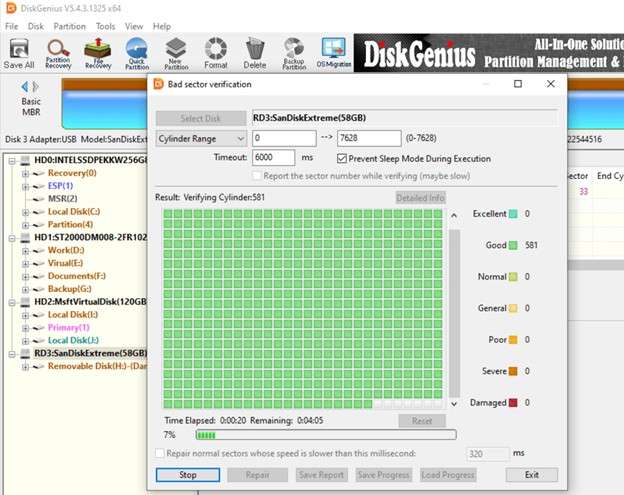
Launch DiskGenius Free Edition and highlight the corresponding USB drive or corrupted storage device you intend to scan. Navigate to the top "Disk" menu bar and purposefully click "Verify or Repair Bad Sectors" to ready the engine for deep scanning.

-
Step 2 Repair Bad Sectors
Proceed by clicking the "Start Verify" button. DiskGenius will intensely read the drive to accurately identify dead sectors or localized damaged areas. Carefully follow the explicit on-screen technical instructions to execute bad sector repair. After the lengthy repair concludes, ensure you safely eject the USB or storage device before regular use.
3. Recuva - Easiest Beginner USB Repair Tool
Recuva, expertly developed by Piriform, continues to reign as an exceptionally straightforward Windows utility dedicated to un-deleting files. It fundamentally supports salvaging pictures, vast music libraries, crucial documents, high-definition videos, raw emails, and more from practically any rewritable media, heavily emphasizing USB pen drives. Impressively, it can frequently restore data from physically damaged or newly reformatted drives. It introduces an Advanced Deep Scan mechanism for deeply buried, hard-to-find fragmented files and bundles a military-grade secure overwrite option (the "Shredder") to permanently annihilate sensitive unwanted files. While the free version generously covers standard recovery, upgrading to the Pro version unlocks virtual drive mounting and seamless automatic background updates.
Key Features
- Reliably recovers standard files deleted initially from USB drives, assorted memory cards, and bulky external mechanical disks.
- Possesses the technical ability to forcefully restore fragmented data from physically damaged or freshly formatted USB storage environments.
- Dedicated Deep scan algorithmic mode meticulously uncovers hidden file traces that standard quick scans routinely bypass.
- Securely deletes compromised files using highly resilient, multi-pass overwrite methods specifically designed to prevent future forensic recovery.
- The core version is completely free to deploy with absolutely zero restrictive artificial file-size limits.
- Intelligently provides dual interfaces: a guided step-by-step wizard for absolute beginners, alongside a dense advanced mode built for IT power users.
- Remarkably quick and lightweight application, boasting extremely rapid preliminary scans and occupying minimal system resources.
- It natively operates solely on legacy Windows builds and still lacks full official documentation regarding complete Windows 11 optimization.
- Attempting to recover data from severely damaged RAW file systems routinely ends in failure due to its inherent inability to scan unmounted volumes.
How to Use the Tool
-
Step 1 Launch the Wizard
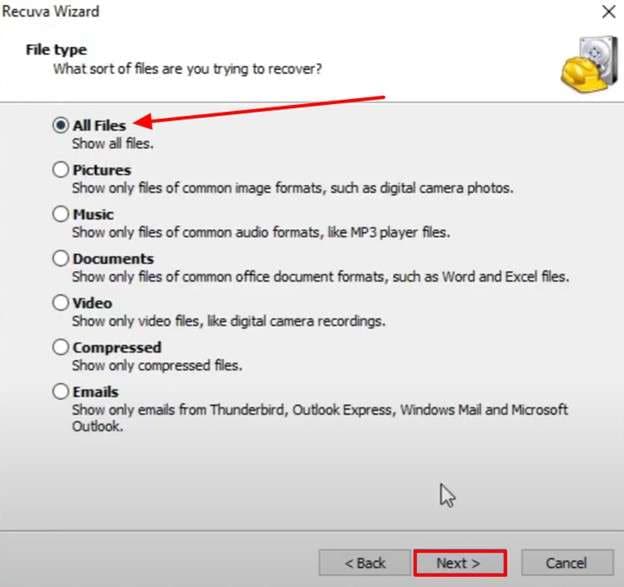
Securely download Recuva onto your primary Windows device and open the application. Simply click on "Next" at the welcome prompt, choose the inclusive "All Files" categorization option, and confidently hit the "Next" button once again to proceed.
-
Step 2 Target the USB Drive
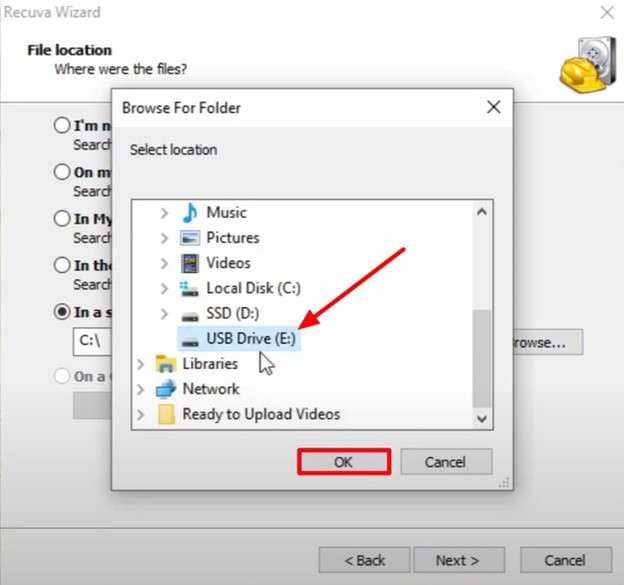
Next, specifically select the "In a specific location" radio option, hit the adjacent "Browse" button, and carefully isolate your targeted USB drive from the directory tree before clicking the final "OK" button.
-
Step 3 Enable Deep Scan
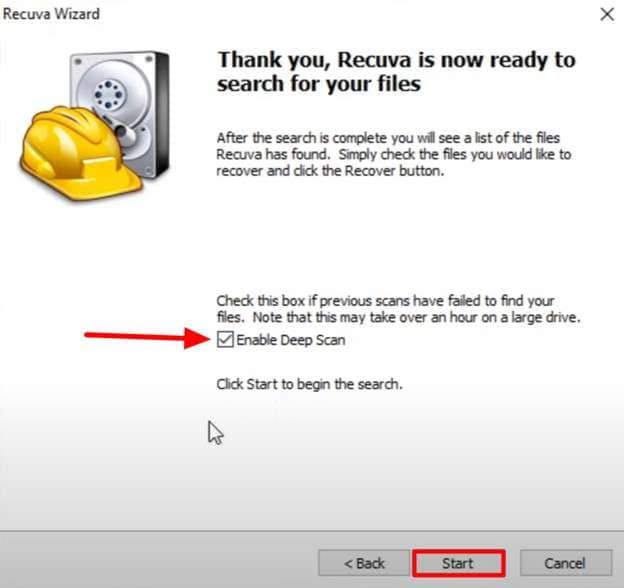
Shortly after that, press "Next," and it is highly recommended to check the "Enable Deep Scan" box for maximum retrieval potential. Next, actively press the "Start" button, initiating a thorough block-by-block inspection of your drive for deeply deleted file fragments.
-
Step 4 Execute Recovery
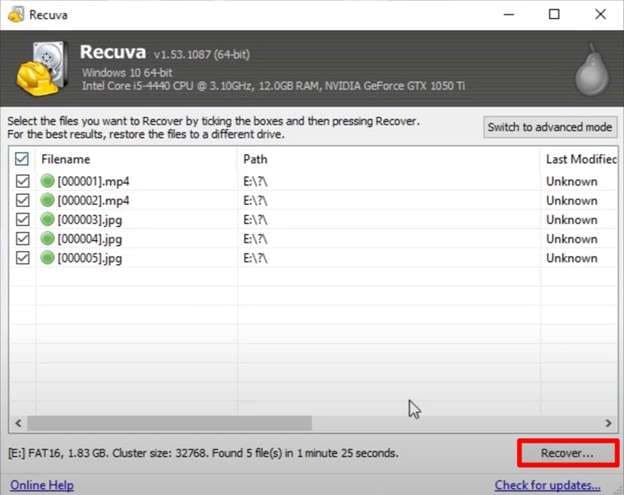
Once the exhaustive scan fully completes, manually highlight your required files using the checkboxes and urgently hit the "Recover" button. Ensure you save these recovered files at an entirely separate local hard drive location to mitigate any risk of data overwrite.
4. USB Repair by Rizonesoft - Quick Fix USB Repair Tool
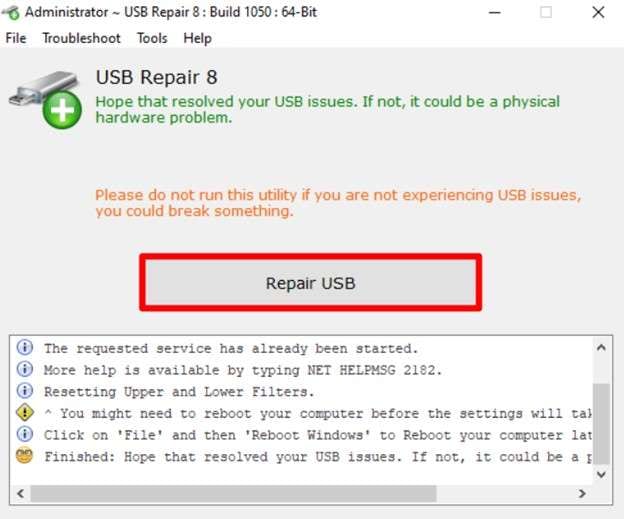
Rizonesoft USB Repair operates as a highly specialized, absolutely free diagnostic utility dedicated to modern Windows systems. It is primarily built to address stubborn Device Manager hardware conflicts, specifically resolving error codes 19, 31, 32, 37, 39, and 41. It achieves this by methodically repairing broken registry settings and corrupted configuration files that actively prevent USB drives from installing properly or mounting securely within the Windows environment. Moreover, a convenient portable version is readily available, allowing field technicians to run it directly from an alternate flash drive without initiating a full software installation.
Key Features
- Fully compatible with legacy Windows 7 and 8, extending all the way up to Windows 10, and 11 environments (supporting both 32-bit and 64-bit architectures).
- An extraordinarily lightweight free utility (hovering around a mere 2 MB footprint) making it incredibly quick to rapidly download and deploy.
- Directly targets and resolves entrenched OS driver conflicts that stubbornly force USB motherboard ports into an unresponsive state.
- Safely flushes and clears invalid, obsolete, or completely orphaned USB device connection records historically stored by the Windows registry.
- Functions as a phenomenally straightforward one-click automated tool, completely bypassing the extreme risk of manually editing the system registry.
- The Graphical User Interface (GUI) is refreshingly uncluttered and strictly beginner-friendly, requiring zero technical background.
- Effectively saves you the immense hassle of reinstalling your entire Windows OS or triggering risky system restores simply for isolated USB driver faults.
- Fundamentally unable to repair actual physical hardware faults, blown capacitors, or localized bad sectors on the physical flash memory chips.
- Demands that you proactively back up your system registry first, as it executes deep system-level registry modifications that could theoretically trigger instability.
How to Use the Tool
-
Step 1 Initiate the Fix
Locate, download, and install the USB Repair Tool securely on your Windows PC architecture. Navigate directly to the "Tools" dropdown menu and explicitly click "Create a Windows Restore Point" as a crucial safety precaution. Return smoothly to the main software screen and click the prominent "Repair USB" button to instruct the engine to start fixing the common USB registry errors. Firmly reboot your entire computer system and finally check if the targeted USB drive is now mounting and working properly.
5. JetFlash Recovery Tool - Brand Specific USB Repair Tool
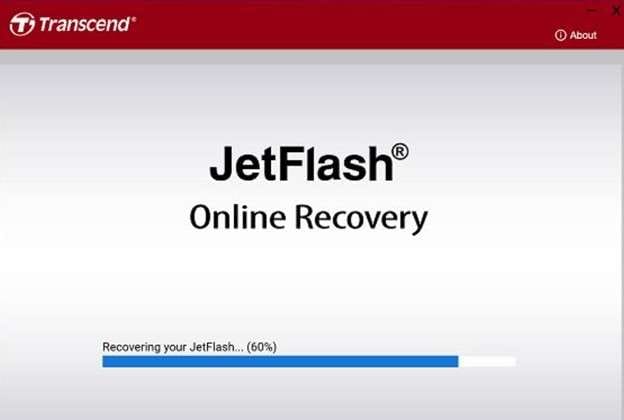
JetFlash Online Recovery operates as a specialized, entirely free proprietary utility engineered directly by Transcend. It is strictly designed to diagnose and repair heavily malfunctioning Transcend JetFlash USB drives. This targeted software runs effectively on modern Windows architectures and actively attempts to restore the corrupted drive straight back to its original factory configuration settings. It intelligently offers two distinct operational modes: "Repair USB & keep all data," which gently tries to fix file system corruption without executing destructive data erasure, and the far more aggressive "Repair USB & erase all data," which comprehensively formats the drive entirely, obliterating all stored bytes.
Key Features
- Permits establishing rigid hardware-level passwords to effectively shield sensitive USB flash drives from widespread unauthorized local access.
- Features native support for secure one-time password (OTP) delivery via SMS protocols to urgently unlock physically protected drives on the go.
- Functions flawlessly alongside various enterprise security toolboxes, prominently including TCG Opal architecture, ATA Security standards, and broader UFD Security frameworks.
- Tightly integrates directly with heavy-duty industrial USB drives to provision robust drive encryption algorithms and guarantee secure corporate usage.
- The crucial "Keep Data" mode impressively manages to resolve minor logical corruption strings without actively forcing catastrophic file deletion.
- It remains completely free to securely download and legally use in commercial settings, massively lowering standard cost barriers for enterprise data recovery.
- Delivers an exceedingly simple and lightning-fast graphical interface, thereby making complex recovery dynamics highly accessible for non-technical office staff.
- Strictly requires downloading massive proprietary firmware bundles and relentlessly insists on verifying the target drive's specific manufacturing serial number before launching.
- Exclusively operates on official Transcend JetFlash hardware ecosystems, meaning alternative third-party consumer brands are entirely incompatible and unsupported.
How to Use the Tool
-
Step 1 Launch the Utility
Boot up the dedicated software utility and physically connect your problematic JetFlash USB flash drive into an open port. Carefully read the on-screen technical prompts and deliberately tick the "I understand....." checkbox to officially agree with the potentially destructive repair procedure. Once confirmed, confidently hit the prominent "Start" button.

-
Step 2 Await Completion
The program will immediately initiate its diagnostic sweep, scanning and repairing the compromised drive blocks completely automatically in the background. Patiently wait until the entire progress bar finishes before unplugging.
Part 2. Comparison of USB Repair Tools
It's important to recognize that each dedicated USB repair tool inherently handles entirely different diagnostic levels of physical and logical corruption. While some lightweight utilities are tuned to fix surface-level file system errors or registry mismatches, robust alternatives are designed to painstakingly rebuild shattered partitions or completely restore wiped factory firmware. The comprehensive matrix below sharply outlines the specific corruption severity each utility can realistically handle, emphasizing their absolute strongest operational abilities:
| Tool Name | Supported OS | Corruption Level | Notable Strengths | Best For |
|---|---|---|---|---|
| Disk Drill | Windows, macOS | Light to Moderate | Unparalleled data recovery, advanced file system repair protocols, and highly intuitive smart scanning engines | Users desperately needing both deep repair and thorough file recovery inside one cohesive suite |
| DiskGenius | Windows | Light to Moderate | Exceptional partition repair, complex bad sector isolation handling, and safe byte-to-byte cloning | Executing entirely free structural fixes for severe partition allocation errors |
| Recuva | Windows | Light | Highly beginner-friendly graphical design, incredibly fast scan times, and straightforward file restoration procedures | Simple, stress-free file recovery immediately following minor corruption events |
| USB Repair (Rizonesoft) | Windows | Light | Virtually instantaneous automated auto-repair and simplistic Device Manager registry error diagnosis | Extremely fast, automated software fixes for common USB motherboard detection issues |
| JetFlash Recovery Tool | Windows | Moderate | Proprietary factory firmware restore capabilities and full destructive USB resetting logic | Exclusive deep repairing protocols reserved strictly for branded Transcend USB hardware |
Part 3. How to Recover Data from Google Drive Using Dr.Fone - Data Recovery (Android)
 Scan Android phones and tablets directly.
- Preview and recover only what you want.
- Supports WhatsApp, photos, videos, contacts, and more.
- Works with 6000+ Android devices.

In highly specific scenarios where you have already successfully repaired your physical USB drive hardware but tragically realize you still lost certain localized information that was thankfully stored redundantly in your Google Drive account, there is absolutely no need to spiral into panic. Retrieving that stranded cloud information remains incredibly accessible. The renowned Dr.Fone - Data Recovery (Android) ecosystem offers an incredibly specialized cloud synchronization feature expressly designed to securely download and restore comprehensive Google Drive backups.
Whether your ultimate goal is to seamlessly restore missing contacts, retrieve lost call logs, recover deleted text messages, or instantly revive crucial calendar event information, simply authorizing a secure sign-in to your official Google account initiates the pipeline. You can precisely proceed by granularly selecting the exact data architecture types to carefully bring files back to your local PC storage without ever being forced to reset your primary mobile phone. This capability proves exceptionally critical if your initial wireless data didn't sync correctly with the cloud server or was tragically removed by accidental deletion errors during a firmware update panic.
Key Features
- Universally supports Android operating system versions 5.0 and above, seamlessly offering out-of-the-box compatibility with over 6,000 distinct Android smartphone and tablet models globally.
- Effortlessly targets and recovers more than 14 distinct core file types, comprehensively including high-resolution photos, raw videos, business contacts, and SMS messages.
- Surgically recovers critical data packets from Google Drive cloud backups entirely selectively, radically bypassing the traditional requirement for a destructive factory reset.
- Robustly supports the deep recovery of heavily compressed zip files, digital e-books, raw installation APK files, and deeply encrypted Wi-Fi network passwords.
Steps To Use Wondershare Dr.Fone To Recover Data From Google Drive
You can confidently follow the highly simplified, step-by-step framework below to leverage the power of Wondershare Dr.Fone and seamlessly recover highly sensitive data straight from your Google Drive without encountering any frustrating technical hurdles:
-
Step 1 Launch Wondershare Dr.Fone
Initially download and securely access the Wondershare Dr.Fone application on your preferred desktop operating system. Navigate directly to the "Toolbox" segment located clearly in the left-side navigation panel, and confidently select the "Data Recovery" module icon from the primary central screen to initialize the advanced recovery engine tools.

-
Step 2 Choose Your Device Type
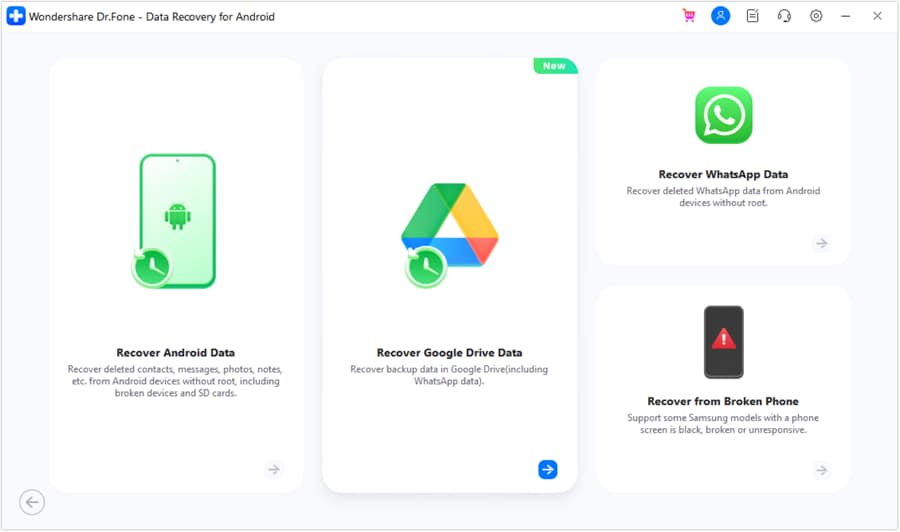
Subsequently, explicitly select "Android" as your designated target device type to guarantee that the ensuing recovery process perfectly targets the correct localized data structures and file paths. From the subsequent list of contextual options, actively click the "Recover Google Drive Data" prompt.
-
Step 3 Sign In to Google Drive
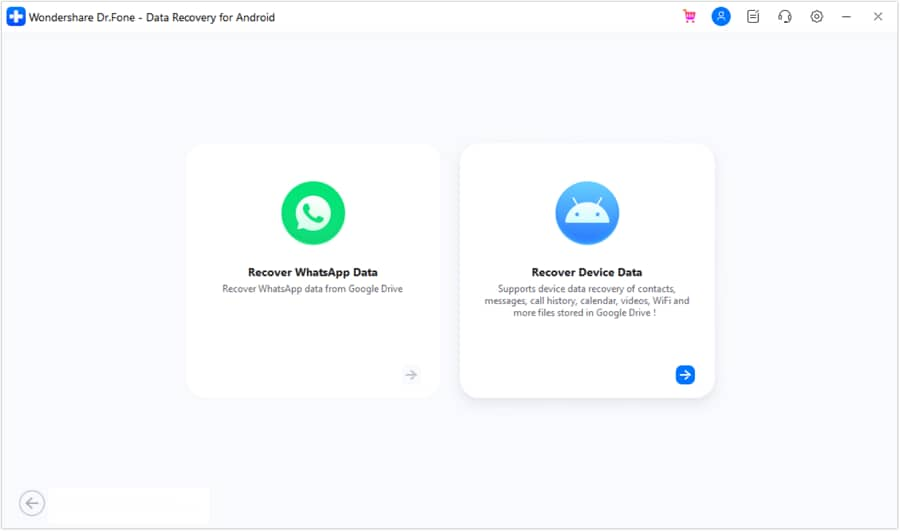
Progressively, click the vivid "Sign In" button to securely trigger the Google API and swiftly complete the standard OAuth authentication process inside the secure browser popup. Immediately after successfully verifying your credentials, select the "Recover Device Data" card from the two visibly available overarching recovery parameters.
-
Step 4 Choose File Types to Download
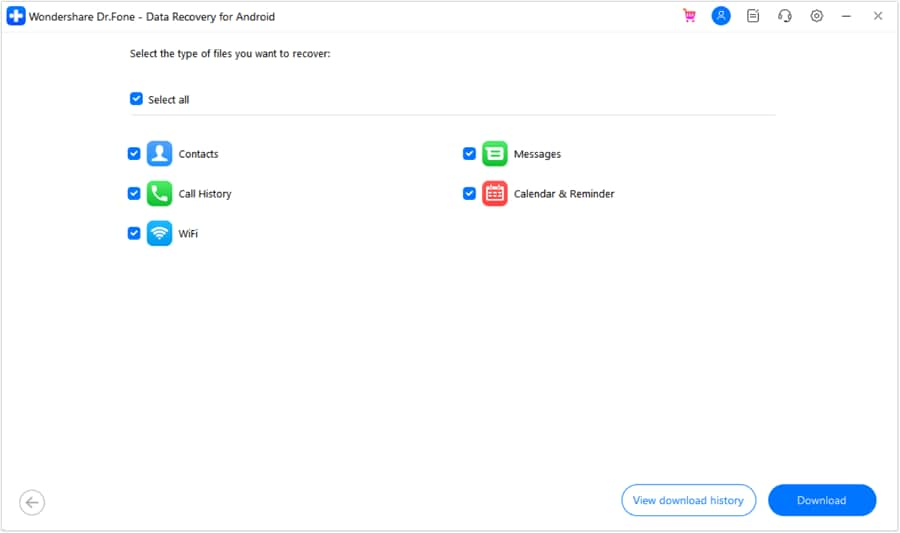
An extensive, categorized list of all highly recoverable internal file types will rapidly populate on the screen, prominently displaying quantities for photos, videos, call histories, and messages. Actively tick the specific checkboxes for your deeply required file types and click "Download." A dedicated real-time progress window will immediately display the ongoing data transfer status over your network. Once fully downloaded into the cache, you can visually preview all the recovered digital assets securely.
-
Step 5 Recover Files to Your Computer
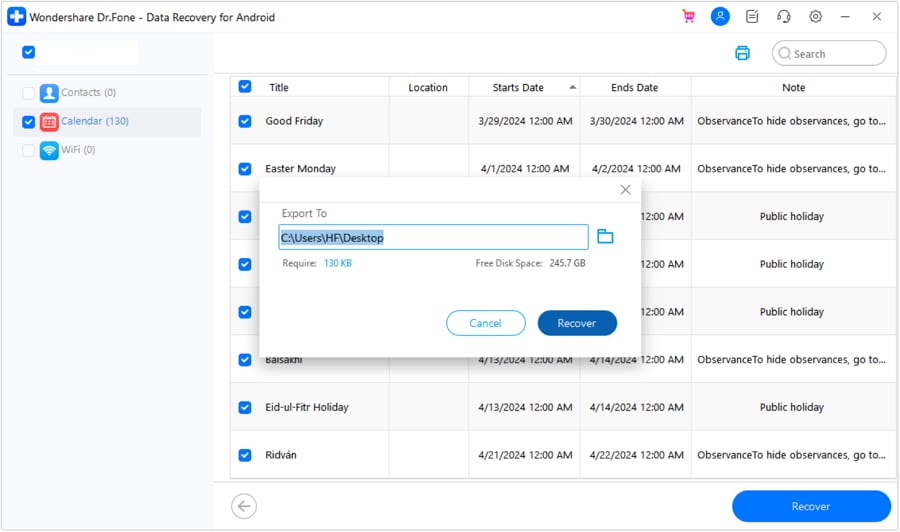
Finally, click the prominent "Recover" command located snugly in the bottom-right corner of the interface and purposely dictate a safe directory location on your hard drive to permanently save these recovered cloud files. Click through to the desired destination folder and confirm by clicking "Recover" one last time to securely complete the entire pipeline transaction.




Conclusion
To definitively conclude, we have extensively explored the five absolute best USB repair tools dominating the 2026 technical landscape, engineered specifically to seamlessly repair physically and logically comprised USB flash drives and successfully retrieve enormously valuable gigabytes of information. Our deep dive ranged from intensely discussing their nuanced core features and operational pros and cons, to decisively providing detailed execution steps to make the stressful process of fully restoring a bricked USB drive demonstrably easier for you. Software tools such as Recuva or the lightweight Rizonesoft utility are exceedingly suitable for immediately addressing minor registry or deletion issues, while heavy-duty forensic tools like DiskGenius or Disk Drill masterfully address far more complex and severe sector corruption paradigms.
However, if you have already triumphantly repaired the physical USB drive structure but remain highly concerned about extracting missing app data or recovering older contact backups from the cloud, Wondershare Dr.Fone - Data Recovery (Android) unequivocally serves your overarching purpose the absolute best. It consistently provides the safest possibility to intelligently recover your cloud data at its highest fidelity, all while heavily minimizing the underlying risk of permanently losing or overwriting your sensitive localized device files.
FAQ
-
1. What is the absolute best free USB repair tool available today?
Recuva remains a tremendously popular top-tier choice among consumers as it is completely free to heavily download and actively use without file size restrictions. Additionally, the USB Repair by Rizonesoft utility is a phenomenal free and open-source option, and it proves exceptionally powerful for exclusively fixing unresponsive USB drives as it technically repairs underlying OS registry settings rather than the disk surface itself. -
2. Can you truly repair a badly corrupted USB drive without permanently losing your data?
Yes, absolutely! The vast majority of premium modern tools are explicitly designed to repair corrupt USB drives fundamentally without reformatting the raw file system, thereby safely preserving the trapped data. Even though data is theoretically not lost during these operations, the most universally safest approach recommended by experts is to always aggressively recover and extract your raw data first, and then subsequently start to boldly repair the actual hardware USB structure via your deeply desired formatting tool. -
3. What actually causes a stable USB drive to suddenly encounter severe corruption?
A standard USB storage device can rapidly become severely corrupted by a wide variety of unpredictable factors. Widely known primary reasons overwhelmingly include the highly unsafe physical removal or sudden total power loss occurring actively during a heavy read/write data transfer, OS software bugs, malicious malware infections, and heavily corrupt core files. Fatal corruption may also suddenly occur due to purely physical hardware causes, such as degraded or faulty motherboard USB ports, inherently defective internal flash memory blocks, or unexpected electrical power surges instantly frying the controller.
 Add Wondershare Dr.Fone as a preferred source on Google



